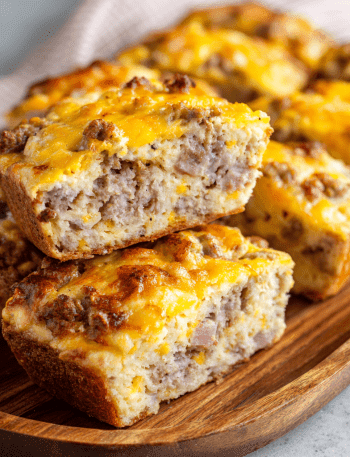
Freezer Breakfast Sandwiches: Your Secret Weapon for Effortless Mornings!
Hey, breakfast warriors! 👋 Raise your hand if your morning routine feels like a chaotic race against the clock. *raises both hands, flour flying everywhere* Between packing lunches, finding that missing shoe, and trying to gulp down coffee before it gets cold, actually eating a satisfying breakfast often gets tossed out the window faster than expired yogurt. We’ve all been there – grabbing a sad granola bar or skipping breakfast entirely, only to hear our stomachs growling like angry bears by 10 AM. Not exactly the recipe for a focused, energetic day, right?
What if I told you there’s a way to conquer the breakfast blues? Imagine opening your freezer and pulling out a hot, hearty, homemade breakfast sandwich – melty cheese, fluffy eggs, savory bacon (or sausage!), all hugged by a perfectly toasted English muffin – ready in under 3 minutes. Sounds like magic? It practically is! That’s the pure, unadulterated joy of big-batch freezer breakfast sandwiches. This isn’t just meal prep; it’s morning meal liberation. Whip up a massive batch of 20 sandwiches in about an hour, stash them in the freezer, and boom! You’ve got weeks of grab-and-go goodness that tastes infinitely better (and is way kinder to your wallet) than anything from a drive-thru. Let’s ditch the morning scramble and build your freezer arsenal!
Grandma’s Apron Strings & My Breakfast Sandwich Revelation
This recipe? It’s got roots deeper than my love for sharp cheddar. It takes me back to my first apartment after culinary school – tiny kitchen, even tinier budget, and a schedule that was pure chaos. I was juggling two kitchen jobs, often starting at the crack of dawn (or earlier!). One bleary-eyed, 4 AM morning, running purely on caffeine fumes, I fumbled through making a single breakfast sandwich. It took forever, made a huge mess, and I was left wishing I had a stash ready. That’s when I remembered my Grandma Dot.
Grandma Dot wasn’t a fancy chef, but she was a genius of practicality and feeding a crowd with love. Her kitchen was always ready for an impromptu army (aka grandkids). I remembered her pulling frozen bundles of homemade biscuits or muffins from her ancient deep freezer, ready to warm and serve at a moment’s notice. Inspired by her “be prepared” spirit, I started experimenting. Big sheet pans of baked eggs! Assembly lines of muffins and cheese! My tiny freezer became a treasure chest of ready-made breakfasts. Those sandwiches weren’t just fuel; they were warm hugs from past-me to future-exhausted-me, and a delicious echo of Grandma Dot’s no-nonsense kitchen wisdom. They became my lifeline, and now, I’m thrilled to share that lifeline with you!
Print
Freezer Breakfast Sandwiches
- Total Time: 45 minutes
- Yield: 20 sandwiches 1x
Description
More mouths to feed or just want your mornings set for weeks? This big-batch freezer breakfast sandwich recipe delivers 20 hearty, cheesy, protein-filled muffins — perfect for grab-and-go breakfasts that keep you full and focused.
Ingredients
20 eggs
3 tbsp milk
1½ tsp salt
1 tsp freshly ground black pepper
20 slices cooked bacon, sausage patties, ham, or Canadian bacon
20 English muffins
20 slices cheddar cheese (or preferred cheese)
Instructions
Preheat oven to 350°F (175°C). Grease two 9×13-inch baking dishes or line with parchment.
Whisk eggs, milk, salt, and pepper in a large bowl. Divide evenly between both dishes.
Bake 18–20 minutes or until eggs are set. Let cool and cut into 20 squares.
Toast English muffins in batches.
Assemble sandwiches: 1 egg square, 1 meat slice or patty, and 1 slice of cheese per muffin.
Wrap each sandwich in foil or parchment, then store in freezer-safe bags.
To reheat: Microwave wrapped in paper towel for 1½–2½ minutes until heated through.
- Prep Time: 25 minutes
- Cook Time: 20 minutes
Nutrition
- Calories: 310 per sandwich
- Sugar: 2g per sandwich
- Fat: 17g per sandwich
- Saturated Fat: 6g per sandwich
- Carbohydrates: 25g per sandwich
- Fiber: 2g per sandwich
- Protein: 17g per sandwich
Gathering Your Breakfast Sandwich Dream Team
Here’s everything you need to build your freezer fortress of breakfast goodness! The beauty is in the simplicity and customizability.
- 20 Large Eggs: The star protein! Fresh is always best. Chef’s Insight: Whisking them well with the milk creates a lighter, fluffier baked egg base compared to frying individual rounds.
- 3 tbsp Milk: Whole milk adds richness, but any milk (dairy or unsweetened non-dairy like almond or oat) works. This little bit helps prevent the eggs from becoming too dense during baking.
- 1½ tsp Salt: Essential for flavor! Don’t skip it. Seasoning the egg mixture evenly is key.
- 1 tsp Freshly Ground Black Pepper: Adds that warm, savory kick. Freshly ground makes a noticeable difference!
- 20 Slices Cooked Bacon, Sausage Patties, Ham, or Canadian Bacon: The savory anchor! Substitution Heaven: Use pre-cooked for ease! Swap in turkey bacon, veggie sausage patties, leftover roasted turkey, or even a thin slice of tomato or avocado for a vegetarian twist. Cook your chosen meat until crisp (bacon/sausage) or warmed through (ham/Canadian bacon) before assembling. Pat off excess grease!
- 20 English Muffins: The perfect vessel! They toast beautifully, freeze well, and have those nooks for catching melty cheese. Chef’s Pick: Whole wheat adds fiber, but plain, sourdough, or gluten-free versions work great too. Split them before toasting!
- 20 Slices Cheddar Cheese (or preferred cheese): The melty glue! Sharp cheddar is classic, but mix it up: Swiss, Pepper Jack (for heat!), Provolone, or even American cheese all melt beautifully. Use pre-sliced for speed!
Pro-Tip: Having all your components prepped and ready (muffins split, meat cooked, cheese sliced) makes the assembly line fly!
Let’s Build Your Breakfast Empire: Step-by-Step
Alright, team! Let’s roll up our sleeves and transform these simple ingredients into your morning saviors. This is where the magic (and efficiency!) happens.
- Preheat & Prep: Fire up your oven to 350°F (175°C). Grab two trusty 9×13-inch baking dishes (metal or glass work great!). Chef’s Hack: Generously grease those pans with butter, oil, or cooking spray, OR line them with parchment paper leaving overhang on the long sides. This parchment sling makes lifting the giant cooked egg slabs out SO much easier later – trust me, it’s a game-changer for clean cuts!
- Egg-cellent Whisking: In a very large bowl (or even a big pot if your bowl is MIA!), crack those 20 eggs. Add the milk, salt, and pepper. Now, whisk like you mean it! You want it completely combined and slightly frothy. Chef’s Insight: This aeration is your secret weapon for light, fluffy baked eggs, not rubbery ones. Pour the mixture evenly between your two prepared baking dishes. Give each dish a gentle jiggle to settle it.
- Bake to Perfection: Carefully place both dishes in the oven. Bake for 18-22 minutes. Watch Closely: You want the eggs to be *just* set in the center – no jiggle! They’ll continue cooking slightly as they cool. Overbaking leads to toughness. Chef’s Test: Gently poke the center with a knife or toothpick; it should come out clean.
- Cool Down Crucial: This step requires patience, my friends! Take the egg pans out and let them cool COMPLETELY on a wire rack. Trying to cut hot eggs is a crumbly, frustrating mess. Speed Hack: Pop them in the fridge for 20-30 minutes once they’re cool enough to handle safely. Once cool, use a knife to cut each pan of eggs into 10 equal squares (5 rows x 2 columns usually works). If you used parchment, lift the whole slab out first using the sling, then cut on a cutting board.
- Toast Those Muffins: While the eggs cool, get your English muffins toasted. Do this in batches using your toaster, toaster oven, or even under the broiler (watch carefully!). You want them lightly golden and crisp – they’ll soften slightly when frozen/reheated, so starting crispier is better! Let them cool slightly too.
- Assembly Line Power! Clear some counter space! Line up your cooled components: toasted muffin bottoms, egg squares, meat slices, cheese slices, and muffin tops. This is where you channel your inner breakfast factory worker. For each sandwich: Place one cheese slice on a muffin bottom (the cheese against the warm-ish muffin helps it start melting later). Top with one egg square. Add your chosen meat slice. Cap it off with the muffin top. Chef’s Hack: Press down GENTLY to compact it slightly – makes wrapping easier.
- Wrap & Freeze: Individually wrap each beautiful sandwich tightly in aluminum foil OR parchment paper. Freezer Tip: Parchment is microwave-safe for reheating later, foil is not (you’ll need to unwrap before microwaving). Label each packet or place them all into large, heavy-duty freezer-safe bags or airtight containers. Squeeze out as much air as possible to prevent freezer burn! Pop them in the freezer. They’ll be your breakfast heroes for up to 3 months!
- Reheat & Devour! Morning victory! Grab a frozen sandwich (no need to thaw!). Unwrap it *if you used foil*. Place it on a microwave-safe plate and cover it loosely with a damp paper towel (this traps steam and prevents the muffin from turning into a hockey puck!). Microwave on high for 1 minute 30 seconds. Check it. If not piping hot throughout (especially the center!), zap it in 15-30 second bursts until it is. Usually 1:45 – 2:30 minutes total does the trick, depending on your microwave. Let it sit for 30 seconds – it’s lava-hot! Enjoy your homemade, delicious, time-saving triumph!
Serving Up Your Morning Masterpiece
These sandwiches are the ultimate grab-and-go champions! Slide that reheated beauty straight onto a plate (or hey, even a napkin!). For a super-quick dash, just hold it in the parchment paper it was reheated in. Feeling fancy on a slower morning? Pair it with a small side of fresh berries or sliced melon for a bright contrast. A drizzle of hot sauce (Cholula lovers, unite!) or a smear of avocado on the muffin before assembling adds an extra flavor kick. They’re perfectly satisfying solo, but a cold glass of OJ or your favorite coffee brew makes it feel like a real diner experience, minus the wait!
Mix It Up! Endless Freezer Sandwich Possibilities
Don’t get stuck in a breakfast rut! This recipe is a blank canvas. Here are some tasty twists:
- The Veggie Delight: Skip the meat! Add a layer of sautéed spinach, mushrooms, onions, or bell peppers (cooled and patted dry!) under the cheese. Or use a veggie sausage patty!
- The Southwest Fiesta: Mix 1/2 cup of drained, diced green chilies or a few dashes of hot sauce into the egg mixture. Use Pepper Jack cheese. Top the sandwich with a spoonful of salsa after reheating!
- The Lighter Bite: Use 10 whole eggs + 10 egg whites (or all egg whites) and swap in turkey bacon or Canadian bacon. Opt for low-fat cheese and whole wheat muffins.
- Cheese Adventurer: Swap cheddar for Swiss & ham (a classic combo!), creamy Havarti, smoky Gouda, or tangy goat cheese crumbles.
- Bread Swap: While English muffins rock, try mini bagels, whole wheat biscuits (homemade or store-bought, baked and cooled), or even split mini croissants for a decadent treat!
Emily’s Extra Crumb… I Mean, Crumb of Wisdom!
This recipe has been a constant in my kitchen life for years, evolving from those frantic post-culinary-school days to feeding hungry teens and their friends before early sports practices. The biggest lesson? Embrace the assembly line chaos! Enlist helpers – kids are surprisingly good at placing cheese slices! I once tried using a giant silicone baking mat instead of greasing/parchment… let’s just say the eggs staged a dramatic, sticky protest upon removal. Lesson learned: stick with the grease or parchment sling! Another time, in a pre-coffee fog, I accidentally used powdered sugar instead of salt in the eggs. 🤦♀️ That batch… did not make it to the freezer. Sweet scrambled eggs are *not* a vibe. Now I double-check labels before the whisking commences! Over time, I’ve found baking the eggs is the absolute key for batch perfection versus frying. It’s less messy and yields consistently tender results. These sandwiches are more than food; they’re little parcels of “I’ve got your back, Future Self.” Make them your own!
Freezer Sandwich SOS: Your Questions Answered!
Q: Can I reheat these in the oven?
A: Yes! If you prefer oven reheating (or don’t have a microwave handy), you’re in luck. Keep the sandwich wrapped in foil and place it directly on a baking sheet. Bake in a preheated 350°F (175°C) oven for 30–35 minutes, or until heated through. Want it extra toasty? Unwrap the sandwich for the last 5 minutes to crisp up the muffin. Pro Tip: This is a great option if you’re reheating several at once—perfect for busy weekend brunches!
🥪 Nutrition Info (Per Sandwich)
-
Calories: ~310
-
Protein: 17g
-
Carbohydrates: 25g
-
Fiber: 2g
-
Sugar: 2g
-
-
Fat: 17g
-
Saturated Fat: 6g
-
-
Cholesterol: 210mg
-
Sodium: ~670mg
🍳 Variations That Affect Nutrition:
-
Using turkey bacon or veggie sausage reduces fat and sodium.
-
Swapping cheddar for Swiss or part-skim mozzarella slightly lowers saturated fat.
-
Whole wheat muffins add fiber and complex carbs.
-
Adding avocado or a second egg boosts healthy fats and protein.
-
Going meatless drops fat and calories a bit.

Final Thoughts: Start Your Day the Delicious Way ☀️🥪
Let’s be real—mornings are rarely calm. But these Freezer Breakfast Sandwiches? They’re a secret stash of calm in a chaotic world. They bring the comfort of a warm, savory meal to your fingertips in under three minutes, no drive-thru, no drama. Whether you’re hustling to get kids out the door, commuting with one shoe on, or just craving a hot breakfast without a single skillet involved, these sandwiches have your back.
They’re more than just food—they’re peace of mind, a gift from your past self, and a reminder that you can fuel your day with something homemade, hearty, and happy. So take the time to build your stash now… and thank yourself every morning for weeks to come. ✨
Here’s to fewer skipped breakfasts, fewer coffee-only mornings, and way more melty cheese moments. You deserve that kind of joy—every single day.
— Chef Emily
Tasty Chow | Real food. Real mornings. Real wins.