Your New Favorite No-Bake Obsession: Fudgy Mint Chocolate Bites
Hey there, friend! Let’s talk about cravings. You know the ones I mean. That 3 PM slump where your brain starts whispering sweet nothings about something rich, something chocolatey, and something that feels just a *little* bit indulgent. Or maybe it’s after dinner, and you’re scrolling through your phone, dreaming of a dessert that’s satisfying but won’t leave you feeling like you need to unbutton your jeans.
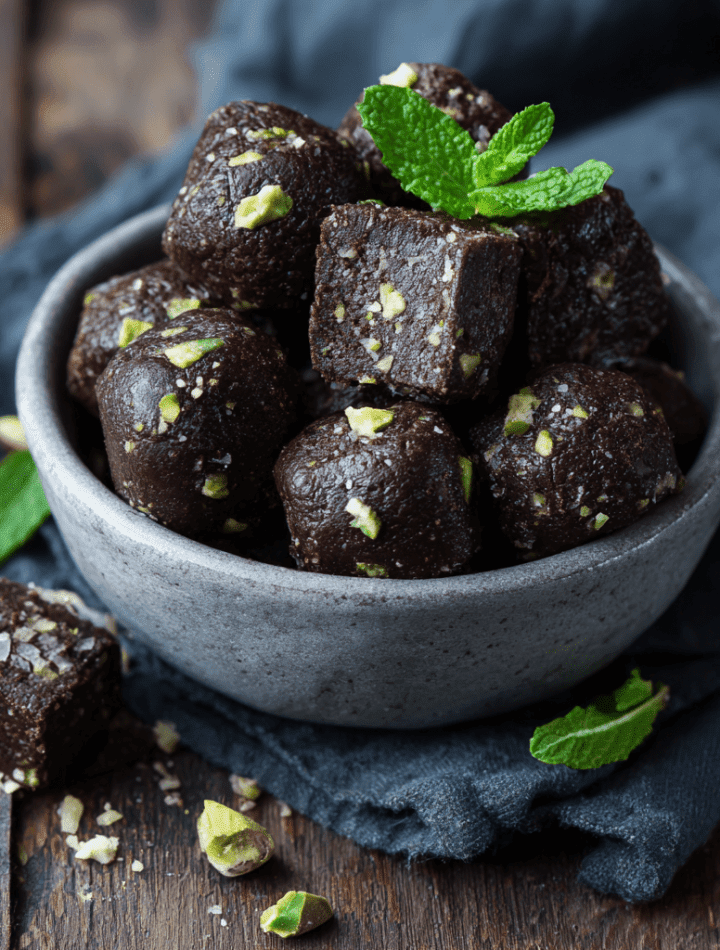
Well, pull up a chair and get ready to meet your new best friend: the Fudgy Mint Chocolate Bite. These little morsels are pure magic. They’re chewy, deeply chocolatey, and kissed with the most refreshing hint of cool mint. The best part? You don’t even need to turn on your oven. We’re talking 10 minutes of active kitchen time and a quick chill in the fridge. That’s it!
I created these bites for those exact moments. They’re the perfect bridge between a healthy snack and a decadent dessert. They’re packed with good-for-you ingredients like oats and coconut, and they’re naturally sweetened, so you can enjoy that blissful mint-chocolate combo without any of the guilt. Think of them as a grown-up, sophisticated version of your favorite thin mint cookie, but in a blissful, no-bake, energy-ball form. So, tie that apron on (embrace the mess, I always do!), and let’s make something delicious together.

A Spoonful of Nostalgia: Where This Recipe Was Born
This recipe always takes me right back to my grandma’s kitchen, though she’d probably chuckle at the sight of it. You see, Grandma Walker was a queen of from-scratch baking. Her counter was always dusted with flour, and her rolling pin was her scepter. Her signature dessert was a towering, from-scratch chocolate mint layer cake that was the star of every family reunion. It was incredible, but it was also a project.
One sweltering summer afternoon, a massive craving for that classic mint-chocolate combo hit me. But my tiny apartment kitchen felt about 100 degrees, and turning on the oven was simply out of the question. I started rummaging through my pantry, pulling out oats, cocoa powder, a bag of lonely shredded coconut, and my trusty bottle of mint extract. I melted some chocolate chips on the stovetop for 30 seconds, stirred everything together in one bowl, and rolled the sticky, fragrant dough into little balls.
Thirty minutes later, after a nap in the fridge, I took a bite. And my eyes just about popped out of my head. It was *the* flavor—that beautiful, nostalgic marriage of rich chocolate and cool mint—but in a simple, no-fuss, blissfully cool package. It was my grandma’s famous cake, reimagined for a busy, modern life. It’s a happy kitchen accident that I’m now so thrilled to share with you.
Gathering Your Happy Ingredients
Here’s the beautiful part: this is a pantry raid recipe! You likely have most of this hanging around. Let’s break it down so you feel like a pro before we even start mixing.
- 1 cup old-fashioned oats: This is our base, giving these bites a wonderful, chewy texture and a hearty kick of fiber. Chef’s Tip: If you need these to be gluten-free, just make sure your oats are certified GF!
- ½ cup unsweetened cocoa powder: This is where that deep, dark chocolate flavor comes from. Don’t skimp—use the good stuff! It’s the soul of the bite.
- ½ cup unsweetened shredded coconut: This adds a subtle tropical sweetness and helps bind everything together. Substitution: If you’re not a coconut fan, you can replace this with an additional ¼ cup of oats.
- ¼ cup milk (dairy or non-dairy): This is our magic liquid that brings it all together. I’ve used everything from whole milk to creamy oat milk, and it works beautifully every time.
- ½ teaspoon mint extract: The star of the show! This gives that refreshing, cool flavor. Chef’s Insight: Start with ½ tsp—it’s potent! You can always add a tiny bit more after mixing if you’re a mint fanatic.
- ½ cup semisweet chocolate chips: Melting these in gives us that fudgy, melt-in-your-mouth texture. Substitution: Feel free to use dark chocolate chips for a richer, less sweet bite.
- 2–3 tablespoons honey or maple syrup (optional): This is your sweetness dial. I like my desserts less sweet, so I often leave this out. But if you have a sweet tooth, add it in! The maple syrup will also keep this recipe completely vegan.
Let’s Get Rolling: Your Foolproof Steps to Bite-Sized Bliss
Ready? This is where the fun begins. I’ll walk you through every step, complete with my favorite messy-kitchen hacks.
- The Dry Team Assemble! Grab a medium-sized mixing bowl—my favorite one, the one with the little chips on the rim. Add your old-fashioned oats, unsweetened cocoa powder, and unsweetened shredded coconut. Give this a good whisk. You’re not just mixing; you’re making sure every single oat and coconut flake gets a cozy coat of that gorgeous cocoa powder. This is the foundation of our flavor, so let’s do it right.
- Melt Your Chocolatey Heart Out. Now, grab a small saucepan. Pour in your milk, toss in the semisweet chocolate chips, and add that glorious mint extract. Turn the heat to LOW. I’m saying low because we’re patient chefs, and we don’t want to scorch our chocolate. Stir it almost constantly with a spatula until it’s a smooth, shiny, and incredibly fragrant liquid. It should only take a couple of minutes. You’ll know it’s ready when you can’t see a single chocolate chip chunk. Chef’s Hack: You can also do this in a microwave-safe bowl in 20-second bursts, stirring in between. Easy peasy!
- The Big Mix! Carefully pour that warm, minty chocolate mixture over your waiting bowl of dry ingredients. It’s going to smell amazing. Now, take your spatula and stir, stir, stir until every last bit of oat and coconut is enveloped in that chocolatey goodness. The mixture will be thick and fudgy—exactly what we want! This is the moment to taste-test. Dip a clean spoon in and give it a try. Want it sweeter? Now is the time to stir in your honey or maple syrup.
- The Roll-Up. Line a baking sheet or a plate with a little parchment paper. Using a tablespoon, a small cookie scoop, or just your hands, scoop out about a tablespoon of the mixture. Now, roll it between your palms to form a neat little ball. Don’t worry if they aren’t perfect! A little rustic charm is what homemade is all about. If the mixture is too sticky, just wet your hands slightly with cold water. Pro-level move, right there.
- The Patient Chill. Place each beautiful little bite onto your prepared tray. Once they’re all rolled, slide the tray into the fridge for at least 30 minutes. This is the hardest part—waiting! This chill time allows the oats to soften a bit and the chocolate to set up, transforming our sticky dough into a firm, chewy, perfect bite.
How to Serve These Little Gems
Okay, the timer has beeped! Your Fudgy Mint Chocolate Bites are ready for their grand debut. How you serve them can make the moment even more special.
For a simple snack, just pile them high on a cute little plate or in a small bowl. They’re perfect for grabbing as you run out the door or for setting out when friends pop over.
Want to get a little fancy? Give them a quick drizzle! Melt a few extra chocolate chips with a teaspoon of coconut oil, and zig-zag it over the top of the bites while they’re still on the tray. It looks incredibly professional and adds another layer of chocolatey joy.
My absolute favorite way to serve them? With an after-dinner coffee or a tall glass of cold almond milk. The contrast of the cool, minty bite with a warm sip of coffee is pure heaven. They also make a fantastic, healthier dessert option for a party—your guests will be so impressed, and only you’ll know how incredibly easy they were to make!
Mix It Up! Fun Flavor Twists
Once you’ve mastered the classic, the kitchen playground is open! Here are a few of my favorite ways to shake up this recipe.
- Peppermint Patty: Add 2-3 tablespoons of crushed peppermint candies or candy canes to the mixture for a festive crunch and an extra-strong mint kick. Perfect for the holidays!
- Nutty Buddy: Stir in ¼ cup of finely chopped almonds, pecans, or walnuts along with the dry ingredients. The nutty crunch against the fudgy texture is a game-changer.
- Orange-Mint Dream: Add the zest of one small orange to the dry ingredients. The combination of chocolate, orange, and mint is sophisticated and incredibly refreshing.
- Protein Power-Up: For a post-workout boost, mix in a scoop of your favorite chocolate or vanilla protein powder. You may need to add an extra tablespoon of milk to keep the mixture from getting too dry.
- Double Chocolate Chunk: For extra bursts of chocolate, fold in an additional ¼ cup of mini chocolate chips right before rolling.
A Few More Thoughts From My Kitchen to Yours
This recipe has become such a staple in my house that I almost don’t need to look at the recipe card anymore. It’s my go-to for last-minute hostess gifts, road trip snacks, and yes, those 3 PM cravings.
Over time, I’ve learned to embrace the sticky fingers during the rolling process—it’s part of the fun! I also once, in a hilarious kitchen blunder, used almond extract instead of mint. Let me tell you, chocolate-almond is also delicious, but it was NOT the minty fresh experience I was hoping for. So, double-check your extract bottle! The beauty of cooking is that even our “mistakes” can lead to new favorite flavors.
Your Questions, Answered!
I’ve made these so many times, I’ve tackled every possible kitchen quandary. Here are the answers to the questions I get most often.
Q: My mixture is too dry and crumbly. It won’t hold a ball shape! What do I do?
A: No worries! This usually means we need a touch more liquid. Add an extra tablespoon of milk, one teaspoon at a time, and mix thoroughly after each addition until the mixture comes together nicely.
Q: My mixture is too wet and sticky. Help!
A> This can happen if your “scoop” of milk was a little too generous. Easy fix! Just add another tablespoon or two of oats or shredded coconut until the texture is firm enough to roll.
Q: Can I make these vegan?
A: Absolutely! Use maple syrup (or agave) for sweetness, and ensure your chocolate chips and milk (like almond or oat) are vegan-friendly. It’s a wonderfully adaptable recipe.
Q: How long will these keep?
A> Store them in an airtight container in the fridge for up to a week. For longer storage, you can freeze them for up to 3 months! Just let them thaw for a few minutes before eating for the best texture.
A Little Note on the Good Stuff
I’m all about food that makes you feel good, inside and out. While I’m not a nutritionist, I love understanding what’s going into my body. These bites are a pretty fantastic little package!
The oats provide a great source of soluble fiber, which is wonderful for digestive health and helps keep you feeling full and satisfied. The cocoa powder is rich in flavonoids, which are powerful antioxidants. And by using unsweetened coconut and controlling the sweetener ourselves, we keep the added sugars way down compared to store-bought treats.
Each bite is a balanced little snack with a mix of healthy fats from the coconut and chocolate, complex carbs from the oats, and a bit of plant-based protein. It’s energy that’s sustained and not spiky, making it the perfect pick-me-up. Remember, this is an indulgence that loves you back!
You Did It!
Look at you, you brilliant kitchen wizard! You’ve just created a batch of incredibly delicious, no-bake treats that are sure to become a regular in your snack rotation. I am so proud of you for getting in the kitchen and making something with your own two hands.
I hope these Fudgy Mint Chocolate Bites bring a little moment of cool, minty, chocolatey joy to your day. Share them with your family, your friends, or hey, hide them in the back of the fridge just for you—I won’t tell!
If you make them, I’d be absolutely thrilled if you tagged me on social @TastyChow so I can see your beautiful creations. Happy cooking, and until next time, chow down!
— With love and a full jar of mint extract,
Emily