One Pan, Zero Fuss, All the Feels: Your New Favorite Chicken & Rice
Hey there, friend! Come on in, the butter’s melted and the kitchen smells like heaven. If you’re scrolling through recipes right now, caught in that classic “I want something delicious but I *really* don’t want a mountain of dishes” dilemma, I see you. I’ve been there more times than I can count. That’s why this Garlic Butter Chicken and Rice Skillet isn’t just a recipe—it’s a weeknight rescue mission, a hug in a pan, and my absolute go-to when comfort and convenience need to hold hands and jump in the pot together.
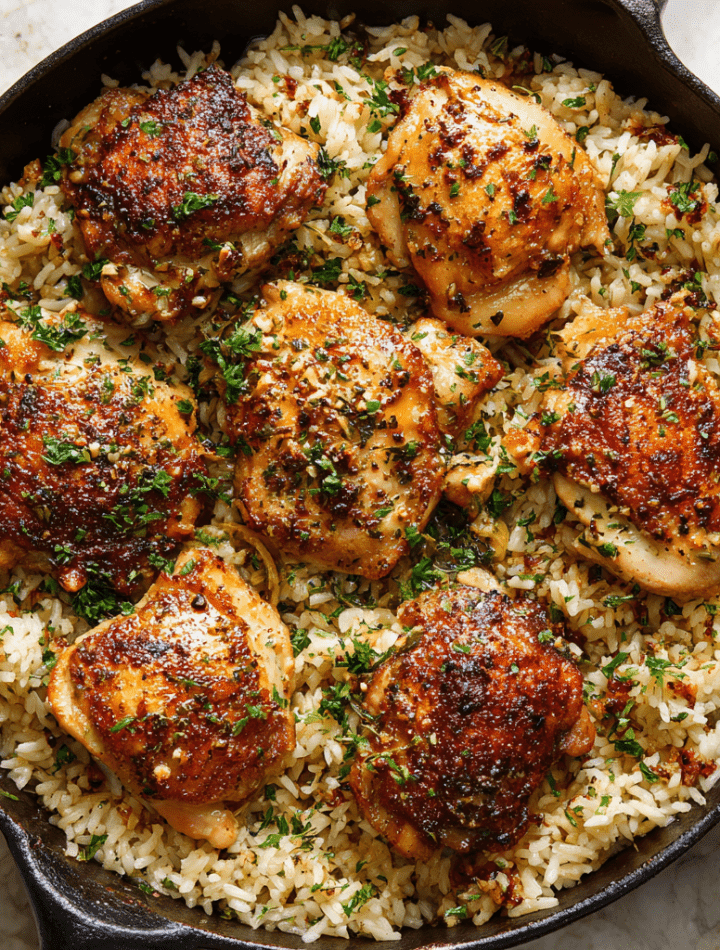
Picture this: golden-seared chicken thighs, all juicy and herb-kissed, resting on a bed of fluffy rice that’s soaked up every single drop of garlicky, buttery, savory broth. It’s rich, it’s satisfying, and the whole gorgeous thing comes together in one single skillet. No juggling three pots on the stove, no frantic oven timing. Just simple, honest ingredients transforming into something that tastes like you fussed for hours. We’re about to make magic with minimal cleanup, and I promise, you’re going to want to add this to your regular rotation. So tie on that apron (the messy one is always the best), and let’s make something incredibly tasty.

The Recipe That Saved My Sanity (And My Dignity)
This skillet dish holds a special place in my heart, and not just because it’s delicious. It reminds me of my first tiny apartment kitchen after culinary school. I was so eager to impress my friends with complicated, five-step recipes, but one night, a dinner party went… sideways. Let’s just say a soufflé deflated in a way that felt personal, and I was left with a sink full of dishes and a hungry, patient crowd. In a panic, I threw chicken, rice, and what I had left of my dignity into a trusty cast-iron skillet. Twenty minutes later, we were all sitting on the floor, plates in our laps, devouring this simple, garlicky creation. The laughter came back, the stress melted away, and I learned the best lesson: food doesn’t have to be fancy to be fantastic. Sometimes, the most memorable meals are the simple, soul-nourishing ones you can share without pretense. This skillet is that lesson, simmered to perfection.
Gathering Your Flavor Squad
Here’s everything you’ll need. I’ve added my little chef-y notes because knowledge is power (and tastier dinners)!
- 4 boneless, skinless chicken thighs (about 1.5 lbs): Thighs are my MVP here—they stay incredibly juicy and forgiving during the simmer. If you only have breasts, slice them in half horizontally to make thinner cutlets so they cook evenly.
- 1 cup long-grain white rice (like Jasmine or Basmati): Jasmine is my favorite for its fragrant, slightly sticky texture that holds the sauce beautifully. Avoid instant rice—it will turn to mush.
- 2 tbsp unsalted butter: This is our flavor foundation! Unsalted lets you control the seasoning. For a dairy-free twist, a good olive oil works, but you’ll miss that classic rich note.
- 3-4 garlic cloves, minced: Don’t be shy! Fresh is best. Pro tip: smash the cloves with the side of your knife first—the skins slip right off.
- 2 ¼ cups low-sodium chicken broth: Low-sodium is key here, as the broth reduces and concentrates. Using regular broth can make the final dish too salty. Veggie broth is a great swap for a different flavor profile.
- 1 tsp dried thyme (or Italian seasoning): I adore thyme with chicken—it’s earthy and classic. Italian seasoning is a fantastic pantry staple that adds a little oregano and basil kick.
- Salt & freshly cracked black pepper: Season every layer! I always use kosher salt for poultry—it adheres better.
- Chopped fresh parsley (for garnish): This isn’t just a pretty green sprinkle. That fresh, slight bitterness at the end brightens the whole rich dish. Chives or green onions are awesome too.
- Optional: A big squeeze of fresh lemon juice: My secret weapon! A splash at the end just before serving cuts the richness and makes all the flavors sing. Highly, highly recommended.
Let’s Build Some Flavor, Step-by-Step
Ready? Grab your largest skillet with a tight-fitting lid. We’re doing this!
Step 1: Season & Sear That Chicken. Pat your chicken thighs completely dry with paper towels. This is the *golden rule* for a good sear—no steam, just caramelization! Season them generously on both sides with salt, pepper, and half of your dried thyme. Heat your skillet over medium-high heat and add the butter. Once it’s foaming, lay the chicken in the pan. Don’t crowd them! Give them space so they sear, not steam. Let them cook, undisturbed, for 4-5 minutes per side until you get a gorgeous, golden-brown crust. They won’t be cooked through yet, and that’s perfect. Transfer them to a plate. We’re building layers of flavor, starting with those tasty browned bits left in the pan.
Step 2: Wake Up the Garlic. In that same beautiful, buttery pan (see? No wasted flavor!), reduce the heat to medium. Add the minced garlic. Now, stand right there and stir for just 30-60 seconds. You just want it fragrant and taking on a tiny bit of color. The second you smell that toasty, nutty aroma, move on! Burnt garlic is bitter, and we are not about that life.
Step 3: Toast the Rice & Bring the Broth. Stir the uncooked rice right into the garlicky butter. Let it toast for about a minute, stirring constantly. You’ll hear it start to make a faint crackling sound—this little step adds a wonderful nutty depth to the final dish. Now, carefully pour in your chicken broth. It’ll sizzle and steam gloriously. Use your spoon to scrape up any of those delicious browned bits (the *fond*) from the bottom of the pan. This is pure flavor gold! Add the remaining thyme and a pinch more salt and pepper.
Step 4: The Simmer & Steam (Trust the Process!). Bring the broth to a steady simmer. Once it’s bubbling, nestle the seared chicken thighs back into the pan, along with any juices that accumulated on the plate. Reduce the heat to low, cover the skillet with your tight lid, and set a timer for 18 minutes. Walk away. Seriously—no peeking! The steam needs to stay in to cook the rice properly.
Step 5: The Grand Finale & Rest. After 18 minutes, turn off the heat but keep the lid on. Let it sit, undisturbed, for another 5-10 minutes. This rest time is non-negotiable. It lets the rice finish steaming to fluffy perfection and allows the chicken juices to redistribute. Then, lift the lid to your masterpiece. Garnish with that bright parsley and a glorious squeeze of fresh lemon juice. The lemon is the magic touch—don’t skip it!
How to Serve It Up in Style
This dish is a beautiful, complete meal all on its own, but a little styling goes a long way! I like to use a large serving spoon to scoop up that gorgeous rice and place a chicken thigh right on top. Spoon a little extra of the buttery rice from the bottom of the pan over the chicken. That fresh parsley and lemon squeeze? Essential for color and a pop of freshness. If you’re feeling fancy, a light sprinkle of lemon zest over the top adds a beautiful aroma. For a simple side, a crisp green salad with a tangy vinaigrette is the perfect partner to cut through the richness. Or, just grab a fork, gather your people around the skillet, and let everyone dig in family-style—it’s that kind of cozy, welcoming dish.
Make It Your Own: 5 Tasty Twists
Got an itch to experiment? Here are some of my favorite ways to riff on this classic:
- Sun-Dried Tomato & Spinach: Stir in ½ cup chopped sun-dried tomatoes (oil-packed, drained) and 2 big handfuls of fresh baby spinach when you add the broth. The tomatoes add a sweet-tart punch, and the spinach wilts into lovely ribbons of green.
- Creamy Parmesan: After the rest time, stir in ½ cup of freshly grated Parmesan cheese and a splash of heavy cream or half-and-half. Let it melt into the rice for an ultra-rich, decadent risotto-like texture.
- Spanish-Inspired “Paella” Style: Swap the thyme for 1 tsp smoked paprika and a pinch of saffron (if you have it). Add ½ cup of diced chorizo with the garlic, and stir in ½ cup of frozen peas right before the final rest.
- Lemon Herb & Artichoke: Add the zest of one lemon with the garlic. In the last 5 minutes of cooking, place a drained can of quartered artichoke hearts on top of the rice to warm through. Finish with lots of fresh dill along with the parsley.
- Dairy-Free/Veggie-Packed: Use olive oil instead of butter and swap the chicken for 1.5 cups of canned, drained chickpeas or extra-firm tofu cubes (press and pan-sear first). Use veggie broth and load it up with diced zucchini or mushrooms sautéed with the garlic.
Emily’s Kitchen Notebook
This recipe has been with me for years, and it’s evolved from that “save-the-dinner-party” panic meal into a trusted friend. The biggest lesson? Trust the rest time! I used to peek and stir, wondering if it was done, and ended up with gummy rice. Now I set the timer and walk away—it never fails. Also, I’ve learned that the quality of your broth makes a HUGE difference. A good, flavorful homemade or quality store-bought low-sodium broth is worth its weight in gold here. And one funny fail? I once tried to double the recipe in the same 12-inch skillet. Let’s just say I learned about boil-overs the hard, starchy way. If you’re doubling, use a large Dutch oven!
Your Questions, Answered!
Q: My rice is still crunchy/undercooked after the time is up. What happened?
A: This usually means the heat was too high and the liquid boiled off too fast before the rice could absorb it. Next time, ensure you’ve brought it just to a simmer, then immediately reduced the heat to the lowest setting. Also, check that your lid is fitting tightly—no steam escapes! If it happens, just add a splash of hot broth or water, cover, and cook for another 5-10 minutes on low.
Q: Can I use chicken breasts instead of thighs?
A: Absolutely! For boneless, skinless breasts, I recommend slicing them horizontally into thinner cutlets or pounding them to an even thickness before searing. This ensures they cook through at the same rate as the rice without drying out. They may cook a minute or two faster, so check for doneness (165°F internal temp).
Q: Is it okay to use brown rice?
A: Brown rice needs more liquid and a longer cook time. I’d suggest looking for a specific one-pan brown rice and chicken recipe, as the ratios and timing would be different for this method.
Q: How do I store and reheat leftovers?
A: Store in an airtight container in the fridge for up to 4 days. Reheat gently in the microwave with a sprinkle of water or broth to re-steam the rice, or in a covered skillet over low heat. It freezes well for up to 3 months—thaw in the fridge overnight before reheating.
Nutritional Information (Per Serving, based on 4 servings)
Please note: This is an estimate provided for informational purposes. Exact values will vary based on specific ingredients and brands used.
- Calories: ~430
- Protein: 32g (A fantastic, satisfying source!)
- Carbohydrates: 35g (Primarily from the rice for energy)
- Fat: 18g (From the chicken thighs and butter—this is where the flavor lives!)
- Fiber: 2g
- Sugar: 1g
This meal offers a great balance of protein, carbs, and healthy fats to keep you full and energized. Using low-sodium broth helps control the salt content, and the dish is naturally free of added sugars.
Final Thoughts from My Kitchen to Yours
And there you have it, friend—my beloved, no-fuss, one-pan wonder. This Garlic Butter Chicken and Rice Skillet proves that a truly great meal doesn’t need to be complicated. It’s about layering simple flavors, trusting the process, and creating something that feeds both the belly and the soul. I hope this recipe finds its way onto your table on a busy Tuesday, a lazy Sunday, or any day you need a reliable, delicious win. Remember, cooking is about joy, not perfection. So if your rice sticks a little or your sear isn’t magazine-perfect, it’s okay! It will still taste incredible because you made it with love (and lots of garlic butter). Now go forth, cook, and chow down!
With a full heart and a happy skillet,
Emily 🧑🍳