Golden Egg Peach Pies: Your New Favorite Easter Magic Trick
Hey there, fellow flavor-chaser! Emily here, from my perpetually flour-dusted kitchen. Have you ever had a dessert idea that just *sparkles* in your mind? You can almost taste the flaky crust, smell the warm cinnamon peaches, and see the delighted smiles before you even preheat the oven. That’s exactly how these Golden Egg Peach Pies came to life.
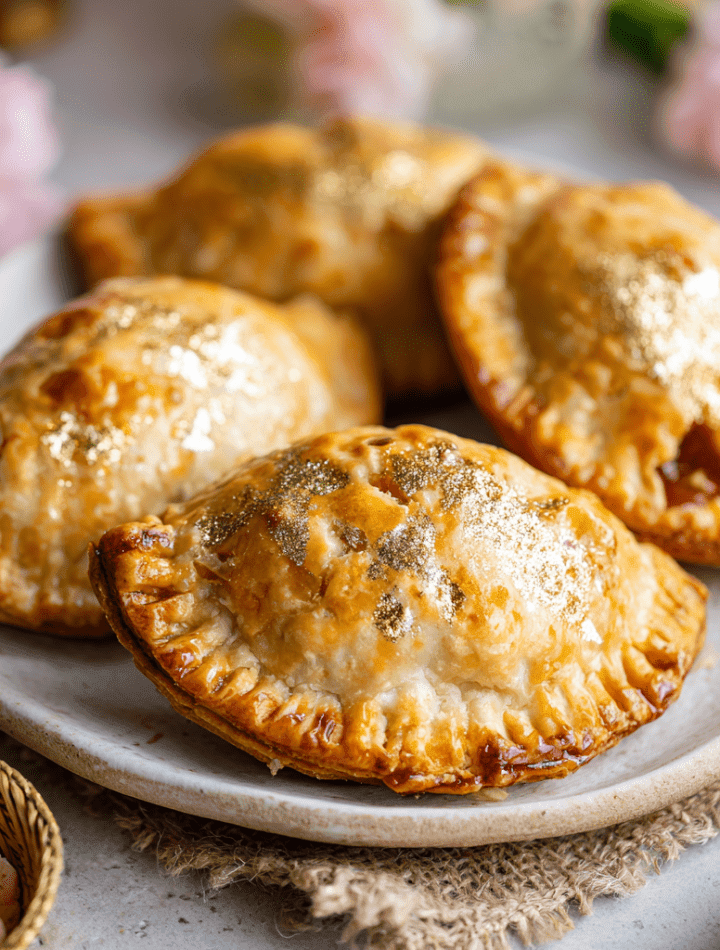
Imagine this: bite-sized hand pies, shaped like precious Easter eggs, with a filling of sweet, jammy peaches that tastes like a cozy hug. Now, picture them brushed with a touch of edible gold, catching the light and making your whole dessert table glitter with pure spring magic. That’s what we’re making today! These aren’t just pies; they’re little edible treasures. They’re perfect for Easter brunch nestled in a bed of raffia, dazzling on a holiday dessert platter, or even tucked into a special someone’s lunchbox for a sweet surprise. The best part? They come together with joyful ease, using simple ingredients and a whole lot of love. So, tie on your favorite apron (the messy one is always the best), and let’s create some kitchen magic that’s as fun to make as it is to eat. Get ready for your house to smell incredible and for everyone to ask, “How did you DO that?”

The Story Behind the Sparkle: Grandma’s Apron & A Dash of Glitter
This recipe has its roots in two very different, but equally wonderful, kitchen memories. The first is the smell of my grandma’s kitchen in early spring. She wasn’t a fancy baker, but she was a wizard with a can of peaches and a biscuit cutter. She’d make what she called “peach pokes”—simple, rustic fried pies—and we’d devour them while they were still almost too hot to handle. That taste of warm, cinnamon-spiced peaches wrapped in a tender crust is my ultimate comfort food.
The second memory is much more recent, and frankly, a bit chaotic. A few Easters ago, I decided to make a “fancy” dessert for friends. I attempted a towering, layered meringue thing that, well… let’s just say it had a great personality before it gently slumped into a delicious, sticky puddle. In a last-minute panic, I grabbed some pie dough, used a cup to cut circles, threw in some leftover peach compote, and crimped them shut. To hide the rustic look (and my stress), I dusted them with powdered sugar and the edible gold luster dust I’d bought for the failed meringue. When I brought them out, everyone’s eyes widened. “Golden eggs!” someone exclaimed. They were the hit of the night. It was a beautiful reminder that the most magical recipes often come from a happy accident, a bit of nostalgia, and the courage to add a little glitter.
Gathering Your Golden Treasures: The Ingredients
Here’s everything you’ll need to create your own basket of sparkling delights. I’ve added my notes because I love knowing the “why” behind ingredients—it makes you a more confident cook!
- For the Filling:
- 2 cups diced peaches (canned or fresh): Canned peaches in juice (not heavy syrup) are my secret weapon here for consistent sweetness and texture year-round. Just drain them well! If you’re using gorgeous fresh peaches when they’re in season, you’ll need to peel and poach them briefly until just tender.
- 1 tbsp brown sugar: This adds a deeper, molasses-like sweetness that pairs perfectly with the spices. Light or dark works!
- 1/2 tsp cinnamon: The classic cozy spice. Don’t skip it!
- 1/8 tsp ground ginger (optional): My little chef’s hack! This tiny bit adds a subtle, warm zing that makes the peach flavor pop. Trust me.
- 1 tbsp cornstarch: This is our magic thickener. It transforms the peach juices into a glossy, perfect pie filling that won’t run away when you take a bite.
- 1 tsp lemon juice: A bright splash to balance all the sweetness and wake up the fruit flavor.
- For the Dough & Assembly:
- 1 package (2 crusts) store-bought pie dough: I’m a huge fan of using high-quality store-bought dough. It’s a fantastic shortcut that guarantees flaky, buttery results every time, leaving you energy for the fun decorating part! Of course, if your grandma’s pie crust recipe is calling your name, go for it.
- 1 egg + 1 tbsp milk: This simple egg wash is the key to that beautiful, deep golden-brown shine on the baked crust.
- For the Decoration & Magic:
- Edible gold dust or luster dust: This is where the “wow” factor comes in! You can find this at cake supply stores or online. A little goes a very long way.
- A small, clean pastry brush: Dedicated just for food decoration.
- Gold foil baking cups or raffia nests: For serving. Placing these golden eggs in a nest is an adorable presentation trick that never fails to delight.
Let’s Make Some Magic: Step-by-Step Instructions
Ready? Let’s turn these ingredients into something spectacular. Follow these steps, and you’ll have perfect little pies!
- Preheat & Prep: Fire up your oven to 375°F (190°C). This ensures it’s perfectly hot and ready when your pies are assembled. Line a baking sheet with parchment paper—this prevents sticking and makes cleanup a dream.
- Create the Filling: In a medium bowl, gently toss together the diced peaches, brown sugar, cinnamon, ginger (if using), cornstarch, and lemon juice. Let it sit for 5 minutes. You’ll see the cornstarch start to mix with the juices—that’s exactly what we want! Chef’s Tip: Taste a peach piece! Adjust the spice or lemon to your liking. Cooking is personal.
- Cut Your Egg Shapes: Unroll your first pie crust on a lightly floured surface. Using an egg-shaped cookie cutter (about 3-4 inches tall) or a knife and a steady hand, cut out as many shapes as you can. Re-roll the scraps gently to get more. Repeat with the second crust. You’ll need an even number—these are our pie tops and bottoms!
- Fill & Seal: Place half of your egg shapes on the prepared baking sheet. Spoon about 1 tablespoon of the peach filling into the center of each, leaving a ½-inch border clear all the way around. Place a second egg shape on top. Now, seal the edges with a fork: press down firmly all around to crimp and fuse the layers together. Chef’s Hack: For an extra-secure seal, you can moisten the bottom dough’s edge with a tiny bit of water before placing the top on.
- Egg Wash & Vent: In a small bowl, whisk the egg and milk together until smooth. Gently brush this mixture over the top of each pie. This gives us that beautiful color! Then, use the tip of a sharp knife to cut 2-3 small slits in the top of each pie. This lets steam escape so your pies don’t puff up like balloons.
- Bake to Golden Perfection: Bake for 18-22 minutes. Watch for them to turn a lovely, deep golden brown. The filling might bubble a little through the vents—that’s a good sign! Chef’s Note: Ovens vary, so start checking at 18 minutes.
- Add the Sparkle: Let the pies cool on the sheet for at least 15 minutes. They need to be just warm, not hot. Pour a small amount of edible gold dust into a little dish. Using your clean, dry pastry brush, lightly dust or brush the gold onto the tops of the pies. It will stick to the egg wash beautifully. Behold, the magic!
How to Serve These Shimmering Stars
Presentation is half the fun with these little gems! Here are a few of my favorite ways to make them shine:
The Classic Nest: This is my go-to! Line a basket or a platter with raffia, shredded paper “grass,” or even fresh wheatgrass. Nestle the golden egg pies inside. It’s instantly festive and adorable.
The Glimmering Platter: For a more elegant look, arrange the pies on a beautiful cake stand or a simple white platter. Dust a little more gold dust around the plate for extra sparkle. Maybe add a few fresh mint leaves or edible flowers for a pop of green.
With a Side of Sweet: While they’re fantastic on their own, a dollop of softly whipped cream, a scoop of vanilla bean ice cream, or even a drizzle of extra peach jam takes them over the top. The warm pie with cool cream is a textural dream.
Make It Your Own: Delicious Twists & Swaps
Once you’ve mastered the classic, play with it! Here are some fun variations:
- Mixed Berry Bliss: Swap the peaches for a mix of diced strawberries, raspberries, and blueberries. Use vanilla extract instead of ginger.
- Apple Cinnamon “Eggs”: Use finely diced, peeled apples (like Granny Smith) and increase the cinnamon to 1 tsp. A pinch of nutmeg is wonderful here too.
- Savory-Sweet Option: Add a tablespoon of finely chopped rosemary to the peach filling. It sounds wild, but the herbal note with the sweet fruit is incredible!
- Gluten-Free Friendly: Use your favorite gluten-free pie dough recipe or a store-bought GF crust. The method stays exactly the same.
- Vegan Sparkle: Use a vegan pie crust and brush the tops with almond milk or a melted vegan butter wash instead of egg. The gold dust is already vegan-friendly!
Chef Emily’s Extra Notes & Kitchen Confessions
This recipe has become my Easter staple, but it’s evolved. I used to stress about getting the egg shapes perfectly symmetrical. Then my nephew, helping me one year, made a wonky, lopsided “egg” that he declared was the best dinosaur egg he’d ever seen. It was the most loved pie on the plate. So, embrace the imperfections—they have character!
I also learned the hard way that applying gold dust to piping hot pies makes it melt and look streaky. Letting them cool just a bit is the secret to that perfect, fairy-dust shimmer. And pro-tip: label that pastry brush “DECORATION ONLY” unless you want your next batch of garlic bread to have a mysterious golden sheen (not recommended!).
Your Questions, Answered: FAQs & Troubleshooting
Q: Can I make these ahead of time?
A: Absolutely! You can assemble the pies (up to the egg wash step), place them on the parchment-lined sheet, and freeze them solid. Once frozen, transfer to a bag. Bake from frozen, adding 3-5 minutes to the baking time. You can also bake them a day ahead and store in an airtight container; reheat gently and apply the gold dust just before serving.
Q: My filling leaked out everywhere! What happened?
A> Don’t worry, they’ll still taste amazing! This usually means: 1) The vent slits weren’t big/deep enough, causing pressure to build and burst the side, or 2) The edges weren’t sealed tightly enough. Next time, really press that fork down and ensure your slits go through the top layer of dough.
Q: I can’t find edible gold dust. What can I use instead?
A> No problem! A simple dusting of powdered sugar looks snowy and beautiful. Or, mix a tablespoon of coarse sugar with a drop of yellow food coloring, let it dry, and sprinkle that on before baking for a sparkly, golden-sugar crust.
Q: Can I use other fruit fillings?
A> Yes! Just make sure any fresh fruit is diced small and adjust the cornstarch as needed. For very juicy berries, you might need an extra half teaspoon of cornstarch.
Nutritional Information (Because Knowledge is Power!)
Here’s a general breakdown per pie (based on a yield of 10 pies, using standard store-bought crust). Remember, these are little treats!
- Calories: ~180
- Protein: 2g
- Total Fat: 9g
- Saturated Fat: 3g
- Carbohydrates: 22g
- Fiber: 1g
- Sugars: 7g
This is an approximation, as ingredients vary. If you’re making specific dietary calculations, always use the exact brands and ingredients you have on hand for the most accurate info. My philosophy? Enjoy every delicious, glittery bite mindfully and joyfully!
Final Thoughts from My Kitchen to Yours
And there you have it, my friend—your guide to creating edible, sparkling Easter magic. These Golden Egg Peach Pies are more than just a dessert; they’re a conversation starter, a memory maker, and a testament to the fact that the most special foods often come from a place of joy and a willingness to try something fun.
I hope you feel empowered to bake these, to adapt them, and to share them with people who make your life brighter. That’s what Tasty Chow is all about: sharing recipes that fill your belly and warm your heart. If you make them, I’d be absolutely thrilled to see your creations! Tag me on social @TastyChow so I can cheer you on.
Now, go preheat that oven, put on some good music, and let’s make something delicious together. Happy baking, and may your Easter be full of love, laughter, and just the right amount of edible glitter.
With love and a sparkly apron,
Emily 🥧✨