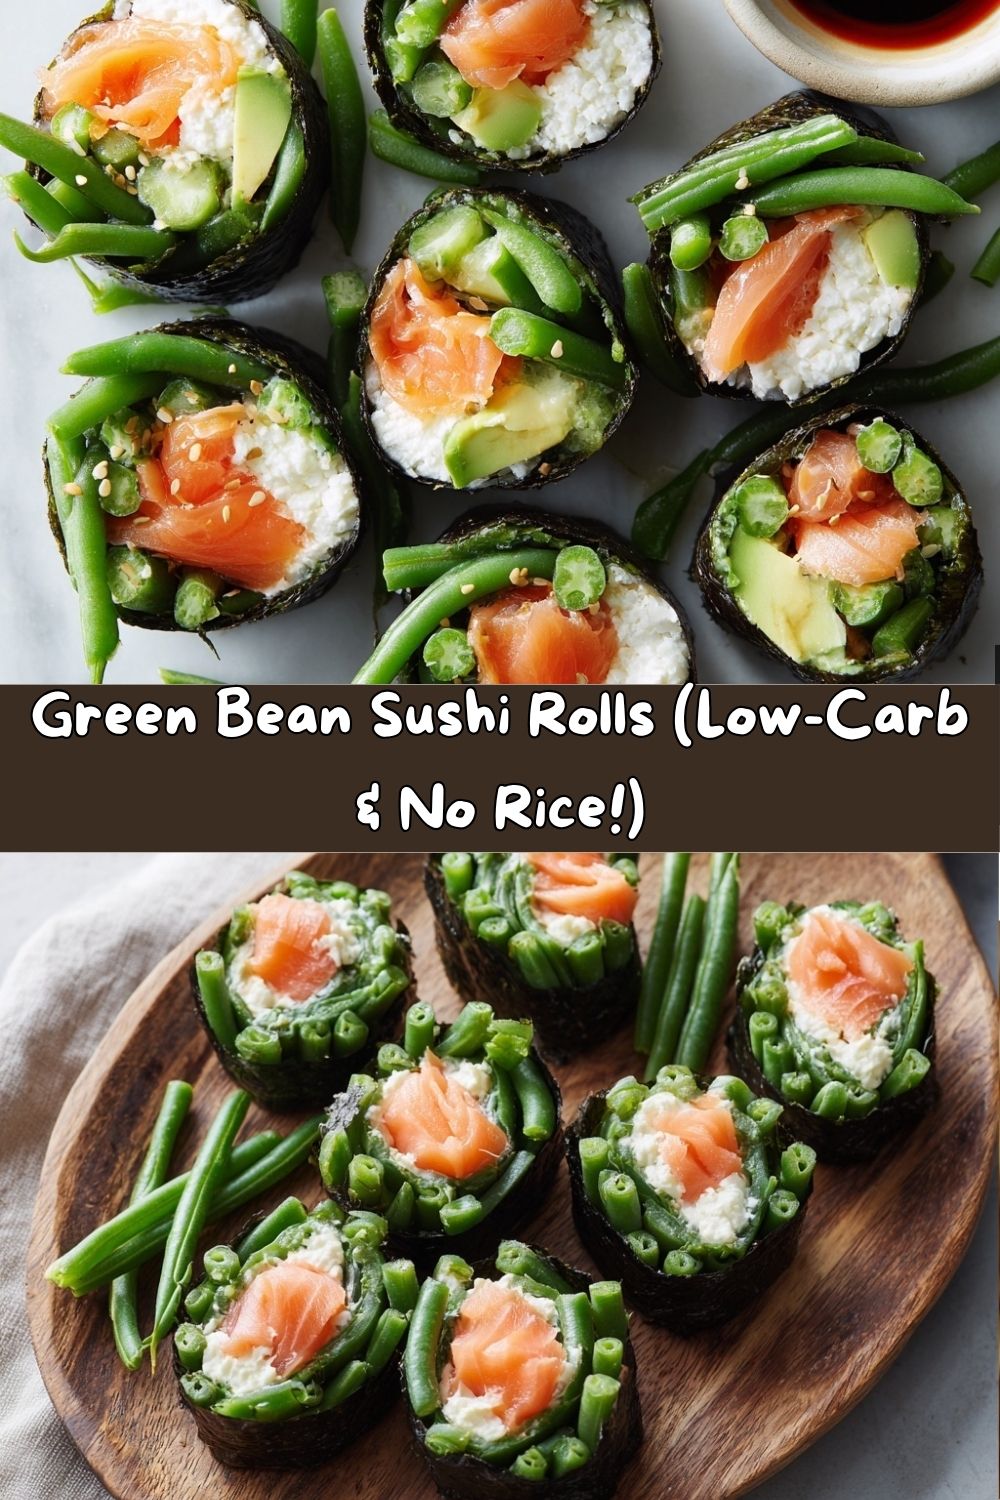
Green Bean Sushi Rolls: A Crispy, Low-Carb Twist You’ll Adore
Hey there, my fellow flavor-seeker! Let’s have a little heart-to-heart about sushi. I adore it. The delicate balance of vinegared rice, the fresh fillings, the sheer artistry of it all… but let’s be real, sometimes my body just screams for something a little lighter, a little greener, and a whole lot less carb-heavy. And sometimes, let’s be really honest, making perfect sushi rice feels like a high-stakes science experiment I don’t have the energy for on a busy Tuesday night.
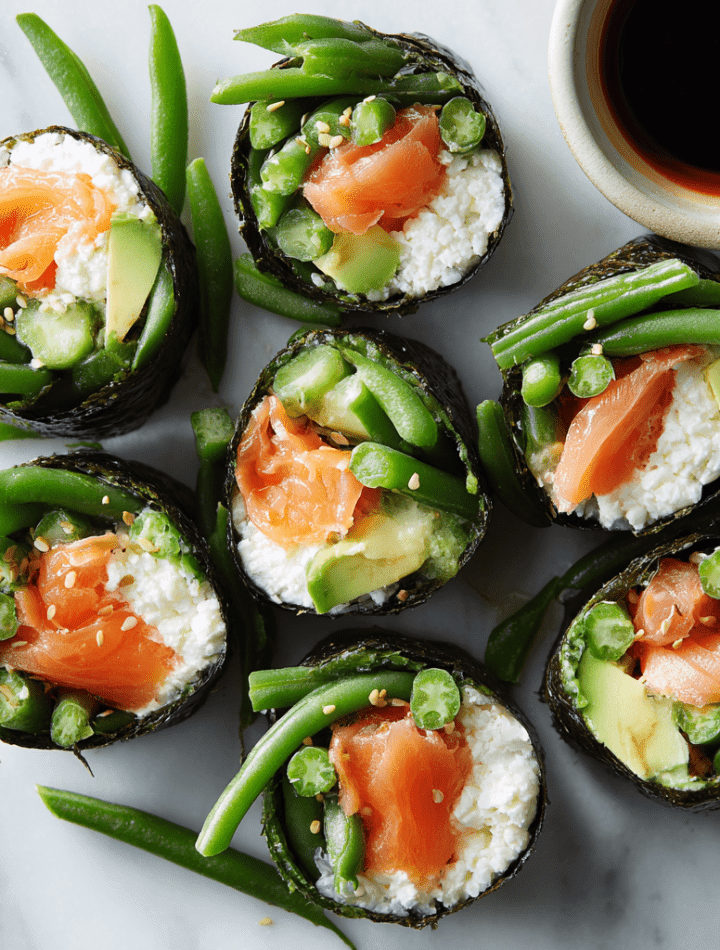
That’s exactly how these vibrant, crunchy, and utterly delicious Green Bean Sushi Rolls came to life in my kitchen. We’re taking everything we love about a classic sushi roll—the nori, the creamy fillings, the smoky salmon—and giving it a fresh, crisp makeover by swapping the rice for tender-crisp green beans. The result? A snack or light meal that feels incredibly fancy but is an absolute joy to put together. They’re packed with protein, bursting with clean flavors, and are naturally gluten-free (just use tamari for dipping!). So, tie on your favorite apron, grab your sharpest knife, and let’s make something wonderfully different together.
The Garden Patch That Started It All
This recipe always takes me back to my grandma’s sprawling backyard garden. She had a dedicated patch for green beans that seemed to stretch on forever every summer. I have such vivid memories of sitting on the back porch with her, a big metal bowl between us, snapping the ends off what felt like a million beans. The sound was so satisfying—a crisp snap! followed by her telling some story about the neighborhood. She’d often serve them blanched with a pat of butter and a sprinkle of salt, and to me, that was the height of culinary sophistication.
Years later, during my culinary school days, I was obsessed with deconstructing and rebuilding classic dishes. One sweltering summer day, craving sushi but wanting something cooler and lighter, I saw a bowl of fresh green beans on my counter and heard that little snap! in my memory. What if the beans were the roll? The first attempt was messy, the second was better, and by the third, I knew I had stumbled onto something special. It’s a recipe that perfectly marries my grandma’s simple, wholesome cooking with my own playful, flavor-chasing spirit.
Gathering Your Delicious Cast of Characters
This is where the fun begins! The beauty of these rolls is in their simplicity and the quality of your ingredients. Here’s what you’ll need to make about 6-8 gorgeous rolls.
- 1 lb Fresh Green Beans, trimmed: Look for beans that are firm, crisp, and a vibrant green color, with no visible blemishes. They’re the star of the show, providing that fantastic crunch and a boost of fiber and vitamins. Chef’s Insight: If green beans aren’t your thing, you can use slender asparagus spears, blanched just like the beans!
- 6-8 Nori Sheets (Sushi Seaweed): These are the classic wrappers that hold our creation together. You’ll find them in the international aisle of any major grocery store. They come in packs and stay fresh for ages.
- 6 oz Smoked Salmon, sliced: I love the smoky, salty depth this adds. It pairs magically with the cream cheese. Substitution Tip: Not a salmon fan? Use cooked, chilled shrimp, imitation crab (surimi), or even thinly sliced, seared tuna. For a veggie version, marinated and baked tofu strips are phenomenal.
- 6 oz Cream Cheese, softened: This is our “glue” and a creamy, tangy counterpoint to the crisp beans. Leave it on the counter for 30 minutes before you start so it spreads easily without tearing the nori. Chef’s Insight: For a lighter touch, you can use whipped cream cheese or even a thin layer of mashed avocado.
- 1 Small Cucumber, julienned: It adds a wonderful, hydrating crunch. I like to use English or Persian cucumbers as they have fewer seeds. Just slice them into matchsticks!
- 1 Ripe Avocado, sliced: Creamy, dreamy avocado brings a rich, buttery texture that makes every bite feel indulgent.
- 1 tbsp Soy Sauce or Tamari (optional): A little splash tossed with the blanched green beans adds a layer of umami that makes the beans even more flavorful. Use tamari to keep the whole recipe gluten-free!
- Optional Twists: Feel like getting fancy? Add a tiny, tiny smear of wasabi paste inside the roll, or a sprinkle of toasted sesame seeds (black or white!) for a nutty flavor and beautiful look.
- Dipping Sauce: This is non-negotiable for me! Set out little bowls of soy sauce/tamari, spicy mayo (just mix sriracha with mayo!), or my personal favorite, tangy ponzu sauce.
Let’s Roll! Your Step-by-Step Guide to Sushi Success
Don’t let the word “sushi” intimidate you. We’re keeping this process fun, fast, and totally approachable. No bamboo mat? No problem! Your hands work perfectly fine.
- Blanch Those Beans! Bring a pot of salted water to a rolling boil. Have a bowl of ice water ready nearby. Gently drop your trimmed green beans into the boiling water and let them cook for just 2-3 minutes. You want them to be bright green and tender-crisp, not mushy. As soon as their time is up, quickly scoop them out and plunge them into the ice water. This “shocks” them, stopping the cooking process and locking in that gorgeous color and crunch. Chef’s Hack: This is a great task to do ahead of time! You can blanch your beans, dry them, and keep them in the fridge for a few hours before you plan to assemble the rolls.
- Season & Dry: Once the beans are completely cool, drain them and pat them very dry with a clean kitchen towel or paper towels. This is a crucial step! If the beans are wet, they’ll make your nori soggy. If you’re using the optional soy sauce/tamari, toss the dried beans with it now.
- Set Up Your Sushi Station: Lay a nori sheet on a clean, dry cutting board. Have your cream cheese, smoked salmon, cucumber, and avocado within easy reach. I like to put a small bowl of water nearby to seal the rolls.
- The Art of Assembly: Spread a thin, even layer of the softened cream cheese over the bottom third of the nori sheet (the part closest to you). You don’t need a ton—just enough to act as a tasty adhesive.
- Layer the Goodness: Now for the fun part! Arrange a small bundle of your green beans horizontally on top of the cream cheese. You want enough for a good crunch, but not so many that you can’t roll it. Next, layer on a slice or two of smoked salmon, a few cucumber matchsticks, and a couple slices of avocado. Chef’s Tip: Resist the urge to overfill! This is the number one secret to a tight, beautiful roll. Less is more here.
- The Tight Roll: Using your fingers, gently but firmly lift the bottom edge of the nori sheet up and over the fillings. Tuck the fillings in as you start to roll, aiming to create a tight cylinder. Continue rolling, applying even pressure, until you get to the end of the sheet.
- Seal the Deal: Dip your finger in the water and lightly moisten the top edge of the nori. Press it firmly against the roll—it will stick like a seal on an envelope! Place the finished roll seam-side down on your board and repeat with the remaining ingredients.
- The Perfect Slice: This is where a sharp knife is your best friend. A dull knife will crush your beautiful roll. Wipe your knife with a damp cloth between each cut for super clean slices. Gently slice each roll into 6-8 bite-sized pieces. And voilà! You just made sushi!
Plating Your Masterpiece
Presentation is part of the joy of eating! You’ve put in the work, now let’s make these rolls look as incredible as they taste. I love arranging them on a beautiful rectangular platter or a simple wooden board. Fan them out, stack them in a little tower, or lay them flat—get creative!
Don’t forget those dipping sauces. I serve them in small, shallow bowls right on the platter. Garnish is the finishing touch that makes it look professional. A little pile of pickled ginger adds a zingy punch, a small dollop of wasabi brings the heat, and a scattering of extra sesame seeds or even some microgreens makes the whole plate pop with color and texture. These are perfect for a light lunch with a side salad, as an impressive appetizer for a dinner party, or even packed in a bento box for a work-from-home treat that feels anything but ordinary.
Get Creative! Flavor Twists & Swaps
The fun doesn’t stop here! This recipe is a fantastic blueprint for your own culinary adventures. Here are a few of my favorite ways to mix it up:
- The “California Dreamin'” Roll: Swap the smoked salmon for imitation crab (surimi) stick and add a tiny bit of mashed avocado inside the roll. It’s a classic flavor combo that never fails.
- The Spicy Tuna Twist: Replace the salmon with canned tuna (well-drained) mixed with a tablespoon of sriracha and a tablespoon of mayo. It’s creamy, spicy, and so satisfying.
- The Veggie Delight: For a stunning vegetarian option, skip the fish altogether. Add other veggie matchsticks like carrots or bell peppers, and include a layer of marinated baked tofu for protein.
- The “Everything Bagel” Roll: Lean into the salmon-and-cream-cheese vibe! Mix everything bagel seasoning right into the cream cheese before spreading it on the nori. It’s a game-changer.
- The Tropical Escape: Add a couple of thin slices of mango alongside the smoked salmon. The sweet and savory combination is absolutely incredible.
From My Messy Apron to Yours: Chef’s Notes
This recipe has evolved so much since that first messy attempt in my hot apartment kitchen. I’ve learned that the key is truly in the drying of the beans and the restraint with the fillings. One of my favorite kitchen memories is teaching my niece how to make these. She was about seven, and she was so focused on arranging her green beans “just so.” She got more cream cheese on her face than on the nori, but the pride on her face when she successfully rolled and sliced her first piece was priceless. It reminded me that cooking isn’t about perfection; it’s about the joy of creating something with your own two hands. These rolls are meant to be fun, a little imperfect, and totally delicious.
Your Questions, Answered!
I’ve made these a million times, and I’ve answered just as many questions from friends and readers. Here are the most common ones to help you out.
- Q: My nori is tearing when I roll. What am I doing wrong?
A: This usually happens for one of two reasons. First, you might be overfilling the roll, putting too much pressure on the nori. Second, the nori itself can become less pliable if it’s exposed to air for too long. Try to work relatively quickly once you start assembling, and make sure your fillings are slim and tidy. - Q: Can I make these ahead of time?
A: You can! Assemble them up to 2-3 hours ahead. The key is to wrap them very tightly in plastic wrap and store them in the fridge. The nori will soften a bit from the moisture in the fillings, but they will still taste amazing. I don’t recommend making them a full day ahead, as they can get a little too soft. - Q: My rolls won’t stay closed! Help!
A: No worries! That water seal at the end is crucial—make sure you’re using enough to really make the nori sticky. Also, ensure your cream cheese layer goes all the way to the edges; it acts as a secondary “glue.” If you’re still having trouble, you can place the finished roll seam-side down for a few minutes to let it set before slicing. - Q: I’m gluten-free. Are these safe for me?
A: Absolutely! Just make sure you use tamari instead of soy sauce for seasoning the beans and for your dipping sauce. All the other core ingredients are naturally gluten-free.
A Nourishing Bite
I’m all about food that tastes good and makes you feel good, and these rolls definitely fit the bill! By swapping out the white rice for green beans, we’re significantly lowering the carbohydrate count and upping the fiber, vitamins, and minerals. Green beans are a fantastic source of Vitamin K, Vitamin C, and manganese. The smoked salmon provides high-quality protein and heart-healthy Omega-3 fatty acids, while the avocado contributes healthy monounsaturated fats. The cream cheese adds a bit of richness and protein. It’s a balanced, nutrient-dense option that provides lasting energy without the heavy feeling that sometimes comes with a traditional rice-based sushi meal. Remember, these are estimates and can vary based on your specific ingredients and fillings.
Your New Go-To Healthy Snack
And there you have it! Your passport to a world of crispy, creamy, low-carb sushi goodness. I hope this recipe brings as much joy and flavor to your kitchen as it has to mine. It’s a testament to the fact that healthy eating doesn’t have to be boring or restrictive—it can be creative, fun, and absolutely delicious.
So, the next time a sushi craving hits but you want something lighter, I hope you give these Green Bean Sushi Rolls a try. I’d love to see your creations! Tag me on social @TastyChow with your beautiful rolls. Now, go forth and chow down!
With love and a fully stocked veggie drawer,
Emily