Let’s Make Some Christmas Magic: Grinch-Inspired Candy Bark!
Hey there, my festive friend! Can you smell it? That crisp, chilly air mixed with the scent of pine trees and sugar cookies? That’s right—the holiday season is in full swing, and my kitchen is buzzing with more excitement than a bowl full of jingle bells. If you’re anything like me, you’re constantly searching for that perfect holiday treat that’s equal parts stunning, delicious, and—let’s be real—incredibly fun to make. Well, search no more. I’m so thrilled to share my Deluxe Grinch-Inspired Christmas Candy Bark with you today!
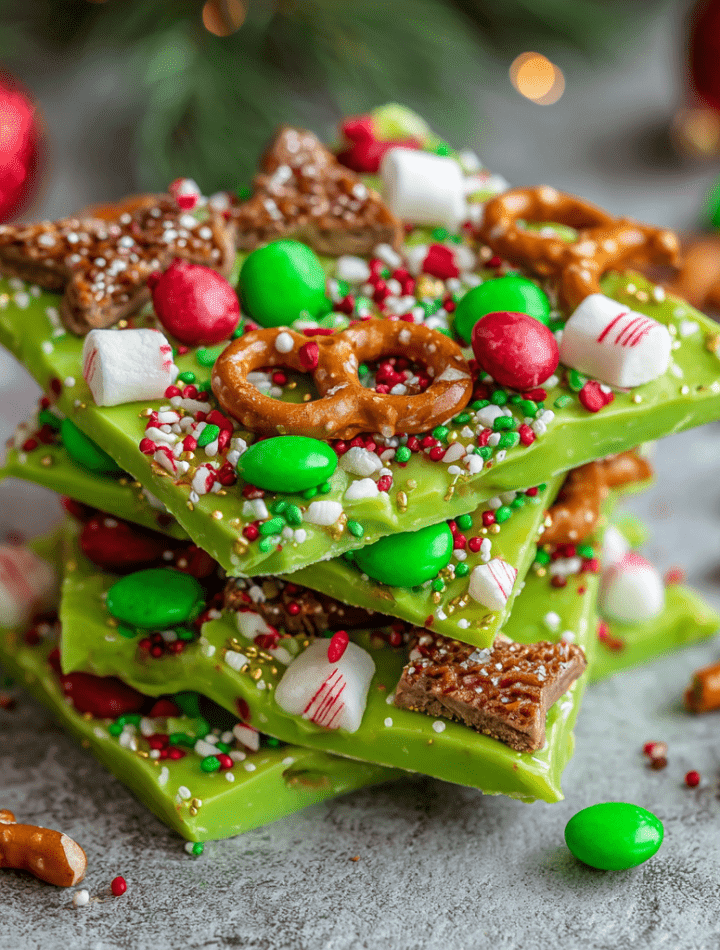
This isn’t just any candy bark. Oh no. This is a vibrant, crunchy, sweet-and-salty masterpiece that looks like it stole Christmas itself! With its brilliant green base, pops of red, and a texture that’ll have you doing a happy dance, this no-bake wonder is the ultimate crowd-pleaser. It’s perfect for holiday parties, teacher gifts, cookie swaps, or just keeping on hand for when those sweet cravings hit while you’re watching your favorite Christmas movies. It’s so easy, the whole family can get involved. So, tie on your most festive apron, put on some Mariah Carey, and let’s create something magically delicious together!

A Story of Sweetness & Sneaky Grinches
This recipe always takes me right back to my grandma’s cozy, overheated living room. Every Christmas Eve, after a massive dinner, my entire family would pile onto her floral couch to watch the classic animated How the Grinch Stole Christmas! I’d be tucked between my cousins, a blanket fort around us, completely mesmerized. I wasn’t so much scared of the Grinch as I was fascinated by his wild, green character arc—and let’s be honest, by all the whimsical Who-ville treats! I remember dreaming of what his feast of “roast beast” and “Who-pudding” would actually taste like.
Years later, in my first apartment, I hosted a “Grinchmas” movie night. I wanted to make a treat that captured that feeling—whimsical, a little mischievous, and utterly joyful. My first attempt at this bark was… well, let’s just say it was more “lump of coal” than “feast.” The chocolate seized, the toppings sank, and it was a murky brown-green. But! A little culinary school knowledge and a lot of kitchen experiments later, I cracked the code. This deluxe version, with its perfect melt and symphony of textures, is my edible love letter to those childhood movie nights and the message that Christmas—and dessert—is always better when shared.
Gathering Your Who-ville Worthy Ingredients
Here’s everything you’ll need to create this festive masterpiece. The beauty of bark is its flexibility, so I’ve included my favorite chef insights and swaps to make it your own!
- 24 oz Green Candy Melts: This is our glorious, vibrant base! Candy melts (or candy wafers) are my go-to because they set firm, melt beautifully, and hold their color. Chef’s Tip: You can find these in the baking aisle. If you can’t find green, use white chocolate and mix in a high-quality oil-based green food coloring.
- ½ cup Green Christmas Sprinkles: For maximum Christmas cheer and extra crunch. Use jimmies, nonpareils, or a mix!
- 4 tbsp Green M&Ms: These little guys add a classic candy coating and a delicious chocolatey bite. For a nut-free version, check the label or use all sprinkles.
- 2 tbsp Red Candy Hearts: I love using these (often available around Valentine’s Day too!) as our “Grinch’s heart” that grows three sizes. They provide a perfect pop of red. No hearts? Red M&Ms or Sixlets work great.
- ½ cup Mini Pretzels (broken pieces): This is my SECRET WEAPON! The salty crunch against the sweet chocolate is absolutely irresistible. It creates the most amazing texture contrast.
- ¼ cup Crushed Candy Canes: Brings a delightful minty freshness and a beautiful festive look. Peppermint bark, anyone?
- ¼ cup Mini Marshmallows: For a soft, pillowy texture that reminds me of little snow drifts in Who-ville.
- Optional: Edible glitter or gold sprinkles: Because every holiday treat deserves a little sparkle and magic! This is our “final touch” that makes it extra special.
Let’s Build Our Bark: A Step-by-Step Adventure
Okay, team! Let’s get our hands dirty (figuratively, of course—we’re keeping those paws clean!). Follow these steps for bark that’s not only gorgeous but has the perfect snap.
- Prep Your Station: First things first! Line a standard baking sheet (approx. 10×15 inches) with parchment paper. Smooth out any wrinkles for a nice, even back for your bark. Having all your toppings measured and ready to go in little bowls is a game-changer. This is called your mise en place (everything in its place), and it makes the process smooth and fun, not frantic!
- Melt the Magic: Place the green candy melts in a microwave-safe bowl. Microwave on high for 30 seconds, then STOP. Take it out and stir. Repeat! Microwave for another 30 seconds, stir. It usually takes about 3-4 intervals. DO NOT just set it for 2 minutes and walk away—you will scorch the chocolate! We want it smooth and glossy. Chef’s Hack: If the melts seem a little thick, you can add a tiny teaspoon of coconut oil or vegetable shortening to help thin them out for easier spreading.
- Spread the Green Canvas: Once your candy is perfectly melted and smooth, pour it directly onto the center of your prepared baking sheet. Using an offset spatula or the back of a spoon, spread it out into a rectangle about ¼ inch thick. It doesn’t have to be perfect—rustic and whimsical is the vibe we’re going for!
- The Grand Topping Extravaganza: Now for the best part! While the candy coating is still warm and wet, immediately start scattering your toppings. I like to start with the bigger items first—press the pretzel pieces and M&Ms gently into the surface. Then, shower on the sprinkles, crushed candy canes, candy hearts, and mini marshmallows. Look at all those colors and textures! Finally, give it a generous dusting of edible glitter or gold sprinkles for that magical finish.
- The Patient Wait: Now, we let science do its thing. You can let the bark set at room temperature, which will take about 30-45 minutes, or you can pop the entire tray into the refrigerator for 15-20 minutes to speed up the process. The fridge method gives you a super satisfying snap when you break it.
- Break & Enjoy! Once the bark is completely firm and hard to the touch, it’s time! Lift the entire sheet of parchment paper off the tray. Place the giant bark slab on your counter and use your hands to break it into rustic, irregular pieces. Some big, some small—it’s all good! Alternatively, you can use a knife to score and break it for more controlled pieces.
How to Serve Your Festive Creation
Presentation is part of the fun! This bark is a total showstopper all on its own. I love piling the pieces high on a festive platter or in a large holiday-themed bowl right in the center of my dessert table. It adds such a vibrant pop of color amongst the cookies and brownies.
For gifting, this is where it truly shines. Stack pieces in clear cellophane bags, tie them with a gorgeous red or gold ribbon, and attach a cute gift tag. It’s a homemade gift that looks and tastes professional! You can also layer pieces in a mason jar for a cute, portable treat. For your own family, just store it in an airtight container at room temperature (if it’s cool) or in the fridge (if your kitchen is warm) and let everyone grab a piece as they pass by. It’s the perfect sweet snack to have on hand throughout the holiday season.
Get Creative: Fun Variations to Try
Feel like mixing it up? Here are a few of my favorite twists on this classic recipe!
- The “Max” Version (For Dogs): Make a pet-safe version for your furry friends! Use carob chips (chocolate is toxic for dogs) and decorate with dog-friendly sprinkles and broken-up dog biscuits.
- Dark Chocolate Swirl: For the chocolate purists, melt ½ cup of dark chocolate chips and drizzle it over the green bark after you’ve added your toppings. Use a toothpick to swirl it through for a marbled effect.
- Nutty Grinch: Add a quarter cup of chopped pistachios and/or peanuts for an extra layer of savory, salty crunch. It’s amazing!
- Gluten-Free & Dairy-Free: Easily done! Ensure your candy melts are dairy-free (many are!), use gluten-free pretzels, and double-check that all your candies and sprinkles meet your dietary needs. Enjoy Life brand is a great resource.
- “Grinch’s Heart” Version: Go all-in on the theme! Use only red toppings—red M&Ms, red sprinkles, crushed red candies—to symbolize his big, loving heart at the end of the movie.
Chef Emily’s Notes from My Messy Kitchen
This recipe has truly evolved from a kitchen disaster to a holiday staple. I’ll never forget the year I tried to use green food coloring in white chocolate for the first time. I didn’t use an oil-based kind, and the chocolate seized up into a grainy, clumpy mess. I almost cried! But my husband (bless him) tasted it and said, “Well, it still tastes good… it just looks like the Grinch’s swamp.” We laughed so hard, and it taught me the valuable lesson of using the right ingredients for the job. Now, I always keep extra candy melts in the pantry, just in case. The best kitchen memories often start with a little mistake!
Your Questions, Answered!
Q: My candy melts are thick and clumpy after melting. What did I do wrong?
A: Ah, the dreaded seize! This usually happens if a tiny bit of water or steam got into the melts. Water is chocolate’s enemy! Always ensure your bowl and utensils are completely dry. If it happens, you can sometimes save it by stirring in a teaspoon of coconut oil or vegetable shortening until it smooths out.
Q: Can I use real chocolate instead of candy melts?
A: You can, but it requires a little more skill. Real chocolate needs to be “tempered” to set properly and have a snap. If you don’t temper it, it can stay soft and melt easily in your hands. Candy melts are formulated to be foolproof for melting and setting, which is why I love them for projects like this.
Q: My toppings are sinking to the bottom! How do I make them stay on top?
A: The key is timing! You have to add your toppings immediately after spreading the chocolate, while it’s still very wet. If the chocolate has started to set even a little, the toppings won’t stick. Work quickly and confidently!
Q: How far in advance can I make this?
A: It keeps beautifully! Stored in an airtight container at a cool room temperature, it will stay fresh and crunchy for up to 2 weeks. It’s the perfect make-ahead holiday treat.
Grinch-Inspired Christmas Candy Bark
- Total Time: 25 minutes
- Yield: 16 1x
Description
This festive Grinch-Inspired Christmas Bark is the ultimate no-bake holiday treat! Bright green, full of crunch, and sprinkled with love (and candy!), it’s a hit with kids and grown-ups alike. This double batch is perfect for holiday parties, dessert trays, or packing into gift bags. And we’ve added a few magical twists for even more texture and color!
Ingredients
24 oz Green Candy Melts
½ cup Green Christmas Sprinkles
4 tbsp Green M&Ms
2 tbsp Red Candy Hearts
½ cup Mini Pretzels (broken pieces for crunch)
¼ cup Crushed Candy Canes
¼ cup Mini Marshmallows
Optional: Edible glitter or gold sprinkles for sparkle
Instructions
Line a baking sheet with parchment paper.
Melt green candy melts in a microwave-safe bowl, stirring every 30 seconds until smooth.
Pour the melted chocolate onto the baking sheet and spread it evenly into a rectangle (~10×14 inches).
While still warm, sprinkle all toppings over the surface: M&Ms, sprinkles, red candy hearts, crushed candy canes, mini pretzels, and marshmallows.
For a touch of magic, add edible glitter or gold sprinkles on top.
Let the bark cool and set completely at room temp or refrigerate for 15 minutes.
Once firm, break into pieces and store in an airtight container.
- Prep Time: 10 minutes
- Chill Time: 15 minutes
Nutrition
- Calories: 220 per piece
- Sugar: 27g per piece
- Fat: 10g per piece
- Carbohydrates: 32g per piece
- Protein: 1g per piece
Nutritional Information (Per Serving)
Okay, let’s be real—this is a holiday treat, a moment of pure joy! But I know some folks like to have an idea of what they’re enjoying. This nutritional info is an estimate per serving (assuming 16 servings from the batch).
Calories: ~220 | Fat: 10g | Saturated Fat: 7g | Carbohydrates: 32g | Sugar: 27g | Protein: 1g
Remember, the holidays are about balance. Enjoy a piece (or two!) of this magical bark with a cup of coffee or milk, savor every bite, and then maybe go for a walk to look at Christmas lights. It’s all about the experience!
Final Sweet Thoughts
And there you have it, my friend! Your very own ticket to Whoville. I hope this Grinch-Inspired Christmas Candy Bark brings as much joy to your kitchen as it has to mine. It’s more than just a recipe; it’s a chance to create a moment of fun, to get a little messy, and to make something beautiful and delicious to share with the people you love.
That’s what my Tasty Chow community is all about—sharing the love, one recipe at a time. However you choose to enjoy this bark, whether it’s on a grand platter or secretly straight from the fridge, I’d love to see your creations! Tag me on social @TastyChow so I can share in your holiday spirit.
From my cozy, sprinkle-covered kitchen to yours, I wish you the happiest, tastiest holiday season ever. Now, let’s chow down!
— Emily 🎄