Healthy Sesame Chicken – Your Takeout Crush, Lightened Up & Loving It!
Hey there, friend! Let’s talk about that magical moment when the craving hits. You know the one. It’s 6 PM, you’re scrolling through your phone, and suddenly all you can think about is that glossy, sweet, savory, nutty, perfect sesame chicken from your favorite takeout spot. Your mouth starts watering just picturing it. But then… the post-indulgence reality check whispers in your ear. The heavy batter, the mystery oil, the “why-do-I-feel-like-I-just-ate-a-brick?” feeling. Ugh. What if I told you we could capture all that incredible flavor, every bit of that sticky-sweet joy, and wrap it up in a recipe that makes your body feel as happy as your taste buds?
Welcome to my Healthy Sesame Chicken – the dish that’s been on permanent rotation in my kitchen for years. This isn’t about deprivation; it’s about celebration! We’re skipping the deep fryer and using a clever little coating trick to get tender, juicy chicken that gets beautifully crispy in a hot pan. The sauce? It’s a simple, whisk-together wonder that’s naturally sweetened and clings to every single bite. It’s weeknight fast (we’re talking 25 minutes, tops), meal-prep genius, and honestly, so much fun to make. So, tie on your apron, grab your favorite skillet, and let’s create some takeout magic that’s so good, you might just start your own delivery service.
The Takeout Rebellion That Started in My Tiny Apartment
This recipe has a backstory, and it involves a truly tragic container of greasy, sad chicken. Picture this: a younger Emily, fresh out of culinary school and living in a shoebox-sized apartment. My budget was tight, but my craving for good Chinese food was limitless. One particularly rough day, I splurged on a big order of sesame chicken. It arrived lukewarm, soggy, and swimming in a one-note, cloyingly sweet sauce. I took one disappointed bite and had a full-on kitchen epiphany right there at my rickety table. “I can make this better. I will make this better.”
I marched into my tiny kitchen, fired up the stove, and started experimenting. I wanted the crackle of the sear, the punch of fresh ginger and garlic, the deep toastiness of real sesame oil, and a sauce that balanced sweet, salty, and tangy in every bite. After a few (okay, several) hilarious attempts—including a “caramelized” sauce that turned into a pan-scouring project—I landed on this version. It’s the recipe I make when I need a hug in a bowl, when friends come over, or when I simply want to prove that “healthy” and “seriously delicious” absolutely belong in the same sentence. It’s my tasty little rebellion, and I’m so excited to share it with you.
Gathering Your Flavor Squad
Here’s everything you’ll need to build this flavor masterpiece. I’ve tossed in my favorite chef tips and swaps so you can make this recipe work with what you’ve got!
- 1½ lbs boneless, skinless chicken breast – Cut into bite-sized pieces. Chef’s Insight: Chicken thighs are a fabulous swap here for even more juiciness and flavor. If you use them, just add a minute or two to the cooking time.
- 1 tablespoon cornstarch or arrowroot powder – This is our *magic dust*! It creates a light, crispy coating on the chicken without any heavy batter. Substitution Tip: Arrowroot works exactly the same and is a great whole-food alternative.
- Salt and pepper, to taste – The essential flavor starters. Don’t be shy!
- 1 tablespoon avocado or olive oil – For searing. I love avocado oil for its high smoke point, but olive oil works perfectly.
For the Legendary Sesame Sauce:
- ¼ cup low-sodium soy sauce – Our salty, umami base. Swaps: Use tamari for gluten-free, or coconut aminos for a soy-free, slightly sweeter option.
- 2 tablespoons honey or maple syrup – For that essential sweetness. Pure maple syrup keeps it vegan-friendly!
- 1 tablespoon rice vinegar – The tiny bit of tang that makes the sauce sing. No rice vinegar? A dash of apple cider vinegar works in a pinch.
- 1 tablespoon sesame oil – Use the toasted kind! This is non-negotiable for that authentic, nutty aroma. It’s the soul of the dish.
- 2 teaspoons cornstarch + 2 tablespoons water – Mixed together into a “slurry.” This is what transforms our sauce from a soup into a luxurious, glossy glaze. Promise it’s easy!
- 1 clove garlic, minced & 1 teaspoon grated fresh ginger – The dynamic duo! Fresh is best here—that bright, pungent kick is everything.
- 1 tablespoon toasted sesame seeds – For texture and that iconic look. I always toast a little extra for garnish.
- Optional: red pepper flakes – Like a little heat? Add a pinch to the sauce or sprinkle on at the end.
To Serve & Make It a Meal:
- Cooked brown rice, quinoa, or cauliflower rice
- Steamed broccoli, snap peas, or bell peppers
- Sliced green onions and extra sesame seeds for that gorgeous finish
Let’s Get Cooking: Your Step-by-Step Roadmap to Deliciousness
Ready? Let’s do this. I’ll walk you through each step with all my favorite kitchen hacks so you feel like a pro.
- Prep the Chicken Like a Pro. Pat your chicken pieces completely dry with a paper towel. (This is the #1 secret to a good sear—no steam, just crisp!). Toss them in a bowl with the cornstarch, salt, and pepper. Make sure each piece gets a light, even coating. It will look a little powdery—that’s perfect! Chef Hack: Do this step right before cooking so the cornstarch doesn’t get gummy.
- Sear to Golden-Brown Perfection. Heat your oil in a large skillet or non-stick pan over medium-high heat. Give it a minute to get properly hot—you should see the oil shimmer. Add the chicken in a single layer. Don’t crowd the pan! If you pile it in, the chicken will steam. Cook in batches if you need to; it’s worth it for that beautiful color. Let it cook undisturbed for 3-4 minutes to get a gorgeous sear, then flip and cook for another 3-4 minutes until cooked through. Remove to a plate. See that golden crust? You’re already winning.
- Whisk Up the Magic Sauce. While the chicken rests, grab a small bowl or measuring cup. Whisk together the soy sauce, honey, rice vinegar, sesame oil, garlic, and ginger. In a separate little dish (or just use a fork in a cup), mix the 2 teaspoons of cornstarch with 2 tablespoons of cold water until it’s completely smooth. This is our thickening slurry.
- Simmer & Thicken. Reduce the heat under your skillet to medium. Pour the sauce mixture into the pan—it will sizzle and bubble deliciously. Let it simmer for about 30 seconds, then give your cornstarch slurry one more stir and drizzle it in while whisking constantly. Within 1-2 minutes, you’ll watch the sauce transform from thin to luxuriously thick and glossy. It’s kitchen magic every single time!
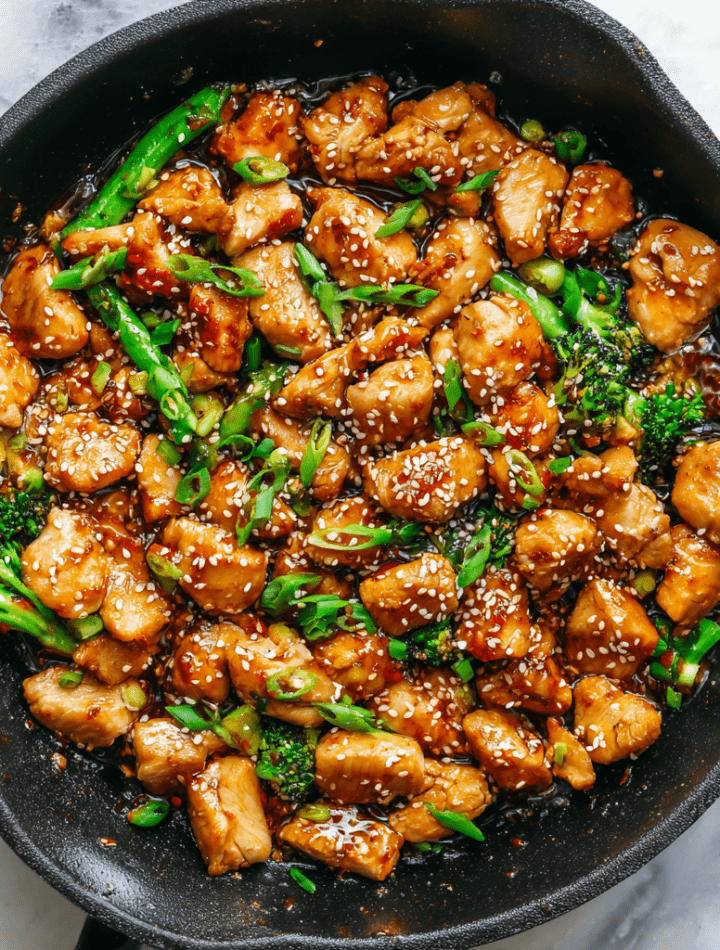
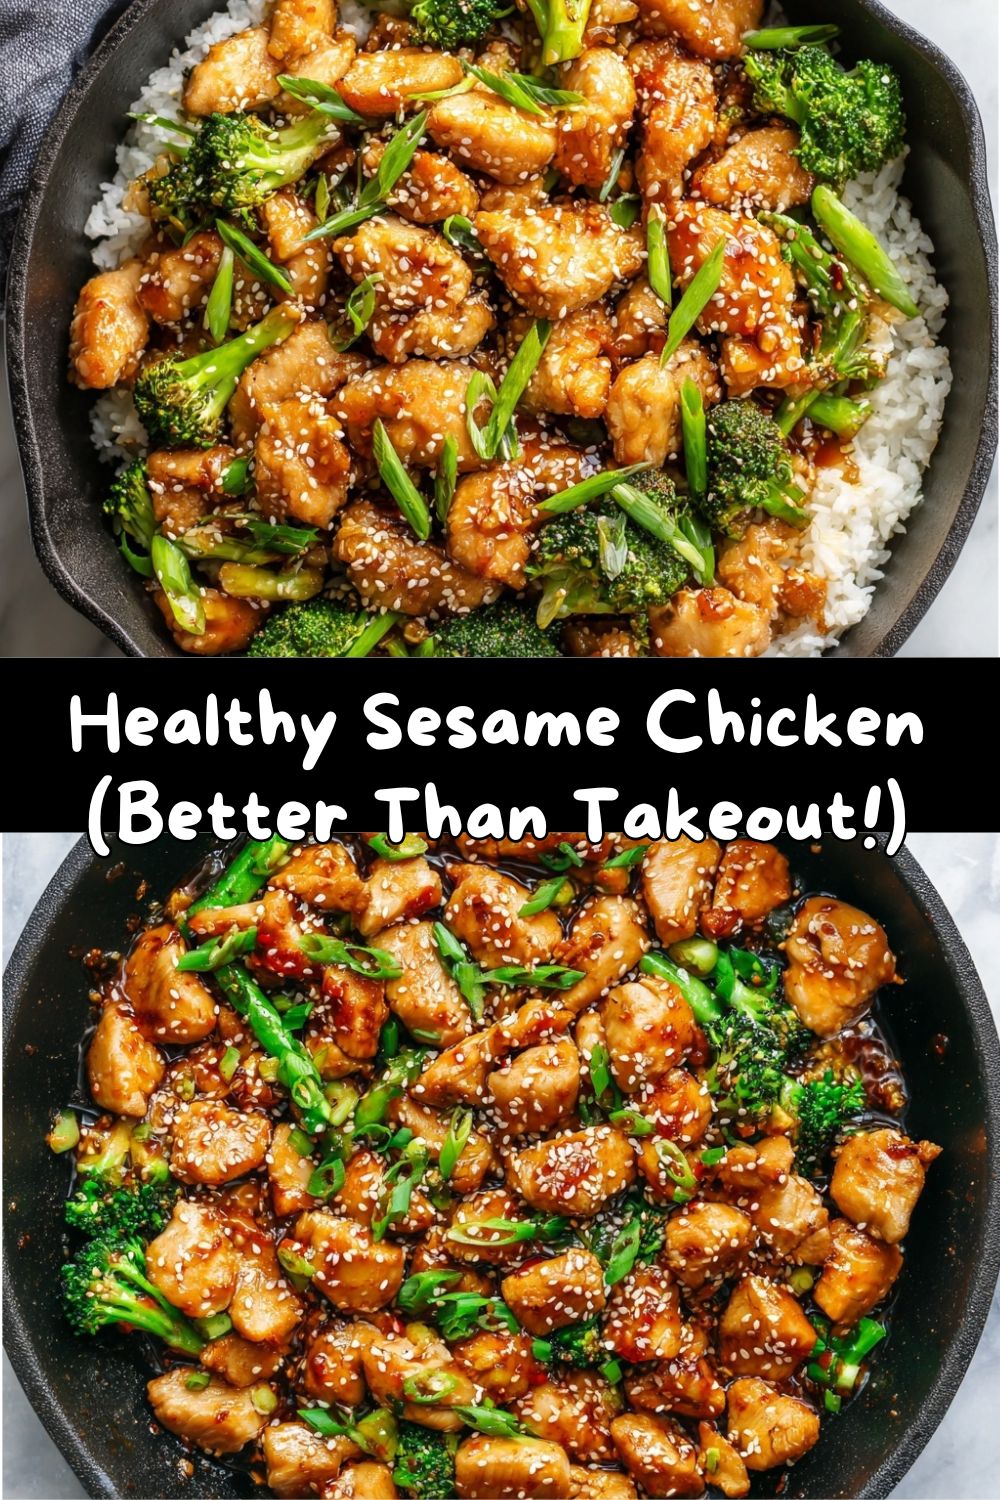
- The Grand Reunion. Add the cooked chicken (and any juices from the plate) back into the skillet. Toss, toss, toss until every piece is lovingly coated in that shiny, incredible sauce. Sprinkle in the toasted sesame seeds and give it one final stir.
Plating Up Your Masterpiece
Now for the fun part—making it look as incredible as it tastes! I like to fluff a big scoop of brown rice or cauliflower rice right in the center of a shallow bowl. Pile that glorious sesame chicken right on top, letting some sauce drizzle down the sides. Tuck your vibrant steamed veggies (I’m a broccoli fanatic) around the edges. Then, the grand finale: a generous sprinkle of sliced green onions and another pinch of toasted sesame seeds. That pop of green against the deep amber sauce is just *chef’s kiss*. Serve it immediately while everything is hot and the sauce is perfectly sticky. Don’t forget the chopsticks for the full experience!
Make It Your Own: Fun Twists & Swaps
This recipe is like your favorite playlist—awesome as-is, but easy to remix! Here are a few of my favorite variations:
- The Spicy Dragon: Add 1-2 teaspoons of sriracha or a tablespoon of gochujang (Korean chili paste) to the sauce mix. Garnish with thin-sliced fresh chili peppers for real fire.
- Veggie-Packed Power Bowl: Double the veggies! Toss in chopped bell peppers, onions, and broccoli florets right into the skillet after removing the chicken. Sauté for 4-5 minutes, then proceed with the sauce and combine everything.
- Honey-Lime Zing: Swap the rice vinegar for fresh lime juice and add a teaspoon of lime zest to the sauce. It’s brighter and totally tropical.
- Extra-Crispy “Almost-Fried”: For a more substantial coating, toss the cornstarch-dusted chicken in a beaten egg white before searing. It gives an extra layer of crispiness that’s absolutely divine.
- Keto/Low-Carb Friend: Use allulose or monk fruit sweetener instead of honey, serve over cauliflower rice, and you’re golden!
From My Kitchen to Yours: A Few Chef’s Notes
This recipe has seen many iterations in my kitchen! The first time I made it for my now-husband, he looked at the pan skeptically and said, “That’s it? No frying?” One bite later, he was hooked. It’s become our go-to “fakeaway” Friday night feast. Over time, I learned that toasting your own sesame seeds in a dry pan for a minute until they’re fragrant takes the flavor to a whole new level—it’s a tiny step with a huge payoff. Also, this sauce is a LEGEND for meal prep. I often double it and keep a jar in the fridge for quick veggie and protein bowls all week. It thickens when cold, but loosens up perfectly when reheated. Trust me, you’ll want to put it on everything.
Your Questions, Answered!
Let’s tackle some common kitchen curiosities so you’re set up for success.
- Q: My sauce didn’t thicken! What happened?
A: No worries! This usually means the cornstarch slurry wasn’t fully mixed (clumps can’t thicken) or the sauce wasn’t at a simmer when you added it. Solution: Mix another teaspoon of cornstarch with a tablespoon of cold water, make sure the sauce is bubbling, and whisk it in. It should thicken right up. - Q: Can I use frozen chicken?
A> You can, but thaw it completely first and pat it extra dry. Frozen chicken releases a lot of water, which can prevent a good sear and make the sauce watery. - Q: I don’t have fresh ginger. What can I use?
A: You can use ¼ teaspoon of ground ginger in a pinch. The flavor will be slightly different but still delicious. For the garlic, ½ teaspoon of garlic powder can sub for the fresh clove. - Q: How do I store and reheat leftovers?
A: Store in an airtight container in the fridge for up to 4 days. Reheat gently in a skillet over medium-low heat with a tiny splash of water or chicken broth to revive the sauce. The microwave works too, but the skillet method keeps the texture better.
A Quick Nutritional Glance
I’m all about balance and feeling good about what you eat! This nutritional information is for one serving (approximately ¼ of the chicken and sauce), served with ½ cup of cooked brown rice and ½ cup of steamed broccoli. Remember, these are estimates based on the specific ingredients used.
- Calories: ~430
- Protein: 35g (Hello, muscle fuel!)
- Carbohydrates: 45g
- Fat: 12g
- Sugar: 12g (Primarily from natural honey)
- Sodium: ~600mg (Using low-sodium soy sauce helps control this!)
Compared to a typical restaurant order of sesame chicken, which can clock in at over 800 calories and 40g+ of fat per serving, this lightened-up version lets you enjoy the incredible flavors you crave while nourishing your body with high-quality protein and far less saturated fat and refined sugar. It’s a win-win!
Final Thoughts: You’ve Got This!
And there you have it, my friend—your new secret weapon against lackluster takeout. This Healthy Sesame Chicken recipe is proof that you don’t have to sacrifice flavor for wellness. It’s about clever techniques, fresh ingredients, and that wonderful feeling of creating something truly delicious with your own two hands. I hope this dish brings as much joy to your table as it has to mine. Remember, cooking is an adventure. If your sauce thickens a bit too much, add a splash of water. If you burn the first batch of sesame seeds (we’ve all been there!), just toast another. The kitchen is your playground.