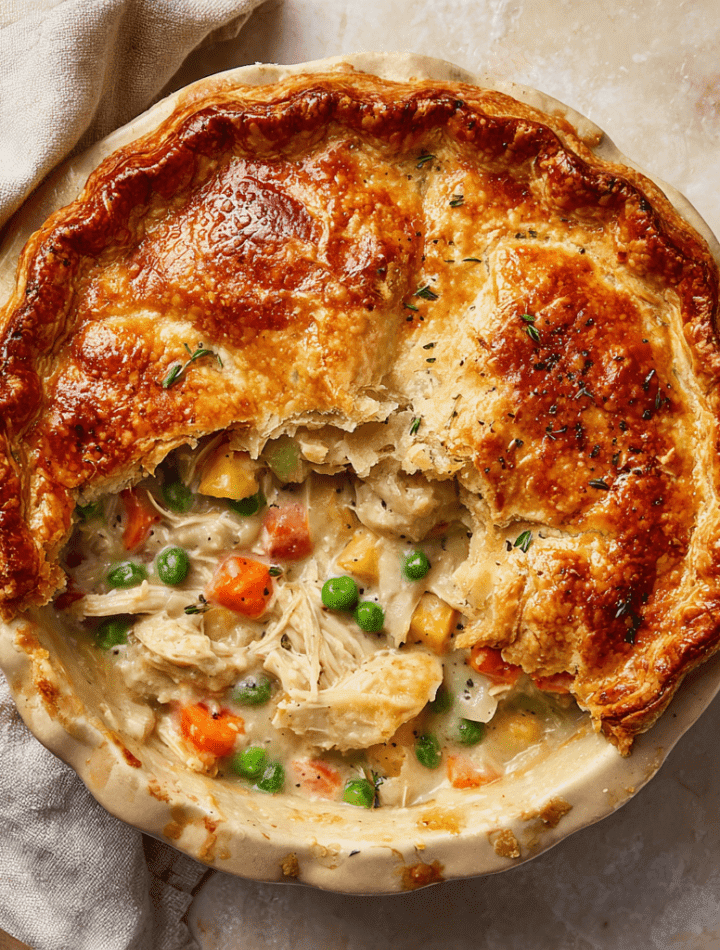
The Ultimate Cozy Classic: Hearty Chicken Pot Pie
Hey friend! Pull up a chair and imagine this: It’s a blustery afternoon, the kind where the wind howls a tune against the windowpane, and you’re bundled up inside, craving something that feels like a hug from the inside out. That, my friends, is the exact moment a Hearty Chicken Pot Pie enters the chat. This isn’t just food; it’s a mood. It’s the aroma of buttery pastry wafting through your kitchen, the promise of a creamy, savory filling packed with tender chicken and garden veggies, and that spectacular moment when your fork breaks through a flaky, golden-brown crust to reveal the steamy, comforting goodness beneath.
For me, pot pie is the edible equivalent of your favorite, well-worn sweater. It’s timeless, reliable, and universally loved. But here’s my chef’s secret: while it tastes like a labor of love, my version is designed for real life. We’re using smart shortcuts, building incredible flavor from the ground up, and creating a centerpiece dish that will have everyone at the table asking for seconds before you’ve even taken your first bite. So, tie on your apron (the messy one is totally acceptable here), and let’s create some kitchen magic together. This classic comfort dish with its flaky golden crust is about to become your new go-to for feeding the people you love.

Grandma’s Spoon & The Legacy of Comfort
My love affair with pot pie started not in culinary school, but at my grandma’s Formica kitchen table. Her version was a humble, beautiful affair. She’d use leftover Sunday roast chicken, the vegetables she’d put up from her summer garden, and a simple, forgiving crust she’d roll out with her favorite worn wooden spoon—the handle was smooth from decades of use. There was no fancy pastry brush; she’d use her fingers to dab a little milk on top. And the “vents” on the top crust? They were always a lopsided heart or a clumsy “E” for Emily.
The ritual was everything. The long bake filled the whole house with an anxious, delicious anticipation. When she’d pull that steaming, bubbling pie from the oven, the whole world felt right. It was more than dinner; it was her way of gathering us, of saying “I love you” without words. That spoon sits in my own kitchen jar now, and every time I make this pie, I give it a little tap on the counter for good luck. It reminds me that the best recipes aren’t about perfection—they’re about heart, history, and the simple joy of a shared meal. This recipe is an homage to that feeling.
Gathering Your Flavor Crew: Ingredients & Insights
Here’s where we build our flavor foundation! I’ve broken it down into the filling and the crust. Remember, great ingredients make a great pie, but I’ve also packed this list with swaps and chef-y insights so you can make it your own.
For the Luscious Filling:
- 4 cups Cooked Chicken, diced or shredded: The star! A rotisserie chicken is your ultimate weeknight hack—just shred the meat. Leftover roasted chicken or even poached breasts work beautifully. Want a richer flavor? Use thigh meat!
- 1/2 cup (1 stick) Unsalted Butter: Our flavor base. Unsalted lets us control the seasoning. This creates the roux that thickens our filling into creamy perfection.
- 1 medium Onion, diced: The aromatic workhorse. A yellow or white onion brings sweetness and depth. No onions? Shallots are a fabulous, slightly gentler substitute.
- 2 Carrots, sliced into 1/4-inch coins: For sweetness, color, and that classic pot pie bite. Don’t skip them—they’re essential for authenticity!
- 2 stalks Celery, sliced: The unsung hero that adds a subtle, savory backbone to the flavor profile.
- 2 cloves Garlic, minced: A non-negotiable for me! It adds a layer of savory depth that elevates the whole dish. Use more if you’re a garlic fan!
- 1/2 cup All-Purpose Flour: This joins with the butter to create a roux, the magic paste that thickens our broth into a luxurious gravy.
- 2 cups Chicken Broth: The liquid gold. Use a good-quality, low-sodium broth for the best flavor control. Homemade stock? Even better!
- 1 cup Milk or Heavy Cream: For creaminess! Whole milk works great, but for an ultra-luxurious, “swoon-worthy” filling (my preference!), heavy cream is the move. Half-and-half is a perfect middle ground.
- 1 cup Frozen Peas: We add these at the end so they stay bright green and sweet. No need to thaw! You can also use frozen mixed vegetables if you’re in a pinch.
- 1 1/2 tsp Salt & 1 tsp Black Pepper: Season, taste, season again! This is crucial. The filling should be well-seasoned on its own before it goes under the crust.
- 1 tsp dried Thyme OR 1 tbsp fresh: The classic herb for poultry. Poultry seasoning is also a great one-stop-shop blend. Rosemary or sage in small amounts are lovely twists.
For the Flaky Golden Crust:
- 1 package (2 crusts) of refrigerated pie dough, OR 1 recipe of your favorite double pie crust: Let’s be real, store-bought crust is a fantastic, flaky time-saver! No shame in that game. If you’re feeling ambitious, a homemade butter crust is divine. We’re aiming for cozy, not crazy.
- 1 Egg, beaten with 1 tbsp water (for egg wash, optional but recommended): This is your crust’s best friend. It gives that professional, deep golden-brown shine and helps any decorative salt or herbs stick.
Let’s Build Some Magic: Step-by-Step Instructions
Alright, team! Let’s fire up the oven and get our hands deliciously involved. Follow these steps, and read my little hacks along the way—they’re like I’m right there beside you, guiding you through.
Step 1: Preheat & Prep. Crank that oven to 400°F (205°C). This hot oven is key for a crisp, flaky crust that doesn’t get soggy. Take your pie crusts out of the fridge to let them warm up slightly—this makes them easier to roll or unfold without cracking.
Step 2: Sauté the Veggie Base. In a large, deep skillet or Dutch oven, melt the butter over medium heat. Once it’s foamy, add the diced onion, carrots, and celery. We’re going to sauté these for about 8-10 minutes, until the onions are translucent and the carrots are just starting to soften. Chef’s Hack: Don’t rush this step! Cooking the veggies properly in the butter builds a sweet, foundational flavor you can’t get any other way. In the last minute, stir in the minced garlic and cook until fragrant—about 30 seconds. Burnt garlic is bitter, so keep it moving!
Step 3: Create the Roux & Gravy. Sprinkle the flour evenly over the cooked veggies. Stir constantly and cook for a full minute. This cooks the raw flour taste out and creates our thickening agent. Now, slowly pour in the chicken broth and milk/cream while whisking constantly. This prevents lumps! Bring the mixture to a gentle simmer, whisking often. It will thicken beautifully into a creamy gravy. Let it bubble gently for 2-3 minutes to reach its full thickness.
Step 4: Bring It All Together. Take the skillet off the heat. Now, stir in the cooked chicken, frozen peas, thyme, salt, and pepper. Give it a really good taste. Does it need more pepper? A pinch more salt? Adjust now. The filling should be highly seasoned and delicious on its own. Pro Tip: Let the filling cool for 15-20 minutes before assembling the pie. A piping-hot filling can start to melt the bottom crust before it even hits the oven, leading to sogginess.
Step 5: Assemble Your Masterpiece. Roll or place your first pie crust into a 9-inch pie dish, letting the edges overhang. Pour the slightly cooled filling into the crust. Moisten the edge of the bottom crust with a little water. Carefully place the second crust over the top. Press the edges together to seal, then crimp them with your fingers or a fork. Use a sharp knife to cut 4-5 small slits in the top crust—these are steam vents and prevent a soupy explosion! For that gorgeous finish, brush the top lightly with the egg wash.
Step 6: Bake to Golden Perfection. Place the pie on a baking sheet (to catch any potential bubble-overs) and bake for 35-40 minutes. You’re looking for a deeply golden-brown crust and visible, bubbly filling through the vents. If the edges brown too fast, you can cover them with strips of foil.
Step 7: The Most Important Step—Rest! I know, the temptation is REAL. But you must let the pie rest for at least 10-15 minutes after pulling it from the oven. This allows the filling to set, so when you slice into it, it holds together in a glorious, creamy way instead of running everywhere. Use this time to set the table and build the anticipation!
Serving Up the Cozy
Presentation is part of the fun! Place the whole, gorgeous pie right in the middle of the table and let everyone admire your work. For serving, I love using a big, sturdy pie server or a sharp knife paired with a wide, shallow spoon. Slide that first piece onto a plate—listen for the crackle of the crust!
While this pie is a complete meal in itself, a few simple sides can round it out perfectly. A bright, crisp green salad with a tangy vinaigrette cuts through the richness beautifully. For a true comfort-food feast, a scoop of mashed potatoes or buttery egg noodles on the side is pure heaven. And don’t forget a chilled glass of dry white wine or sparkling water with lemon for the adults, and apple cider for the kids. The goal? A plate that looks and feels abundantly comforting.
Make It Your Own: Delicious Variations
One recipe, endless possibilities! Here are a few of my favorite twists to keep this classic feeling fresh.
- The “Everything But The Kitchen Sink” Veggie Pie: Swap or add veggies based on what’s in season or in your fridge! Diced potatoes, sweet corn, sautéed mushrooms, or chopped green beans are all fantastic additions. Just keep the total veggie volume roughly the same.
- Biscuit-Topped Skillet Pie: For a rustic, no-fuss approach, pour the filling into a greased 10-inch cast-iron skillet. Top with drop biscuits (from a can or homemade) and bake at 400°F until the biscuits are golden. Instant family-style charm!
- Herb & White Wine Elegance: Deglaze the pan after cooking the veggies with a 1/2 cup of dry white wine (like Sauvignon Blanc), letting it reduce by half before adding the flour. Stir in a tablespoon of fresh chopped parsley and tarragon at the end with the chicken.
- Turkey & Wild Mushroom (Leftover Hero): The day after Thanksgiving, this is your move. Use leftover turkey and sauté a mix of cremini and shiitake mushrooms with the onions. Add a pinch of sage. It’s a glorious second act for holiday leftovers.
- Lightened-Up Version: Use a mix of low-sodium broth and 2% milk. Swap half the butter for olive oil. Load up on extra veggies like leeks and turnips. You can even use a phyllo dough or puff pastry top for a lighter, flakier crust.
Chef Emily’s Notebook
This recipe has lived many lives in my kitchen! My culinary school version was insanely complex, involving a separate velouté sauce and lard in the crust. Over the years, I’ve stripped it back to the soul-warming essentials. The biggest game-changer was learning to cool the filling slightly before assembling—it was the final barrier to defeating the dreaded “soggy bottom.”
One funny fail I’ll never forget? I once forgot to cut steam vents. My then-boyfriend (now husband) and I watched in horror as the crust slowly domed up in the oven like a giant, buttery balloon before it finally burst, sending a geyser of creamy filling all over the oven floor. We still ate it (carefully!), and laughed until we cried. So, moral of the story: don’t forget the vents! Kitchen disasters make the best stories later.
Your Questions, Answered!
Q: Can I make this ahead of time?
A: Absolutely! You have two great options. 1) Make the filling completely, let it cool, and store it in the fridge for up to 2 days. Assemble and bake when ready. 2) Assemble the entire pie, wrap it tightly in plastic and foil, and freeze it for up to 3 months. Bake from frozen, adding 20-30 minutes to the baking time (cover the crust with foil if it browns too quickly).
Q: My filling is too runny/thick. What happened?
A: Runny filling often means the roux wasn’t cooked long enough, or the simmering time was too short to activate the flour’s thickening power. Next time, ensure you cook the flour for a full minute and let the gravy simmer until it coats the back of a spoon. If it’s too thick, you can simply whisk in a splash more broth or milk until it reaches the desired consistency before adding the chicken.
Q: Can I use puff pastry for the top?
A: You can! It will be delicious, but different—more shatteringly flaky than traditionally flaky. Just be sure to thaw it according to package directions and score it lightly with a knife to allow for expansion. The baking temp and time will be similar.
Q: How do I store and reheat leftovers?
A: Store cooled leftovers covered in the fridge for 3-4 days. Reheating is best done in the oven (350°F for 20-25 mins) or toaster oven to keep the crust crisp. The microwave will work in a pinch but will soften the crust.
Nutritional Information*
*Please note: The following is an estimate for 1 serving (1/6th of the pie) based on the primary ingredients using whole milk and a standard pie crust. Values can vary significantly based on specific brands, ingredient choices, and portion sizes.
- Calories: ~480 kcal
- Protein: 26g
- Carbohydrates: 34g
- Fat: 28g
- Saturated Fat: 13g
- Fiber: 3g
- Sugar: 5g
This dish is a hearty, balanced meal that delivers protein, vegetables, and pure comfort in every forkful. It’s meant to nourish, not nitpick—so enjoy it fully.
One Last Slice Before You Go
If there’s a dish that knows how to show up for you, it’s this Hearty Chicken Pot Pie. It doesn’t rush you. It doesn’t ask for fancy skills. It simply sits there, golden and bubbling, reminding you that comfort can be homemade, dependable, and deeply satisfying.
This is the meal you make when you want to slow time just a little—when you want everyone to linger at the table, when leftovers feel like a gift, and when the kitchen smells so good it becomes the coziest room in the house. It’s a recipe that forgives substitutions, welcomes shortcuts, and still tastes like love every single time.
So bake it on a chilly Sunday, a hectic weeknight, or anytime your heart asks for something familiar and warm. Let it rest. Let it steam. Let it gather people.
From my kitchen to yours,
Emily