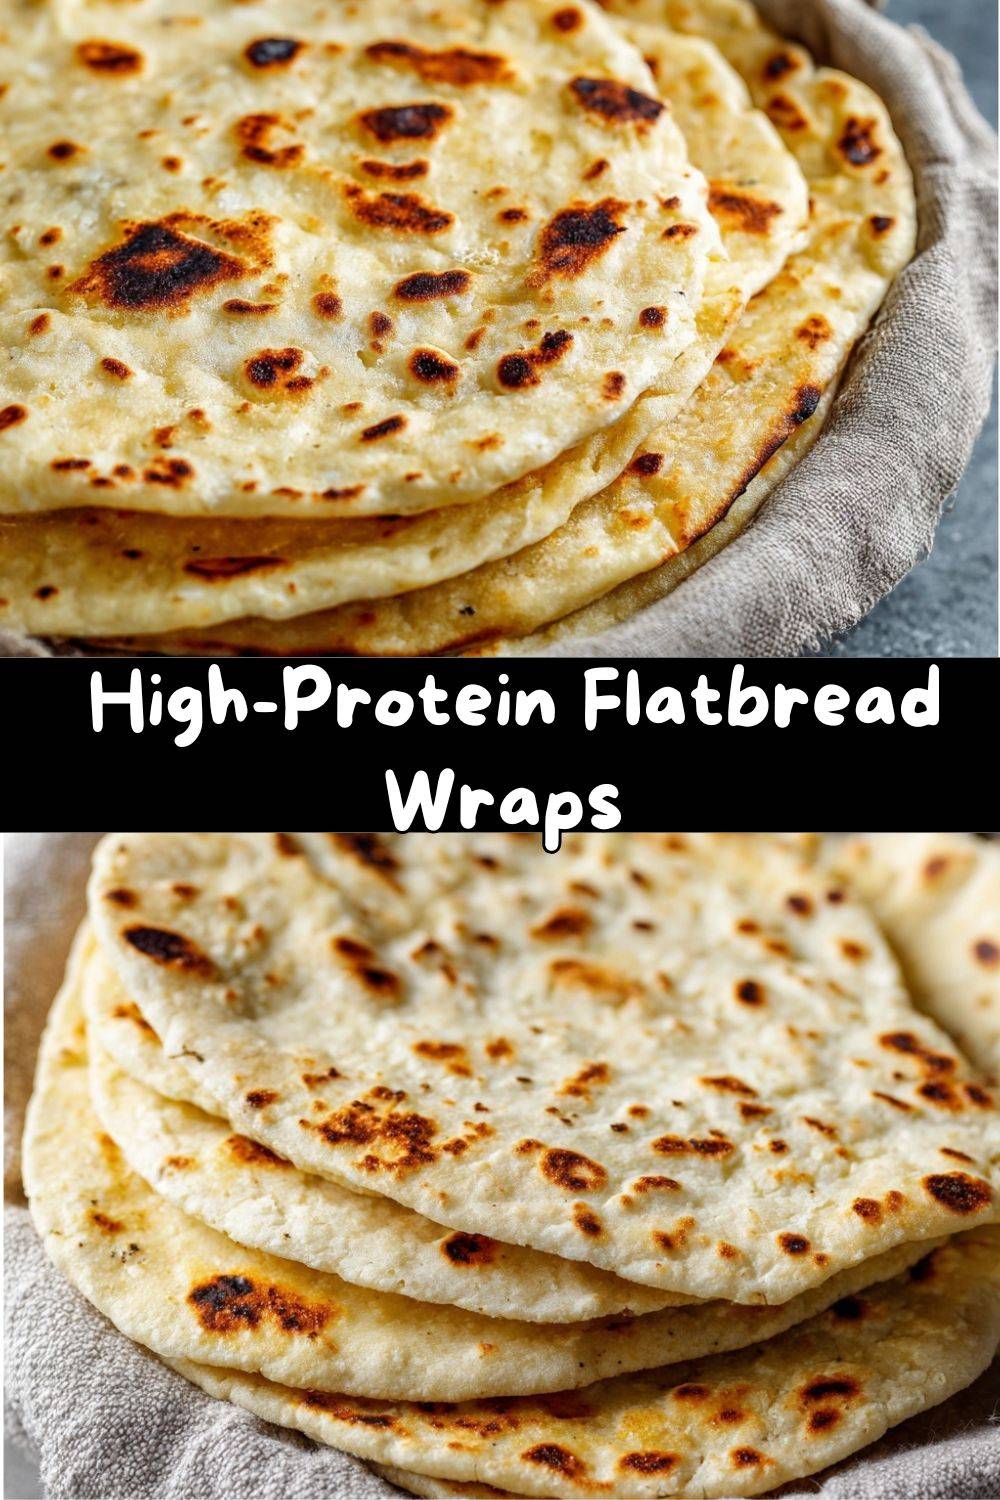
Say Hello to Your New Favorite Wrap Vehicle
Let’s have a real talk for a second. How many times have you dreamed of a perfect, soft, pliable homemade flatbread, only to be stopped by thoughts of yeast, rising times, and a flour-dusted kitchen that looks like a blizzard hit it? Or worse, you grab a store-bought wrap, load it up with all your favorite fillings, and take that first glorious bite… only to have it crack, split, and dump its contents directly onto your plate (or, let’s be honest, your lap). The struggle is real, my friends.
Well, pack those wrap woes away. Today, we’re making magic. We’re creating High-Protein Flatbread Wraps that are soft, chewy, incredibly forgiving, and ready in under 20 minutes. No yeast, no waiting, no fancy equipment. Just a bowl, a skillet, and two superstar ingredients you probably already have: self-rising flour and Greek yogurt.
This isn’t just a recipe; it’s a kitchen revelation. The yogurt works its tangy, tenderizing magic on the flour, creating a dough that’s a dream to handle and cooks up into the most satisfying, slightly chewy flatbread you can imagine. It’s sturdy enough to hold a mountain of veggies and protein, yet soft enough to fold into a perfect taco. It’s your blank canvas for breakfast scrambles, lunchtime chicken salad, epic veggie-loaded dinners, or even just a warm vehicle for hummus and olive oil. Let’s get your skillet hot and your imagination rolling!
The “Aha!” Moment: From Grandma’s Spoon to My Skillet
This recipe takes me right back to my grandma’s linoleum-floored kitchen, but with a protein-packed twist. Grandma Walker made the most incredible, pillowy potato rolls. The process was an all-day affair—the careful proofing, the gentle shaping, the heavenly scent that filled the entire house. I loved them, but as a busy adult, I rarely had that kind of time. I wanted that feeling of bread-making—the tactile joy of kneading, the satisfaction of a warm, homemade bite—but on a Tuesday night timeline.
The “aha” moment hit me during my culinary school days, playing with doughs for savory pies. I learned about the science of acid (like yogurt) tenderizing gluten. Later, as a personal chef for a family focused on high-protein meals, I started experimenting. What if I swapped the usual water or milk in a quick bread for thick, protein-rich Greek yogurt? The first batch was… okay. The tenth batch was a revelation. It had the spirit of those comforting, hands-on breads from my childhood, but it was faster, healthier, and endlessly versatile. It felt like I’d unlocked a secret door in the kitchen. And now, I get to hand you the key.
Gathering Your Flatbread Toolkit
Here’s the beautiful part: the ingredient list is short, sweet, and powerful. Each one plays a crucial role in our wrap success story.
- 1 cup self-rising flour – This is our convenient all-in-one. It already has baking powder and salt perfectly blended in. Chef’s Insight: If you only have all-purpose flour, no panic! Simply add 1 ½ teaspoons of baking powder and ½ teaspoon of salt to your measuring cup before filling it with flour. Give it a quick whisk to distribute.
- 1 cup plain Greek yogurt (non-fat or 2%) – The MVP! Full-fat works too, but non-fat/2% gives us that great protein boost without extra fat. Its thickness and tang create the perfect dough texture and flavor. Sub Tip: In a pinch, you can use regular plain yogurt, but you may need a touch more flour as it’s thinner. Straining it for 10 minutes in a cheesecloth helps.
- Optional Flavor Boosters: This is where you make it yours! A teaspoon of garlic powder, dried oregano, rosemary, or an “everything bagel” seasoning mix kneaded into the dough adds a whole new dimension.
- Olive oil spray or a light drizzle for the pan – Just enough to prevent sticking and give those lovely golden-brown spots. A neutral oil like avocado works great too.
Let’s Make Some Dough Magic: Step-by-Step
Ready to see how easy this is? Tie on that apron, and let’s go.
- The Great Mix-Off: In a medium bowl, plop in your Greek yogurt. Add the self-rising flour (or your AP flour + baking powder + salt combo). Using a fork or your hands (I’m a hands person—feels more connected!), start mixing. It will look shaggy and dry at first, but keep going. Chef Hack: If it feels too sticky after combining, add a tablespoon of flour. Too dry? A teaspoon of yogurt. Climate affects dough!
- Knead with Love (But Not Too Much): Turn the dough out onto a lightly floured surface. Knead it gently for just 2-3 minutes. You’re not trying to develop gluten like a bread dough; you just want it smooth and cohesive. It should feel soft and slightly elastic. Commentary: This is the therapeutic part. Press, fold, turn. You’re literally shaping your dinner.
- Divide and Conquer: Split your dough ball into 4 equal pieces. Roll each into a little ball. Let them rest for just 5 minutes under a towel. This relaxes the gluten, making the next step WAY easier.
- Roll Out Your Canvas: On a lightly floured surface, roll each ball into a thin circle or oval, about 1/8-inch thick. Don’t stress perfection! Rustic is charming. Pro Tip: Roll between two pieces of parchment paper—zero sticking, zero extra flour needed.
- Skillet Sizzle: Heat a good non-stick or cast-iron skillet over medium-high heat. Give it a quick spray of oil or a drizzle wiped with a paper towel. When a drop of water sizzles, it’s ready. Cook one flatbread at a time for 1-2 minutes per side. You’ll see it puff up in beautiful spots and get golden-brown freckles. Flip, repeat! Watchpoint: If it’s browning too fast, lower the heat. We want cooked-through, not burnt.
- Keep ‘Em Cozy: As they finish, stack them on a plate and cover with a clean kitchen towel. The steam keeps them soft and pliable for wrapping. Now, admire your handiwork!
How to Serve & Load These Beauties
Fresh off the skillet is prime time! Here’s how I love to serve them:
The Classic Wrap: Lay the warm flatbread flat. Spread a layer of hummus, tzatziki, or mashed avocado down the center. Pile on your main filling—think sliced grilled chicken, spiced chickpeas, or crispy tofu. Add a rainbow of crunch: shredded lettuce, thinly sliced red onion, bell peppers, and a few cherry tomatoes. Fold the bottom up, then the sides in, and roll tightly. It’s a handheld masterpiece.
Street-Taco Style: Smaller? Perfect for tacos! Fill with carnitas, black beans, cilantro, onion, and a squeeze of lime.
Dippable Delight: Cut into wedges and serve warm with a bowl of hot soup, a hearty stew, or your favorite dips (spinach artichoke, anyone?).
Breakfast MVP: Fill with scrambled eggs, cheese, and salsa for the ultimate breakfast burrito that won’t get soggy.
Make It Your Own: 5 Flavorful Twists
The basic recipe is your launchpad. Let’s get creative!
- Everything Bagel: Knead 2 tablespoons of everything bagel seasoning into the dough. Roll, cook, and top with cream cheese, lox, and capers for an insane brunch.
- Herb & Garlic: Add 1 tsp garlic powder and 2 tbsp of finely chopped fresh herbs (parsley, dill, chives) to the dough. Perfect for pairing with Mediterranean fillings.
- Whole Wheat Boost: Substitute half the self-rising flour with whole wheat flour. You’ll get extra fiber and a nuttier flavor. Note: You may need a touch more yogurt.
- Gluten-Free Friendly: Use a 1:1 gluten-free self-rising flour blend (check it contains baking powder & xanthan gum). The texture will be slightly more delicate but still delicious.
- Vegan Version: Swap the Greek yogurt for an equal amount of thick, unsweetened vegan yogurt or even well-mashed silken tofu blended with a teaspoon of lemon juice for tang.
Chef Emily’s Notebook Scribbles
This recipe has lived in my back pocket for years, evolving from a “neat trick” to a weekly staple. I’ve made these on camping trips (mixed in a zip-top bag!), taught them in kids’ cooking classes, and even used them as a last-minute pizza crust in a pinch (just par-cook, add toppings, and broil!).
A funny story: I once demoed this recipe live and was talking so much I accidentally used vanilla Greek yogurt. We rolled with it (pun intended), sprinkled the cooked flatbread with cinnamon sugar, and drizzled it with honey. The crowd went wild! It became a dessert flatbread variation. Moral of the story? Even “mistakes” can lead to delicious discoveries. Don’t be afraid to play.
FAQs & Flatbread Rescue Tips
Q: My dough is super sticky and I can’t handle it! Help!
A: No worries! Just add a little more flour, a tablespoon at a time, until it’s manageable. Humidity is a factor. Also, letting the mixed dough rest for 5-10 minutes before kneading can help the flour fully absorb the yogurt.
Q: Can I make these ahead of time?
A: Absolutely. Cook them, let them cool completely, then store in a sealed bag in the fridge for up to 4 days. Reheat gently in a skillet, microwave for 10-15 seconds, or even in a toaster. They may lose a little flexibility but are still great.
Q: Why didn’t my flatbread puff up?
A: Your skillet might not have been hot enough, or you rolled them a bit too thick. Ensure the pan is properly preheated so the baking powder reacts quickly to create steam and lift. A thin roll is key!
Q: Can I freeze them?
A: Yes! Separate cooled flatbreads with parchment paper and freeze in a zip-top bag for up to 3 months. Thaw at room temp or reheat from frozen in a skillet.
Nutritional Lowdown*
*Please note: These are estimates based on the core recipe using non-fat Greek yogurt and will vary with specific brands and additions.
- Prep time: 10 minutes
- Cook time: 8 minutes
- Total time: 18 minutes
- Servings: 4 flatbreads
Per Flatbread (approximate):
Calories: 150 | Protein: 10g | Carbohydrates: 20g | Fat: 2g | Fiber: 1g
The star here is the 10 grams of protein per serving, courtesy of that powerhouse Greek yogurt. Compared to a standard store-bought wrap or tortilla, you’re getting more protein, fewer processed ingredients, and total control over what goes in. It’s a win for staying full, satisfied, and energized.
Your Kitchen, Your Rules
And there you have it—your passport to a world of better, easier, tastier wraps. This recipe is more than just instructions; it’s an invitation to trust your hands, to enjoy the process, and to create something wonderfully wholesome and delicious any day of the week.
I hope these High-Protein Flatbread Wraps become as beloved in your kitchen as they are in mine. They’re proof that the most satisfying food doesn’t have to be complicated. So go ahead, get rolling, and fill them with your favorite things. And when you do, I’d love to hear about it! Tag me @TastyChow or leave a comment below with your creations.
Now, go forth and wrap with confidence!
— Emily 🥖❤️