Hey There, Nut Butter Lover!
Picture this: It’s 7 AM, lunchboxes are scattered like confetti, and you’re staring at that jar of store-bought almond butter with its mile-long ingredients list. Sound familiar? Been there, done that, bought the sticky t-shirt. That’s exactly why I’m throwing open my kitchen doors today to share the life-changing magic of homemade almond butter. Forget complicated recipes—this is stupidly simple, friends. Just almonds, a food processor, and 20 minutes between you and creamy, dreamy goodness. No sneaky sugars, no preservatives, just pure nutty bliss. And trust me, once you taste that first spoonful? You’ll feel like a kitchen wizard. Let’s make your taste buds dance!
I’ve been obsessed with this recipe since my daughter started kindergarten. Those commercial nut butters? Too sweet, too oily, too… fake. This version is velvety, rich, and ridiculously versatile—slather it on apple slices, swirl it into oatmeal, or eat it straight from the jar (no judgment here!). Best part? You control everything. Want it saltier? Sweeter? Roastier? Done. Let’s ditch the overpriced jars and make something real together. Your pantry—and your soul—will thank you.
How a Kindergartener Sparked My Nut Butter Revolution
Okay, real talk time. When my little girl started school, I went full “Mama Bear Mode.” Suddenly, every snack felt like a high-stakes mission. Store-bought almond butter? Sugar bombs disguised as health food! I needed something wholesome, nourishing, and genuinely delicious. Cue my first batch of homemade almond butter. Spoiler: It was a DISASTER. I under-roasted the almonds, then nearly burned out my food processor. The result? A gritty, sad paste that made my kid frown. But failure? Nah, just a first draft.
The next weekend, I tried again. This time, I roasted those almonds until they smelled like toasted heaven. As they whirled in the processor, my kitchen filled with this warm, nutty perfume. When that crumbly mess finally melted into silk? EUREKA! My daughter took one bite of her “almond butter sandwich” and declared, “Mama, this tastes like love!” Now, we make it together every Sunday—her little hands pouring almonds, me scraping the bowl. It’s our edible hug in a jar.
Print
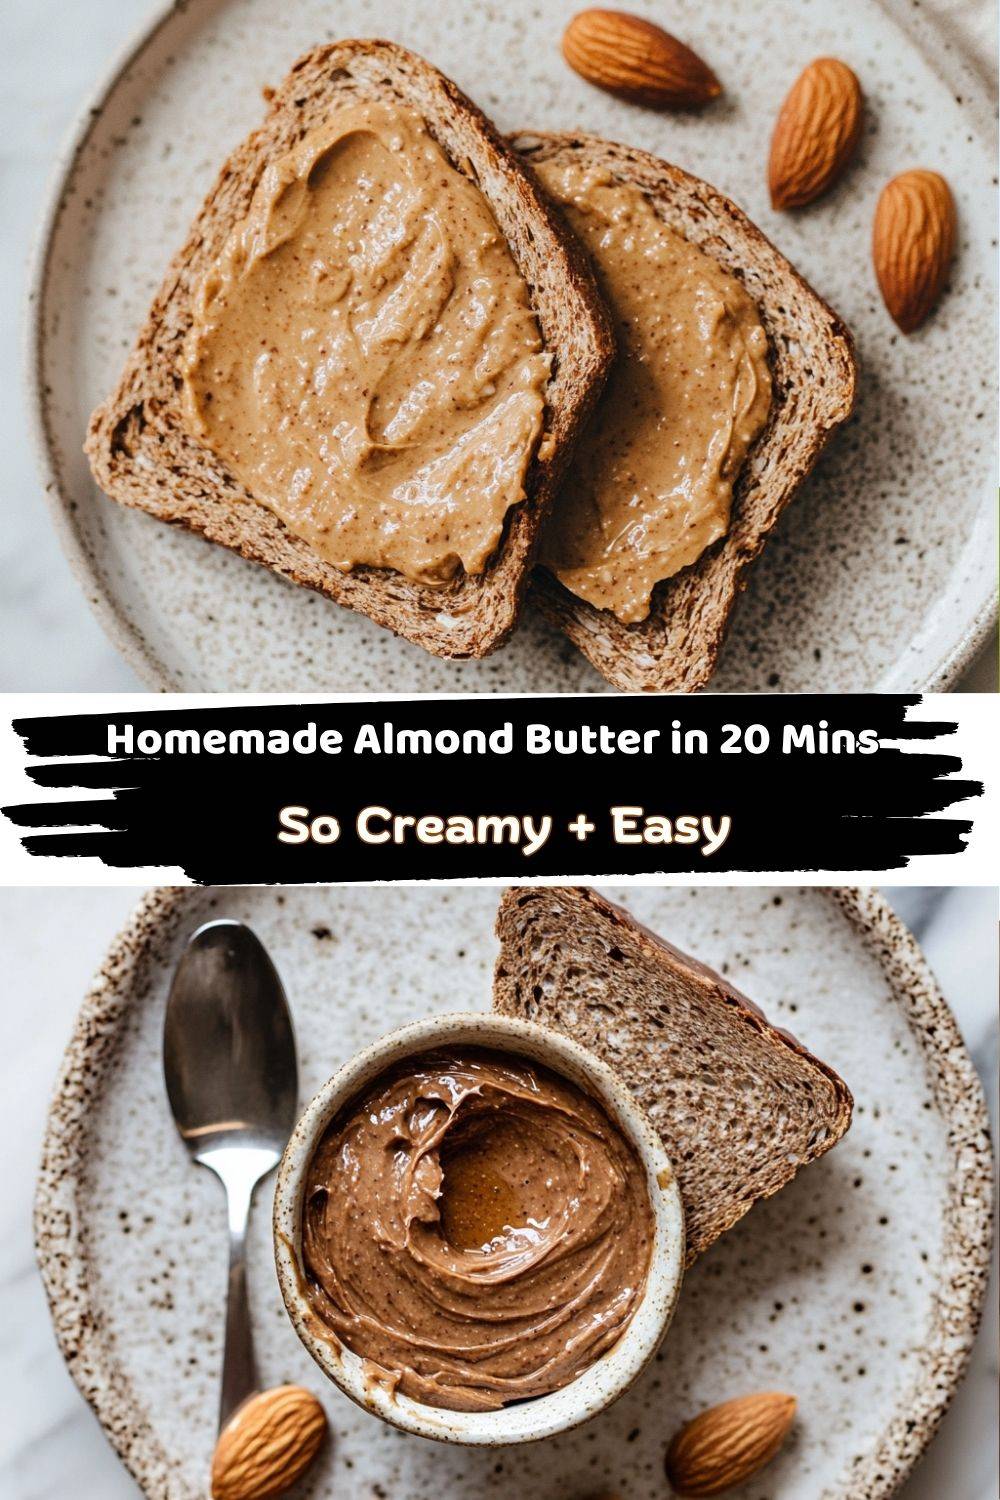
Homemade Almond Butter
- Total Time: 20 minutes
- Yield: 1½ cups 1x
Description
When my daughter started school, I wanted a wholesome spread for her lunchbox that wasn’t loaded with sugar. That’s when I discovered the magic of homemade almond butter—simple, rich, and made with love. It’s now a family favorite, perfect on toast, in smoothies, or straight off the spoon. Once you make it yourself, you’ll never go back to store-bought.
Ingredients
3 cups raw almonds
Optional: ¼ tsp salt, 1–2 tsp honey or maple syrup for sweetness, or a splash of vanilla extract
Instructions
Preheat oven to 350°F. Spread almonds on a baking sheet and roast for 10–12 minutes, stirring once.
Let almonds cool slightly, then transfer to a food processor.
Process for 10–15 minutes, scraping down sides as needed.
First, it will look crumbly, then form a ball, and finally turn into smooth butter.
Add salt, sweetener, or vanilla if desired, and blend until creamy.
Store in a jar in the fridge for up to 3 weeks.
- Prep Time: 5 minutes
- Cook Time: 12 minutes
Nutrition
- Calories: 98 per tbsp
- Sugar: 0.7g per tbsp
- Fat: 9g per tbsp
- Carbohydrates: 3g per tbsp
- Fiber: 2g per tbsp
- Protein: 3g per tbsp
Your Simple, Soul-Satisfying Ingredients
You literally need ONE thing: almonds. But let’s jazz it up! Here’s your flexible lineup:
- 3 cups raw almonds – The MVP! Raw lets you control the roast level. Chef’s tip: Buy in bulk! So much cheaper than store-bought butter.
- ¼ tsp sea salt (optional) – Just a pinch makes flavors POP. Swap: Pink Himalayan salt for minerally vibes.
- 1-2 tsp honey or maple syrup (optional) – For a hint of sweetness. Insider hack: Maple syrup gives caramel notes! Avoid liquid sweeteners if you want it super thick.
- Splash of vanilla extract (optional) – Like a cozy blanket for your taste buds. Pro move: Use vanilla bean paste for speckled elegance.
Why these work: Almonds have natural oils—no added fats needed! Salt balances richness, while sweeteners tame bitterness if your nuts are older. Vanilla? Pure joy.
Let’s Make Magic: Step-by-Step
- Roast to wake up those nuts! Preheat oven to 350°F. Spread almonds on a baking sheet. Roast 10-12 mins, shaking the pan halfway. Watch closely after 8 mins—they go from golden to burnt FAST! You’ll know they’re ready when your kitchen smells like a bakery.
- Cool slightly (but keep ’em warm). Transfer almonds to your food processor bowl. Hot tip: Warm nuts blend smoother! But don’t burn your fingers—give ’em 5 mins.
- Process like a boss. Secure the lid. Pulse a few times, then let ’er rip! Scrape sides every 2-3 mins. Patience, grasshopper: It’ll look sandy (5 mins), clump into a ball (8 mins), then suddenly smooth out (12-15 mins). Sound scary? That’s normal! Your machine is working hard—give it breathers if it overheats.
- Flavor party time! Once silky, add salt, sweetener, or vanilla. Blend 30 secs. Texture check: Want it drippy? Add 1 tsp avocado oil. Prefer thick? Skip it!
- Jar it up! Scoop into a clean glass jar. Storage secret: Wipe the rim super clean to prevent mold. A layer of oil on top? Totally natural—just stir before use!
Total time: 20 mins (mostly hands-off!) | Yield: 1.5 cups
Beyond the Spoon: Serving Ideas
Homemade almond butter isn’t just a recipe—it’s a lifestyle, sugar! Once that warm, golden spread hits your spoon, the possibilities stretch farther than a school pickup line on a Monday.
Go classic: Slather it thick on toast with banana slices and a sprinkle of cinnamon. Want crunch? Add a handful of granola on top—chef’s kiss.
Kid-approved snack hack: Spread it on apple slices, celery sticks, or rice cakes, then let the little ones decorate with raisins, sunflower seeds, or rainbow sprinkles. Sneaky veggies? Who, us?
Breakfast upgrade: Swirl a spoonful into your oatmeal, Greek yogurt, or smoothie bowls for extra richness and staying power. Bonus: it makes everything feel a little fancier.
Savory switch-up: Feeling bold? Dollop it on roasted sweet potatoes, or whisk into sauces for a nutty, creamy depth that’ll blow your taste buds’ minds.
Sweet surprise: Dip dark chocolate squares, strawberries, or pretzels right in and keep it in the fridge for those “just one bite” dessert cravings (that never stop at one bite, let’s be honest).
However you serve it, this almond butter brings comfort, versatility, and a whole lotta “I made this myself!” pride to your table. Whether you’re packing lunchboxes or treating yourself to a quiet midnight snack—this jar’s got your back.
Mix It Up: 5 Fun Twists
Feeling fancy? Customize your batch!
- Chai-Spiced: Add 1 tsp cinnamon + ¼ tsp cardamom with the almonds pre-roast.
- Cocoa Dream: Post-blend, stir in 2 tbsp cocoa powder.
- Savory Garlic-Herb: Skip sweeteners. Add ½ tsp garlic powder + 1 tsp rosemary with salt.
- Sunflower Boost: Replace 1 cup almonds with roasted sunflower seeds (great for nut-free schools!).
- Extra-Crunchy: Reserve ¼ cup chopped roasted almonds; stir in after blending.
Emily’s Kitchen Confessions
This recipe evolved from desperation to obsession! My first “ball of doom” phase terrified me—I almost tossed it. But scraping relentlessly? That’s KEY. Now, I blast my ’90s playlist and dance while processing. The almonds’ transformation from rubble to satin is pure kitchen alchemy! Pro tip: Double batches freeze beautifully. I stash jars like a squirrel preparing for winter. Oh, and my kid? She’s 10 now and makes it solo. Last week she added rainbow sprinkles “for vibes.” My heart exploded.
Your Almond Butter SOS Guide
Q: Why won’t my almond butter get smooth?
A: Three culprits: 1) Underoasted nuts (roast longer next time!), 2) Weak processor (pause every 2 mins to cool motor), 3) Impatience! It can take 15+ mins. If stuck, add 1 tsp coconut oil.
Q: Can I use roasted almonds?
A> Absolutely! Skip roasting. But raw + home-roasted tastes fresher and deeper. Avoid salted ones—you can’t control sodium.
Q: Why did it seize into a dry ball?
A> Relax—that’s the magic! Keep processing. The friction releases oils. It’ll smooth out, promise.
Q: How long does it last?
A> 3 weeks refrigerated. If oil separates, stir! No preservatives = natural settling.
Nutritional Perks (Per Tbsp)
Calories: 98 | Fat: 9g (mostly heart-healthy monounsaturated!) | Carbs: 3g | Fiber: 2g | Protein: 3g | Sugar: 0.7g (unsweetened version). Compare that to store-bought—less sugar, more control, all flavor!
Final Thoughts: One Jar, A Whole Lotta Love
Isn’t it wild how something so simple—just almonds and patience—can turn into something so downright magical? This homemade almond butter isn’t just about ditching store-bought jars. It’s about slowing down, taking control, and turning a basic pantry staple into something that feels like a little act of self-care.
It’s about swirling love into your daughter’s lunchbox, spooning calm into a chaotic morning, and savoring the satisfaction of saying, “Yeah, I made that.” Whether you’re a first-timer or a seasoned kitchen whiz, this recipe meets you where you are and hands you a spoonful of confidence.
So roast those almonds, crank that food processor, and dance through the “ball-of-doom” phase knowing what’s coming: smooth, glossy, golden bliss. And every time you reach for that jar, remember—you didn’t just make nut butter.
You made something real.
Simple. Nourishing. Joyful.