That Magical Moment When Cream Becomes Butter (And Your Life Changes Forever!)
Hey there, butter buddies! 👋 Emily here from Tasty Chow, your partner-in-crime for all things deliciously uncomplicated. Raise your hand if you’ve ever stared at a grocery store butter wall feeling utterly overwhelmed. Grass-fed? European-style? Sea salt crystals? What if I told you the creamiest, dreamiest butter of your life requires just one ingredient and 10 minutes? No fancy equipment, no culinary degree—just you, some cream, and a little kitchen magic.
Picture this: golden swirls of fresh butter melting into warm bread, that rich “I-made-this!” pride bubbling in your chest. Homemade butter isn’t just a recipe—it’s a front-row seat to food science wizardry! Watching heavy cream morph into velvety butter solids and tangy buttermilk feels like unlocking a superpower your grandma secretly knew about. And trust me, once you taste it? Store-bought butter will taste like cardboard impostors. Ready to churn some joy? Let’s dive in!
P.S. This is the #1 recipe I demo at dinner parties—guests literally gasp when the cream splits! It’s cheap, foolproof, and kids go nuts for it. Consider this your golden ticket to rockstar status.
My Butter Epiphany: A Wooden Spoon, My Grandma, and a Whole Lot of Laughs
Let me take you back to 1998. Seven-year-old me, standing on a wobbly stool in my grandma’s Kansas kitchen, sleeves rolled up, fiercely shaking a mason jar of cream like it owed me candy money. “Keep going, firecracker!” Grandma cheered, her apron dusted with flour. “When your arms feel like Jell-O, that’s when the magic happens!”
Twenty minutes (and one dramatic arm cramp) later, I witnessed pure alchemy: pale yellow globs swimming in cloudy liquid. Grandma strained it, rinsed it, then smeared my creation onto warm cornbread. That first bite? Clouds parted. Angels sang. It tasted like sunshine and happy cows. But the real magic was Grandma’s wink: “See, Em? Fancy gadgets don’t make good food—heart and hustle do.” That jar of butter taught me cooking isn’t about perfection—it’s about giggles, messy hands, and memories you can taste. Every time I make butter now, I’m back in that kitchen, feeling her squeeze my shoulder.
Your Butter Toolkit: Literally Just One Hero Ingredient
Gather this:
- 2 cups heavy cream – Not ultra-pasteurized if possible! Why? Ultra-pasteurization super-heats cream, making it stubborn to separate. Look for “pasteurized” or “cream-top” bottles. Chef’s secret: room-temp cream whips faster than cold! (But cold works too—just add 5 extra minutes to your workout.)
- Pinch of salt (optional but glorious) – Flaky sea salt or kosher salt transforms it from “wow” to “WHERE HAVE YOU BEEN ALL MY LIFE?!” Start with ¼ tsp and taste. Pro tip: Salt after rinsing so it doesn’t wash away!
See? I told you it was simple! Why heavy cream? Butterfat is the star—aim for cream with 36-40% fat. Half-and-half? Won’t work. Whipping cream? Okay in a pinch, but yields less butter. Feeling fancy? Try organic or local cream—you’ll taste the terroir!
Let’s Make Butter! Your Foolproof Roadmap to Golden Glory
Step 1: Pick Your Weapon
Pour cream into your chosen vessel:
- Stand Mixer (easiest!): Use the whisk attachment. Secure that splash guard—trust me.
- Blender/Food Processor: Pulse in short bursts to avoid overheating.
- Mason Jar (most nostalgic!): Fill halfway, screw lid TIGHT. Shake like you’re dancing to 90s hip-hop!
Step 2: Channel Your Inner Warrior
Start mixing/shaking! First, you’ll get billowy whipped cream (yay!). Keep going past “stiff peaks” into “over-whipped” territory—this is normal! Around the 5-8 minute mark (15+ for jars), the magic happens:
- Stage 1: Sudden texture change—grainy, almost curdled.
- Stage 2: SPLOOSH! Yellow butter solids separate from buttermilk. Chef’s hack: Listen for a sloshy sound in jars!
Step 3: Rescue Your Buttermilk!
Strain solids through a fine-mesh sieve or cheesecloth. SAVE the buttermilk! (It’s liquid gold for biscuits or pancakes.) Squeeze butter gently to release excess liquid.
Step 4: The Spa Rinse
Place butter in a bowl. Pour ice-cold water over it. Mash with a spatula/spoon until water runs clear (about 4-5 rinses). Why? Leftover buttermilk spoils butter fast. Cold water firms it up!
Step 5: Flavor Time (Optional)
Knead in salt now. Feeling adventurous? Add honey, herbs, or roasted garlic! (See variations below.)
Step 6: Store & Swoon
Shape into a log, block, or cute ramekin. Refrigerate in airtight container for 1-2 weeks. Or freeze for 3 months!
Butter Up: How to Serve Your Liquid Gold
Slather it WARM! Let it sit at room temp 15 minutes before serving. Try:
- Smothered on crusty sourdough with flaky salt
- Melted over roasted carrots or popcorn
- Swirled into mashed potatoes (game-changer!)
- As a “butter board” topped with honey, nuts, and edible flowers
Pair with your saved buttermilk in pancakes—full-circle deliciousness!
Play With Your Food! 5 Crazy-Delicious Butter Twists
Once you master basic butter, the flavor playground opens!
- Honey-Cinnamon Bliss: Knead in 2 tbsp honey + 1 tsp cinnamon. Perfect on waffles!
- Everything Bagel Bomb: Mix in 1 tbsp everything seasoning. Killer on eggs.
- Lemon-Herb Sunshine: Zest 1 lemon + 2 tbsp chopped herbs (dill, chives, parsley).
- Maple Sea Salt: 1 tbsp real maple syrup + flaky salt. Cornbread’s BFF.
- Vegan “Butter”: Not traditional, but fun! Whip 1 cup coconut cream until separated, then rinse. Add nutritional yeast for “buttery” flavor.
Confessions from My Butter-Fueled Kitchen
True story: I once hosted a “Butter Shaking Dance Party” where guests battled to make butter fastest. My cousin Mark shook so hard, the jar flew—butter on the ceiling! We scraped it off, salted it, and ate it laughing. Moral: Imperfection tastes better.
Over the years, I’ve tweaked this recipe: Room-temp cream? Cuts shaking time in half. Salt after rinsing? Prevents flavor washout. But the core remains—cream + love = magic. My culinary students call this “gateway dairy” because it sparks that “I can make ANYTHING!” fire. Pass it on!
Butter SOS: Your Top Questions, Answered!
Q: Why won’t my cream turn into butter?!
A: Three culprits: 1) Ultra-pasteurized cream (check the label!), 2) Under-whipping (keep going past whipped cream!), or 3) Cold cream (let it sit out 30 mins first).
Q: How long does homemade butter last?
A: 1-2 weeks in the fridge (thanks to rinsing!). Freeze for 3 months! Store-bought lasts longer due to stabilizers—fresh is worth the trade-off!
Q: Can I use a hand mixer?
A: Absolutely! Use a deep bowl and medium speed. Beware of splash-back—aprons recommended!
Q: My butter tastes bland. Help!
A: Two fixes: 1) Salt it! Salt enhances butteriness. 2) Rinse better—leftover buttermilk mutes flavor. Rinse until water runs crystal clear!
Nutritional Snapshot (Per Tablespoon)
Calories: 102 | Fat: 12g | Saturated Fat: 7g | Carbs: 0g | Protein: 0g | Sodium: Varies with salt
Note: This is pure dairy fat—delicious, but best enjoyed mindfully!

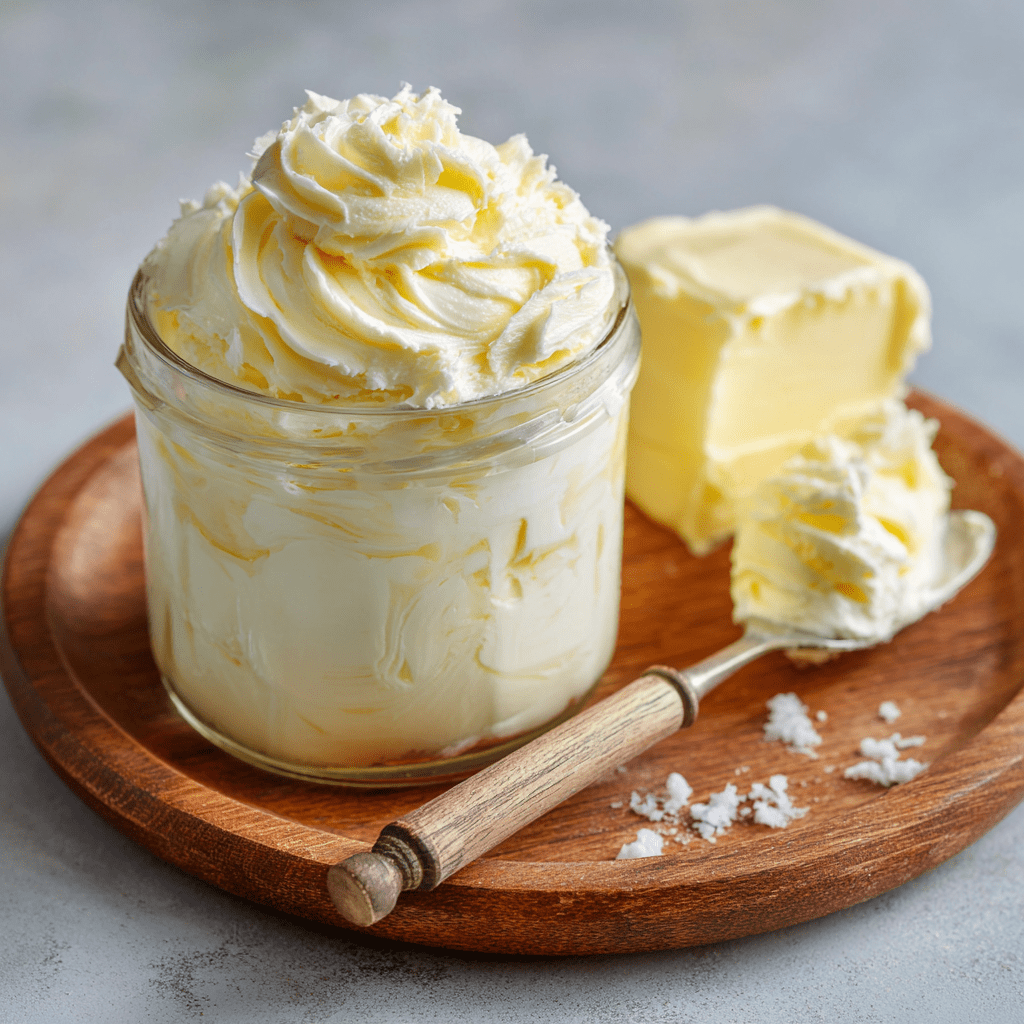
Homemade Butter (Just 1 Ingredient!)
- Total Time: 10 minutes
- Yield: About 3/4 cup butter + 1 cup buttermilk 1x
Description
There’s something magical about making your own butter—watching cream transform into something rich, spreadable, and completely fresh. With just one ingredient and a little effort, you can create a kitchen staple that’s better than store-bought. Once you taste it, you won’t go back!
Ingredients
2 cups heavy cream (preferably not ultra-pasteurized)
Optional: Pinch of salt
Instructions
Pour cream into a stand mixer, blender, or jar with a tight lid.
Whip, blend, or shake vigorously until the cream separates into yellow butter solids and liquid buttermilk.
Strain off the buttermilk and save for baking, if desired.
Rinse the butter with cold water, pressing with a spatula or spoon until water runs clear.
Mix in salt if using.
Store in the fridge in an airtight container.
- Prep Time: 10 minutes
Nutrition
- Calories: 102
- Fat: 12g
- Saturated Fat: 7g
- Protein: 0g
Final Thoughts: When Butter Meets Joy, Magic Happens
Homemade butter is one of those rare kitchen wins that feels both wildly impressive and ridiculously easy. It’s a small act of rebellion against the store-bought, a creamy reminder that real food doesn’t need labels or preservatives—it just needs you, a little patience, and a whole lot of heart.
Whether you’re shaking a mason jar with your kids, whipping up a weekend treat, or sneaking a buttery swipe on warm bread before anyone sees, this recipe delivers more than rich flavor—it delivers wonder. It connects us to the past, to the people who stirred before us, and to the kind of everyday magic we sometimes forget is possible.
So next time you see that heavy cream in your fridge, remember: you’re just a few minutes away from something joyful, nostalgic, and utterly delicious. Keep shaking, keep smiling, and keep making butter the way Grandma would—with love, laughter, and maybe a few butter-splattered walls.
💛🥄 Here’s to turning cream into confidence, one dreamy swirl at a time.