Let’s Bring a Little Debbie Classic Home for the Holidays!
Hey there, my festive friend! Can you smell that? It’s the scent of vanilla cake baking, the crisp chill of winter air, and the unmistakable magic of the holiday season. If you’re anything like me, your childhood Christmas memories are sprinkled with the iconic taste of those boxed Little Debbie Christmas Tree Cakes. That soft cake, that fluffy white filling, that waxy-yet-wonderful candy coating with its classic red stripes… pure nostalgia in a cellophane wrapper!
But what if I told you we could make them at home? And what if I promised you they’d be even better? More flavor, more love, and 100% free of mystery ingredients? Friends, we are about to embark on a holiday baking adventure that will become your new favorite tradition. This isn’t just a recipe; it’s a ticket to a merrier, tastier Christmas. So, tie on your most festive apron, put on some holiday tunes, and let’s create some magic together. These Homemade Christmas Tree Cakes are perfect for gifting, for decorating your dessert table, or for sneaking into the living room with a cup of hot cocoa. Let’s get baking!
A Tree Grows in My Grandma’s Kitchen
My love affair with these little tree cakes started long before culinary school, in my grandma’s wonderfully chaotic kitchen. Every December, my brother and I would be tasked with “decorating” the store-bought version, which really just meant fighting over who got to squeeze the red icing tube. One particularly snowy year, a blizzard kept us from getting to the store. My grandma, never one to be defeated, looked at our long faces and declared, “Well, I guess we’ll just have to make our own!”
What ensued was a flour-dusted, laughter-filled afternoon of baking, cutting, and (mostly) licking bowls clean. They weren’t perfect—some trees were lopsided, my red stripes were wobbly, and we definitely used a bit too much peppermint extract—but they were ours. They tasted like triumph and togetherness. That’s the spirit I want to bring to your kitchen today. It’s not about perfection; it’s about the joy of creating something delicious with your own two hands. Every time I make these, I’m right back in that warm kitchen, and I hope you’ll feel that same magic, too.
Gathering Your Holiday Baking Squad (The Ingredients!)
Here’s your shopping list for a double batch of joy! This makes plenty for your family, for neighbors, and, most importantly, for you. Don’t be shy with substitutions—make it your own!
- 2 boxes vanilla or yellow cake mix: This is our secret weapon for a soft, consistent crumb that holds its shape when cut. It’s a huge time-saver! Chef’s Insight: For a richer, more homemade flavor, try a butter recipe golden cake mix.
- Ingredients from the box (typically 6 eggs, 2 cups water, ½ cup oil): The supporting cast that brings our cake mix star to life.
- 2 cups heavy whipping cream: This is the base of our dreamy, cloud-like filling. Make sure it’s very cold for the best whip! Sub Tip: For a non-dairy version, you can use well-chilled coconut cream (the solid part from a can).
- ⅔ cup powdered sugar: Sweetens our filling without any graininess. It also helps stabilize the whipped cream a bit.
- 2 teaspoons vanilla extract: The classic flavor we all know and love. Use the good stuff—it makes a difference!
- ⅔ cup marshmallow fluff: The key to that iconic, sticky-sweet texture and flavor that makes these cakes so special. It also helps thicken the filling.
- Optional: ½ teaspoon peppermint extract: My favorite holiday twist! It adds a refreshing, cool burst that feels so festive. Start with ¼ tsp if you’re unsure.
- 32 oz white candy coating or almond bark: This creates that signature smooth, crisp shell. Chef’s Hack: Almond bark is often easier to work with than pure chocolate chips as it’s designed for melting and dipping.
- 4 tablespoons shortening: Don’t skip this! It thins the candy coating, making it easier to dip and giving it a beautiful glossy finish.
- Store-bought red decorating icing: For those classic, no-fuss stripes. The kind in a squeezable tube is perfect for this.
- Green sprinkles, holiday sugar mix, or edible glitter: This is where you get to shine! Go for green sanding sugar for a classic look or funfetti sprinkles for a party vibe.
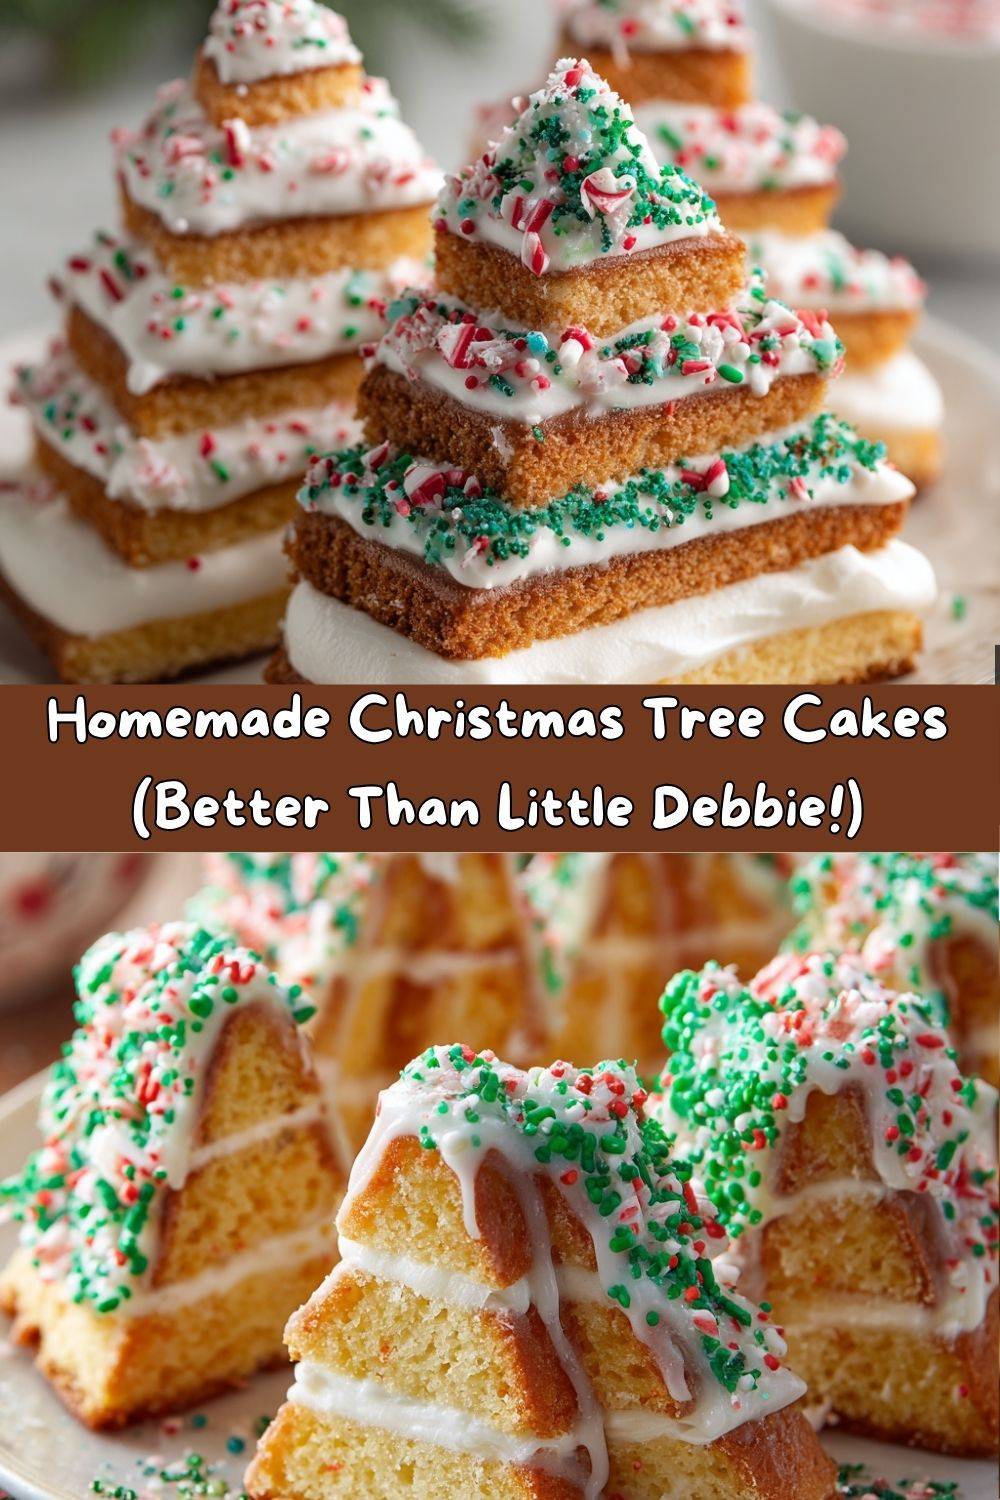
Building Your Edible Evergreen Forest: A Step-by-Step Guide
Ready to create? Follow these steps, and you’ll have a forest of festive treats in no time. I’ve packed this section with all my best tips to ensure your success!
Step 1: Bake the Cake
Preheat your oven to 350°F (175°C). Grease and flour two 9×13-inch pans or one large half-sheet pan (18×13 inches). This double batch needs space! Mix your cake batter according to the package directions. Chef’s Tip: For an extra tender crumb, let the mixed batter sit for 5 minutes before pouring it into the pans. This allows the ingredients to fully hydrate. Bake for 20-25 minutes, or until the top is golden and the center springs back when lightly touched. Let the cakes cool completely in the pan—I mean, completely! This is crucial for clean cutting. Rushing this step leads to crumbly messes.
Step 2: Cut the Shapes
Once your cakes are room temperature, run a knife around the edges and turn them out onto a large cutting board. Now, take your Christmas tree cookie cutter and get to work! Press straight down and twist slightly to get a clean cut. Chef’s Hack: Dip your cookie cutter in a little powdered sugar between cuts to prevent sticking. You’ll need two matching tree shapes for each cake “sandwich.” Don’t waste the scraps! Crumble them up for a trifle or cake pop mixture.
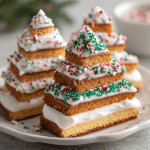
Step 3: Make the Magical Filling
In a large, chilled bowl, pour in your cold heavy whipping cream. Using a hand mixer or stand mixer with the whisk attachment, whip on medium-high speed until soft peaks form. This means the cream will hold its shape for a second before melting back into itself. Now, add the powdered sugar, vanilla extract, marshmallow fluff, and peppermint extract (if using). Pro Tip: To easily measure the sticky marshmallow fluff, spray your measuring cup with a little cooking spray first—it will slide right out! Whip everything together on high speed until you have stiff, fluffy peaks. Be careful not to over-whip, or it can become grainy.
Step 4: Assemble the Cakes
Lay out one set of your tree shapes. Using a spoon or a piping bag for more control, spread or pipe a generous dollop of the marshmallow filling onto the flat side of one tree. Gently press a second tree on top to form a sandwich. Repeat with all pairs. Chef’s Note: The filling might squish out a little—that’s okay! You can clean it up with a finger (baker’s treat!) or a small knife. Place all assembled cakes on a parchment-lined baking sheet and pop them in the fridge for at least 15 minutes. This firms up the filling and makes the dipping step MUCH easier.
Step 5: The Big Dip (Coating the Cakes)
This is the fun part! In a deep, microwave-safe bowl, combine the white candy coating and the shortening. Microwave in 30-second bursts, stirring vigorously between each burst, until completely smooth and melted. Crucial Tip: Do not overheat the coating! If it gets too hot, it can seize up and become clumpy. If this happens, add a tiny bit more solid shortening and stir until it smooths back out. Now, using a fork or a dipping tool, submerge a chilled cake into the melted coating. Lift it out, let the excess drip off, and gently place it back on the parchment paper. Work quickly before the coating sets!
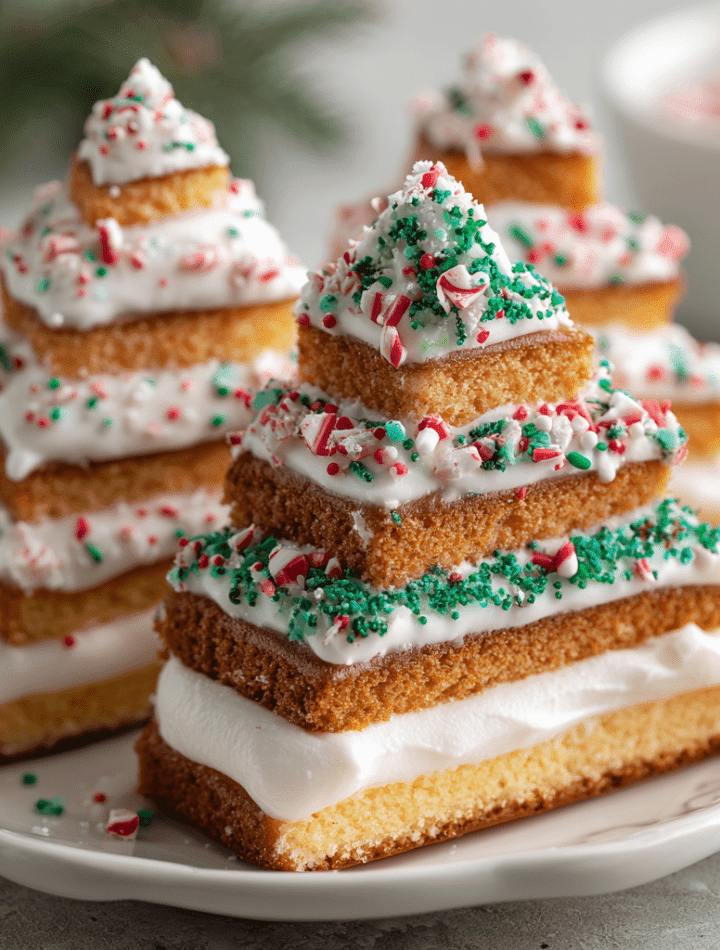
Step 6: Decorate & Dazzle
Wait until the white coating is fully set and hard to the touch before you decorate. This usually takes about 10-15 minutes. Then, take your tube of red icing and get creative! Pipe zig-zag stripes across the trees for the classic look. Immediately after piping, shower your trees with green sprinkles or edible glitter so they stick to the red icing. Let everything set completely before stacking or packaging.
How to Serve Your Festive Masterpieces
Presentation is part of the fun! For a truly magical dessert table, arrange your Christmas Tree Cakes on a platter lined with parchment paper that you’ve dusted with a little “snow” (aka powdered sugar). Scatter a few extra sprinkles around the base for effect. They’re the perfect sweet treat alongside a cup of strong coffee, a glass of cold milk, or my personal favorite, a rich hot chocolate. These cakes are also absolutely perfect for edible gift-giving. Stack them in a clear cellophane bag tied with a ribbon, or place them in a holiday gift box lined with wax paper. A homemade gift from the kitchen is always a winner and shows you put real love into your holiday giving.
Mix It Up! Festive Flavor Twists
Once you’ve mastered the classic, why not play around? Here are a few of my favorite ways to mix up the recipe:
- Chocolate Peppermint Forest: Use chocolate cake mix for the trees. Add the peppermint extract to the filling and crush some candy canes to sprinkle on top of the wet coating instead of green sprinkles.
- Funfetti Birthday Trees: Who says trees are just for Christmas? Use funfetti cake mix and add a handful of rainbow sprinkles to the filling. Use colorful icing and sprinkles for a birthday party any time of year!
- Lemon Snowy Pines: Use lemon cake mix for a bright, zesty flavor. Omit the peppermint and vanilla from the filling and add a teaspoon of lemon zest instead. The white coating will look like fresh snow on a lemon tree!
- Dairy-Free Delights: Use a vegan cake mix and the egg substitute listed on the box. For the filling, use chilled coconut cream whipped with powdered sugar and vegan marshmallow fluff (like the brand Dandies).
- Gingerbread Spice Trees: Add a teaspoon of ginger, cinnamon, and a pinch of cloves to your vanilla cake batter. The warm spice is so cozy and holiday-appropriate!
Chef Emily’s Notes from a Floury Kitchen
This recipe has evolved so much since that first blizzardy day in my grandma’s kitchen. I’ve learned that the secret to a non-crumbly cake is patience (let it cool!). I’ve learned that a little shortening is the magic key to a smooth dip. And I’ve learned that no matter how wobbly your red stripes are, they’re made with love and that’s all that matters. One of my favorite kitchen fails was the year I tried to dye the coconut cream filling green for a “wreath” effect. It looked… murky. Let’s just stick to white filling and green sprinkles on the outside, friends! The beauty of this recipe is its flexibility. Make it your own, have fun with it, and don’t forget to lick the spoon.
Your Questions, Answered!
Q: My cake is too crumbly when I try to cut it! What did I do wrong?
A: The number one cause of this is not letting the cake cool completely. Warm cake is fragile cake! Pop it in the fridge for an hour if you’re short on time. Also, make sure you’re using a sharp cookie cutter and pressing straight down without twisting too much.
Q: My candy coating is thick and clumpy. How can I fix it?
A: This means it’s likely overheated. Don’t panic! Add a tablespoon of solid shortening and stir vigorously. The residual heat should melt it and bring the coating back to a smooth consistency. If it’s still thick, microwave for just 5-10 more seconds and stir again.
Q: Can I make these ahead of time?
A: Absolutely! The assembled (but uncoated) cake sandwiches can be stored in an airtight container in the fridge for up to 2 days. You can also freeze them for a month! Thaw in the fridge before dipping. The dipped cakes are best enjoyed within 3-4 days stored in a cool, dry place.
Q: My whipped cream filling deflated/is runny. Help!
A: This usually happens if your cream wasn’t cold enough or if your bowl had any trace of grease. Always chill your bowl and beaters for 15 minutes before starting. If it’s runny, you can try to salvage it by whipping in a little more powdered sugar, but sometimes it’s best to start over with new, ultra-cold cream.
Homemade Christmas Tree Cakes
- Total Time: 2 hours 10 minutes
- Yield: 30 - 40 mini cakes 1x
Description
These Homemade Christmas Tree Cakes are a nostalgic throwback to the beloved Little Debbie holiday snack—but made even better in your own kitchen. With soft vanilla cake, fluffy marshmallow cream filling, and a crisp candy coating, they’re perfect for gifting, decorating, or devouring. This double batch is party-ready and includes fun holiday twists like peppermint-infused filling and festive sprinkle mix-ins.
Ingredients
Cake:
2 boxes vanilla or yellow cake mix
Ingredients from the box (6 eggs, 2 cups water, ½ cup oil)
Filling:
2 cups heavy whipping cream
⅔ cup powdered sugar
2 teaspoons vanilla extract
⅔ cup marshmallow fluff
Optional: ½ teaspoon peppermint extract (for a holiday twist)
Decoration:
32 oz white candy coating or almond bark
4 tablespoons shortening (helps coating stay smooth)
Store-bought red decorating icing (for stripes)
Green sprinkles, holiday sugar mix, or edible glitter
Instructions
Bake the cake: Preheat oven to 350°F (175°C). Prepare two 9×13 pans or one large sheet pan. Mix cake batter according to box instructions. Bake 20–25 minutes or until golden and springy. Let cool completely.
Cut the shapes: Once cooled, use a Christmas tree cookie cutter to cut out cake shapes. You’ll need two matching shapes per cake.
Make the filling: Whip heavy cream until soft peaks form. Add powdered sugar, vanilla, and marshmallow fluff (plus peppermint extract if using). Beat until fluffy and spreadable.
Assemble the cakes: Spread filling between two tree shapes to form a sandwich. Chill for 15 minutes to firm.
Coat the cakes: Melt candy coating with shortening until smooth. Dip each cake or spoon coating over the top, ensuring full coverage. Place on parchment to set.
Decorate: Once coating is set, pipe red icing stripes across the trees. Finish with sprinkles or edible glitter for a festive sparkle.
- Prep Time: 1 hour
- Assembly & Chill: 45 minutes
- Cook Time: 25 minutes
Nutrition
- Calories: 250 / mini cake
- Sugar: 20g / mini cake
- Fat: 14g / mini cake
- Carbohydrates: 30g / mini cake
- Protein: 20g / mini cake
Nutritional Information (Because Knowledge is Power!)
Okay, let’s be real: these are a holiday treat, through and through! This nutritional info is an estimate per mini cake (based on a yield of 35 cakes) and will vary based on specific ingredients used and the size of your cookie cutter. The marshmallow fluff and candy coating are the main contributors to the sugar content. While they’re not an everyday health food, they are a fantastic homemade alternative to the store-bought version, as you control the quality of ingredients. To lighten them up slightly, you could use a sugar-free cake mix and look for a lower-sugar candy coating alternative, though the texture may vary. My philosophy? Enjoy them mindfully and savor every single festive, delicious bite!
- Calories: ~250
- Fat: 14g
- Carbohydrates: 30g
- Sugar: 20g
- Protein: 2g
Final Thoughts from My Kitchen to Yours
Well, my fellow holiday baker, we’ve done it! We’ve taken a beloved store-bought classic and infused it with real, homemade heart. I hope this recipe brings as much laughter and light to your kitchen as it has to mine over the years. Remember, the slightly lopsided tree with the wobbly stripe is always the one made with the most love. Baking is about the journey, the mess, the memories, and the delicious results. So from my messy apron to yours, I wish you the happiest of holidays filled with good food and even better company. Now, go forth and create your own edible evergreen forest! I can’t wait to see your creations. Tag me on social @TastyChow so I can share in your holiday baking joy!
With love and a sprinkle of sugar,
Emily