Homemade Yogurt – Creamy, Fresh & Easier Than You Think!
Hey there, friend! Let’s have a little kitchen heart-to-heart. Have you ever stood in the dairy aisle, staring at the wall of yogurt cups, and wished for something… more? Something creamier, tangier, and just, well, purer? Maybe you’ve glanced at the ingredient list on some of those fancy flavored brands and found yourself squinting at words you can’t pronounce. I’ve been there too. That’s exactly why I’m pulling you into my kitchen today to share one of my all-time favorite culinary magic tricks: making homemade yogurt.
I know, I know. It sounds intimidating. It sounds like something only professional chefs or your super-healthy aunt with a backyard full of kale does. But trust me on this: making yogurt at home is one of the simplest, most satisfying things you can do with a saucepan and a little bit of patience. The reward is a creamy, tangy batch that’s fresher, more flavorful, and infinitely more customizable than anything you can buy. It’s a wholesome staple that feels like a quiet victory every time you pull a jar of your very own creation from the fridge.
All you need is milk, a little starter, and the cozy knowledge that you’re part of a tradition that’s thousands of years old. So, tie on your apron (the messy one is totally welcome here), and let’s transform simple milk into a pot of creamy, dreamy, homemade gold. You’ve got this!

The Day My Yogurt (Finally) Set: A Kitchen Victory
My first attempt at homemade yogurt was… a hilarious failure. I was in culinary school, feeling invincible after mastering a hollandaise, and thought yogurt would be a breeze. I followed the instructions, incubated my milk mixture in what I thought was a “warm spot,” and went to bed dreaming of creamy perfection. The next morning, I rushed to the kitchen, peeled back the towel, and was met with a sad, lukewarm pot of milky soup. My heart sank. I’d failed!
But then I remembered my grandma. She never used a fancy thermometer or an expensive machine. She used her wrist and her wood-fired oven’s residual heat. She understood the feel of it. So, I tried again. This time, I trusted my instincts. I found the perfect warm corner on top of my fridge, wrapped my jar in a thick, cozy towel like I was tucking in a baby, and I waited. When I checked it 8 hours later, I let out a small gasp. It had transformed. It was thick, it was jiggly, it was tangy, and it was mine. That first spoonful, drizzled with a little local honey, tasted like more than just yogurt. It tasted like patience, like a connection to kitchens past, and like a delicious reminder that the best things in life are often worth the wait.
Gather Your Ingredients: The Simple Magic Makers
See? Only two essential players are needed for this kitchen magic. Let’s break them down so you understand the “why” behind the “what.”
- 4 cups (1 quart) of Whole Milk – This is your star. Whole milk will give you the creamiest, richest, most luxurious yogurt. The fat content is your friend here!
Chef’s Insight: You can absolutely use 2% or even 1% milk for a lighter texture, but the final yogurt will be a bit thinner. I don’t recommend using ultra-pasteurized milk, as it can sometimes be finicky about setting up properly. - 2 tablespoons of Plain Yogurt with Live Active Cultures – This is your “starter.” It’s the magical ingredient that introduces the good bacteria to the warm milk, kickstarting the fermentation process.
Pro Tip: Choose a yogurt you love the taste of, as its flavor profile will influence your final product. Look for the words “live and active cultures” on the label. Greek yogurt works great as a starter for a thicker result! This is the only time you’ll need store-bought yogurt; after this, you can use a few tablespoons from your last homemade batch!
Optional Add-ins for After Culturing:
- Honey or Maple Syrup – For a natural, floral sweetness.
- Vanilla Extract – A dash of vanilla makes it taste like a dessert.
- Fresh Fruit, Jam, or Fruit Compote – My personal favorite! Swirling in some macerated strawberries or a spoonful of peach compote is pure joy.
- Granola, Nuts, or Seeds – For that perfect crunch on top.
Let’s Make Yogurt! Your Step-by-Step Guide
Ready to become a yogurt wizard? Follow these steps, and you’ll be a pro in no time. I’ve sprinkled in all my favorite chef hacks to ensure your success.
Step 1: Heat the Milk
Pour your milk into a heavy-bottomed saucepan. This helps prevent scorching. Heat it over medium heat, stirring occasionally with a whisk or spatula, until it reaches 180°F (82°C). If you don’t have a thermometer, look for small bubbles forming around the edges and a bit of steam—it should be just shy of a boil.
Why we do this: Heating the milk this high does two important things. It denatures the proteins, which allows the yogurt to set up thick and creamy later, and it kills off any unwanted bacteria that might compete with our good yogurt cultures.
Step 2: Cool It Down
Once your milk hits 180°F, take the pot off the heat. Now, we need to let it cool down to 110°F (43°C). You can let it sit on the counter, but to speed things up, I sometimes place my pot in a sink filled with a few inches of cold water. Stir it occasionally.
Chef’s Hack: No thermometer? No problem! Dip a clean finger in the milk. It should feel very warm but not hot. If you can comfortably hold your finger in it for a count of 10, you’re in the perfect zone. If it stings, it’s still too hot!
Step 3: Add Your Starter
While the milk is cooling, grab a small bowl and place your 2 tablespoons of store-bought yogurt in it. Once the milk is at 110°F, scoop out about a half-cup of the warm milk and whisk it into the yogurt starter until it’s completely smooth. This step is crucial! It tempers the starter, preventing the shock of going from fridge-cold to warm and creating a smooth, lump-free mixture.
Pro Tip: Now, pour this smooth yogurt-milk mixture back into the main pot of warm milk and whisk it gently but thoroughly to distribute the cultures evenly.
Step 4: Incubate (The “Wait for Magic” Step)
Pour your inoculated milk into a very clean glass jar or a ceramic container. Cover it with a lid or plastic wrap. Now, we need to keep it cozy and warm (around 100-110°F) for 6-10 hours. This is where my towel trick comes in! Wrap your jar in a thick kitchen towel or a small blanket and place it in an undisturbed, draft-free spot.
Cozy Spot Ideas: Inside an oven with just the light on, on top of the refrigerator, in a microwave (not turned on!), or in a cooler with a jar of warm water. The longer you let it culture, the tangier and thicker it will become. I find 8 hours is my personal sweet spot.
Step 5: Chill Out
After your incubation time, your milk should have transformed into yogurt! It might still be a little wobbly, and there might be a bit of clear, yellowish whey on top—that’s totally normal! Give it a gentle stir, screw the lid on tight, and place it in the refrigerator for at least 2 hours. This chilling step halts the culturing process and allows the yogurt to firm up to its final, perfect consistency.
Step 6: Customize & Enjoy!
The fun part! Scoop out your beautiful homemade yogurt into a bowl. Now is the time to stir in your honey, vanilla, or fruit. Top it with your favorite granola, and take a moment to appreciate what you’ve made. You brilliant kitchen wizard, you!
How to Serve Your Homemade Masterpiece
This is where your homemade yogurt truly shines. Because you control the ingredients, the possibilities are endless! Here are a few of my favorite ways to serve it up:
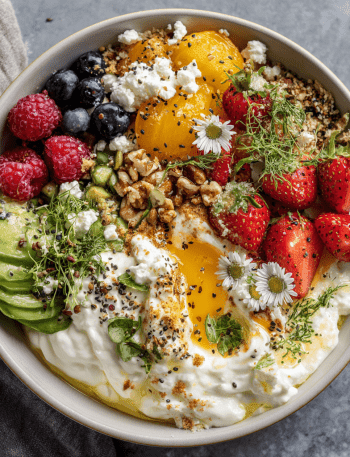
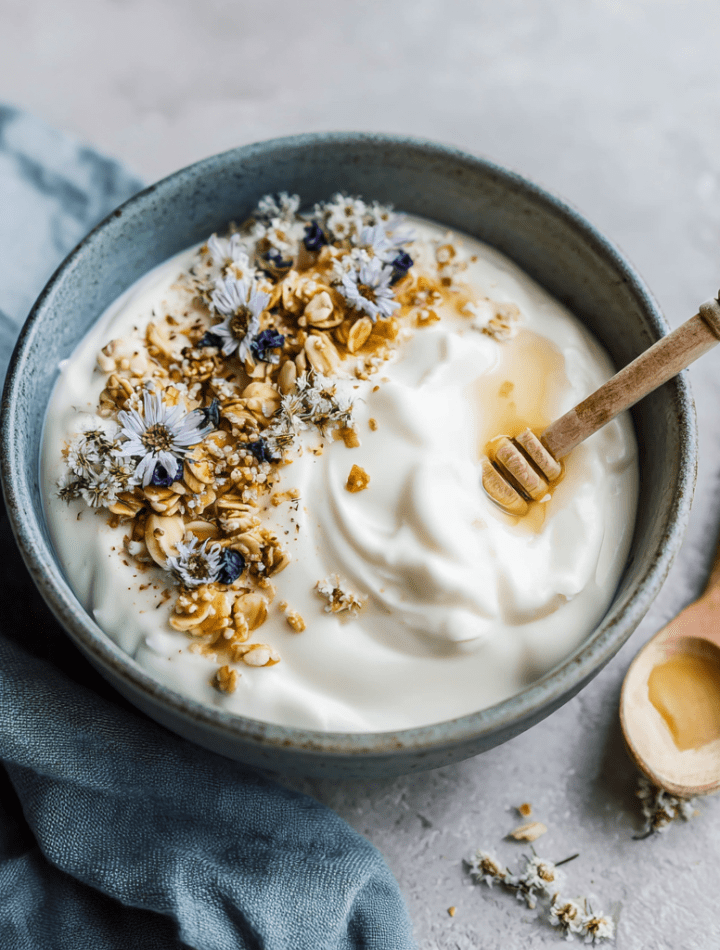
The Classic Breakfast Bowl: This is my go-to. A big scoop of yogurt in a wide bowl, a generous drizzle of local honey or maple syrup, a handful of fresh berries or sliced banana, and a crunchy sprinkle of homemade granola and a few chia seeds. It’s a breakfast that feels like a hug.
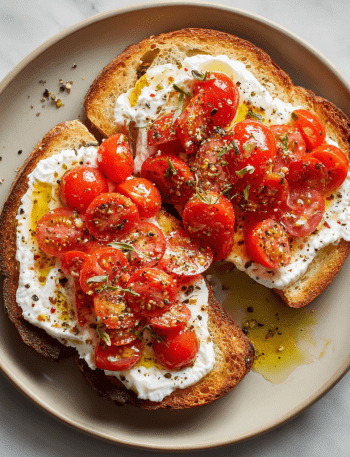
Savory Swirl: Yogurt isn’t just for sweet! In a small bowl, mix a cup of your plain yogurt with a minced garlic clove, a tablespoon of chopped fresh dill, a squeeze of lemon juice, and a pinch of salt. Boom! You have a fantastic, healthy veggie dip or a stellar topping for baked potatoes or grilled chicken.
Fancy Parfaits: For a beautiful brunch or a special treat, layer your yogurt in a tall glass with alternating layers of fruit compote, granola, and nuts. It looks impressive and tastes even better.
Get Creative! Fun Flavor Twists & Swaps
Once you’ve mastered the basic recipe, the kitchen playground opens up! Here are a few of my favorite ways to mix things up:
- Greek-Style Yogurt: For an extra-thick, protein-packed yogurt, line a fine-mesh strainer with cheesecloth or a clean coffee filter and set it over a bowl. Pour your finished (and chilled) yogurt into the strainer and let it drain in the fridge for 2-4 hours. The liquid that drains out is whey (which you can save for smoothies!), and what’s left is gloriously thick Greek yogurt.
- Creamy Vanilla Bean: After the yogurt is chilled and before serving, stir in 1 teaspoon of high-quality vanilla extract or the scraped seeds from one vanilla bean pod. For extra sweetness, add a tablespoon or two of honey or maple syrup.
- Strawberry Swirl: Mash 1/2 cup of fresh strawberries with a fork and stir in a teaspoon of honey. Gently swirl this mixture into your finished yogurt for a beautiful, fruity ripple.
- Dairy-Free Delight: You can absolutely make this with full-fat coconut milk! Just follow the same heating and cooling steps. Because it doesn’t have the same proteins as dairy milk, it won’t get quite as thick, but it will be deliciously creamy and tangy. Be sure to use a dairy-free yogurt as your starter.
- Probiotic Power-Up: For an extra gut-health boost, you can add a scoop of a powdered probiotic to the milk along with your yogurt starter.
Chef Emily’s Kitchen Notes
This recipe has been a living, evolving thing in my kitchen. I’ve made it in a slow cooker, in my instant pot on the “yogurt” setting, and even in a thermos on a road trip once (true story!). The method I’ve shared with you is the one I keep coming back to—it’s simple, requires no special equipment, and feels the most connected to the process. My biggest piece of advice? Don’t stress. The bacteria know what they’re doing. Your main job is to keep them warm and happy. Even if your first batch is a little thinner than you’d like, it’s still a victory. You’ve taken milk and turned it into something new. That’s kitchen alchemy, my friend, and you should be proud.
Your Yogurt Questions, Answered!
Q: My yogurt didn’t thicken! What went wrong?
A: Don’t worry, this is the most common hiccup! A few things could be at play: 1. Your milk was too hot when you added the starter, which can kill the good bacteria. 2. Your incubation spot wasn’t warm enough. Try a warmer location next time, like an oven with just the light on. 3. Your starter might have been weak or old. Always use a very fresh yogurt with live cultures. Even if it’s thin, you haven’t failed! You’ve essentially made a delicious drinkable yogurt—perfect for smoothies!
Q: Why is there liquid on top of my yogurt?
A: That liquid is whey, and it’s totally normal! It’s full of protein and nutrients. You can either stir it back in for a smoother yogurt, or you can pour it off. If you find you have a lot of whey, your yogurt might have cultured for a bit too long, making it extra tangy and causing more separation. Just shorten the incubation time slightly for your next batch.
Q: Can I use my homemade yogurt as a starter for the next batch?
A: Absolutely! You can reuse your homemade yogurt as a starter for about 3-4 batches. After that, the cultures can weaken, and you might not get a good set. Just remember to save 2 tablespoons of your plain, unflavored batch before you add any sweeteners or fruit to it for your next starter.
Q: How long does homemade yogurt last?
A: Stored in a clean, airtight container in the fridge, your homemade yogurt will stay fresh for about 1-2 weeks. You’ll know it’s gone bad if it develops an off smell, an unusual color, or visible mold.
A Quick Peek at the Nutrition
One of the best things about making yogurt at home is knowing exactly what’s in it. There are no stabilizers, thickeners, gums, preservatives, or mysterious additives—just pure, honest ingredients that you chose with intention. You’re getting all the goodness of fresh dairy and live active cultures without any of the unnecessary extras.
Here’s a general nutritional breakdown for a ½-cup serving of plain, whole-milk homemade yogurt (before adding any sweeteners or toppings):
-
Calories: ~80 kcal
-
Protein: ~5 g
-
Fat: ~3.5 g
-
Carbohydrates: ~6 g
-
Sugars: ~5 g (naturally occurring lactose)
-
Calcium: ~15% of the daily value
-
Probiotics: plentiful! (The exact amount varies, but homemade yogurt is typically richer in live cultures than many store-bought brands.)
Homemade yogurt is a wonderful source of protein, calcium, and those amazing gut-friendly probiotics that help support digestion and overall wellness. It’s also naturally lower in sugar than most flavored yogurts, and you get to control exactly what goes into each spoonful.
Whether you enjoy it sweet, savory, or stirred into your favorite recipes, every bite of your homemade yogurt is nourishing your body and soul. And honestly? That’s the kind of nutrition that matters most.