Honey Cinnamon Baked Apples: Your New Favorite Cozy Treat
Hey there, friend! Chef Emily here, waving at you from my flour-dusted kitchen. Is there anything in the world that smells more like a warm, loving hug than cinnamon and apples baking together? I’m pretty sure it’s scientifically impossible to feel stressed when that incredible aroma is wafting through your house. It’s pure, unadulterated magic.
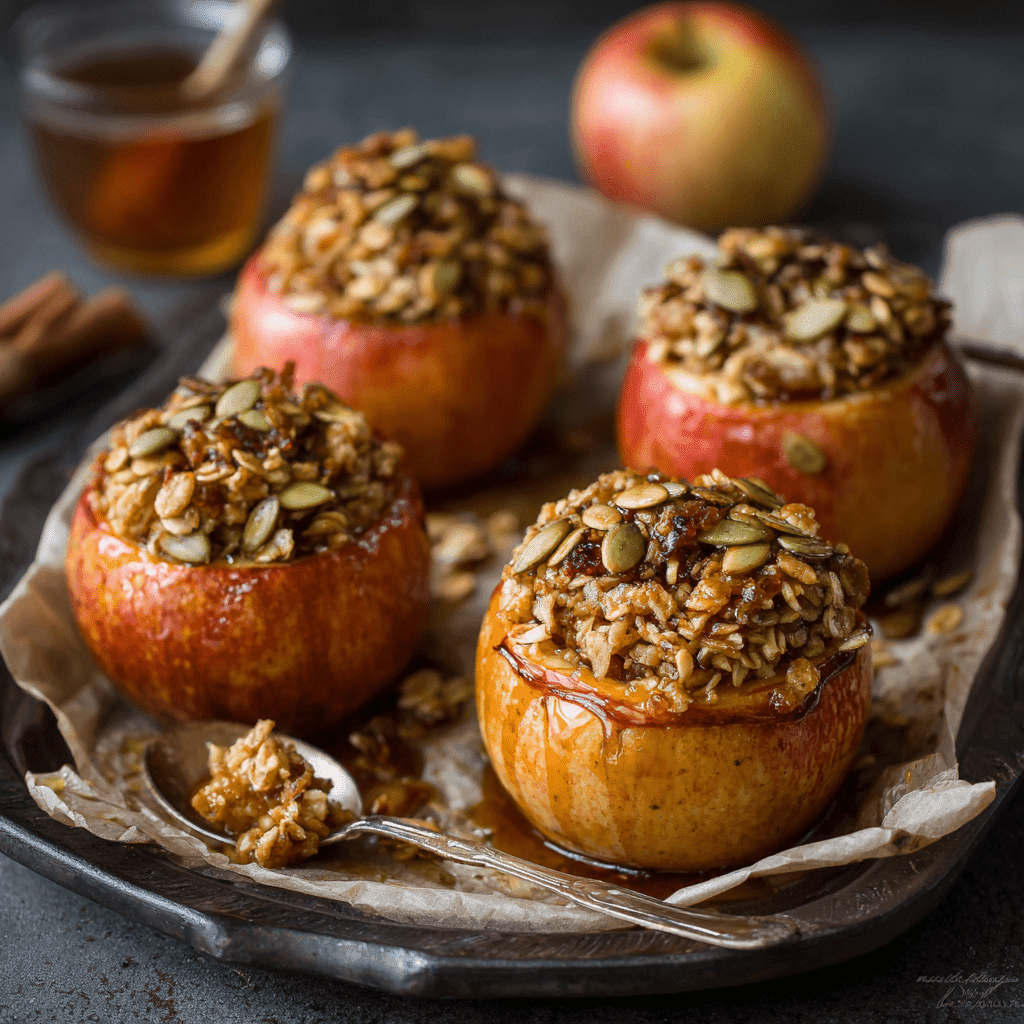
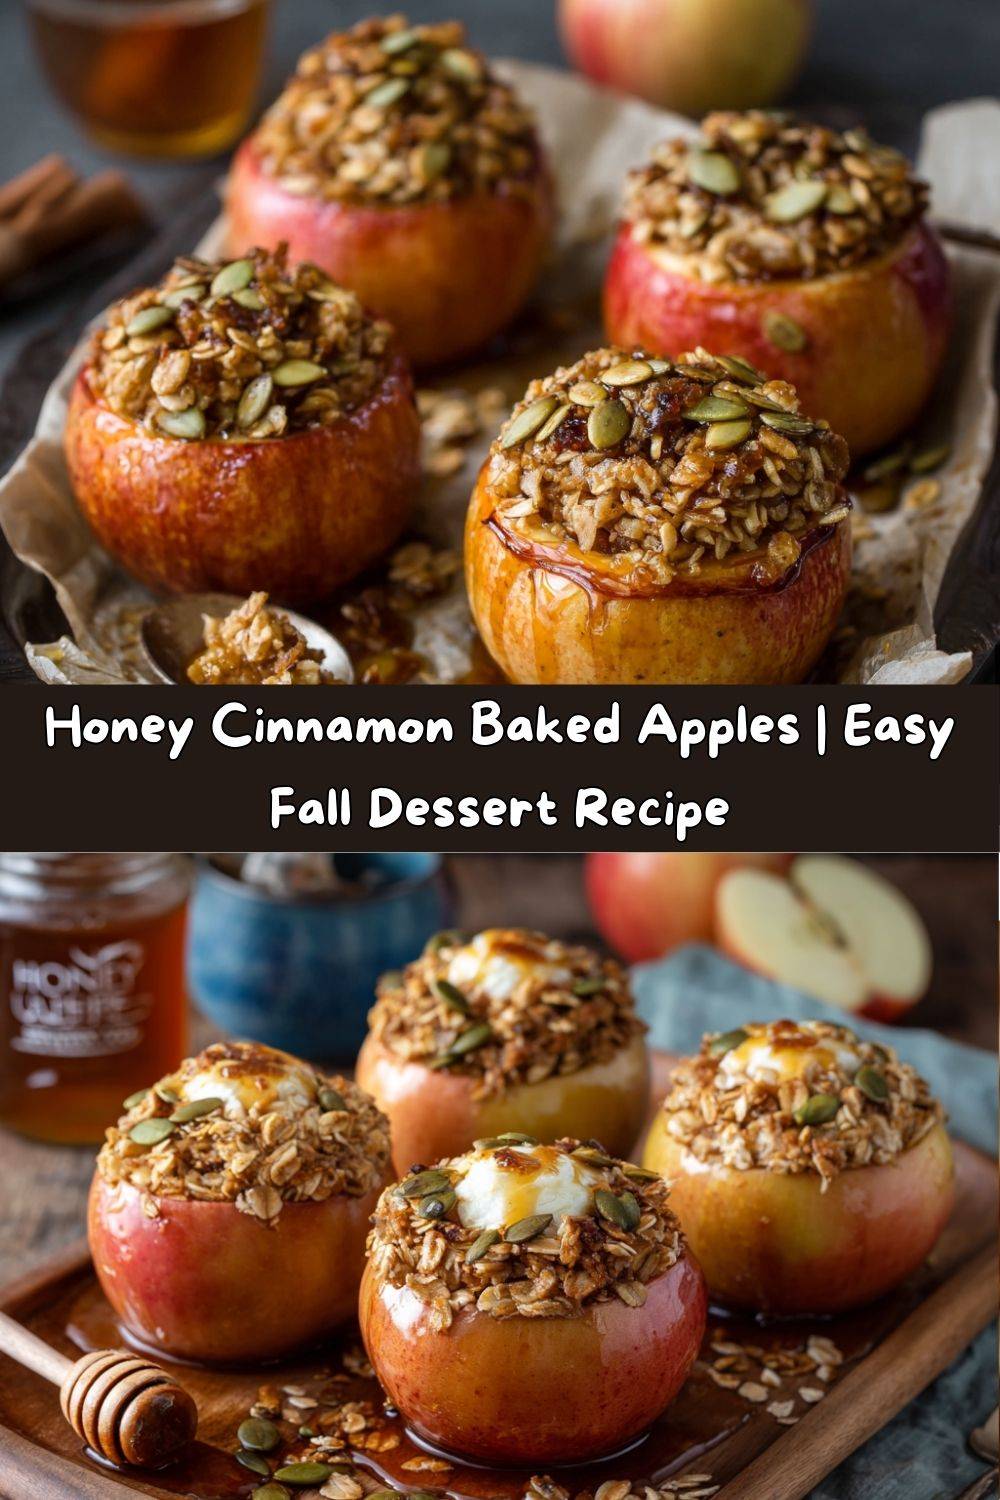
Today, we’re making my all-time favorite, no-fuss, feels-fancy-but-is-actually-simple dessert (or breakfast—I don’t judge!): Honey Cinnamon Baked Apples. Imagine this: tender, juicy apples, their insides scooped out and filled with a buttery, oaty, brown sugar stuffing. They’re baked until they’re practically meltingly soft, and then we take them over the top with a generous crunch of my Honey Cinnamon Roasted Pumpkin Seeds. It’s like an apple crisp, but it comes in its own adorable, edible bowl. Zero bowls to wash? Sign me up!
This recipe is the definition of cozy. It’s perfect for a crisp fall evening, a holiday potluck, a weeknight when you need a little pick-me-up, or a slow weekend morning. It’s the kind of recipe that makes you feel like a superstar in the kitchen with minimal effort. So, preheat that oven, grab your favorite apron, and let’s make something delicious together!
A Spoonful of Nostalgia: My Grandma’s Apple Tree
This recipe always takes me right back to my grandma’s backyard. She had this giant, gnarly old apple tree that seemed to produce fruit by pure magic. Every fall, it was our ritual to spend a Saturday afternoon gathering the windfalls—the apples that had tumbled to the grass, perfectly ripe and begging to be used.
My grandma, with her endless patience and floury hands, would never let them go to waste. She’d whip up pies, sauces, and her famous baked apples. Hers were simpler, often just stuffed with a little sugar and cinnamon, but to my kid-self, they were the most decadent treat in the world. I’d sit at her checkered kitchen table, swinging my legs, watching the oven light glow on the apples as they bubbled away. The warmth of her kitchen, the sound of her humming, and that incredible smell are woven into my very definition of comfort. My version is a little riff on hers—I added the oat filling for heartiness and the pumpkin seeds for that *crunch* I’m obsessed with. It’s my way of keeping her tradition alive, one baked apple at a time.
Gathering Your Cozy Ingredients
Part of the beauty of this recipe is its simplicity. You likely have most of this in your pantry right now! Here’s what you’ll need to create this hug-in-a-bowl:
- 4 medium apples (like Honeycrisp or Fuji): You want a good baking apple that holds its shape but still gets tender. Honeycrisp are my absolute favorite for their sweet-tart flavor and sturdy texture. Fuji and Gala are also fantastic, sweet choices. If you like a tarter bite, Granny Smith works wonderfully too! It’s all about your personal preference.
- ½ cup rolled oats: Also called old-fashioned oats. These give our filling that classic, comforting chew. Chef’s Insight: Don’t use quick oats—they’ll get too mushy. For a gluten-free version, just make sure your oats are certified GF!
- ¼ cup brown sugar: This adds a deep, molasses-y sweetness and helps create that gooey filling. Light or dark brown sugar works—dark will give you a slightly richer flavor.
- 1 tsp cinnamon: The co-star of the show! It’s not a baked apple without that warm, spicy cinnamon flavor. Feel free to add a tiny pinch of nutmeg or allspice if you’re feeling adventurous.
- 2 tbsp butter, melted: This binds our filling together and adds that rich, unmistakable buttery flavor. For a dairy-free swap, coconut oil works beautifully and adds a lovely subtle flavor.
- ¼ cup Honey Cinnamon Roasted Pumpkin Seeds: This is our secret weapon for texture! That sweet, salty, crunchy topping takes these apples from great to “OH MY GOSH, what is this sorcery?!” You can use store-bought, but my homemade recipe is ridiculously easy and so worth it.
- Optional: drizzle of honey or maple syrup: For serving. Because a little extra sweetness never hurt anybody!
Let’s Get Baking: Step-by-Step Instructions
Ready to make some magic? Follow these simple steps, and you’ll have perfect baked apples in no time. I’ve sprinkled in all my best chef hacks to make it foolproof!
- Preheat your oven to 350°F (175°C). This is our sweet spot for baking—hot enough to cook the apples through and get the filling bubbling, but not so hot that the skins burst before the insides are tender.
- Core the apples. This is the only slightly tricky part, but you’ve got this! Using an apple corer or a small paring knife, carefully remove the core from the top of each apple. Chef’s Hack: Make sure you stop about ½ inch from the bottom! We want to create a little bowl to hold all that delicious filling, not a hole that it will leak out of. It’s okay if it’s not perfect—my first few were definitely lopsided! You can also use a melon baller to gently scoop out a wider cavity.
- Make the filling. In a small bowl, combine the rolled oats, brown sugar, and cinnamon. Give it a good stir. Pour in the melted butter and mix until everything is well combined and clumping together slightly. It should smell amazing already.
- Fill the apples. Divide the oat mixture evenly among your four apple bowls. Really pack it in there with a spoon! Don’t be shy—the filling will settle a bit as it bakes.
- Bake (Part 1). Place the stuffed apples in a small baking dish just big enough to hold them. Add about ¼ inch of water to the bottom of the dish. Why? This creates a steamy environment that helps the apples cook through without drying out. Cover the dish tightly with foil and pop it in the preheated oven for 25 minutes.
- Top & Finish (Part 2). After 25 minutes, carefully remove the dish from the oven (steam is hot!) and take off the foil. The apples should be starting to soften. Now, generously sprinkle the top of each apple with those glorious Honey Cinnamon Roasted Pumpkin Seeds. Return the dish to the oven, uncovered, for another 10-15 minutes. This final bake tenderizes the apples completely and toasts the topping to crispy perfection.
- Serve warm! You’ll know they’re done when the apples are easily pierced with a knife and the skin looks puckered. Let them cool for just a few minutes before serving—that filling is like molten lava straight out of the oven!
How to Serve These Warm, Gooey Beauties
Presentation is part of the fun! I love serving each apple in a small, shallow bowl. The second your spoon breaks through that crunchy topping into the soft apple and warm filling… it’s pure joy. For the ultimate experience, add a drizzle of extra honey or maple syrup right on top.
For dessert, a scoop of vanilla bean ice cream or a dollop of freshly whipped cream is non-negotiable. The way the cold, creamy ice cream melts into the warm apple is a thing of beauty. For a breakfast or brunch treat, try a spoonful of Greek yogurt or a drizzle of heavy cream. It feels indulgent but is totally acceptable to eat at 9 a.m.!
Mix It Up! Delicious Recipe Variations
This recipe is a fantastic canvas for your own creativity! Here are a few of my favorite twists:
- Nutty Delight: Add 2 tablespoons of finely chopped pecans or walnuts to the oat filling for an extra layer of flavor and crunch.
- Cranberry Orange Twist: Stir 2 tablespoons of dried cranberries and ½ teaspoon of orange zest into the filling mixture. It’s bright, tart, and perfect for the holidays!
- Chocolate Lover’s Dream: Add 2 tablespoons of chocolate chips to the filling. They’ll get all melty and wonderful. (My kids demand this version.)
- Vegan Friendly: Simply swap the butter for coconut oil and use maple syrup instead of honey for drizzling. It’s just as delicious!
- Grain-Free: Replace the oats with an equal amount of almond flour or crushed gluten-free graham crackers for a different texture.
Chef Emily’s Notes & Kitchen Stories
This recipe has evolved so much since my first attempt, which I remember like it was yesterday. I was so determined to make a “healthy” version that I skipped the butter and brown sugar. Friends, it was… sad. Like, eating warm, mushy cardboard sad. My husband, bless his heart, took one bite and said, “It tastes very… wholesome, honey.” That’s chef-code for “please never make this again.”
That little failure taught me a valuable lesson: food should be a joy. It’s about balance. A little butter and brown sugar used intentionally transforms simple ingredients into a memorable experience. That’s the heart of Tasty Chow. Don’t be afraid of the ingredients—embrace them! This recipe is now a staple in our house, and I love hearing how you all make it your own. The best kitchen is a messy, happy, experimenting kitchen!
Your Questions, Answered!
Q: My apples turned out a bit firm. What did I do wrong?
A: No worries! This usually means your apples were a bit larger or denser, or your oven runs cool. Just pop them back in for another 5-10 minutes, checking frequently until they’re tender. Next time, you can also try baking them covered for a few minutes longer before adding the topping.
Q: Can I make these ahead of time?
A: Absolutely! You can assemble the apples (through step 4) up to a day in advance. Keep them covered in the fridge until you’re ready to bake. You may need to add a few extra minutes to the baking time since they’ll be going into the oven cold.
Q: My filling leaked out everywhere! Help!
A> This is a common one! It likely means the hole at the bottom of the apple was a little too big. It’s totally okay—it will still taste amazing. The water in the pan will mix with the leaked filling and create a delicious syrup. Just spoon it over the apples when you serve! Next time, just be extra careful to leave that ½-inch base intact.
Q: Can I use other types of seeds or nuts for the topping?
A: Of course! This recipe is wonderfully flexible. Toasted chopped pecans, walnuts, or even sunflower seeds would be delicious. Just toss them with a tiny bit of honey and cinnamon before sprinkling them on for the last 10 minutes of baking.

Honey Cinnamon Baked Apples
- Total Time: 55 minutes
- Yield: 4 1x
Description
Warm, gooey, and full of comforting flavor—these Honey Cinnamon Baked Apples are a fall favorite with a crunchy twist. Stuffed with sweet oats and brown sugar, then topped with crisp honey cinnamon roasted pumpkin seeds, they’re like apple crisp in a tidy, edible bowl. Dessert or breakfast? You decide.
Ingredients
4 medium apples (like Honeycrisp or Fuji)
½ cup rolled oats
¼ cup brown sugar
1 tsp cinnamon
2 tbsp butter, melted
¼ cup Honey Cinnamon Roasted Pumpkin Seeds (see previous recipe)
Optional: drizzle of honey or maple syrup
Instructions
Preheat oven: Set to 350°F (175°C).
Core the apples: Remove cores, leaving the bottom intact to form a “bowl.”
Make filling: Mix oats, brown sugar, cinnamon, and melted butter in a bowl.
Fill apples: Spoon the oat mixture into each apple.
Bake: Place apples in a baking dish, add a bit of water to the bottom, cover with foil, and bake for 25 minutes.
Top & finish: Remove foil, top apples with roasted pumpkin seeds, and bake uncovered for another 10–15 minutes until tender.
Serve warm: Add a drizzle of honey or a scoop of vanilla yogurt or ice cream if you like.
- Prep Time: 15 minutes
- Cook Time: 40 minutes
Nutrition
- Calories: 280 / serving
- Sugar: 28g/ serving
- Fat: 9g / serving
- Carbohydrates: 48g / serving
- Fiber: 5g / serving
- Protein: 3g / serving
Nutritional Information
*Please note: This is an estimate for informational purposes and will vary based on specific ingredients used and optional toppings.
Per baked apple (without optional toppings): Calories: ~280 | Protein: 3g | Fat: 9g | Carbohydrates: 48g | Sugar: 28g | Fiber: 5g
Prep Time: 15 minutes | Cook Time: 40 minutes | Total Time: 55 minutes | Servings: 4
There you have it! My go-to recipe for pure, uncomplicated comfort. I hope these Honey Cinnamon Baked Apples become a cherished recipe in your home, filling your kitchen with warmth and your belly with joy. If you make them, I’d love to see your creation! Tag me @TastyChow on social media so I can cheer you on.
Until next time, happy cooking!
— Emily 🍎