Hot Ham and Cheese Sliders: Your New Secret Weapon for Feeding a Happy Crowd
Hey there, friend! Let me paint you a picture. It’s 5:30 PM. The kids are hangry, your partner is asking what’s for dinner, and you’ve got zero energy for a complicated recipe. Or maybe… you’ve just found out the entire neighborhood is swinging by to watch the game, and you need a snack that screams “I’m an amazing host” without requiring you to actually be a trained chef.
Sound familiar? We’ve all been there. That’s exactly why I’m so head-over-apron in love with these Hot Ham and Cheese Sliders. They are my culinary cape, my mealtime superhero, my absolute go-to for turning simple ingredients into pure, unadulterated joy.
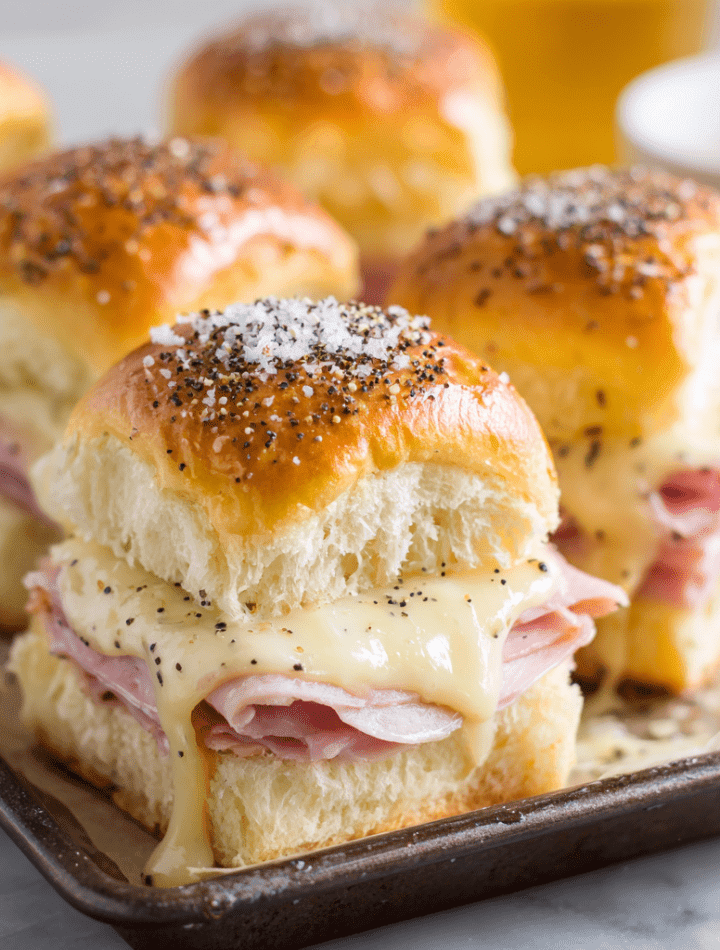
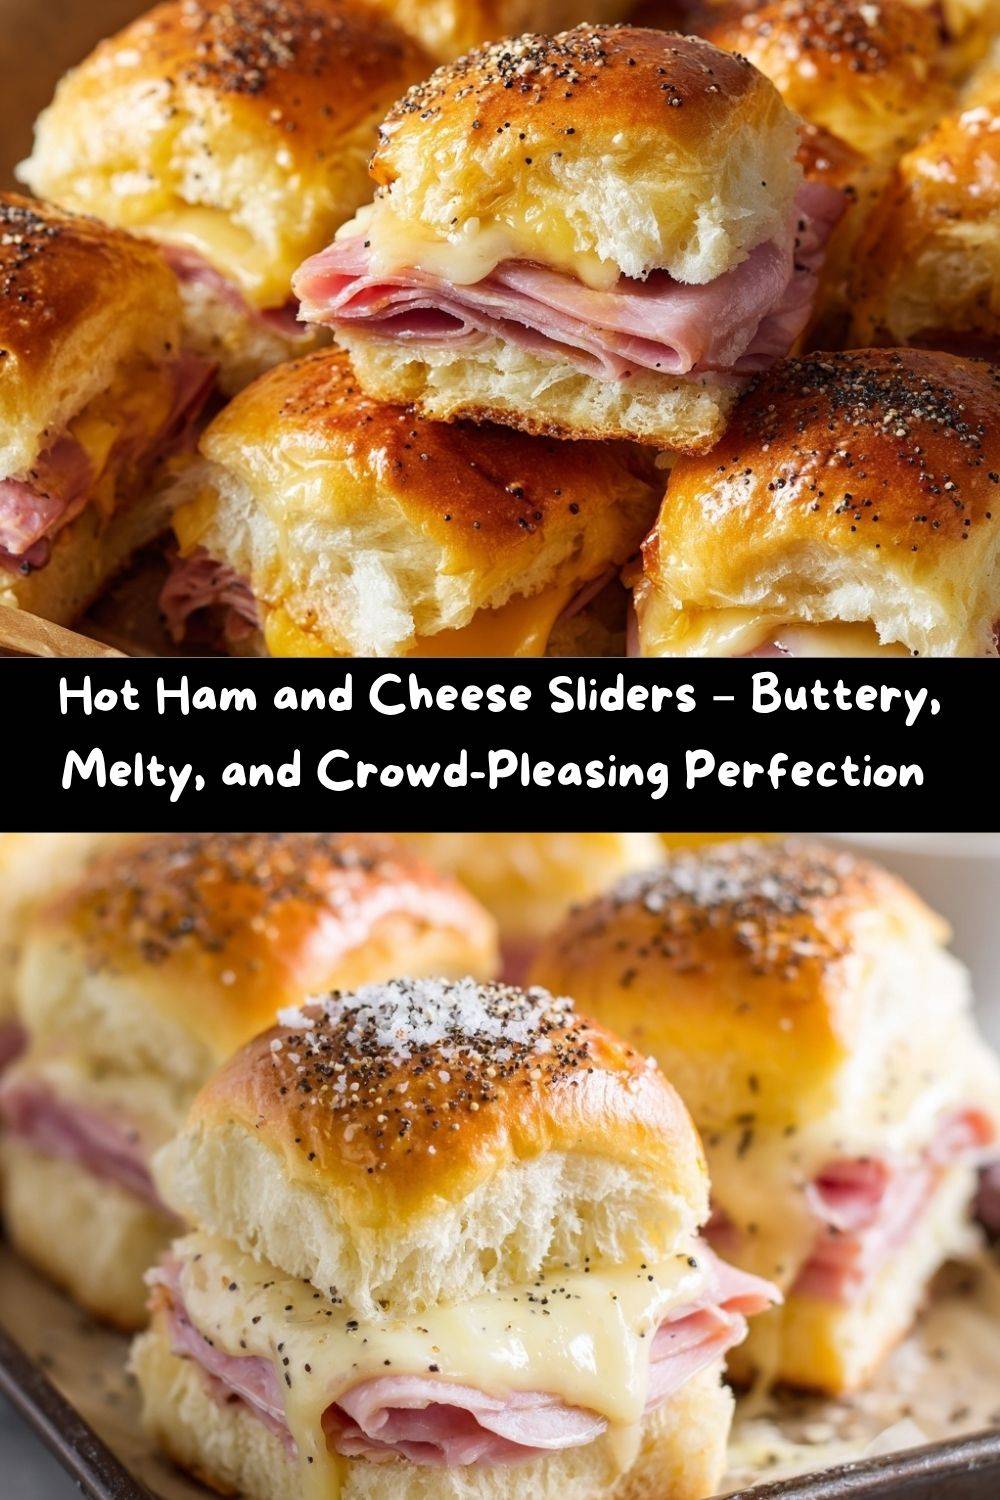
Imagine this: soft, slightly sweet Hawaiian rolls, piled high with savory deli ham and layers of melty Swiss cheese. The whole beautiful bundle gets bathed in a magical, savory butter glaze that seeps into every nook and cranny, then baked until the tops are golden, the cheese is bubbling, and your entire kitchen smells like a hug feels. These sliders are buttery, salty, cheesy, and ridiculously easy to make. They’re the kind of food that disappears in minutes, leaving behind only happy sighs and requests for the recipe. So, grab your favorite baking dish and let’s make some magic happen together!
The Slider That Started It All: A Tale of Two Grandmas
My love for this particular recipe started not in culinary school, but smack-dab in the middle of two very different, very wonderful grandmas. My Grandma Carol was a classic meat-and-potatoes lady. Her version of these sliders was straightforward, delicious, and always present at family potlucks. She used simple dinner rolls and American cheese, and they were perfect in their own comforting way.
Then there was my friend’s Grandma Louise, a woman who believed everything was better with a little “fancy.” The first time I tried her ham and cheese sliders, my eyes practically rolled back in my head. They were different. They had this incredible, savory, *je ne sais quoi* flavor. I, a budding young food enthusiast, had to know her secret. She leaned in and whispered, “A little Worcestershire sauce and Dijon in the butter, honey. It’s all in the glaze.” It was a revelation! This recipe is my homage to both of them—the straightforward comfort of Grandma Carol meets the flavorful spark of Grandma Louise. It’s a beautiful, delicious fusion of love.
Gathering Your Slider Squad: The Ingredients
One of the best things about this recipe is that you probably have most of this in your fridge and pantry right now! Here’s what you’ll need, along with a few of my chef-y insights to help you shop and substitute like a pro.
- 12 Hawaiian Slider Rolls: These are the MVP for a reason! Their soft, pillowy texture and hint of sweetness are the perfect contrast to the salty ham and savory glaze. Chef’s Tip: Can’t find Hawaiian rolls? Any soft, squishy dinner rolls (like King’s Hawaiian or even potato rolls) will work beautifully. The key is that they need to be soft enough to slice as a whole sheet.
- 3/4 lb Deli Sliced Ham: Go for a good-quality, thick-cut honey ham or black forest ham from the deli counter. It has so much more flavor than the pre-packaged thin slices! Chef’s Insight: Don’t be shy about asking for it to be sliced a little thicker—it holds up better in the sandwich and gives you a more substantial bite.
- 12 slices Swiss or Provolone Cheese: Swiss is my classic go-to for its nutty flavor that melts like a dream. Provolone is a fantastic, slightly milder alternative. Substitution Tip: If you have a family member who’s anti-Swiss, sharp cheddar or even pepper jack for a little kick are fabulous swaps!
- 1/2 cup (1 stick) Unsalted Butter, melted: This is the base of our glorious, golden glaze. Using unsalted butter lets us control the salt level perfectly. Chef’s Note: Yes, a whole stick. This is comfort food, friends. Let’s embrace it.
- 1 tablespoon Dijon Mustard: This isn’t just for flavor (though it adds a wonderful tangy depth). The emulsifiers in the Dijon help bind the butter sauce together, creating a smoother glaze.
- 1 tablespoon Worcestershire Sauce: Here it is, Grandma Louise’s secret weapon! It adds a deep, umami, savory flavor that takes these from “good” to “can-I-please-have-the-whole-pan?” good.
- 1 teaspoon Onion Powder & 1/2 teaspoon Garlic Powder: These pantry powerhouses add an instant flavor base without any chopping required. They distribute evenly through the butter, ensuring every single bite is packed with taste.
- Poppy Seeds (optional): These are mostly for that gorgeous, classic bakery-style look and a little bit of texture. They’re totally optional, but I love the confetti-like finish they give!
Let’s Get Building: Your Step-by-Step Guide to Slider Perfection
Okay, team! Aprons on. This is where the fun begins. I’ll walk you through each step with all my favorite kitchen hacks to ensure your sliders are absolutely flawless.
- Preheat and Prep: First things first, get that oven preheating to a cozy 350°F (175°C). This is the perfect temperature for getting everything hot and melty without burning our beautiful, buttery tops. While it’s warming up, grab a 9×13-inch baking dish. I like to line mine with parchment paper – it’s not just for cookies! This makes cleanup an absolute dream and lets you lift the whole block of sliders out for easy slicing. No parchment? A quick spray with cooking oil will do the trick.
- The Great Roll Slice: Take your sheet of Hawaiian rolls and, using a long, serrated bread knife, slice the entire block in half horizontally. You’re creating a giant top bun and a giant bottom bun. Pro Chef Hack: Keep the rolls connected! This is the secret to making these so fast and easy. You’re essentially building one giant sandwich that you’ll slice into individual sliders later. It keeps all the filling neatly tucked inside and makes the glazing process a breeze.
- Layer with Love: Place the bottom half of the rolls into your prepared baking dish. Now, let’s build our layers. Start with half of your cheese slices, laying them down to cover the entire bottom bun. Next, artfully arrange all of your delicious ham. I like to fold the slices into little ruffles – it adds height and makes every bite feel more substantial. Top the ham with the remaining cheese. This double-cheese-layer method ensures maximum meltiness from top to bottom!
- The Lid Goes On: Gently place the top half of the rolls back on, like putting the lid on the coziest, most delicious house imaginable.
- Whisk the Magic Glaze: In a small bowl, whisk together the melted butter, Dijon mustard, Worcestershire sauce, onion powder, and garlic powder. Whisk it until it’s perfectly smooth and emulsified. This sauce is the flavor bomb that makes these sliders truly unforgettable.
- Brush, Brush, Brush! Now, using a pastry brush, generously and meticulously brush every single square inch of the top of the rolls with that glorious butter mixture. Don’t be shy! Get it in all the cracks and crevices. This is what gives the sliders their incredible flavor and that beautiful, golden-brown, glossy finish. Once they’re thoroughly doused, sprinkle the top with poppy seeds if you’re using them.
- Bake to Bubbly Perfection: Here’s the final key step. Cover the entire baking dish tightly with aluminum foil. This creates a little steam bath, gently heating the sliders through and melting the cheese without the tops burning. Bake covered for 15 minutes. Then, remove the foil and bake for another 5-7 minutes, or until the tops are a beautiful golden brown and you can hear the cheese sizzling happily. The smell will be absolutely intoxicating.
- The Final Slice: Take the pan out of the oven and let it rest for just a minute or two—this helps the cheese set slightly so they don’t ooze out everywhere when you cut them. Then, using that same long serrated knife, slice along the original roll lines to create 12 perfect, individual sliders.
How to Serve These Melty Masterpieces
Presentation is part of the fun! You can absolutely serve these right from the pan—it’s a wonderfully casual, cozy vibe. But if you want to dress them up a little, here are my favorite ways to serve them:
For a Party: Transfer the whole block of sliced sliders to a large wooden cutting board or a pretty platter. Scatter some fresh parsley or chives around them for a pop of color. I like to put a bowl of my favorite gourmet potato chips or a simple green salad with a bright vinaigrette on the side to cut through the richness.
For a Weeknight Dinner: Plate them up with some cozy sides. These sliders are fantastic with a simple cup of tomato soup for dipping, a crisp apple and kale salad, or even just some carrot and celery sticks with ranch. It turns a simple sandwich into a complete, satisfying meal that feels special.
The Most Important Tip: Serve them WARM! These sliders are at their absolute peak of deliciousness straight out of the oven when the cheese is at its maximum gooeyness and the butter glaze is still shimmering.
Mix It Up! Fun & Flavorful Slider Variations
Once you’ve mastered the classic, the playground of possibilities opens up! This recipe is a fantastic base for all kinds of flavor adventures. Here are a few of my favorite twists:
- The “Turkey Club” Twist: Swap the ham for sliced turkey and the Swiss cheese for sharp cheddar. Add a few pieces of cooked, crumbled bacon on top of the turkey before you add the cheese. It’s a turkey club in irresistible slider form!
- Pizza Party Sliders: Use sliced pepperoni and mozzarella cheese. Add a layer of your favorite marinara sauce (just a thin layer so it doesn’t make the rolls soggy) over the bottom bun before adding the cheese and pepperoni. Mix a little Italian seasoning into the butter glaze. Bellissimo!
- Rueben Rendezvous: Replace the ham with thinly sliced corned beef and use Swiss cheese. Add a thin layer of well-drained sauerkraut and a drizzle of Thousand Island dressing inside the sliders before baking. You won’t believe how good they are!
- Hawaiian Luau Style: Keep the ham, but add a layer of thin pineapple rings (fresh or canned, well-drained) on top of the ham before the final cheese layer. The sweet and savory combo is a total tropical vacation for your taste buds.
- Everything Bagel Delight: Swap the poppy seeds in the glaze for a generous sprinkling of Everything Bagel Seasoning. The onion, garlic, sesame seeds, and salt take the flavor over the top!
Chef Emily’s Kitchen Confidential
Over the years, I’ve made these sliders probably a hundred times, and they’ve evolved in the best ways. I once, in a frantic pre-party rush, used Italian dressing mix in the butter instead of the individual spices, and it was a hilarious, happy accident that turned out delicious! The beauty of this recipe is its flexibility.
My biggest piece of advice? Make a double batch. I’m not kidding. Every single time I make a single batch for a gathering, I get the “are there any more?” looks of disappointment. A double batch in a larger pan (or two 9x13s) is always the right call. They also reheat surprisingly well, making them a fantastic make-ahead lunch for the week. Just pop them in the toaster oven or a regular oven to get them crispy again—the microwave will make them soft.
Your Slider Questions, Answered!
I’ve gotten so many messages from you all about this recipe over the years! Here are the answers to the most common questions.
Q: Can I make these ahead of time?
A: Absolutely! You can assemble the entire slider block (through step 6, before baking) up to a day in advance. Cover it tightly with plastic wrap and keep it in the fridge. When you’re ready, let the pan sit on the counter for 20-30 minutes to take the chill off, then bake as directed. You might need to add an extra 2-3 minutes to the bake time since it’s starting from cold.
Q: My bottoms got a little soggy. How can I prevent that?
A> This usually happens if the rolls are very soft or if there’s a lot of steam during baking. My best trick is to lightly toast the *cut side* of the bottom bun before assembling! Just place it cut-side up in the baking dish and pop it in the oven for 3-4 minutes during the preheat phase. This creates a protective, slightly crispy barrier that holds up beautifully against the juicy fillings.
Q: The cheese oozed out and stuck to the pan. Help!
A> This is where that parchment paper liner is a true lifesaver! If you don’t have any, just make sure you’re generously greasing the pan. Also, don’t overstuff the sliders right to the very edge—leave a little border to give the cheese some room to melt without spilling over.
Q: Can I use different cheese? My family doesn’t like Swiss.
A> Of course! Cooking should be about what you love. Provolone, cheddar, gouda, mozzarella, or even a pepper jack for a kick are all fantastic choices. Just make sure it’s a good melting cheese.
Let’s Talk Nutrition (Because Balance is Beautiful!)
As a chef who believes food is joy, I also believe in being transparent about what we’re eating. These sliders are a treat, a celebration, and a comfort food powerhouse. Here’s a general breakdown per serving (based on 2 sliders):
Calories: 420 | Total Fat: 25g | Saturated Fat: 13g | Cholesterol: 75mg | Sodium: 900mg | Carbohydrates: 26g | Sugar: 6g | Protein: 22g
The sodium content comes primarily from the ham and cheese. If you’re watching your sodium, you can easily look for lower-sodium deli ham and cheese at the grocery store—it makes a big difference! The carbs and sugars come from the Hawaiian rolls. To lighten it up a bit, you can serve one slider alongside a large, vibrant green salad for a completely satisfying and balanced meal. Remember, it’s all about enjoying the foods you love mindfully!
Final Thoughts from My Kitchen to Yours
Well, my friend, there you have it. My heart, soul, and all my best kitchen secrets for the most perfect Hot Ham and Cheese Sliders. This recipe is more than just a list of ingredients and steps; it’s a tool for creating connection. It’s for the busy weeknights, the last-minute parties, the potlucks, and the simple, quiet dinners that still deserve to feel special.
I hope this recipe becomes a trusted friend in your kitchen, just like it is in mine. I hope it gives you back an hour of your day and fills your home with the best smells.
