Japanese Matcha Pound Cake: An Elegant Slice of Sweet, Earthy Bliss
Hey there, friend! Come on in, grab an apron, and let’s talk about one of my all-time favorite baking adventures: the Japanese Matcha Pound Cake. If you’ve ever sipped a perfect cup of green tea and thought, “I wish I could eat this feeling,” then my friend, this cake is your answer. It’s not a shout-from-the-rooftops kind of dessert. It’s a whisper. A sophisticated, elegant, deeply comforting whisper that says, “Slow down, savor this moment.”
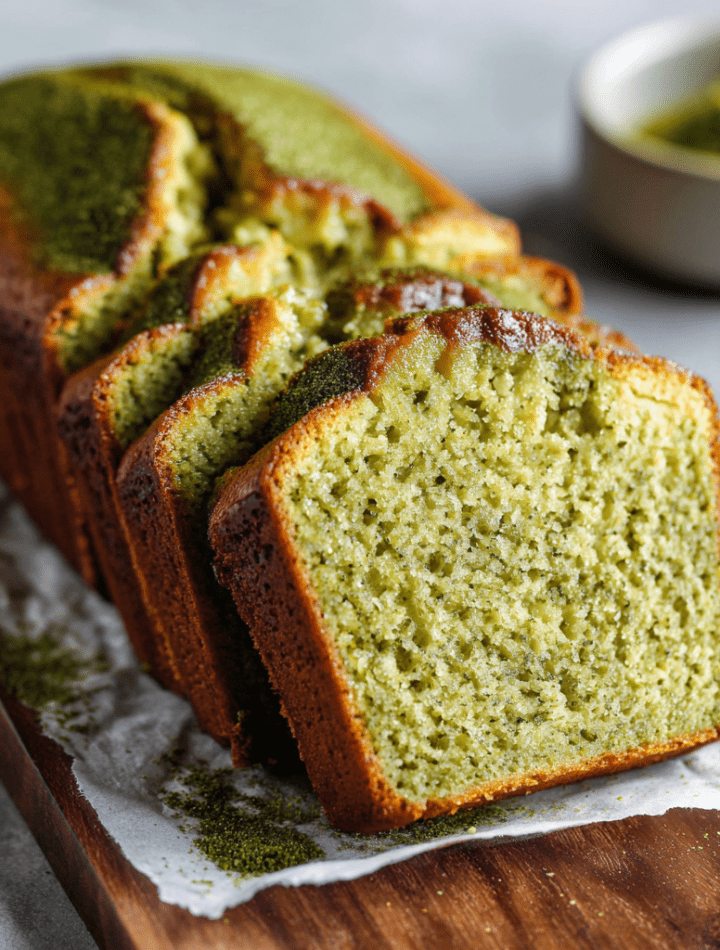
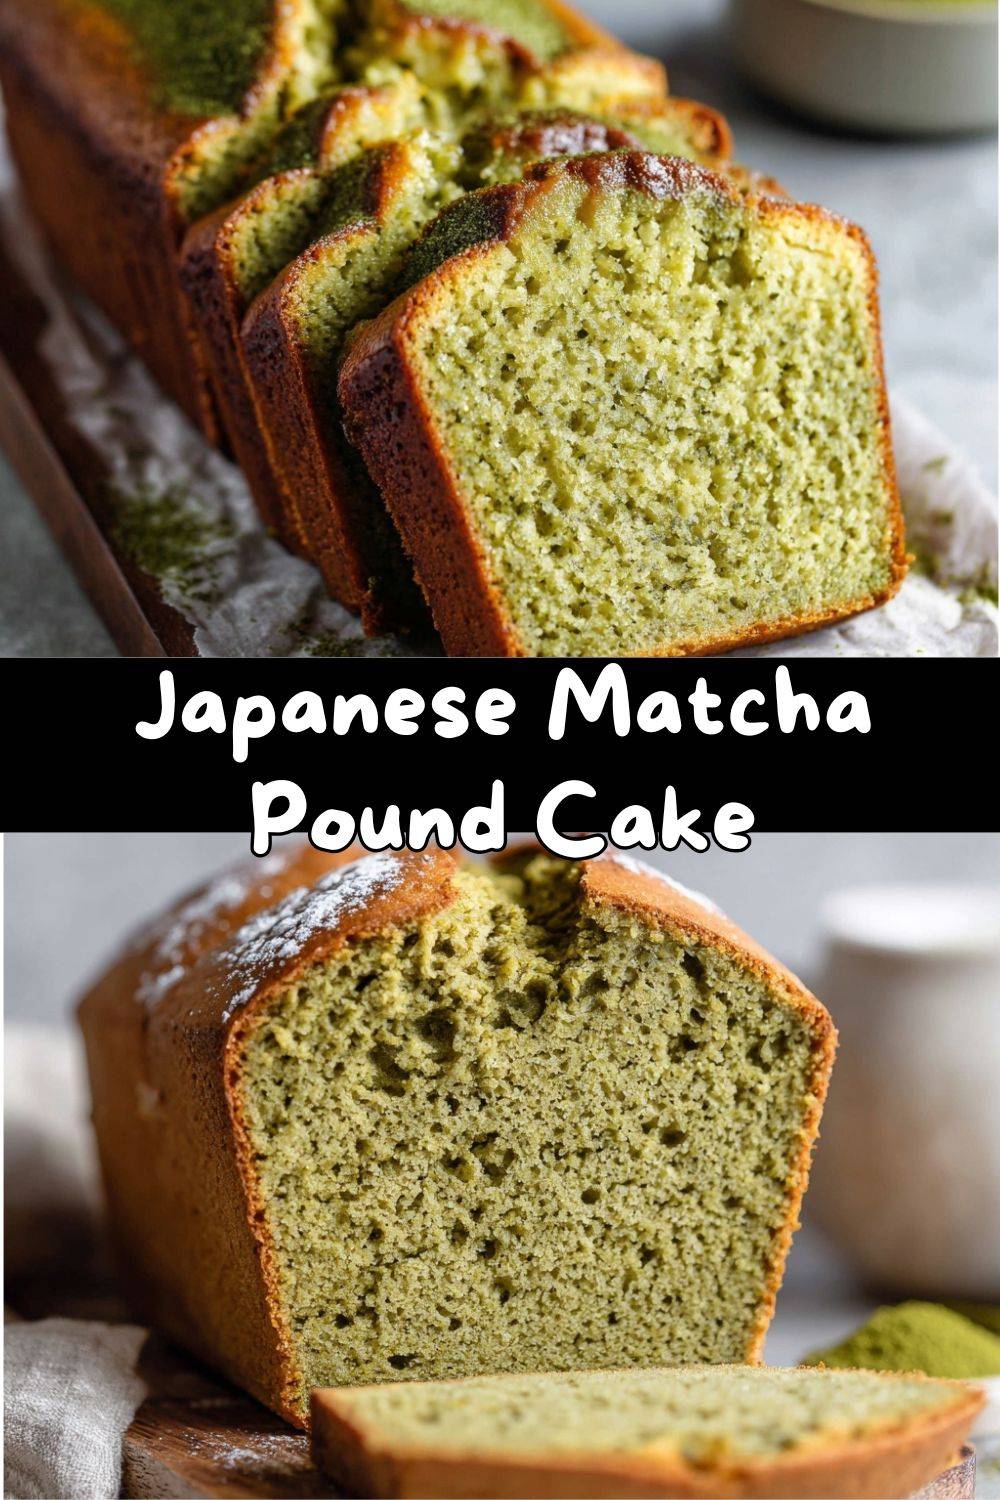
This cake is the beautiful intersection of a classic, buttery pound cake and the ancient, earthy magic of ceremonial-grade matcha. The result? A vibrantly green, incredibly moist loaf with a tender crumb and a flavor that’s perfectly balanced—rich, but not heavy; sweet, but not cloying; earthy, but not bitter. It’s the kind of treat that feels just as right with your morning coffee as it does as a light dessert after a fancy dinner. And the best part? It’s deceptively simple to make. No layers, no fussy frosting—just pure, delicious, bake-from-the-heart goodness. So, are you ready to fill your kitchen with the most incredible aroma? Let’s make something beautiful together.
The Day Matcha Stole My Heart (And My Spatula)
My love affair with matcha didn’t start in a trendy café. It started in a very humble, slightly chaotic way, as the best food stories often do. Years ago, I was visiting a friend’s family, and her obāchan (grandmother) quietly motioned me into her sunlit kitchen. Without a shared language, we communicated through gestures and smiles. She handed me a breathtakingly green, finely powdered tea and a special bamboo whisk. We made usucha (thin tea) together, the ritual of it—the sifting, the careful whisking into a frothy jade emulsion—feeling almost sacred.
After our silent tea ceremony, she pulled out a simple, green-flecked cake. One bite, and I was transported. It was unlike any cake I’d ever had. The subtle sweetness, the profound tea flavor, the dense yet cloud-like texture… it was a masterpiece of restraint. That cake wasn’t just food; it was a feeling of peace, of tradition, of shared understanding. I left that day with a tiny tin of matcha clutched in my hand and a mission in my heart: to learn how to bake that feeling into a cake I could share with all of you. This recipe is my homage to that quiet afternoon, to the power of food to connect us, and to the sublime magic of a really good cup of tea—in cake form.
Gathering Your Flavor Magic: The Ingredients
Great baking starts with great ingredients! Here’s what you’ll need for our matcha masterpiece. I’ve tossed in some chef insights and swaps to make this cake truly yours.
- 1 cup (125g) all-purpose flour: The reliable backbone of our cake. It gives structure without being tough. For a slightly more tender crumb, you can swap in cake flour, but all-purpose works beautifully.
- 2 tablespoons high-quality matcha green tea powder: This is the star. Please, please use culinary-grade or even ceremonial-grade matcha if you can. The cheap, bitter stuff will give you a murky, grassy cake. Look for a vibrant jade green color—it should smell sweet and vegetal, not fishy. This is where the magic (and the beautiful color) comes from!
- 1/2 teaspoon baking powder: Our little lift agent! It gives the dense pound cake a gentle rise, ensuring it’s not a brick.
- 1/4 teaspoon fine sea salt: Never skip the salt! It’s the flavor enhancer that makes the sweet and earthy notes pop. It’s the secret handshake between the butter and the matcha.
- 1/2 cup (1 stick / 113g) unsalted butter, softened: The soul of the pound cake. “Softened” means it should give easily when poked but not be oily or melted. This creaminess is key for that luxurious texture.
- 2/3 cup (135g) granulated sugar: We’re using less sugar than a traditional pound cake to let the matcha shine. The subtle sweetness is what makes this so elegantly Japanese.
- 2 large eggs, at room temperature: Room temp eggs incorporate into the butter-sugar mixture much more smoothly, creating a lovely, emulsified batter. If you forgot to take them out, place them in a bowl of warm water for 5-10 minutes.
- 1 teaspoon pure vanilla extract: A supporting actor that adds a warm, fragrant depth. It complements the matcha beautifully.
- 1/4 cup (60ml) milk, at room temperature: Whole milk adds richness, but any milk you have—dairy or plant-based like oat or almond—works perfectly. Room temperature is crucial to prevent the butter from seizing up!
Let’s Bake: Step-by-Step with Chef Emily’s Tips
Okay, team! Let’s get mixing. Follow these steps, and you’ll have a stunning cake in no time. I’m chatting right alongside you with all my best kitchen hacks.
- Prep Like a Pro: Preheat your oven to 350°F (175°C). Now, let’s prepare the loaf pan. Grease it well with butter or baking spray, then line it with a sling of parchment paper, leaving an overhang on the two long sides. This is my #1 tip for easy, tear-free cake removal! Trust me, it’s a game-changer.
- Sift with Love: In a medium bowl, sift together the flour, matcha powder, baking powder, and salt. Sifting is non-negotiable here—it breaks up any lumps in the matcha and flour, aerates the mixture, and ensures our cake is impossibly smooth. Take a moment to admire that gorgeous green powder. Isn’t it stunning?
- Cream to Dreamy Perfection: In a large bowl, use a hand mixer or stand mixer fitted with the paddle attachment to cream the softened butter and sugar. We’re not just mixing; we’re creaming. Beat on medium-high for 3-5 minutes until the mixture is very pale, fluffy, and almost whipped. This incorporates air, which is part of our leavening! When you stop the mixer, the mixture should cling to the beaters.
- Egg-cellent Integration: With the mixer on medium, add the eggs one at a time, beating well after each addition until fully incorporated before adding the next. Add the vanilla with the last egg. If the mixture looks slightly curdled, don’t panic! It will come back together when we add the dry ingredients.
- The Gentle Fold (Alternating Method): Reduce the mixer speed to low. Add about one-third of your sifted dry ingredients, mixing until just combined. Then, add half of the milk. Repeat with another third of the dry, the rest of the milk, and finally the last of the dry ingredients. Stop mixing as soon as you no longer see dry flour. Overmixing is the enemy of a tender pound cake!
- Pan & Bake: Pour the thick, luscious green batter into your prepared pan. Use a spatula to smooth the top. For an extra-professional touch, run a small offset spatula or butter knife down the center of the batter, creating a shallow trench. This helps the cake rise with a beautiful crack right down the middle. Give the pan a few gentle taps on the counter to release any big air bubbles.
- The Bake & The Test: Slide the pan into the center of your preheated oven. Bake for 40-45 minutes. Start checking at 40 minutes. The cake is done when it’s pulling away slightly from the sides, the top is springy to the touch, and a toothpick or skewer inserted into the crack in the center comes out with a few moist crumbs—not wet batter. If it starts browning too quickly, you can tent it loosely with foil for the last 10 minutes.
- The Patience Game (The Hardest Step!): Once baked, let the cake cool in the pan on a wire rack for 15 minutes. This allows it to set. Then, using those parchment paper slings, carefully lift the cake out of the pan and place it directly on the rack to cool completely. I know it’s tempting, but cutting into a warm pound cake can make it gummy. Let’s let it rest and settle into its perfect texture.
How to Serve This Slice of Zen
Presentation is part of the joy! For a simple, elegant serve, place a slice on a plain white plate. The vibrant green will speak for itself. A light dusting of powdered sugar or matcha powder over the top looks like a light snowfall on a mossy hill—just beautiful.
This cake is the ultimate companion to beverages. It’s transcendent with a cup of sencha or hojicha tea, complementing those umami notes. For a contrast, try it with a creamy oat milk latte. For dessert, a small dollop of lightly sweetened whipped cream or a side of fresh berries (red raspberries are a gorgeous color contrast) is absolute perfection. And it makes the most thoughtful, homemade gift. Wrap the cooled loaf in parchment, tie it with baker’s twine, and you’ve just made someone’s day.
Make It Your Own: Delicious Variations
Once you’ve mastered the classic, play with it! Here are a few of my favorite riffs:
- Matcha-White Chocolate Chip: Fold 1/2 cup of high-quality white chocolate chips into the batter before baking. The creamy sweetness of white chocolate is a classic and heavenly pairing with matcha.
- Black Sesame Swirl: Mix 1 tablespoon of black sesame paste (or finely ground black sesame seeds with a tsp of honey) with 1/3 cup of the cake batter. Pour the plain matcha batter into the pan, then dollop the black sesame mixture on top and swirl with a knife for a stunning marbled effect and a nutty flavor.
- Vegan Matcha Cake: Use a high-quality vegan butter stick and swap the eggs for 1/2 cup of plain, unsweetened applesauce or 2 flax eggs (2 tbsp ground flax + 5 tbsp water, let sit 5 mins). Use your favorite plant milk. The texture will be slightly denser but still delicious.
- Citrus Zest Lift: Add the finely grated zest of one yuzu, lemon, or orange to the butter-sugar mixture during creaming. The bright citrus notes cut through the richness and add a fantastic aromatic layer.
- Mini Loaf Gift Set: Divide the batter between 4-5 greased mini loaf pans. Reduce baking time to 25-30 minutes. Perfect for creating a adorable gift assortment!
Chef Emily’s Notebook Scribbles
This recipe has been my kitchen companion for years, and it’s evolved with me. The first time I made it, I used a very bitter, low-grade matcha (we all start somewhere!) and was so disappointed by the murky color and flavor. It was a powerful lesson in ingredient quality. Now, I splurge on a good tin of matcha just for baking, and the difference is night and day.
I also used to be impatient and slice it warm, mourning the gummy texture. The cooling wait is a lesson in delayed gratification that pays off big time. This cake actually tastes better the next day, as the flavors meld and the crumb becomes even more moist. So if you can, bake it a day ahead! Wrap it tightly in plastic wrap once cool and let it rest on the counter. Your future self will thank you.
Your Questions, Answered!
Q: My cake is very dense and didn’t rise much. What happened?
A: The most common culprits are overmixing the batter after adding the flour (which develops gluten and makes it tough) or using cold eggs/milk which can cause the butter to solidify and break the emulsion. Also, make sure your baking powder is fresh!
Q: The top of my cake cracked a lot/is very dark.
A: A crack down the middle is traditional and lovely! If it’s exploding or browning too fast, your oven might run hot. Next time, try lowering the temperature to 325°F and baking a bit longer. You can also tent the loaf with foil halfway through baking.
Q: My matcha flavor is bitter or the color is dull/brownish-green.
A: This is almost certainly due to the quality of matcha powder. For baking, you need a vibrant, fresh, culinary-grade powder. Also, avoid over-baking, as that can bring out bitter notes in the tea.
Q: How do I store this cake?
A: Once completely cool, wrap it tightly in plastic wrap or store in an airtight container at room temperature for up to 3 days. For longer storage, you can freeze the whole loaf or individual slices for up to 2 months. Thaw at room temperature.
A Quick Note on Nutrition
While I’m all about joy and flavor first, I know some folks like to have an idea of what’s in their food. This information is per slice (assuming 8 slices from the loaf), and is an estimate. Remember, baking is about nourishment for the soul, too!
Each slice provides a comforting balance of carbohydrates for energy from the flour and sugar, along with fats from the butter and eggs that contribute to that luxurious mouthfeel and satiety. The matcha powder is a wonderful source of antioxidants, specifically catechins like EGCG. Using a high-quality matcha means you’re getting the most benefit from those compounds. The protein from the eggs and milk helps balance the treat. As with all good things, enjoying a slice as part of a varied and balanced diet is the perfect approach.
Final Thoughts from My Kitchen to Yours
And there you have it! My heart-felt guide to creating a Japanese Matcha Pound Cake that’s as much a joy to make as it is to eat. This cake is a reminder that the most satisfying recipes are often the simplest ones, where a few high-quality ingredients are treated with respect and care. It’s a little edible moment of peace.
I hope you bake this cake, that your kitchen fills with that incredible, earthy-sweet aroma, and that you share a slice with someone you love (or happily keep it all for yourself—no judgment here!). Thank you for letting me share one of my favorite recipes with you. Now, go forth and bake something wonderful! Don’t forget to tag me @TastyChow if you share a photo—I love seeing your creations.
With love and a sprinkle of matcha,
Emily 🍵