Lamb Cake Push Pops: The Cutest, Mess-Free Easter Treat You’ll Ever Make!
Hey there, my fellow flavor-chaser! Emily here, apron already dusted with a little powdered sugar, because let’s be real—that’s just my natural state of being. Are you staring down the barrel of an Easter party, a spring birthday, or maybe just a serious craving for something unbearably adorable? I’ve got you. Today, we’re diving fork-first into a project that’s equal parts delicious, delightful, and downright genius: Lamb Cake Push Pops.
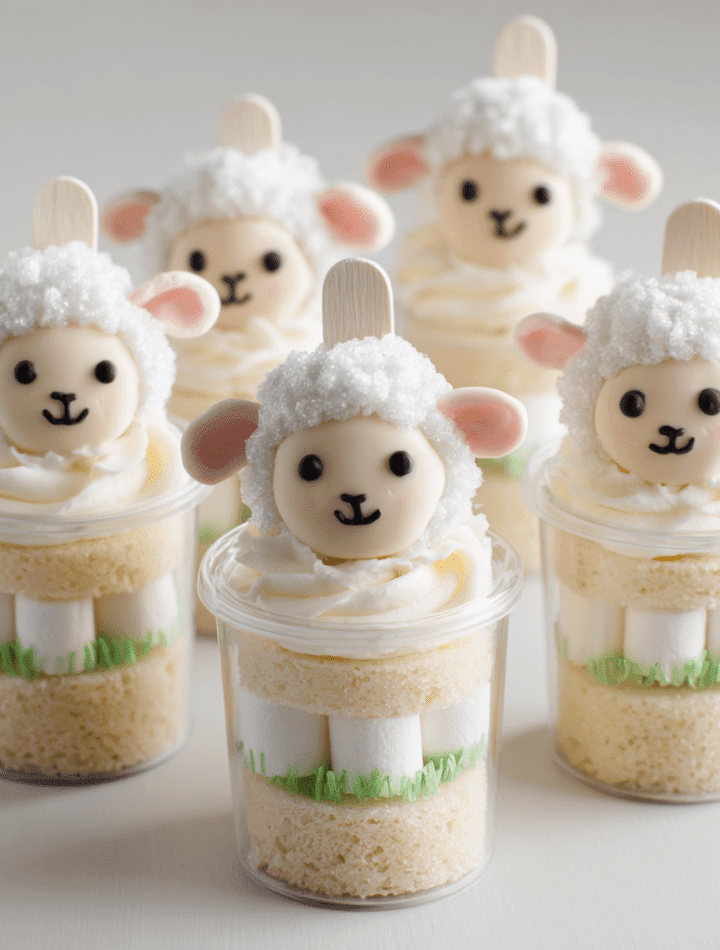
Imagine this: fluffy, soft vanilla cake. Clouds of sweet, silky buttercream. All packed into a portable, personal push-pop container, then topped with a cloud of marshmallow “wool” and the sweetest little fondant lamb face you ever did see. They’re individual servings of pure joy, guaranteed to make both kids and adults do that happy little gasp-and-point thing. The best part? No plates, no forks, and (mostly) no mess. Just pure, push-up, party-perfect fun.
I live for recipes that create a moment, and these push pops are a full-blown experience. They’re perfect for Easter baskets, show-stopping at a baby shower, or being the superstar of a toddler’s birthday party. So, if you’ve ever looked at a complicated bakery cake and thought, “I could never,” I’m here to tell you that you absolutely can. We’re going to walk through this together, one sweet step at a time. Grab your favorite mixing bowl and let’s make some magic—and maybe a little mess, because that’s where the love is. Let’s chow down!

A Tale of Two Lambs: From Grandma’s Table to Push-Up Pops
This recipe takes me right back to my grandma’s kitchen, where Easter wasn’t just a day, it was a scent. The air was always thick with the smell of yeasted bread, glazed ham, and the singular, sweet aroma of her classic lamb mold cake. You know the one—that dense, pound-cake-style lamb standing proud on a platter, covered in a blizzard of shredded coconut “wool.” It was a masterpiece, and as a kid, I was almost too in awe to eat it. Almost.
But friends, between you and me? That traditional lamb cake was also a bit of a… challenge. Getting it out of the intricate mold in one piece was an Easter miracle in itself. And serving it meant awkwardly hacking into this adorable creature’s side. I wanted to capture that nostalgic, springtime charm but in a format that was fuss-free, shareable, and frankly, more fun to eat. Enter the push pop!
The first time I experimented with these, I was making them for my niece’s spring birthday party. I saw her little face light up when she realized she got her own entire lamb to eat, no sharing required. That’s the magic we’re creating here: all the warmth of a family tradition, packed into a modern, playful, and personal treat. It’s my grandma’s Sunday morning love, remixed for today’s celebrations.
Gathering Your Flock: What You’ll Need
Here’s the beautiful part: we’re keeping the components simple and stress-free. This is about assembly and adorable presentation! Here’s your shopping and prepping list.
- 1 box vanilla cake mix (plus the eggs, oil, and water it calls for) – This is our brilliant shortcut! I’m all for from-scratch, but for a project focused on assembly, a reliable box mix gives perfect texture every time. Chef’s Insight: For a richer flavor, substitute the water called for with whole milk or even buttermilk.
- 2 cups of your favorite buttercream frosting – Homemade American buttercream (butter, powdered sugar, vanilla, cream) is glorious, but a high-quality store-bought tub is a fantastic, time-saving option. No judgment in this kitchen! Sub Tip: For a less sweet option, try a Swiss meringue buttercream. For dairy-free, use a plant-based butter.
- 1 bag of mini marshmallows – This is our lamb’s fluffy “wool.” The mini size is perfect for creating texture.
- Ready-to-use fondant (white, black, and pink) – Don’t let fondant intimidate you! We’re using tiny amounts, just for the cute faces. You can find small packs in the baking aisle. Sub Tip: If fondant isn’t your thing, use white candy melts for the face base and edible food marker pens for the details.
- 12 Push Pop containers with plungers – The star of the show! You can find these online or in party supply stores. Make sure they’re food-safe.
- Optional: Green-tinted shredded coconut – For creating a festive “grass” display tray. A drop of green food coloring in a bag with the coconut, shake it up, and you’re done!
Let’s Build Some Adorable Sheep! Step-by-Step
Ready to assemble our edible flock? Follow these steps, and you’ll have a lineup of cute faces in no time. I’m adding my favorite kitchen hacks along the way.
- Bake & Cool the Cake: Prepare your vanilla cake batter according to the package directions. Pour it into a greased 9×13 inch pan or a rimmed sheet pan for an even, easier-to-cut layer. Bake as directed and let it cool completely. This is non-negotiable! A warm cake will turn into soggy crumbs and melt your frosting. Chef’s Hack: Speed up cooling by placing the pan on a wire rack. You can even pop it in the fridge for a bit.
- Cut Your Cake Rounds: Once your cake is cool, use a round cookie cutter that’s slightly smaller than the opening of your push pop containers. If you don’t have a cutter, the rim of a similarly-sized glass works in a pinch! Press down and twist to get clean circles. You’ll get 2-3 rounds per push pop, so cut as many as you can. Chef’s Hack: Gently gather and press any cake scraps into a thin layer to cut more rounds—zero waste!
- Prep Your Frosting & Fondant: Give your buttercream a quick stir to make it smooth and spreadable. If using fondant, pinch off small amounts. Roll tiny white ovals for faces, little black balls for eyes, and small pink teardrops for ears and a nose. Keep them covered with plastic wrap so they don’t dry out.
- The Layering Magic: Take a push pop container. Using a small spoon or a piping bag (even easier!), add a dollop of frosting to the very bottom. Gently press a cake round on top. Add another dollop of frosting, then another cake round. Repeat until you have 2-3 layers of cake and the container is filled to about ¾ full, ending with a frosting layer. Chef’s Tip: Don’t pack it down too hard! We want light, fluffy layers.
- Create the Woolly Top: Now for the fun texture! Take 5-7 mini marshmallows and press them, sticky-side down, into the top layer of frosting to create a fluffy, irregular “head” for your lamb. It should look like a little cloud.
- Give Them a Face: This is where personality pops! Take your pre-made fondant pieces. Press a white oval face onto the front of the marshmallow cloud. Add two black eyes and a pink nose. Finally, place the pink teardrop ears on top of the marshmallow cloud, just above the face. Gently press to adhere. And voilà! You have a lamb.
- Display with Flair (Optional): If you’re using the green coconut, spread it in a serving tray to look like grass. Stand your finished lamb push pops upright in the “grass.” It creates an instantly festive, wow-worthy centerpiece!
Serving Up the Cuteness
Presentation is half the fun with these treats! For a party, I love setting up a whole “pasture” on my table. Use that green coconut grass in a large tray or a clean, shallow box lined with parchment. Nestle each push pop in there, and maybe add a few speckled jelly bean “eggs” or edible flowers around the base. It tells a story before anyone even takes a bite.
When it’s time to eat, just hand one to each guest! The beauty is in the push-up design—they can slowly push up the cake as they eat, keeping fingers clean(ish). For a buffet, stand them upright in a tall jar filled with sugar or more coconut to hold them steady. They’re self-contained little masterpieces, ready for their close-up.
Mix It Up! Flock-Tastic Variations
Once you’ve mastered the basic lamb, the pasture is your oyster! Here are a few fun twists to try.
- Bunny Brigade: Swap the lamb for bunnies! Use pink fondant for inner ears and a little nose, and add two white fondant teeth. You can even use a large pink marshmallow (like a Peep!) for the head.
- Chocolate Sheep: Use a chocolate cake mix and chocolate buttercream. The contrast with the white marshmallow “wool” is stunning and delicious.
- Spring Flower Garden: Ditch the animal theme and create a flower pot! After the final frosting layer, press a Milano cookie or a pirouette cookie into the top as a “flower stem.” Use shaped candies or more fondant to create a flower on top. Display in crushed chocolate cookie “dirt.”
- Gluten-Free/Dairy-Free Friends: Easily adaptable! Use your favorite GF cake mix and DF butter (like Earth Balance) in the frosting. Ensure your marshmallows are gelatin-free if needed (many Dandies brand are), and use DF chocolate for accents.
- “Naked” Lamb Cake Push Pops: For a less sweet version, skip the buttercream layers. Just use cake rounds and a thin smear of frosting or jam between them. The marshmallow and fondant on top will still be plenty sweet!
Emily’s Kitchen Confidential
I’ll let you in on a secret: my first batch of these looked… interesting. Let’s just say one lamb had a serious derp face, and another’s “wool” slid right off because I was impatient and the frosting was too warm. We ate them anyway, laughing the whole time. That’s the spirit!
This recipe has evolved from a messy experiment to a party staple in my home. I’ve learned that letting the kids help assemble the faces leads to the most charming, unique lambs—each with its own personality. Don’t strive for perfection; strive for joy. If the ears are lopsided, it just means your lamb is listening extra hard. The best food always has a little heart, and a little humor, mixed in.
Your Questions, Answered!
Q: Can I make these ahead of time?
A: Absolutely! You can bake the cake and cut the rounds 1-2 days ahead. Store them in an airtight container. Assemble the push pops the day before, but hold off on adding the marshmallow and fondant until the day of the event to keep everything fresh and looking its best. Store assembled pops (without tops) upright in the fridge.
Q: My fondant pieces keep cracking or won’t stick. Help!
A: Fondant dries out quickly. Keep unused portions tightly wrapped. If it cracks, knead in a tiny, tiny dot of vegetable shortening. To help pieces stick to the marshmallow or each other, use a dab of water or clear vanilla extract as “edible glue.”
Q: The cake is crumbling when I try to cut rounds!
A: This usually means the cake is still a bit warm, or your cutter isn’t sharp. Ensure the cake is completely cool. Try dipping your cookie cutter in powdered sugar between cuts to prevent sticking. If it’s still fussy, don’t worry—just pack the crumbs into the container in layers with frosting; it will still taste amazing.
Q: Where do I find push pop containers?
A: They’re easily found online (Amazon, bakery supply sites) or in craft stores like Michaels or Hobby Lobby in the cake decorating section. They often come in packs of 12 or 24.
Nutritional Information*
*Please note: This is an approximate estimate based on the specific ingredients listed, using a standard vanilla cake mix and homemade American buttercream. Values will vary with substitutions.
Per Push Pop (1 serving):
Calories: ~260 | Total Fat: 12g | Saturated Fat: 6g | Carbohydrates: 35g | Sugar: 27g | Protein: 2g | Sodium: 160mg
Remember, friends, these are celebratory treats! They’re about creating joy and memories. Enjoy them mindfully as part of your special occasion, and savor every adorable bite.
Final Thoughts from My Kitchen to Yours
Well, my friend, we did it! We took a sprinkle of nostalgia, a big spoonful of fun, and baked up something truly special. These Lamb Cake Push Pops are more than just a dessert; they’re a conversation starter, a memory maker, and a testament to the fact that you can create stunning, happy food without needing to be a professional pastry chef.
I hope you feel empowered to try them, to play with the variations, and to share them with people you love. That’s what Tasty Chow is all about. If you make them (and I really hope you do!), tag me on social @TastyChow so I can see your beautiful, fluffy creations. Nothing makes my day more than seeing your kitchen wins.