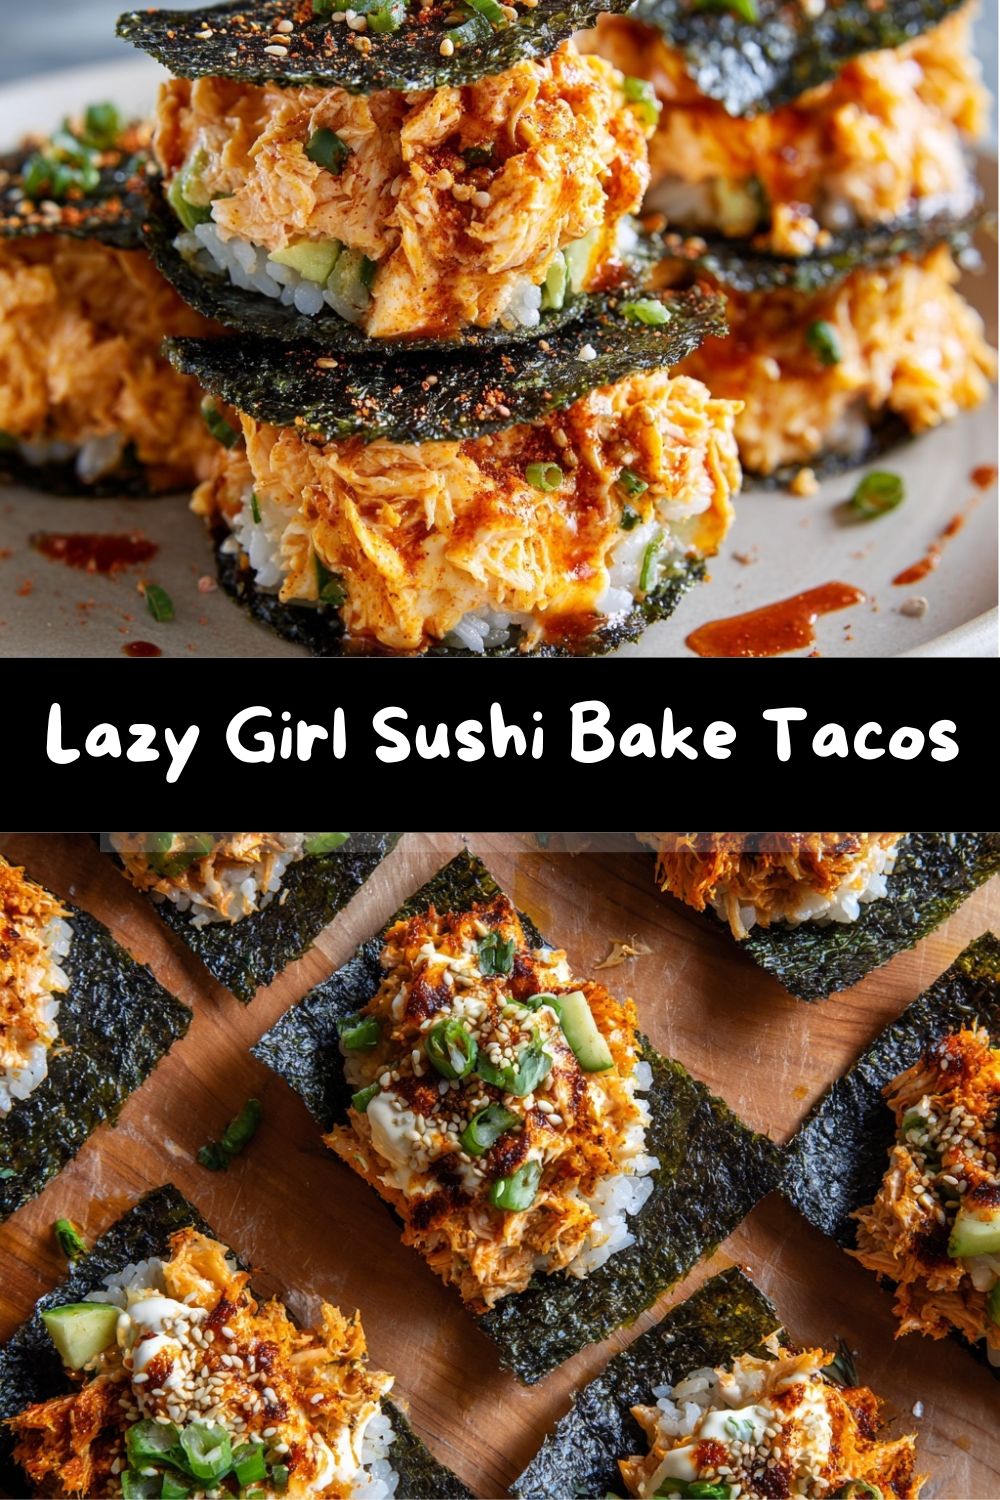
Lazy Girl Sushi Bake Tacos: The Crunchy, Creamy Mashup You NEED to Make
Hey, friend! Pull up a chair and let’s talk about one of my favorite kitchen phenomena: the mashup that’s just too good to ignore. You know the ones—they start as a whisper on social media, then suddenly, your entire feed is screaming about them. That’s exactly what happened when I first saw the glorious collision of sushi bake and tacos. My brain did a little happy dance. My stomach growled in agreement. And I knew I had to run to my kitchen and make my own version to share with you.
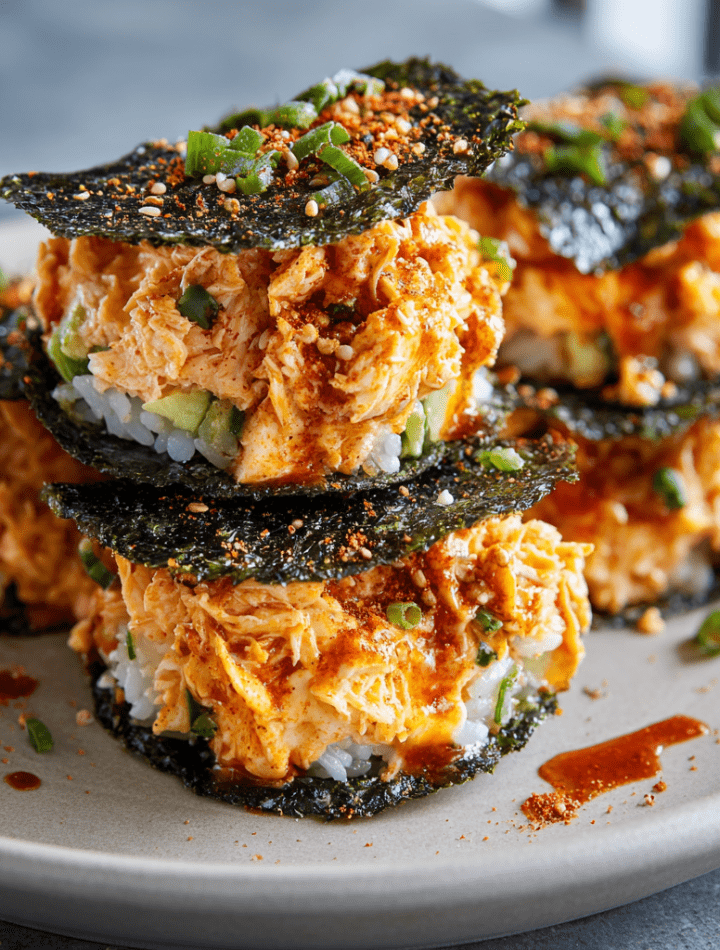
So, what are Lazy Girl Sushi Bake Tacos? Imagine this: a crispy, golden shell made from baked sushi rice. Now, fill that shell with a luscious, creamy, spicy salmon or crab mixture that’s pure umami magic. Finally, you tuck the whole beautiful mess into a square of nori and eat it like the world’s most satisfying handheld taco. It’s crunchy. It’s creamy. It’s savory with a kick. And the best part? It’s shockingly simple. No fancy sushi-rolling skills required, just a muffin tin and a craving for something spectacular. This is for those nights when you want restaurant-level wow factor with couch-level effort. Let’s make something delicious together!
A Tale of Two Cravings: My Sushi Taco “Aha!” Moment
This recipe was born from a classic case of Sunday Scaries indecision. I was scrolling, mindlessly hungry, torn between ordering a giant platter of sushi or heading out for fish tacos. I remember sighing loudly in my kitchen (yes, I talk to myself—a chef’s prerogative!), staring at my fridge, and having a flashback to my grandma’s kitchen.
She was the queen of resourceful, “use-what-you-have” cooking. One day it was leftover rice transformed into crispy patties, another it was canned tuna turned into a magical spread. She never saw limits, only possibilities. That spirit hit me. I had sushi rice. I had nori sheets from a forgotten ramen night. I had some salmon. Why choose between my cravings when I could smash them together and create something entirely new and fun? The first batch was… experimental (we won’t discuss the “rice shell” that disintegrated). But after a few tweaks, I landed on this perfect formula. It’s a tribute to that innovative, joyful kitchen spirit I grew up with, with a hefty dose of modern, viral fun. Every bite feels like a little celebration of creativity.
What You’ll Need: Your Flavor Arsenal
Here’s the dream team of ingredients that makes this mashup sing. I’ve added my chef-y notes and swaps so you can make this your own!
- 2 cups cooked sushi rice: The foundation! Short-grain sushi rice is key here—it gets beautifully sticky and crisp. Chef’s Insight: Day-old rice works GREAT for extra crispiness, but fresh is totally fine.
- 2 tablespoons rice vinegar, 1 tablespoon sugar, 1 teaspoon salt: This is your sushi seasoning mix. It gives the rice its signature tangy-sweet flavor. Sub Tip: No rice vinegar? A mild white wine vinegar or apple cider vinegar with a pinch more sugar will work in a pinch.
- 1 cup imitation crab (surimi) or cooked salmon, shredded: Pick your protein adventure! Imitation crab is sweet, accessible, and perfect. Flaked, cooked salmon is luxurious. Chef’s Insight: For cooked salmon, a quick pan-sear with salt and pepper is all you need. Canned salmon (drained well) is a fantastic pantry hack!
- 1/4 cup Kewpie mayo: This Japanese mayo is creamier, tangier, and richer than regular mayo. It makes the filling incredible. Sub Tip: If you only have regular mayo, add a tiny squeeze of lemon juice to mimic that tang.
- 1 tablespoon sriracha (adjust to taste): Our spice factor! Start with a tablespoon and taste. I usually end up adding more because I love the kick. Chef’s Insight: For a different flavor, try gochujang (Korean chili paste) for a deeper, fermented heat.
- 1 teaspoon soy sauce: The salty, umami backbone that ties the filling together. Use low-sodium if you’re watching salt.
- Nori sheets, cut into squares: Your edible “tortilla”! The savory, oceanic crunch is non-negotiable. Cut them into squares slightly larger than your rice shells for easy grabbing.
- Optional Toppings Army: This is where you play! Toasted sesame seeds for nutty crunch, creamy avocado slices, refreshing julienned cucumber, sharp green onions, or a sprinkle of furikake (seaweed seasoning) for the ultimate finish.
Let’s Build Your Tacos: A Step-by-Step Kitchen Party
Ready? Apron on, music up—let’s do this. Follow these steps and you’ll have a tray of gorgeous, Instagram-worthy (but, more importantly, mouth-watering) tacos in no time.
- Season & Shape Your Rice Shells. In a large bowl, gently fold the warm cooked sushi rice with the rice vinegar, sugar, and salt until evenly coated. Now, grab a standard muffin tin and give it a light coat of non-stick spray. Chef Hack: For easier removal, you can line the cups with small squares of parchment paper. Press about 3-4 tablespoons of the seasoned rice firmly into each muffin cup, pushing up the sides to form a cup shape. The firmer you press, the better they’ll hold together. Bake at 400°F (200°C) for 15-20 minutes, until the edges and tops are golden and crisp. Let them cool in the tin for 5 minutes—they’ll firm up as they cool.
- Whip Up The Creamy Filling. While the shells bake, make the good stuff. In a medium bowl, combine your shredded crab or salmon, Kewpie mayo, sriracha, and soy sauce. Mix until it’s beautifully creamy and homogenous. Taste it! This is your moment. Need more heat? Add sriracha. More tang? A dot more mayo. Make it yours.
- The Grand Assembly. Carefully pop your crispy rice shells out of the muffin tin. Place them on your serving board. Generously spoon the spicy filling into each shell, mounding it up high. Now, unleash your topping creativity! I love a confetti of green onion, a few avocado slices, a sprinkle of sesame seeds, and a dusting of furikake. It makes them look like little edible jewels.
- The All-Important Serve. Pile your cut nori squares on a plate beside your loaded rice shells. To eat, grab a nori square, place a loaded rice shell in the center, and gently fold the nori up the sides like a taco. Take a big, happy bite and prepare for the texture symphony: crisp rice, creamy filling, chewy nori. Bliss.
How to Serve & Chow Down
Presentation is half the fun with this dish! I love serving these as a build-your-own taco bar. Arrange the crispy rice shells on a big platter, put the bowl of filling and all the toppings in little dishes, and let everyone assemble their own. It’s interactive, messy, and perfect for a casual gathering. For a solo night, I plate up two or three on my favorite plate with a little side of pickled ginger and extra soy sauce for dipping. A crisp, cold beer, a glass of sparkling water with lime, or a light Pinot Grigio are all fantastic drink partners to cut through the richness. Don’t forget plenty of napkins—this is joyfully messy eating!
Mix It Up! 5 Tasty Twists on the Classic
Once you’ve mastered the base recipe, the world is your sushi taco oyster. Here are some of my favorite riffs:
- The Spicy Tuna: Swap the crab for finely chopped fresh tuna (sushi-grade). Up the sriracha and add a dash of toasted sesame oil to the mayo mix.
- The Vegan Dream: Use seasoned, mashed chickpeas or shredded marinated tofu as your protein. Use vegan mayo, and top with spicy crispy onions and mango salsa for a sweet-heat combo.
- The Deconstructed California Roll: Use the crab mix, and top with avocado, cucumber, and a tiny dollop of real crab meat or masago (capelin roe).
- The Dynamite Shrimp Style: Use chopped cooked shrimp in the filling, and drizzle the whole taco with a spicy-sweet “dynamite” sauce (mix mayo with sweet chili sauce and a bit of sriracha).
- The Brunch Special: Top your filled taco with a perfectly soft-poached or fried egg. Let that yolk become part of the sauce. Thank me later.
Chef Emily’s Kitchen Notes
This recipe has become a staple in my house for “I don’t know what to cook” nights. Over time, I’ve learned a few things: First, the rice shells are best eaten the day they’re made, as they lose some crispness overnight (though the leftovers are still tasty!). Second, don’t be afraid to really pack the rice in—a solid shell is a happy shell. And my funniest fail? The time I tried to make “giant” versions in a regular-sized muffin tin. They were delicious monsters, but impossible to eat like a taco—we just attacked them with forks. Sometimes bigger isn’t better! The mini size is perfect for flavor-packed, manageable bites.
FAQs & Quick Fixes
Q: My rice shells are falling apart! What did I do wrong?
A: The most common culprit is not pressing the rice firmly enough into the tin. Really compact it! Also, letting them cool for a full 5 minutes in the tin helps them set and firm up before you try to remove them.
Q: Can I make any part of this ahead of time?
A: Absolutely! You can cook and season the rice up to a day ahead. Keep it covered in the fridge. The filling can also be mixed and stored in the fridge for a day. Assemble and bake the shells fresh for the best texture contrast.
Q: I don’t have a muffin tin. Any other options?
A: Yes! You can form the rice into small, flat patties on a parchment-lined baking sheet. Bake them, then treat them like a crispy rice cake base. Or, use a mini tart pan or even shape them by hand into small cups on the sheet—they’ll be more free-form but just as delicious.
Q: Is there a substitute for nori?
A: The nori really makes the “taco” experience. If you can’t find it, very buttery, soft lettuce cups (like butter lettuce) can work as a fresh, crunchy vessel, though you’ll lose that classic sushi flavor.
Nutritional Snapshot (Because We’re Curious!)
Hey, I’m all about balance—enjoying the decadent stuff and knowing what’s in it. Here’s a rough breakdown per taco (based on the recipe making 6 tacos, using imitation crab, and including avocado). Remember, these are estimates and can vary based on your specific ingredients and toppings.
- Calories: ~160-180
- Fat: 8-10g (Mostly from the healthy fats in mayo and avocado)
- Carbohydrates: 16-18g
- Protein: 6-7g
- Sodium: ~300-400mg (Primarily from soy sauce and crab. Use low-sodium versions to reduce.)
This is a fun, satisfying snack or light meal. To add more volume and nutrients, serve it with a big, simple side salad!
Final Thoughts: Your New Go-To Fun Food
And that’s it, my friend! You’re now fully equipped to conquer the glorious world of Sushi Bake Tacos. This recipe is a testament to the fact that cooking doesn’t have to be complicated to be exciting. It’s about playing with flavors, textures, and having a seriously good time in the kitchen. I hope these little crunchy, creamy bites bring as much joy to your table as they do to mine. They’re proof that the best recipes often come from a place of curiosity, a little nostalgia, and a willingness to break the “rules.”
If you make them (and you totally should!), tag me on social @TastyChow—I love seeing your creations! Now, go forth, get crispy, and chow down.
With love and a properly messy apron,
Emily 🥢✨