Your New Go-To Party Appetizer is Here!
Hey there, fellow food lover! Tell me if this sounds familiar: you’re hosting a game day party, a casual get-together, or just need a seriously fun snack for movie night. You want something that screams “comfort food,” something that makes people’s eyes light up the second you bring it out of the kitchen. You need a guaranteed crowd-pleaser.
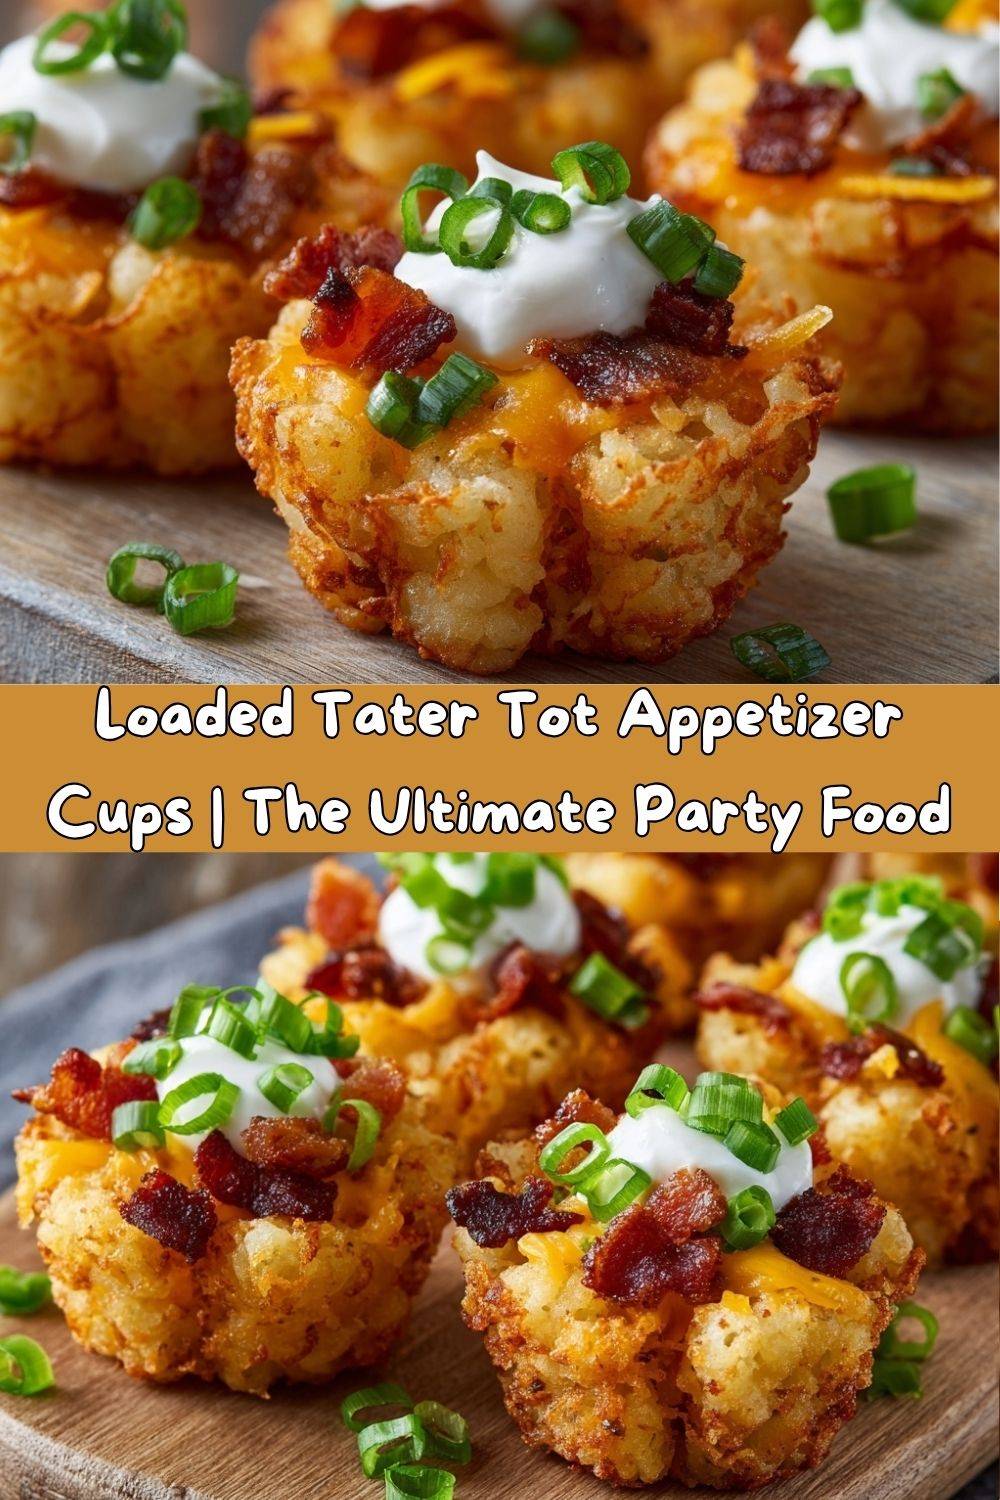
Well, my friend, you have just found your culinary secret weapon. Let me introduce you to my Loaded Tater Tot Appetizer Cups. Imagine this: crispy, golden-brown tater tot cups, acting as the world’s most perfect edible vessel. They’re filled to the brim with melted, gooey cheddar cheese, topped with smoky, crispy bacon, a cool, creamy dollop of sour cream, and a fresh, vibrant sprinkle of green onions.
These aren’t just an appetizer; they’re a whole experience. They’re fun to make, even more fun to eat, and they have this magical ability to vanish from the platter in about 4.2 seconds. They’re the ultimate bite-sized hug for your taste buds, combining all the best parts of a loaded baked potato into one perfectly poppable package. So, tie on your favorite apron (the messy one is totally welcome here), and let’s make something delicious that will have everyone asking you for the recipe!
The Happy Accident That Started It All
I have to confess, the genius of these tater tot cups wasn’t some meticulously planned culinary masterpiece. Nope. It was a happy, delicious accident born from a near-panic situation.
Picture it: my best friend’s annual “Big Game” party. I was in charge of appetizers, and I had ambitiously planned an elaborate spread. But, as fate would have it, my main dish was a total flop. With guests arriving in 45 minutes, I was staring into my freezer, praying for a miracle. My eyes landed on two forgotten bags of tater tots and a block of cheddar cheese. In the fridge, I found bacon, sour cream, and some sad-looking green onions. It was a Hail Mary pass.
I remember frantically pressing those frozen tots into a muffin tin, crossing my fingers, and praying they’d hold a shape. When they came out of the oven as these perfect, crispy little cups, I almost did a happy dance right there in my kitchen. I loaded them up, ran out the door, and set them on the table. They were the first thing to disappear. People were raving about them! That day, a kitchen disaster taught me one of my favorite lessons: sometimes, the very best recipes come from a little bit of chaos and a whole lot of love.
Gathering Your Flavor Dream Team
One of the best things about this recipe is its beautiful simplicity. You only need a handful of ingredients to create pure magic. Here’s your shopping list, complete with my little chef insights to make your life easier.
- 2 (16 oz) bags frozen tater tots (about 96–120 tots): This is our star and our structure! Don’t thaw them; the frozen state helps them hold their shape as they bake. I typically use the classic, name-brand crispy tots for the best golden-brown result, but any brand will work in a pinch.
- 1 ½ cups shredded cheddar cheese: Go for a sharp or medium cheddar for the best flavor punch. Chef’s Hack: I cannot stress this enough—shred your own cheese from a block! Pre-shredded cheese is coated with anti-caking agents that can make it less melty and gooey. A freshly shredded cheese will give you that epic, Instagram-worthy cheese pull.
- 1 cup sour cream: This is our cool, creamy counterpoint to all the salty, savory goodness. For a bit of a tangy twist, you can swap in plain Greek yogurt. It adds a little protein boost, too!
- 8 slices bacon, cooked and crumbled: Smoky, salty, crispy bacon is non-negotiable for that classic “loaded” flavor. For a major time-saver, use real bacon bits from the store. Want to get fancy? Try using thick-cut applewood smoked bacon for an incredible depth of flavor.
- 4 green onions, sliced (green parts only): These little green gems add a necessary fresh, oniony bite that cuts through the richness. Slice them thin for the perfect garnish.
- Non-stick cooking spray: Our trusty sidekick to ensure our crispy cups release from the pan without a fight. A good coating is the key to success here!
Let’s Build These Flavor Cups! (Step-by-Step)
Ready to see the magic happen? Follow these steps, and you’ll be a tater tot cup pro in no time. I’ve packed this section with all my favorite tips and tricks to ensure your success.
- Preheat and Prep: Fire up your oven to 425°F (220°C). While it’s heating, generously spray a 24-cup mini muffin pan with non-stick cooking spray. Get into every nook and cranny! This is the single most important step for easy removal later.
- Fill the Cups: Now, grab those frozen tater tots. Place 4-5 tots into each muffin cup. It might feel a little haphazard, and that’s okay! They just need to cover the bottom. I like to arrange them so they’re standing on their ends, which helps form the walls of the cup as they bake.
- First Bake & The “Press”: Pop the pan into your preheated oven and bake for 10 minutes. This initial bake partially thaws and softens the tots. Now, here’s the fun part! Carefully remove the pan (it’s hot!). Use a small shot glass, the bottom of a narrow spice jar, or even a teaspoon to firmly press the softened tots down and up the sides of each muffin cup. You’re essentially molding them into a perfect little edible bowl. Don’t be shy—a good, firm press is what creates that perfect cup shape.
- Crisp to Perfection: Once you’ve pressed all the cups, return the pan to the oven and bake for another 15-20 minutes. You’re looking for a deep, golden-brown color and a crispy texture. Keep an eye on them towards the end—oven temperatures can vary!
- The Cheesy Topping: Take the pan out of the oven (they look amazing, right?!). Immediately sprinkle the shredded cheddar cheese into each hot cup. The residual heat will start melting the cheese right away, which is exactly what we want.
- Bacon & Final Melt: Sprinkle the crumbled bacon over the cheesy tops. Now, pop the pan back into the oven for just 2-3 more minutes. This final blast of heat will fully melt the cheese into a gooey pool and warm the bacon through.
- The Grand Finale: Let the cups cool in the pan for about 5 minutes. This allows them to set slightly, making them easier to remove. Then, use a small offset spatula or a butter knife to gently lift them out. Right before serving, add that gorgeous dollop of sour cream and a confetti-like sprinkle of green onions. And there you have it—perfection in a bite!
How to Serve These Show-Stopping Cups
Presentation is part of the fun! You’ve worked hard, so let’s show off these beauties.
I love to arrange them on a large, rustic wooden board or a simple white platter. The contrast makes the colors of the green onions and red bacon really pop. Scatter a few extra green onions or a little extra crumbled bacon around the platter for a professional, finished look.
These are the ultimate finger food, so just set them out with some small napkins and let your guests dig in! They pair wonderfully with a cold beer, a zesty ranch dip for those who want extra creaminess, or a spicy buffalo sauce for dipping. They’re the star of any appetizer table, but they also play well with others—think alongside some crispy chicken wings, a fresh veggie platter, or a big, tangy bowl of coleslaw.
Get Creative! Endless Flavor Twists
The basic recipe is a flawless classic, but the fun doesn’t stop there! Think of this tater tot cup as a blank canvas for your culinary creativity. Here are a few of my favorite twists:
- Southwestern Fiesta: Swap the cheddar for a pepper jack cheese. Mix in a teaspoon of taco seasoning with the sour cream, and top with crumbled cooked chorizo, diced avocado, and a sprinkle of fresh cilantro.
- Pizza Party: After the first bake, spoon a little bit of pizza sauce into each cup. Top with shredded mozzarella and mini pepperoni slices. Bake until bubbly and finish with a sprinkle of dried oregano.
- Buffalo Chicken: Toss 1 cup of shredded cooked chicken in 1/3 cup of buffalo sauce. After forming the cups, fill them with the buffalo chicken and top with a blue cheese or ranch dressing instead of sour cream.
- Veggie Lover’s Delight: Skip the bacon and add finely diced sautéed mushrooms, bell peppers, and onions into the cheese layer. A sprinkle of smoked paprika can add a lovely smoky depth without the meat.
- Fully Loaded Breakfast: Perfect for brunch! After forming the cups, crack a small egg into each one. Bake at 375°F until the egg whites are set, then top with cheese and crumbled bacon or breakfast sausage.
Chef Emily’s Kitchen Notes
Over the years, I’ve made these cups more times than I can count, and I’ve learned a thing or two. First, don’t stress if your “pressing” technique isn’t perfect on the first try. Sometimes a tot might break, or a cup might be lopsided. I promise, once they’re loaded with cheese and bacon, no one will notice. They all taste incredible!
This recipe has also evolved into my ultimate “clean out the fridge” appetizer. Got some leftover pulled pork? A bit of steak? Some random herbs? Toss them in! The tater tot cup is incredibly forgiving and welcoming to all sorts of flavor combinations. The most important ingredient is always the joy you put into making them.
Your Questions, Answered!
I’ve gotten loads of questions about this recipe over the years. Here are the most common ones to help you out!
Q: My tater tot cups are sticking to the pan! What did I do wrong?
A: The most likely culprit is not enough non-stick spray. Be *very* generous! Also, make sure you let them cool for 5 minutes before trying to remove them. If they still stick, gently run a small knife or offset spatula around the edges to loosen them.
Q: Can I make these ahead of time?
A: Absolutely! You can assemble the cups through step 4 (baking them until crispy). Let them cool completely, then store them in an airtight container in the fridge for up to 2 days. When you’re ready to serve, pop them back in a 375°F oven for 5-10 minutes to re-crisp, then add the cheese and bacon and continue with the recipe.
Q: Can I use a regular-sized muffin pan?
A: You can, but the results will be different. You’ll need to use more tater tots (about 6-8 per cup) and increase the baking time by 5-10 minutes. They’ll be more like loaded tot “nests” than dainty cups, but just as delicious!
Q: My cheese isn’t melting nicely. Help!
A: This almost always comes back to the cheese. As I mentioned before, pre-shredded cheese doesn’t melt as well. Shredding your own from a block is the #1 solution for that beautifully smooth, melty cheese we all dream about.
A Quick Note on Nutrition
I’m all about balance, friends! Life is about enjoying cheesy, bacon-y delights *and* your favorite green salads. These Loaded Tater Tot Cups are a treat, a celebration food, and they’re meant to be enjoyed as such.
Based on a standard recipe analysis, each cup comes in at around 115 calories. You’re looking at roughly 10g of carbs, 7g of fat, and 4g of protein per piece. Remember, this is an estimate and can vary based on the specific brands of ingredients you use. If you’re looking for lighter options, check out the “Veggie Lover’s” variation, use low-fat cheese, substitute Greek yogurt for sour cream, or use a turkey bacon. But for party days? I say go for the full, glorious, real-deal version and savor every single bite!
Your Turn to Create Some Magic
And there you have it! Everything you need to create these unforgettable Loaded Tater Tot Appetizer Cups. They’re more than just a recipe; they’re a ticket to becoming the hero of your next party. They’re a conversation starter, a memory maker, and a downright delicious bite of pure joy.
I hope you have as much fun making these as I do. I love seeing your kitchen creations! If you make them, please share a photo and tag me @TastyChowEmily so I can see your masterpiece and cheer you on.
Now, go forth and chow down! Until next time, happy cooking!
— Emily 🧀