Lucky Charms Marshmallow Blondies: Your New Favorite Bowl of Sunshine
Hey friend! Come on in, grab an apron, and let’s talk about one of life’s simple, sparkly joys: turning a box of cereal into pure, unadulterated magic. If you’ve ever found yourself staring into a bowl of Lucky Charms, fishing for just one more rainbow or shooting star while the cereal gets soggy (we’ve all been there), I have the best news. We’re taking that entire enchanting experience and baking it into the softest, chewiest, most buttery blondies you’ve ever tasted.
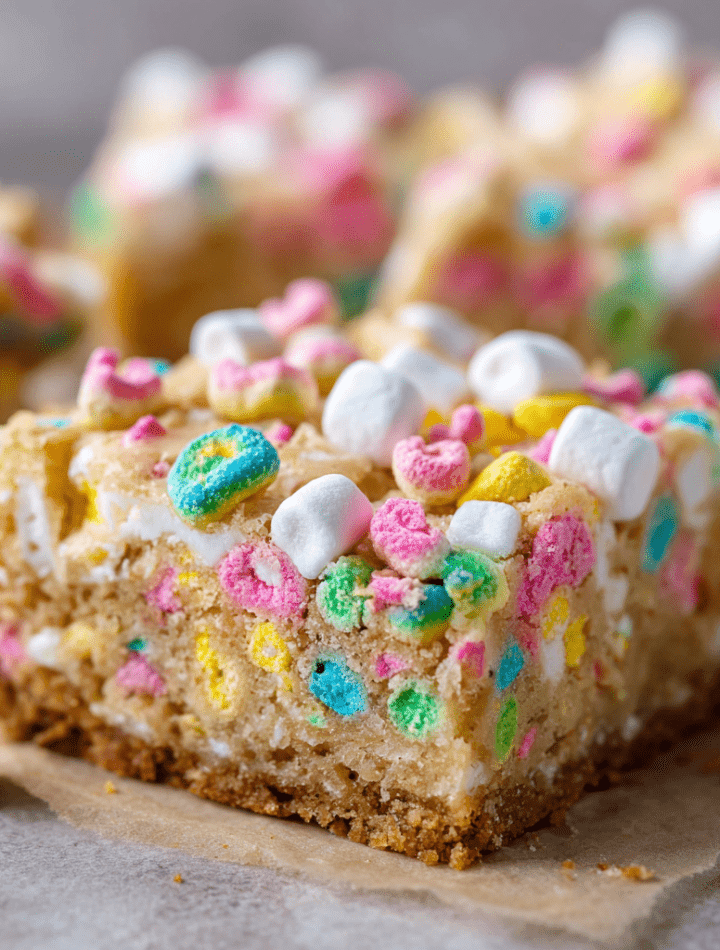
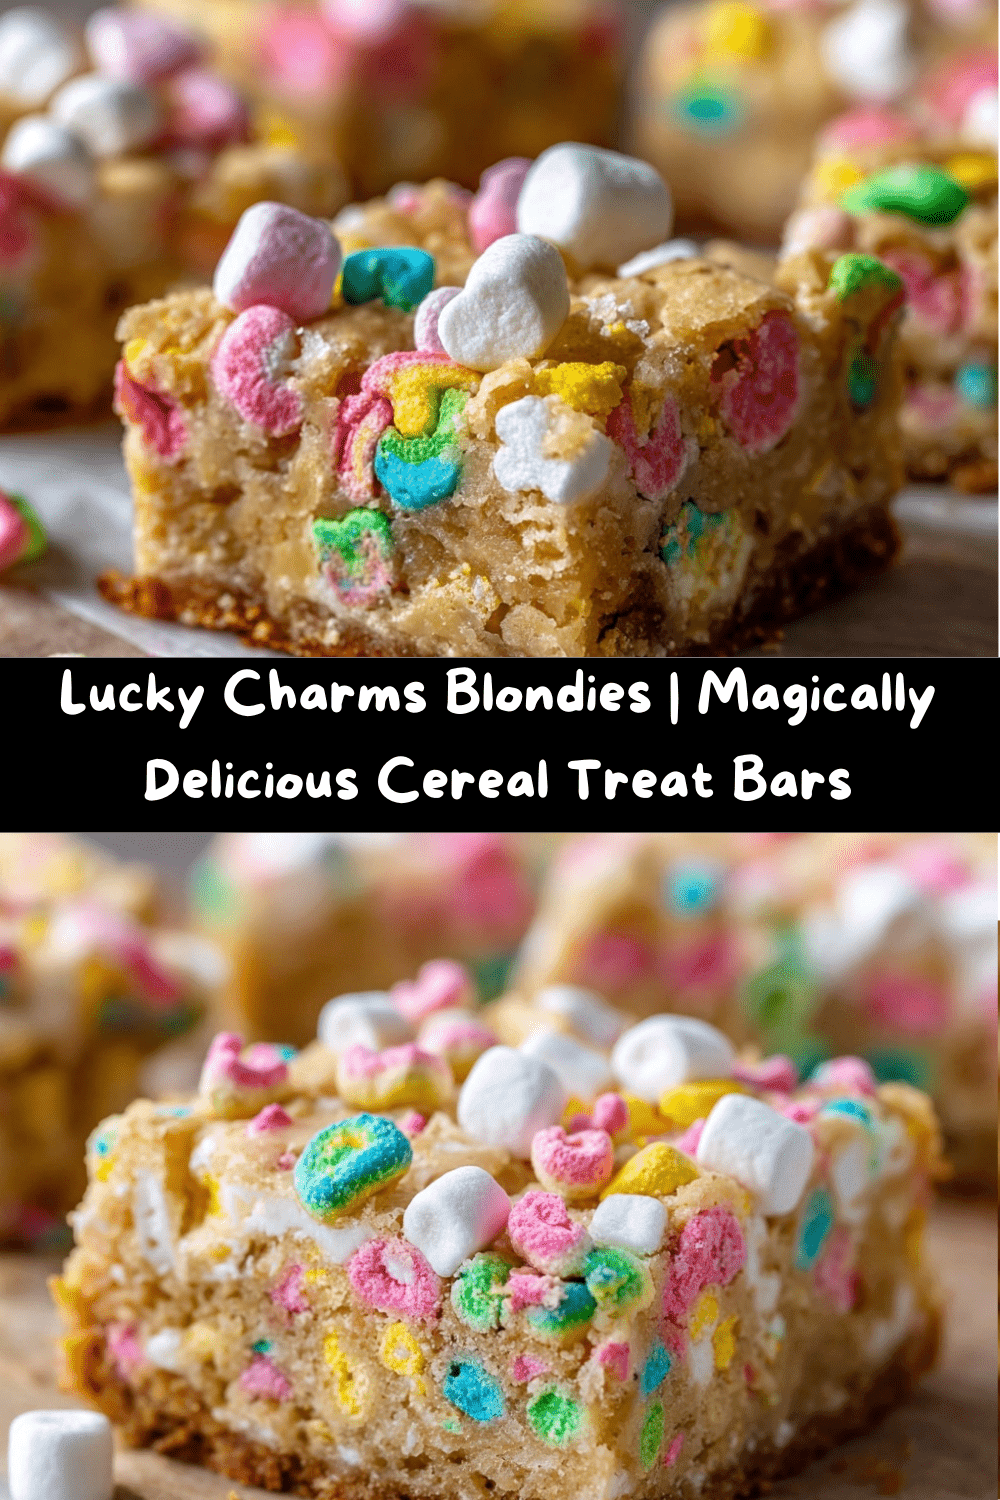
These Lucky Charms Marshmallow Blondies are more than just a dessert; they’re a nostalgia trip with a golden-brown crust. Imagine a blondie so perfect it practically sings—a rich, caramel-y base packed with crunchy cereal pieces, all topped with a layer of those iconic marshmallows that toast into sticky, sweet clouds of joy. They’re the treat that makes kids’ eyes go wide and adults sneak back to the pan for just one more “test” piece. The best part? You only need one bowl, about 10 minutes of hands-on time, and a serious love for fun. So, preheat that oven and let’s make some kitchen magic together!
The Day My Cereal Aisle Daydream Came True
This recipe was born from a seriously specific craving. Last St. Patrick’s Day, I was recipe testing for something “green” and festive, but my heart wasn’t in matcha or spinach pasta. My brain kept drifting back to being six years old, sitting cross-legged in front of Saturday morning cartoons with a bowl of Leprechaun loot. I wanted that feeling in a dessert. I started with a classic blondie base—my grandma’s “never fail” recipe—and stared at the box of cereal on my counter. What if I just… stirred it in?
The first batch was a glorious, delicious mess. I made the rookie mistake of mixing ALL the marshmallows into the batter. They vanished! Melted into sweet little pockets, which was tasty, but I missed the colorful topping. Batch two was the charm. I folded in the cereal pieces and most of the marshmallows, but I saved a big handful to press on top. When I pulled that pan from the oven, I actually did a little dance. The marshmallows on top had puffed and toasted, creating this magical, crackly landscape. It tasted like my favorite childhood memory, but better, because now I get to share it with you.
Gathering Your Magical Ingredients
Here’s everything you’ll need to create this bowl of sunshine. I’ve added my favorite chef notes and swaps so you can bake with confidence!
- ½ cup (1 stick) unsalted butter, melted: This is our flavor foundation! I use unsalted so we control the salt level. Melting it first gives us that dense, fudgy blondie texture we’re after. No microwave? Just chop it up and melt it in a small saucepan over low heat.
- 1 cup brown sugar, packed: Pack it in there, friends! The molasses in brown sugar is what creates that deep, caramel-like flavor and ultra-moist crumb. Light or dark brown works—dark will give you a slightly richer taste.
- 1 large egg: Our binding agent, bringing everything together. Make sure it’s at room temperature for easiest mixing. Just pop it in a bowl of warm water for 5 minutes if you forgot to take it out!
- 1 tsp vanilla extract: The flavor booster. It rounds out the sweetness and adds a warm aroma. For a next-level twist, try using vanilla bean paste.
- 1 cup all-purpose flour: The structure. Spoon it into your measuring cup and level it off to avoid packing in too much, which can make the blondies tough.
- ¼ tsp baking powder: Just a little lift! It gives the blondie a slight rise and a perfect chewy edge.
- ¼ tsp salt: The secret weapon! Salt makes all the sweet flavors pop and keeps the dessert from tasting one-dimensional.
- 1½ cups Lucky Charms cereal: The star of the show! We’ll use about 1 cup (with its marshmallows) mixed in, and reserve a generous ½ cup of mostly marshmallows for the glorious top layer. Pro-tip: pick through the box to get those colorful bits for topping!
Let’s Bake! Your Step-by-Step Guide to Blondie Bliss
Ready? This is the fun part. Put on some happy music, and let’s transform these simple ingredients into something magical.
- Prep Your Pan & Oven: Start by preheating your oven to 350°F (175°C). This is crucial for even baking. Line an 8×8-inch baking pan with parchment paper, leaving some overhang on two sides. This “sling” will let you lift the entire blondie slab out for flawless, crumb-free slicing later. Lightly grease any exposed pan sides.
- Make the Luscious Blondie Base: In a large bowl, whisk together the melted butter and packed brown sugar. Whisk for a good minute—you want it to be smooth and look like glossy, wet sand. This step helps dissolve the sugar. Now, whisk in the egg and vanilla until the mixture is completely smooth and slightly thickened.
- Bring in the Dry Goods: Switch to a spatula. Add the flour, baking powder, and salt right on top of the wet ingredients. Gently fold everything together until you no longer see dry streaks of flour. A few small lumps are okay! Overmixing is the enemy of a tender, chewy blondie.
- Fold in the Magic: Time for the cereal! Gently fold in 1 cup of the Lucky Charms (this includes both the cereal bits and the marshmallows in that cup). Be gentle to avoid crushing the cereal too much. Your batter will be thick and wonderfully speckled.
- Pan & Top with Marshmallow Joy: Scrape the batter into your prepared pan. Use your spatula to spread it evenly into all the corners. Now, take your reserved ½ cup of mostly marshmallows and scatter them artistically (or just happily) over the top. Gently press them down just so they adhere.
- Bake to Golden Perfection: Slide the pan into the center of your preheated oven. Bake for 22-25 minutes. You’re looking for golden brown edges and a center that looks just set—a toothpick inserted will have a few moist crumbs, but not wet batter. The top marshmallows will be puffed and toasted. Remember, they will continue to set as they cool!
- The Most Important Step: COOL! I know, the aroma is intoxicating. But you must let the blondies cool completely in the pan on a wire rack. This is non-negotiable for clean slices. I promise, the wait is worth it. For super clean cuts, you can even pop the whole pan in the fridge for 30 minutes after it cools.
- Slice and Celebrate: Once completely cool, use the parchment paper sling to lift the blondie block onto a cutting board. Use a sharp knife to slice into 9 or 16 squares. Wipe the knife clean between cuts for picture-perfect edges.
How to Serve These Marshmallow Marvels
Presentation is part of the fun! These blondies are a vibrant, cheerful treat all on their own, piled on a simple plate or platter. For a real showstopper, I love serving them on a bright, colorful plate that echoes the rainbow marshmallows. They’re the ultimate lunchbox surprise, picnic star, or after-school snack. Want to take them to a party? Stack them in a clear container or on a cake stand so everyone can admire those toasted marshmallow tops.
And for a truly decadent dessert experience, serve a blondie slightly warm (a quick 10-second zap in the microwave) with a scoop of vanilla ice cream. The contrast of cold, creamy ice cream with the chewy, buttery blondie and the crispy cereal bits is nothing short of legendary. Drizzle with a little caramel sauce, and you’ve got a dessert that will have everyone asking for the recipe.
Make It Your Own! Fun Recipe Twists
The beauty of this recipe is its versatility. Here are a few ways to play with your food:
- Chocolate Chip Carnival: Add ½ cup of semi-sweet or white chocolate chips to the batter along with the cereal for a double dose of sweetness and texture.
- Peanut Butter Paradise: Swirl ⅓ cup of creamy peanut butter into the batter after you spread it in the pan. Use a knife to create beautiful marbled patterns before adding the marshmallow topping.
- “Everything but the Kitchen Sink” Blondie: Feeling adventurous? Add a handful of pretzel pieces, a few tablespoons of sprinkles, and some butterscotch chips to the mix. It’s a party in every bite!
- Gluten-Free Friendly: Use your favorite 1-to-1 gluten-free flour blend and ensure your Lucky Charms are the gluten-free variety (they now make them!). The method stays exactly the same.
- Seasonal Spin: Use holiday-themed cereals! Try Franken Berry or Boo Berry for Halloween, or a red and green cereal mix for Christmas.
Chef Emily’s Kitchen Notes
This recipe has become a permanent fixture in my “Fun Food” file. It’s the one I make when I need a guaranteed smile. Over time, I’ve learned that the key is really in that two-stage marshmallow addition—mixing some in for hidden pockets of goo, and saving the best for the photogenic top. I’ve also been known to double the batch and bake it in a 9×13 pan (adjust baking time to 28-32 mins). Trust me, they disappear faster than you can say “magically delicious.” The only problem? You might start looking at every box of cereal and wondering, “Hmm, could I bake with that?” (Spoiler: The answer is usually yes.)
Your Questions, Answered!
Q: My center was super gooey, even after cooling. Did I underbake it?
A: It might be slightly underbaked, but that can be a delicious thing! These are meant to be chewy. Next time, bake for an extra 2-3 minutes. Also, ensure you’re using the correct pan size—a smaller pan means thicker batter that takes longer to bake through.
Q: Can I use a different cereal?
A: Absolutely! This is a fantastic template. Try it with Fruity Pebbles for a vibrant, citrusy bar, or Cinnamon Toast Crunch for a cozy, spiced version. Just aim for a similar volume.
Q: The marshmallows on top burned! What happened?
A> Ovens can have hot spots. If yours runs hot, try lowering the temp to 325°F and baking a few minutes longer. You can also add the marshmallow topping halfway through baking instead of at the beginning.
Q: How do I store these, and how long do they last?
A: Store in an airtight container at room temperature for up to 3 days. The marshmallows will soften over time, but they’re still delicious. You can also freeze them for up to 2 months—just thaw at room temp.
Nutritional Information (Per Blondie, based on 9 servings)
While these are absolutely a treat, I believe in enjoying every bite mindfully. Here’s a quick nutritional snapshot so you can plan accordingly. Remember, values are estimates and can vary based on specific ingredients used.
- Calories: ~260
- Carbohydrates: 32g
- Protein: 2g
- Total Fat: 13g
- Saturated Fat: 8g
- Sugars: 20g
- Sodium: 110mg
These blondies are a source of quick energy (thanks to the carbs and sugars) and provide a small amount of protein. The fat content, primarily from butter, contributes to that satisfying richness and mouthfeel. As with all indulgent desserts, the best approach is to savor them as part of a balanced lifestyle—enjoy one with a glass of milk or as a special weekend snack!
Final Thoughts from My Kitchen to Yours
And there you have it! My recipe for pure, uncomplicated baking joy. These Lucky Charms Marshmallow Blondies prove that the best recipes often come from a happy heart and a willingness to play with your food. They’re a reminder that cooking doesn’t always have to be serious; it can be silly, colorful, and packed with childhood wonder.
I hope you bake these, share them, and watch faces light up. Most of all, I hope you have as much fun making them as I do. Don’t forget to tag me @TastyChow if you share a photo—nothing makes my day more than seeing your kitchen creations. Now, go forth and make something delicious!
With love and a sprinkle of marshmallow magic,
Emily