Your New Favorite Comfort Food is Waiting
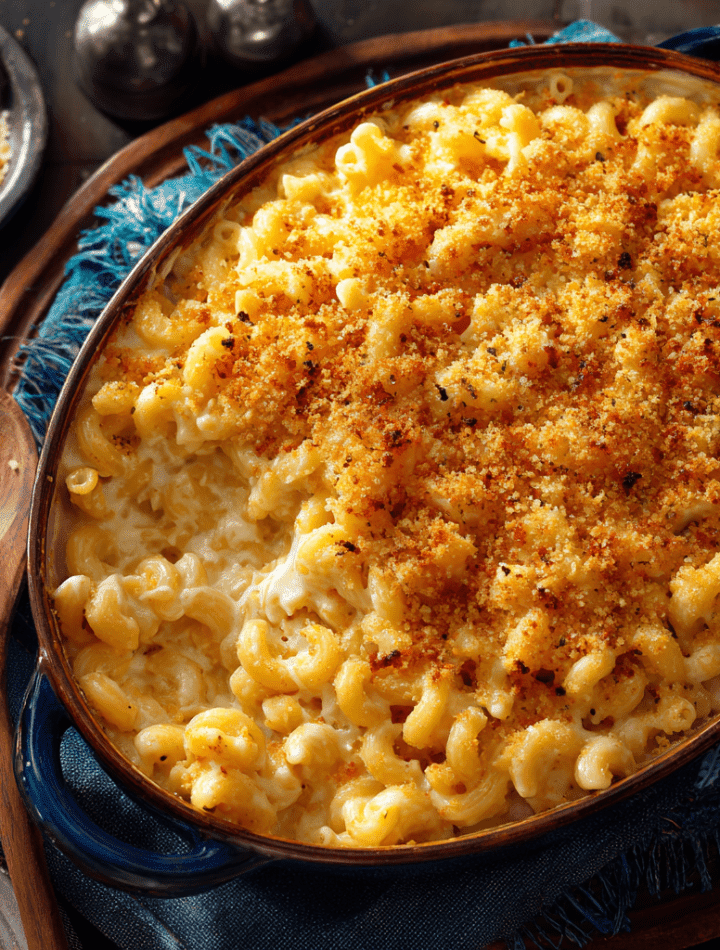
Hey there, friend! Let’s talk about one of life’s greatest simple pleasures: a big, steaming dish of homemade mac and cheese. I’m not talking about the stuff from a blue box (though we’ve all been there and it has its place!). I’m talking about the real deal. Creamy, decadent cheese sauce hugging every curve of the pasta, all baked under a blanket of golden, buttery, crispy breadcrumbs that crackle when you spoon into it. This Mac & Cheese Bake with a Crispy Breadcrumb Topping is the ultimate hug in a dish. It’s the star of the potluck, the hero of busy weeknights, and the side dish that often steals the show at holiday feasts. It’s familiar, it’s nostalgic, and I promise you, it’s totally irresistible. So, tie on your favorite apron—the one with the stains that tell a thousand kitchen stories—and let’s make something incredibly delicious together.

A Sunday Tradition at Grandma’s Table
This recipe takes me right back to my grandma’s linoleum-floored kitchen. Sundays were for church, for family, and for her legendary baked macaroni and cheese. It was the only dish my brother and I would never, ever fight over. We’d hover by the oven, watching the cheese bubble around the edges, begging for the first taste. Her secret, she told me years later with a wink, wasn’t some fancy cheese blend—it was a pinch of dry mustard and letting the sauce thicken until it “coated the spoon like a good winter coat.” That memory, the smell of toasting breadcrumbs and sharp cheddar, is baked right into this recipe. It’s more than just food; it’s a feeling of home. And that’s exactly what I want to share with you in your own kitchen.
Gathering Your Cheesy Arsenal
Here’s everything you’ll need to create this masterpiece. The beauty of mac and cheese is its flexibility, so I’ve included my favorite chef insights and swaps to make it your own!
For the Pasta & Base:
- 1 lb elbow macaroni: The classic shape! Its little tubes are perfect for trapping all that cheesy goodness. Feel free to use cavatappi, shells, or rigatoni for fun twists.
- 4 tbsp butter: Unsalted is my go-to so I can control the salt level. This is the base of our luxurious roux.
- ¼ cup all-purpose flour: This teams up with the butter to form the roux, which is the magic thickener for our sauce. For a gluten-free version, a 1:1 GF flour blend works wonderfully.
- 3 cups whole milk, warmed: Warm milk is KEY! It prevents the roux from getting lumpy. Using whole milk gives the sauce incredible richness. 2% will work in a pinch, but avoid skim.
- 1 cup heavy cream: This is our secret weapon for an ultra-creamy, luscious sauce that doesn’t get grainy.
For the Cheese Sauce:
- 3 cups shredded sharp cheddar: PLEASE shred this yourself! Pre-shredded bags are coated in anti-caking agents that can make your sauce gritty. Sharp cheddar gives that classic, tangy flavor we all love.
- 1 cup shredded mozzarella: This is my “secret” for that epic, stretchy, pull-you-see-in-commercials cheese pull. It melts like a dream.
- ½ tsp garlic powder: It blends seamlessly into the sauce, giving a subtle, savory depth without the texture of fresh garlic.
- Salt & pepper to taste: Season as you go! I always taste the sauce before I add the pasta.
For That Epic Topping:
- 1 cup breadcrumbs: I’m a panko girl for life—they give you the absolute best, craggy, crunchy crust. Regular dry breadcrumbs work too!
- 2 tbsp butter, melted: This butter-to-breadcrumb ratio is perfect for achieving that golden-brown, crispy perfection.
- Optional: 2 tbsp grated Parmesan: A little Parm mixed into the topping adds a salty, nutty, next-level flavor boost. Highly recommend!
Let’s Build the Creamy Dream!
Don’t let the from-scratch sauce scare you. It’s simple, I promise! Just follow these steps and you’ll be a roux-making pro in no time.
- Preheat and Prep: Fire up your oven to 375°F (190°C) and grab a 9×13-inch baking dish. Give it a quick grease with butter or non-stick spray. This is our mac’s future home!
- Pasta Time: Cook your elbow macaroni in a large pot of well-salted boiling water. BUT—and this is a big but—cook it just to al dente (about 1 minute less than the package says). It’s going to keep cooking in the oven, and we don’t want mushy pasta! Drain it and let it hang out.
- Master the Roux: In a large saucepan or Dutch oven, melt the 4 tbsp of butter over medium heat. Once it’s foamy, whisk in the flour. Cook this for a full 1-2 minutes, whisking constantly. You’re looking for a light golden color and a faintly nutty smell. This cooks out the raw flour taste and is the foundation of your sauce!
- Whisk, Whisk, Whisk! Slowly, and I mean slowly, pour in the warm milk and cream while whisking like your life depends on it. This constant whisking is the absolute key to a smooth, lump-free sauce. Keep whisking until the mixture is smooth and begins to thicken. This should take about 5-7 minutes. You’ll know it’s ready when it coats the back of a spoon.
- Get Cheesy: Turn the heat down to low. Now, gradually add your shredded cheeses, one handful at a time, whisking until each addition is fully melted before adding the next. This patience ensures a smooth, emulsified sauce. Stir in the garlic powder, salt, and pepper.
- The Big Combine: Add the drained al dente pasta to the cheese sauce. Use a big spoon or spatula to gently fold it all together until every single piece of pasta is gloriously coated. Pour this beautiful mixture into your prepared baking dish and spread it out evenly.
- Create the Crunch: In a small bowl, mix together the breadcrumbs, melted butter, and Parmesan (if using) until everything is combined and looks like wet sand. Sprinkle this evenly over the entire surface of the mac and cheese.
- Bake to Perfection: Pop it in the oven, uncovered, for 20-25 minutes. You’re waiting for the sauce to be bubbly around the edges and the topping to be a gorgeous golden brown. For that final, restaurant-quality touch, turn on the broiler for the last 2-3 minutes. WATCH IT CLOSELY! It can go from golden to burnt in seconds, but that extra blast of heat makes the topping impossibly crispy.
How to Serve This Masterpiece
Okay, the hardest part is over: waiting for it to come out of the oven! Let it rest for about 5-10 minutes before serving. This allows the sauce to set just a tad, so you get clean, beautiful scoops instead of a runny mess. I love serving this right from the baking dish at the table—it’s so homey and inviting. For a weeknight dinner, it’s a glorious meal all on its own, maybe with a simple green salad or some steamed broccoli on the side to make you feel virtuous. For a holiday or potluck, it’s the ultimate sidekick to roasted turkey, honey-glazed ham, or juicy meatloaf. Don’t forget to garnish with a little fresh chopped parsley or chives for a pop of color and freshness!
Make It Your Own! Creative Twists
The basic recipe is perfection, but why not play with your food? Here are a few of my favorite ways to mix it up:
- The Meat Lover: Stir in 1 cup of cooked, crumbled bacon, diced ham, or shredded rotisserie chicken into the pasta and sauce before baking. Protein power!
- Veggie Delight: Fold in 1-2 cups of your favorite blanched vegetables. Broccoli florets, peas, sautéed mushrooms, or roasted cherry tomatoes are all fantastic additions.
- Spicy Southwest: Kick it up! Add a diced jalapeño (seeds removed for less heat) to the roux, use a pepper jack cheese in place of the mozzarella, and stir in a can of drained green chiles.
- Gourmet Blend: Change up the cheeses! Try a combination of Gruyère, Fontina, and a little Gouda for a more sophisticated, nutty flavor profile.
- Gluten-Free & Lighter: Use your favorite gluten-free pasta and a GF flour blend. For a lighter sauce, you can substitute the whole milk and cream with 4 cups of 2% milk, though the sauce will be slightly less rich.
Chef Emily’s Kitchen Notes
This recipe has evolved so much since my first attempt in culinary school, where I was so nervous I almost burned the roux! My biggest lesson learned? Shred your own cheese. It seems like a small, annoying step, but it makes a world of difference in achieving that silky-smooth sauce. Also, if your sauce seems too thick after adding the cheese, don’t panic! Just whisk in a splash of warm milk to loosen it up to your desired consistency. And finally, the broiler step is non-negotiable for me now. That extra crunch is what takes this from a great mac and cheese to an unforgettable one. It’s the culinary equivalent of putting on a great pair of earrings—it just completes the whole look.
Mac & Cheese Questions, Answered!
Q: Why did my sauce turn out grainy or oily?
A: This usually happens if the heat is too high when you add the cheese or if you use pre-shredded cheese. Always melt your cheese over low heat, and shred it yourself for the creamiest results.
Q: Can I make this mac and cheese ahead of time?
A: Absolutely! Assemble the entire dish (through step 6), cover it tightly, and refrigerate for up to 24 hours. When you’re ready, let it sit at room temp for 30 minutes, add the topping, and bake. You’ll likely need to add 5-10 minutes to the baking time since it’s starting from cold.
Q: My breadcrumbs are burning before the middle is hot! What do I do?
A: Ah, the classic oven dilemma! If the top is getting too dark, simply tent the dish loosely with aluminum foil for the remainder of the baking time. This will protect the topping while allowing the center to heat through.
Q: Is it okay to use different kinds of pasta?
A> Of course! Just stick to short, sturdy shapes with lots of nooks and crannies to hold the sauce. Shells, cavatappi, penne, and rigatoni are all excellent choices.

Mac & Cheese Bake with Crispy Breadcrumb Topping
- Total Time: 40 minutes
- Yield: 6 - 8 1x
Description
Creamy, cheesy pasta baked to bubbling perfection with a golden, buttery breadcrumb crust—this mac & cheese is everything you crave in a comfort dish. Whether it’s a weeknight dinner or holiday side, it’s familiar, nostalgic, and totally irresistible.
Ingredients
For the Pasta:
1 lb elbow macaroni (or pasta of choice)
4 tbsp butter
¼ cup all-purpose flour
3 cups whole milk (warm)
1 cup heavy cream
3 cups shredded sharp cheddar
1 cup shredded mozzarella
½ tsp garlic powder
Salt & pepper to taste
For the Topping:
1 cup breadcrumbs (panko for extra crunch)
2 tbsp butter, melted
Optional: 2 tbsp grated Parmesan
Instructions
Preheat oven to 375°F (190°C). Grease a 9×13-inch baking dish.
Cook pasta al dente, drain, and set aside.
Make the sauce: Melt butter in a saucepan over medium heat. Whisk in flour and cook for 1–2 minutes. Slowly whisk in warm milk and cream until smooth. Cook until thickened (about 5–7 minutes).
Stir in cheeses, garlic powder, salt, and pepper until melted and creamy.
Combine sauce with pasta, then pour into the baking dish.
Mix breadcrumbs with melted butter (and Parmesan if using). Sprinkle over the pasta.
Bake uncovered for 20–25 minutes, or until golden and bubbly. Broil for 2–3 minutes at the end for extra crispiness.
- Prep Time: 15 minutes
- Cook Time: 25 minutes
Nutrition
- Calories: 450 / Serving
- Fat: 26g / Serving
- Carbohydrates: 38g / Serving
- Protein: 15g / Serving
Nutritional Information*
Okay, let’s be real—this is a celebration of comfort food, not a diet dish! But it’s good to know what you’re enjoying. This nutritional info is an estimate per serving (based on 8 servings).
- Calories: ~450
- Fat: 26g
- Carbohydrates: 38g
- Protein: 15g
*Please note: This information is approximate and calculated using an online nutrition calculator. Values can vary significantly based on the specific brands and ingredients you use. This dish contains dairy and gluten.
You Did It! Now, Dig In.
There you have it, my friend! Your very own from-scratch, incredibly delicious, soul-warming mac and cheese bake. I hope this recipe becomes a new favorite in your home, creating its own messy, cheesy, happy memories around your table. There’s nothing quite like the pride of serving a dish you made completely from heart (and a little bit of butter).
I’d love to hear how it turned out for you! Did you add any fun mix-ins? Did your family go crazy for that crispy topping? Tag me on social @tastychow so I can see your beautiful creations. Now, go grab that fork and chow down!
With love and a full belly,
Emily