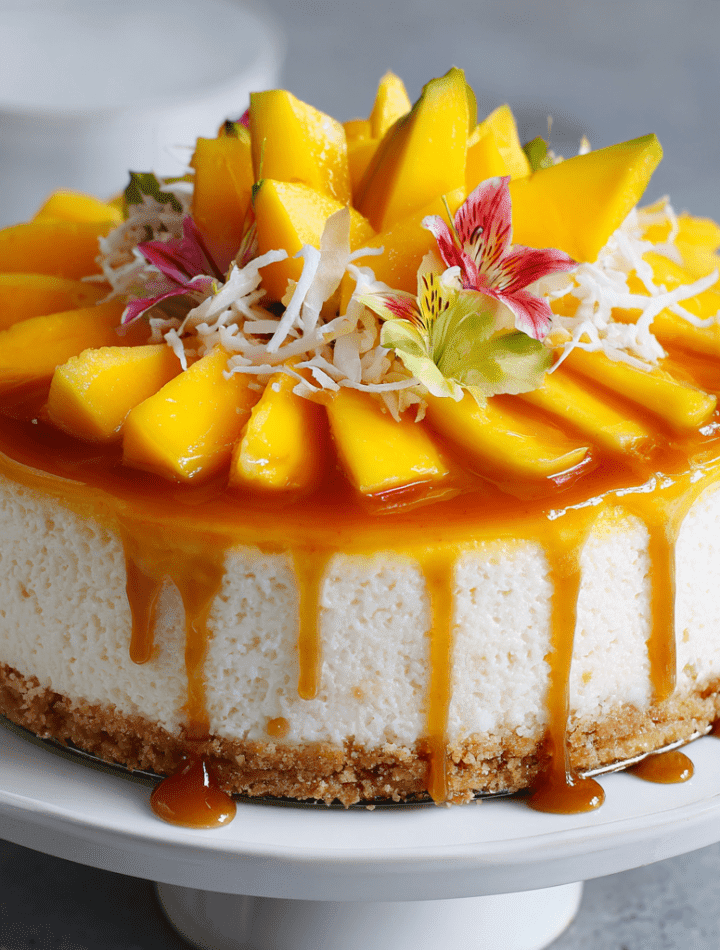
Mango Sticky Rice Cheesecake – Your Ticket to a Tropical Getaway
We’re fusing two of the world’s greatest desserts into one show-stopping masterpiece: the iconic, fragrant sweetness of Thai Mango Sticky Rice and the rich, creamy indulgence of a classic cheesecake. This isn’t just mixing flavors; it’s creating a whole new experience. Imagine a base of sweet, chewy coconut rice, a cloud of no-bake mango cheesecake floating on top, all crowned with glossy fresh mango and a drizzle of coconut syrup. Each bite is a harmony of texture and tropical flavor—creamy, chewy, sweet, and just a tiny bit tangy from a kiss of lime.
And the best part? No oven required. This is a chill-and-fill situation, perfect for hot summer days when you want something impressive without sweating over a hot stove. Whether you’re a fusion foodie, need a stunning centerpiece for your next gathering, or just want to treat yourself to something spectacularly delicious, this recipe is your new best friend. So, let’s grab our spoons and dream of palm trees together. This Mango Sticky Rice Cheesecake is about to become your favorite culinary vacation.
The Night Market Magic That Inspired This Cake
This recipe was born from a core food memory. Years ago, I was wandering a night market in Chiang Mai, Thailand, utterly mesmerized by the symphony of sizzling woks and the scent of lemongrass in the air. But one humble stall stopped me in my tracks: a vendor methodically slicing ripe, golden mangoes and placing them over mounds of steaming coconut sticky rice before finishing with a generous pour of warm, salty-sweet coconut cream.
I took my first bite right there on the street, and it was a revelation. The combination was so simple, yet so profoundly perfect—the warm, savory-sweet rice against the cool, juicy mango. I must have gone back three nights in a row. When I returned home, that flavor combo lived rent-free in my head. I tried making the traditional version, but I’m a cheesecake girl at heart. My brain started whirring: “What if…?”
After a few (okay, several) experiments—one involving a disastrous attempt to bake the rice into the cheesecake—I landed on this layered, no-bake beauty. It captures the soul of that Thai street food dessert but wraps it up in the creamy, celebratory package we all know and love. It’s my edible postcard from that trip, and now I get to share it with you.
Gathering Your Tropical Toolkit: Ingredients & Insights
Here’s everything you’ll need to build this flavor paradise. I’ve added my chef notes and swaps to make this recipe work for you!
For the Coconut Sticky Rice Base:
- 1 cup glutinous (sticky) rice: This is non-negotiable for authenticity! Don’t let the name “glutinous” scare you—it just means the rice is high in starch, which gives it that wonderfully chewy, sticky texture. You can’t substitute regular rice here. Look for it in the Asian aisle labeled “sweet rice” or “Thai sticky rice.”
- 1¼ cups coconut milk: Use full-fat canned coconut milk for maximum richness and flavor. This is the soul of the base, so don’t skimp! Shake the can well before opening.
- ¼ cup sugar: Granulated white sugar is perfect. It dissolves easily and sweetens without competing with the coconut.
- ¼ tsp salt: The secret weapon! Salt makes the coconut flavor pop and balances all the sweetness beautifully. Trust me on this.
For the Mango Cheesecake Layer:
- 8 oz cream cheese, softened: Take this out of the fridge at least an hour ahead. Room temp cream cheese blends smoothly, leaving no lumps behind. Full-fat is best for texture.
- ½ cup sweetened condensed milk: This is our sweetener and adds a lovely fudgy depth. For a richer flavor, you could use coconut-flavored condensed milk if you find it!
- ½ cup mango purée: You can use store-bought or make your own by blending fresh, ripe mango until smooth. Chef’s Tip: If your mango isn’t super sweet, add a teaspoon of honey to the purée.
- 1 tsp vanilla extract: A warm flavor backbone that complements the tropical notes.
- 1 tbsp fresh lime juice: The essential bright note! It cuts through the richness and makes the mango flavor sing. Bottled juice just doesn’t have the same magic.
- ¾ cup heavy cream (cold), whipped: Whipping the cream separately and folding it in is what gives this layer its light, mousse-like texture. Make sure your cream and bowl are cold for the best whip.
For the Topping:
- 1–2 ripe mangoes, thinly sliced: Choose mangoes that yield slightly to gentle pressure and smell fragrant at the stem. Ataulfo (Honey) mangoes are my favorite for their buttery texture and less fibrous flesh.
- ½ cup coconut milk: The base for our shiny glaze.
- 1 tbsp sugar: Just a touch to sweeten the glaze.
- 1 tsp cornstarch + 1 tbsp water (slurry): This simple mix thickens our coconut milk into a gorgeous, brushable glaze that clings to the mangoes.
Let’s Build This Dreamy Dessert: Step-by-Step
Follow these steps, and you’ll have a flawless fusion dessert. I’m walking you through every stage with my favorite kitchen hacks!
Step 1: Make the Coconut Sticky Rice Base
Soak the Rice: First, rinse your glutinous rice in cold water until the water runs mostly clear. Then, cover it with plenty of fresh water and let it soak for at least 4 hours, or ideally overnight. This step is crucial for even cooking and achieving that perfect tender-chewy texture. Don’t rush it!
Steam It: Drain the soaked rice. I use a bamboo steamer lined with cheesecloth or a fine-mesh sieve set over a pot of simmering water. Spread the rice in an even layer. Cover and steam for 20-25 minutes. You’ll know it’s done when the grains are fully translucent and tender. Pro Tip: Halfway through, flip the rice over for even steaming.
Season & Press: While the rice steams, combine the coconut milk, sugar, and salt in a small saucepan. Warm it over medium heat, stirring, just until the sugar dissolves—don’t boil it. Once the rice is cooked, transfer it to a bowl and immediately pour the warm coconut milk mixture over it. Gently fold until the rice absorbs all the creamy liquid. Let it cool for 10 minutes. Then, firmly press this glorious coconut rice into the bottom of a 7 or 8-inch springform pan lined with parchment. I use the bottom of a measuring cup to press it into a smooth, even layer. Pop the whole pan in the fridge to chill and set while you make the cheesecake layer.
Step 2: Whip Up the Mango Cheesecake Layer
Whip the Cream: In a cold bowl, whip the heavy cream to stiff peaks. Set it aside. This is our fluffy cloud waiting to happen.
Blend the Base: In a large bowl, beat the softened cream cheese with a hand mixer until it’s completely smooth and lump-free. This is your foundation, so take a minute here. Add the sweetened condensed milk, mango purée, vanilla, and lime juice. Beat again until everything is silky and combined. Taste it! This is the fun part. Adjust lime or sweetness if you like.
Fold & Fill: Now, using a rubber spatula, gently fold in the whipped cream. Use a big, sweeping motion—you want to keep all that air in there. Stop as soon as no white streaks remain. Pull your chilled rice base from the fridge. Pour the mango cheesecake mixture over the top and spread it gently into a smooth, beautiful layer. Give the pan a few light taps on the counter to settle everything and remove air bubbles.
The Long Chill: This is the test of patience! Loosely cover the pan and refrigerate for at least 6 hours, or best overnight. Overnight is king—it allows the flavors to marry and the texture to become perfectly sliceable.
Step 3: Create the Glaze & Top It Off
Make the Glaze: About an hour before serving, make the coconut glaze. In a small saucepan, combine the ½ cup coconut milk and 1 tbsp sugar. Heat over medium. In a separate tiny bowl, mix the cornstarch and water into a smooth slurry. Once the coconut milk is steaming, whisk in the slurry. Keep whisking for 1-2 minutes until the mixture thickens slightly and becomes glossy. Remove from heat and let it cool completely to room temperature. It will thicken a bit more as it cools.
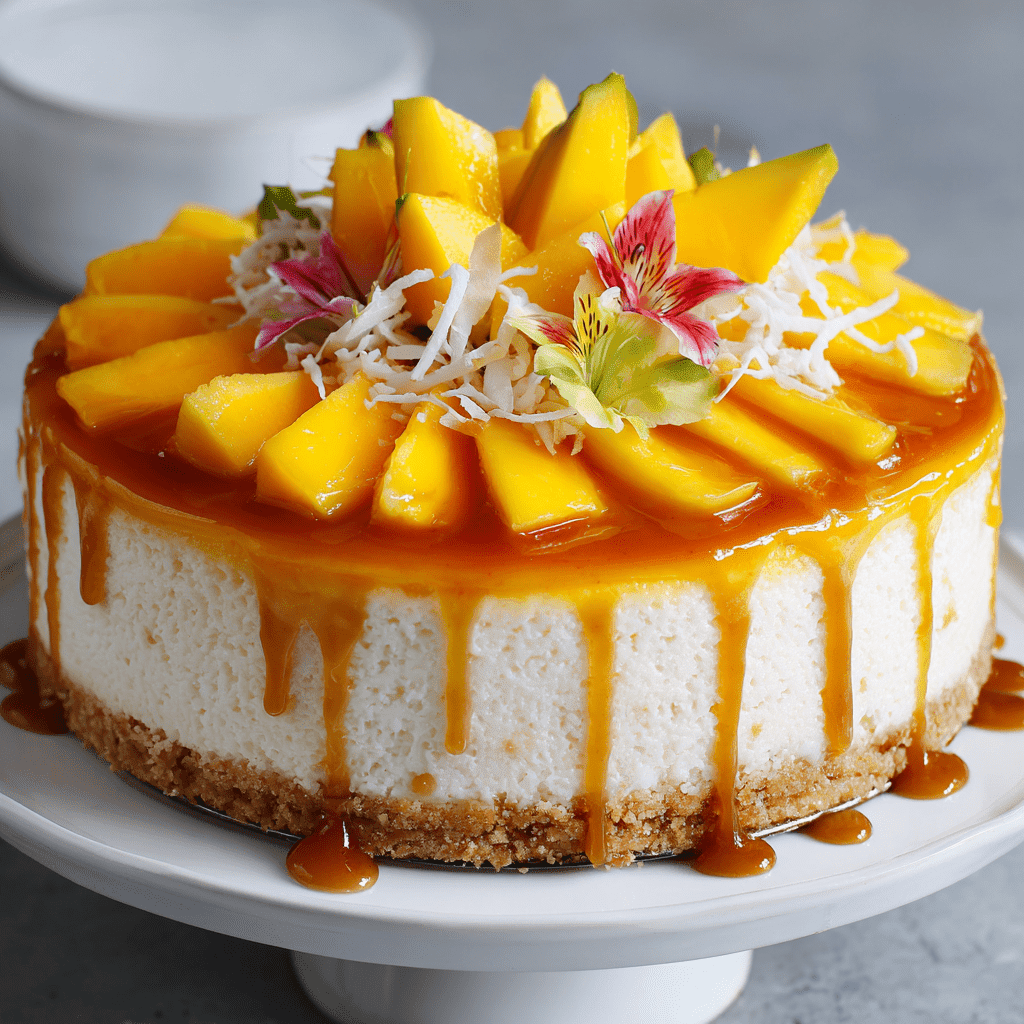
The Grand Finale: Carefully arrange your fresh mango slices on top of the set cheesecake in whatever pattern makes your heart happy—I love a sunburst or simple overlapping fan. Using a pastry brush, gently brush the cooled coconut glaze over the mango slices. This gives them an incredible shine and seals in their freshness. You can even drizzle a little extra artfully over the top!
How to Serve This Stunning Showstopper
Presentation is part of the fun! Run a thin knife under hot water, dry it, and then gently slide it around the edge of the springform pan before releasing the clamp. Carefully lift the ring away.
For pristine slices, repeat the hot-knife trick for every cut—wipe the blade clean and reheat between slices. Place each gorgeous piece on a plate. I love to add a few extra toasted coconut flakes on the side for crunch and a tiny sprinkle of lime zest for a color pop and aroma. A small fresh mint leaf is also a beautiful, refreshing touch. Serve it cold, and watch your guests’ eyes light up as they discover the magical rice layer at the bottom. It’s a true conversation starter!
Make It Your Own: Delicious Twists & Swaps
Love the idea but want to tweak it? Go for it! Here are some of my favorite riffs on this recipe:
- Passion Fruit Swirl: Swirl 2-3 tablespoons of passion fruit pulp (seeds strained if you prefer) into the top of the cheesecake layer before chilling for a gorgeous, tangy marbled effect.
- Vegan Delight: Use vegan cream cheese, coconut condensed milk (or maple syrup to taste), and chilled full-fat coconut cream whipped in place of heavy cream. It’s just as luscious!
- Grilled Mango Upgrade: For a smoky-sweet twist, lightly grill your mango slices before arranging them on top. It adds incredible depth.
- Matcha Coconut Base: Add 1-2 teaspoons of high-quality culinary matcha powder to the warm coconut milk mixture for the rice base. You’ll get a stunning green layer with an earthy flavor that pairs wonderfully with mango.
- Individual Jars: Skip the springform pan! Layer the cooled coconut rice and mango cheesecake mixture in small glasses or jars. They make perfect, portable individual desserts.
Chef Emily’s Kitchen Confidential
This recipe is a living, breathing thing in my kitchen! The first time I tried it, I was so eager I didn’t let the rice cool enough before adding the cheesecake layer… let’s just say it got a little *too* soft. Lesson learned: patience is a key ingredient!
Over time, I’ve played with adding a whisper of pandan extract to the rice (if you can find it, it’s incredible) or a pinch of cardamom to the cheesecake. My friends now request this for every summer potluck, and I’ve even made a “deconstructed” version for a fancy dinner party. The beauty of fusion cooking is that it evolves with you. Don’t be afraid to add your own signature touch—maybe a sprinkle of chili-lime salt on top for the adventurous? The kitchen is your playground.
Your Questions, Answered (Let’s Troubleshoot!)
Q: My cheesecake layer isn’t setting firm. What happened?
A: This usually has two culprits: 1) Not enough chilling time. This dessert needs a solid 6+ hours to fully set. Overnight is always best. 2) The whipped cream was under-whipped or over-folded. Make sure your cream is whipped to stiff peaks, and fold it in gently but quickly to maintain the structure. If it’s still too soft after proper chilling, it will still taste amazing—just serve it with a spoon as a mango dream parfait!
Q: Can I use regular rice instead of glutinous rice?
A: Unfortunately, no. The unique sticky, chewy texture of glutinous rice is central to the dish. Substituting regular rice (like jasmine) will give you a mushy, porridge-like base that won’t hold its shape. It’s worth seeking out the right ingredient!
A: Can I use regular rice instead of glutinous rice?
Unfortunately, no—and I promise this isn’t chef snobbery. Glutinous (sticky) rice is what gives this dessert its signature chewy, sliceable base. Regular rice like jasmine or basmati will turn soft and porridge-like once mixed with coconut milk, and it won’t hold together as a crust. The good news? Sticky rice is easy to find in Asian grocery stores and online, often labeled sweet rice or Thai sticky rice. It’s 100% worth the extra step.
Q: Can I make this cheesecake ahead of time?
Yes, and honestly—it’s even better that way. This cheesecake is a dream make-ahead dessert. You can prepare it up to 24 hours in advance, keep it covered in the refrigerator, and add the mango topping and coconut glaze the day of serving for the freshest look and flavor.
Q: What if my mangoes aren’t very sweet?
Totally fixable! If your mangoes are a little bland, brush them with a touch of honey or simple syrup before glazing, or add an extra teaspoon of sugar to the coconut glaze. A tiny pinch of salt on the mango also helps amplify sweetness—trust me, it’s a chef trick that works wonders.
Q: Can I freeze Mango Sticky Rice Cheesecake?
You can, but with a caveat. The cheesecake and rice layers freeze well, but fresh mango doesn’t love the freezer. If freezing, wrap the cheesecake tightly without the mango topping, freeze up to 1 month, then thaw overnight in the fridge and add fresh mango and glaze before serving.
Final Spoonful: A Dessert That Travels Without a Passport
This Mango Sticky Rice Cheesecake is more than a dessert—it’s a little edible escape. It’s proof that food can tell stories, bridge cultures, and bring sunshine to the table no matter where you are. Whether you’re serving it at a summer dinner party, a backyard celebration, or just treating yourself to something extraordinary, this cheesecake is meant to be savored slowly, one dreamy bite at a time.
So light a candle, put on your favorite travel playlist, and let dessert take you somewhere beautiful. If you make this recipe, I’d love to see it—tag me, share your twist, or just tell me where it transported you.
Until next time,
Chef Emily 🥭🥥✨