Mexican Chocolate Milk Cake Recipe – Moist, Spiced Dessert with a Twist
Hey there, friend! Emily here, from my flour-dusted kitchen to yours. Have you ever caught a whiff of something baking—chocolatey, warm, with a mysterious hint of spice—and just had to follow the scent? That’s the magic I’m bringing you today. This isn’t just any chocolate cake. This is a Mexican Chocolate Milk Cake, a dessert that wraps you in a cozy blanket of rich cocoa and cinnamon, then playfully nudges you with the gentlest, most intriguing whisper of warmth.
Imagine the softest, most tender crumb you’ve ever tasted, so moist it practically melts on your tongue, but with a soulful depth that makes you pause and go, “Wait, what is that amazing flavor?” That’s the magic of combining classic baking with the beautiful traditions of Mexican chocolate. It’s familiar, yet exciting. It’s comforting, yet a little adventurous. And the best part? It comes together in one bowl with simple ingredients, because I believe the most spectacular food shouldn’t be complicated. So, tie on your favorite apron (the one with the stains that tell stories), and let’s bake a cake that’s as full of character as it is of flavor. Your kitchen is about to smell incredible.
The Day I Fell for Spiced Chocolate
My love affair with this flavor combo started not in a fancy restaurant, but in my grandma’s cramped, sunny kitchen. She was a wizard with a jar of cinnamon, putting it in everything from oatmeal to her famous apple pie. One blustery autumn afternoon, she handed me a mug of steaming hot chocolate. But this wasn’t the powdered stuff from a packet. It was dark, foamy, and smelled like her spice drawer had exploded in the best way possible. She’d stirred in a cinnamon stick and the tiniest, tiniest pinch of chili powder. “It opens up your heart, honey,” she’d said with a wink.
I took a sip, and my world tilted. The chocolate was rich and profound, the cinnamon was like a warm hug, and then… a faint, glowing warmth bloomed in the back of my throat. It didn’t burn; it energized. It made the chocolate taste more like chocolate. That moment—the surprise, the comfort, the sheer deliciousness—stuck with me. Years later in culinary school, I played with mole sauces and spiced drinking chocolates, and I knew I had to translate that childhood feeling into a cake. A cake that’s a tribute to that wise woman and her magical mug. This recipe is that tribute: soft, milky, deeply chocolatey, and with just enough spice to make your taste buds sit up and sing.
Gathering Your Flavor Party
Here’s the beautiful cast of characters for our cake. The magic is in how they all work together! I’ve included my favorite chef-y insights and swaps so you can make this cake your own.
- 1 cup whole milk: The “milk” in our milk cake! Whole milk gives us fantastic richness and tenderness. For a dairy-free version, unsweetened almond or oat milk works wonderfully.
- 1/2 cup vegetable oil: Our secret weapon for an unbelievably moist crumb. It keeps the cake tender longer than butter would. Melted coconut oil is a tasty substitute if you love that subtle tropical note.
- 1 tsp vanilla extract: The flavor backbone. It enhances the chocolate and spice beautifully. If you have vanilla bean paste, use it—those little specks are gorgeous!
- 2 large eggs: Our binding agents and structure-builders. Make sure they’re at room temperature to help them incorporate smoothly into the batter.
- 1 cup granulated sugar: Sweetens the deal. The sugar also helps create that lovely, tender texture.
- 1 cup all-purpose flour: The foundation. For a slightly denser, nuttier cake, you can swap in 1/2 cup of whole wheat pastry flour, but all-purpose is perfect here.
- 1/2 cup unsweetened cocoa powder: The star! Use the best quality you have for deep, robust chocolate flavor. Dutch-processed cocoa will give a darker color and smoother taste, but natural cocoa works perfectly too.
- 1 tsp baking soda & 1/2 tsp baking powder: Our leavening dream team. They work together to give our cake a beautiful, even rise. No skipping the sifting here—it helps distribute them evenly.
- 1/2 tsp salt: The ultimate flavor enhancer. It makes the chocolate taste richer and balances the sweetness. Trust me on this.
- 1 tsp ground cinnamon: The soul of our spice profile. That warm, familiar aroma is non-negotiable!
- 1/4 tsp cayenne pepper (optional): The playful nudge! This is where the magic happens. It adds zero “hot sauce” heat, just a gentle, warming glow that makes the chocolate flavor pop. If you’re nervous, start with 1/8 tsp. I promise, it’s a game-changer.
Let’s Bake This Beauty: Step-by-Step
Ready? This is the fun part. I’ll walk you through each step with all my favorite kitchen hacks to ensure cake success.
- Preheat & Prep: First, crank that oven to 350°F (175°C). This gives it plenty of time to reach the perfect, steady temperature. Now, grab your 8×8 inch square pan. My go-to trick for never-stick cakes? A quick brush of softened butter or a spray of baking spray, then a light dusting of flour or cocoa powder (cocoa prevents a white dusting on your chocolate cake!). Tap out the excess. Your cake will flip out beautifully later.
- Whisk the Wet Team: In a large mixing bowl, pour in the milk, oil, and vanilla. Crack in those room-temperature eggs. Now, grab your whisk and go to town! Whisk with enthusiasm for about a minute until the mixture is completely smooth, creamy, and slightly frothy on top. You’re not just mixing; you’re incorporating air, which is the first step to a lovely texture.
- Sift the Dry Crew: Here’s a chef secret I learned the hard way: always sift your dry ingredients for cakes. It’s not fussy, it’s smart! Into a sieve or sifter over another bowl, add the flour, cocoa powder, sugar, baking soda, baking powder, salt, cinnamon, and that daring cayenne. Sift it all through. This breaks up any lumps in the cocoa and baking powder, ensures everything is evenly distributed, and gives you the lightest possible cake. Just look at that fluffy, spiced chocolate mountain—it’s already promising greatness.
- Create the Batter: Now, pour your sifted dry ingredients into the bowl with the wet ingredients. Switch to a spatula or spoon. Gently fold the dry into the wet. Start slow to avoid a flour cloud, then mix just until the last streak of dry ingredients disappears. A few tiny lumps are okay—overmixing is the enemy of a tender cake! The batter will be thin and pourable, which is exactly what we want.
- Bake to Perfection: Pour that gorgeous, dark batter into your prepared pan. Give the pan a gentle tap on the counter to release any big air bubbles. Slide it into the center of your preheated oven. Now, set a timer for 30 minutes and resist the urge to open the oven door! Peeking lets heat escape and can cause uneven baking. At 30 minutes, do the toothpick test: poke one into the center. If it comes out with a few moist crumbs clinging to it, it’s done. If it’s wet, give it 3-5 more minutes. You’ll know it’s ready when the top is set and the kitchen smells like a chocolate paradise.
- The Crucial Cool Down: This might be the hardest step! Take the cake out and let it cool in the pan on a wire rack for at least 20-30 minutes. This allows the structure to set. If you try to cut it while it’s hot, it’ll be too tender and might fall apart. Patience, my friend, leads to perfect slices.
How to Serve & Savor
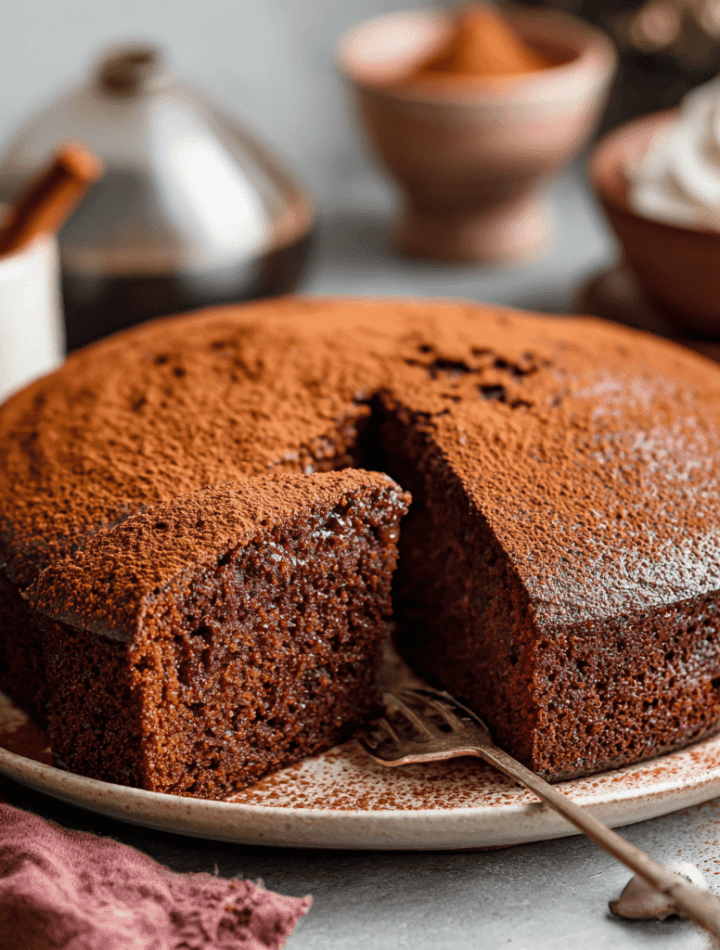
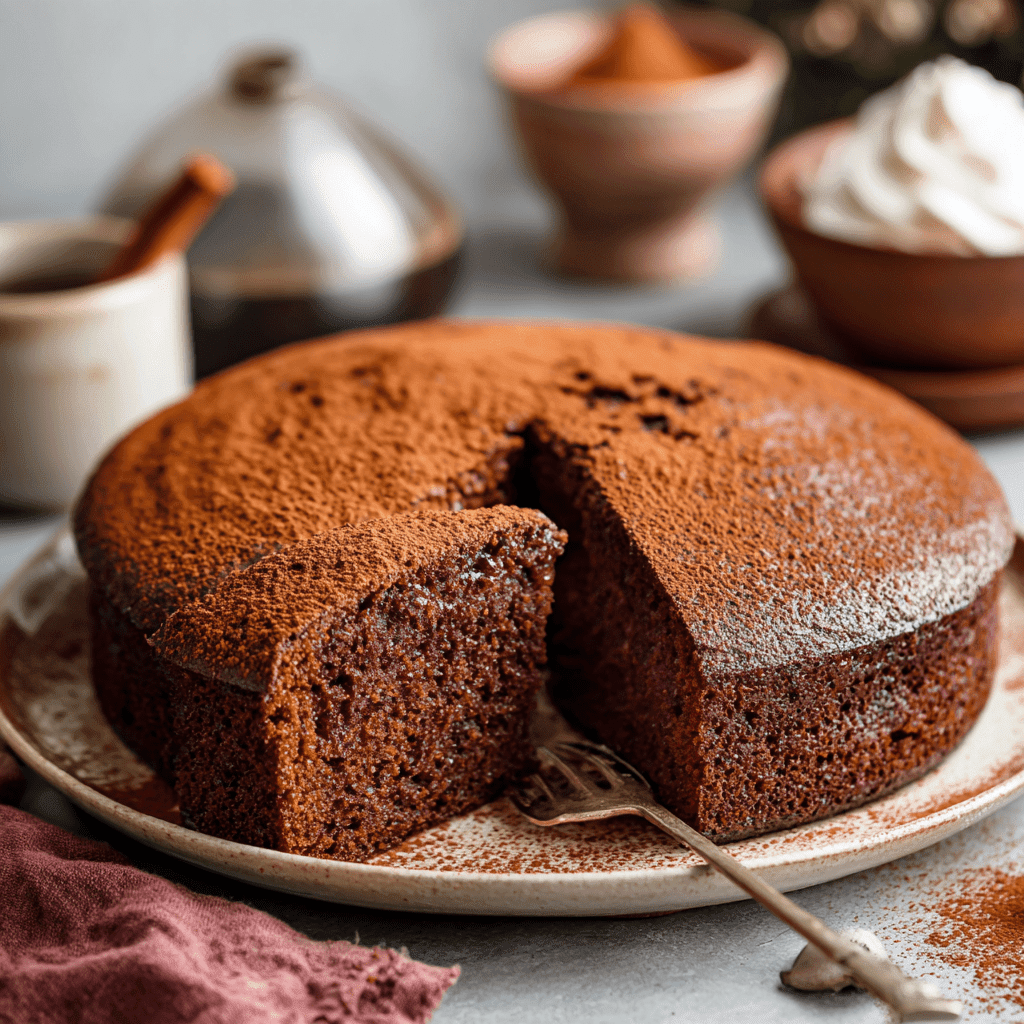
This cake is a superstar all on its own, but a little presentation goes a long way! Once it’s completely cool, you can cut it into nine generous squares. For serving, I love keeping it simple to let those complex flavors shine. A cloud of freshly whipped cream on top is absolute perfection—the cool, creamy contrast with the warm-spiced cake is sublime. Or, for a truly authentic touch, dust the top liberally with a mix of cinnamon and cocoa powder (I do 50/50) using a fine-mesh sieve. It looks gorgeous and adds another layer of flavor.
Want to take it to party-level? Serve each square with a small scoop of vanilla bean ice cream or a drizzle of cajeta (Mexican caramelized goat’s milk sauce) or dulce de leche. A few fresh berries on the side add a bright, tart contrast. Honestly? A warm square with a cold glass of milk is my ultimate happy place.
Make It Your Own: Delicious Twists
Once you’ve mastered the base recipe, the playground is open! Here are a few of my favorite riffs:
- Mocha Mexicana: Add 1 tablespoon of instant espresso powder to the dry ingredients. The coffee deepens the chocolate flavor beautifully, creating a sophisticated mocha-spice situation.
- Orange-Zested Bliss: Add the zest of one large orange (about 1 tablespoon) to the wet ingredients. The bright citrus aroma paired with the chocolate and cinnamon is a classic, vibrant combination.
- “Abuelita” Style: Infuse your milk! Before starting, gently heat the milk with half of a Mexican chocolate tablet (like Abuelita or Ibarra) until melted. Let it cool to room temperature, then use it in place of the plain milk. This adds an extra layer of spice and sweetness.
- Nutty Crunch: Fold 1/2 cup of chopped toasted pecans or walnuts into the batter just before pouring. The nutty texture is fantastic against the soft cake.
- Gluten-Free & Dairy-Free Friend: Use a 1:1 gluten-free all-purpose flour blend and your favorite unsweetened non-dairy milk. The oil-based batter is very forgiving for GF bakes!
Chef Emily’s Notebook Scribbles
This recipe has been my reliable “wow” cake for years. It’s the one I bring to potlucks when I want to impress without stress. The version you see today is actually simpler than my first attempt—I originally made it as a layer cake with a spicy chocolate frosting! It was glorious but, between you and me, a bit over-the-top for a Tuesday. I scaled it back to this humble square format because sometimes the most memorable food is also the most approachable.
A funny story: The first time I served this to my partner, I didn’t tell them about the cayenne. They took a bite, their eyes got wide, and they said, “What did you DO to this chocolate cake? It’s… alive!” They now request it weekly. The lesson? Don’t be afraid of the spice. It’s a conversation starter in dessert form.
Your Questions, Answered!
- Can I use butter instead of oil? You can, but the texture will change. Melted, cooled butter will give a richer, more buttery flavor but a slightly denser crumb. The oil guarantees that incredible, melt-in-your-mouth moistness that lasts for days. I’m Team Oil for this specific cake.
- My cake is dense/gummy. What happened? This is almost always a case of overmixing. Once you add the flour, mix just until combined. Overworking the gluten in the flour leads to a tough cake. Also, double-check your leavening agents (baking soda & powder) to make sure they’re fresh!
- I’m really sensitive to spice. Can I omit the cayenne? Absolutely! The cake will still be a delicious, cinnamon-spiced chocolate cake. The cayenne is just my favorite playful twist. You could also substitute it with a pinch of ground black pepper for a different, more subtle kind of warmth.
- How do I store leftovers? Keep it cozy! Once completely cool, cover the pan tightly with plastic wrap or transfer slices to an airtight container. It will stay supremely moist at room temperature for 3 days. You can also freeze individual slices wrapped in plastic and foil for up to 2 months.
A Quick Nutritional Glance
Just a little friendly info, because I believe in balance (and then eating cake)! This nutritional estimate is for 1 of 9 servings, without optional toppings. Remember, using different milk or oil will change these values slightly.
- Calories: ~290
- Protein: 4g
- Fat: 14g (Saturated Fat: 2g)
- Carbohydrates: 38g (Sugar: 22g, Fiber: 2g)
- Sodium: 180mg
Prep Time: 10 minutes | Cook Time: 30-35 minutes | Total Time: 45 minutes | Servings: 9
Final Sweet Thoughts
And there you have it, my dear foodie friend! My heart-on-a-plate Mexican Chocolate Milk Cake. This recipe is more than just a list of ingredients; it’s an invitation to play, to savor, and to create a little moment of joy in your day. It’s proof that the most extraordinary flavors can come from the simplest of kitchens—yours.