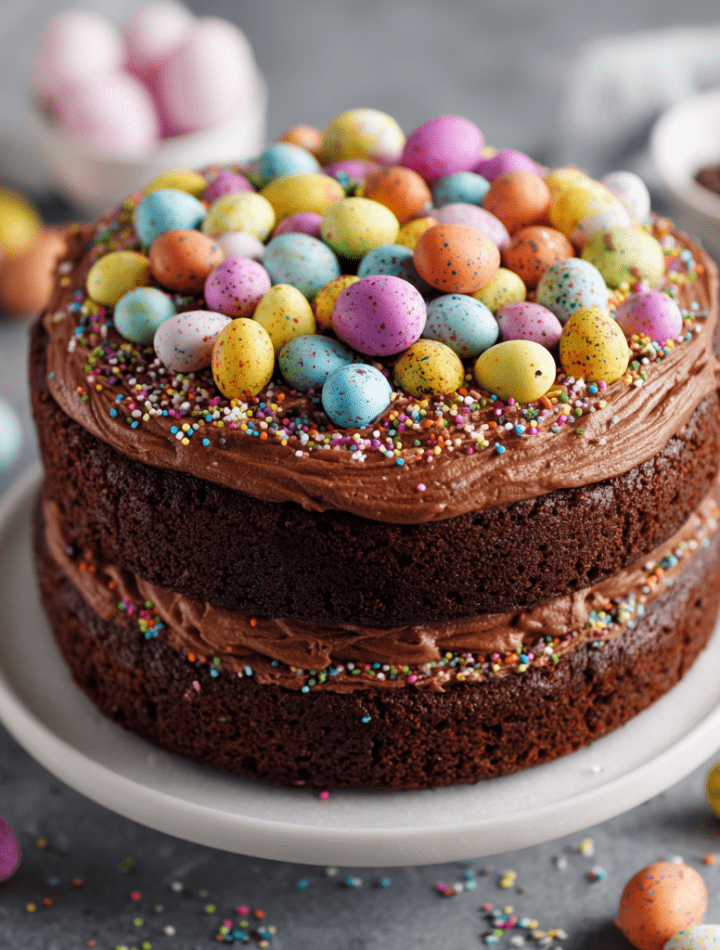
Mini Egg Chocolate Cake: Your New Spring Celebration Tradition
Hey there, friend! Emily here, from my flour-dusted kitchen to yours. Is there anything more joyful than that first glimpse of pastel colors popping up in stores? It signals spring, rebirth, and my personal favorite: the triumphant return of those adorable, candy-coated mini eggs! They’re not just for hiding in baskets; they’re the star of the most show-stopping, conversation-starting, downright delicious chocolate cake you’ll make this season.
This Mini Egg Chocolate Cake is my love letter to that feeling. It’s a chocolate lover’s dream with a serious playful streak. We’re talking layers of the deepest, moistest chocolate cake you can imagine, hugged by a cloud of silky chocolate buttercream, and then crowned with a whole nest of those cheerful mini eggs. It’s festive without being fussy, impressive but totally doable, and it tastes like pure, unadulterated happiness.
Whether you’re hosting Easter brunch, celebrating a spring birthday, or just need a dazzling weekend baking project that’ll have your crew begging for seconds (and the recipe), you’ve landed in the right place. So, tie on your favorite apron—the one with the stains that tell stories—and let’s make something spectacular together. This cake isn’t just a dessert; it’s a memory in the making.

The Cake That Started a Tradition
My obsession with this cake started, like many of my best kitchen stories, with a happy accident and my niece, Lily. A few years back, she was “helping” me bake for a family gathering, which mostly meant strategically eating all the decorator’s chocolate. We were making a simple chocolate cake when she dumped an entire bag of leftover mini eggs into the batter, eyes wide with a mix of mischief and hope. “Aunt Em, it’ll be a surprise inside!”
Well, the eggs sank straight to the bottom and created a (deliciously crunchy) layer on the pan bottom, but the idea was born. The next year, we got smarter. We baked the cakes perfectly plain and let those colorful eggs shine on top, where everyone could see them. The moment we brought it to the table, there were actual oohs and aahs. It wasn’t just a cake anymore; it was the centerpiece of the celebration. Now, Lily and I make it every single spring. It’s our thing. It reminds me that the best recipes aren’t about perfection—they’re about joy, a little mess, and the people you share them with.
Gathering Your Ingredients
Here’s everything you’ll need to create this masterpiece. I’ve added my little chef notes to help you understand the “why” behind each item and give you smart swaps if you’re in a pinch!
For the Chocolate Cake:
- 1 3/4 cups all-purpose flour: The trusty foundation. For a slightly more tender crumb, you can swap in cake flour.
- 3/4 cup unsweetened cocoa powder: Use a good quality one! This is the soul of your cake. I love Dutch-processed for its deep, mellow flavor, but natural works great too.
- 1 1/2 tsp baking powder & 1 1/2 tsp baking soda: Our dynamic leavening duo. They work together to give this dense batter a beautiful, light rise. Make sure they’re fresh!
- 1/2 tsp salt: Crucial for balancing all that sweetness and making the chocolate flavor pop. Don’t skip it.
- 2 cups granulated sugar: Sweetens and also helps create a tender texture.
- 2 large eggs: Bring them to room temperature! This helps them incorporate smoothly for an even cake texture.
- 1 cup buttermilk: The secret to incredible moisture and a subtle tang. No buttermilk? Make a quick “sour milk”: stir 1 tbsp white vinegar or lemon juice into 1 cup of milk and let it sit for 5 minutes.
- 1/2 cup vegetable oil: Keeps the cake wonderfully moist for days. A neutral oil like canola or grapeseed is perfect.
- 1 tbsp vanilla extract: Yes, a full tablespoon! It adds a warm, complex background note that elevates the chocolate.
- 1 cup hot water (or brewed coffee): This is the magic trick! The hot liquid “blooms” the cocoa powder, intensifying its flavor. Using hot coffee (don’t worry, you won’t taste it) makes the chocolate taste even richer and more decadent.
For the Chocolate Buttercream:
- 1 cup (2 sticks) unsalted butter, softened: Softened is key. It should give slightly when pressed. This ensures a fluffy, not greasy, frosting.
- 3 cups powdered sugar: Sift it if you have lumps! This prevents a gritty frosting.
- 3/4 cup unsweetened cocoa powder: Sift this too! We’re doubling down on that chocolate goodness.
- 1/4 cup heavy cream or milk: Start with 2 tbsp and add as needed to reach your perfect spreading consistency. Heavy cream gives a richer, silkier result.
- 1 tsp vanilla extract & a Pinch of salt: The finishing flavor balancers for your frosting.
For the Festive Decoration:
- 1 to 1 1/2 cups mini chocolate eggs: The star of the show! Cadbury Mini Eggs are the classic, but any pastel-coated chocolate candy egg works.
- Optional: edible gold dust or cocoa powder: For a little “speckled egg” magic on the buttercream. We’ll get to that fun trick!
Step-by-Step: Let’s Build This Beauty
Follow these steps, and you’ll have a flawless cake. I’m talking you through each part like you’re here in the kitchen with me!
- Prep Like a Pro: Preheat your oven to 350°F (175°C). Grease two 8-inch round cake pans with butter or non-stick spray, then line the bottoms with parchment paper circles. This guarantees your cakes will release perfectly. Trust me, this 2-minute step saves heartache later!
- Combine the Dry Goods: In a large bowl, whisk together the flour, cocoa powder, baking powder, baking soda, and salt. Whisking by hand here does two things: it combines everything evenly and aerates the mixture a bit, which is a good thing! Set this bowl aside.
- Mix the Wet Team: In the bowl of your stand mixer (or a large bowl with a hand mixer), beat the sugar and eggs together on medium speed for about a minute until slightly pale and combined. Add the buttermilk, oil, and that glorious tablespoon of vanilla. Mix on medium until it’s a smooth, homogenous mixture.
- The Grand Union: With the mixer on low speed, gradually add the dry ingredients to the wet. Mix just until the last streaks of flour disappear. The batter will be thick. Now, here’s the fun part: with the mixer still on low, slowly pour in the hot water (or coffee). The batter will become very thin and liquidy—this is exactly right! Don’t panic; it’s what makes the cake super moist.
- Bake to Perfection: Carefully divide the thin batter evenly between your prepared pans. I like to use a kitchen scale for precision, but the eyeball method works too. Tap the pans gently on the counter to release any big air bubbles. Bake for 30-35 minutes. The cakes are done when a toothpick inserted into the center comes out with just a few moist crumbs attached. Let them cool in the pans for 15 minutes, then run a knife around the edges and invert them onto a wire rack to cool completely. Chef’s Rule: Do not attempt to frost a warm cake. Patience makes perfect layers.
- Whip Up the Buttercream: While the cakes cool, beat the softened butter in a clean bowl on medium-high speed for 3-4 minutes until it’s very pale, fluffy, and almost whipped. Sift in the cocoa powder and powdered sugar. Start mixing on LOW unless you want a powdered sugar cloud in your kitchen! Once incorporated, add the vanilla, salt, and 2 tbsp of cream. Beat on medium-high for another 2-3 minutes until incredibly smooth and spreadable. Add more cream, a teaspoon at a time, if needed.
- Assemble & Frost: Place one cooled cake layer on your serving plate or cake stand. Spread a generous, even layer of buttercream on top. Gently place the second layer on top. Apply a thin “crumb coat” of frosting all over the cake—this is just a initial layer to trap any loose crumbs. Pop the cake in the fridge for 15 minutes to set. Then, pile on the remaining frosting and smooth or swirl it all over the top and sides. No stress if it’s not bakery-perfect! Rustic is charming.
- The Grand Finale – Decorating! Pile the mini eggs in the center of the cake, creating a beautiful, abundant nest. For a speckled egg effect, dip a clean pastry brush in a tiny bit of edible gold dust or cocoa powder, hold it over the frosted sides, and gently tap the handle so the dust falls randomly onto the cake. It’s so pretty and whimsical!
How to Serve This Showstopper
Presentation is part of the fun! I love placing this cake on a simple, elegant cake stand to let the colors really sing. When it’s time to slice, use a sharp knife that you run under hot water and wipe dry between cuts. This gives you those picture-perfect, clean slices with beautiful layers.
Pair each slice with a cold glass of milk, a cup of strong coffee, or even a glass of red wine if you’re feeling fancy. The rich chocolate pairs wonderfully with a berry compote on the side for those who love a tart contrast, but honestly, it’s stunning all on its own. Let it sit at room temperature for about 20 minutes before serving if it’s been in the fridge—this lets the frosting soften to its dreamy, creamy best.
Make It Your Own: Fun Recipe Twists
Love the base recipe? Here’s how to play with it!
- Peanut Butter Lover’s Dream: Add 1/2 cup of smooth peanut butter to the buttercream. Swirl it in or fully incorporate it. Decorate with chopped peanut butter cups alongside the mini eggs.
- Orange Zest Delight: Add the zest of one large orange to the cake batter. The chocolate-orange combo is a classic for a reason! A drop of orange extract in the frosting is heavenly too.
- Mint Chocolate Refresh: Swap the vanilla in the frosting for 1/2 teaspoon of pure peppermint extract. Decorate with After Eight mints or Andes mint pieces for a cool, refreshing twist.
- Gluten-Free & Dairy-Free Friendly: Use a 1:1 gluten-free flour blend. For the cake, use a non-dairy milk + vinegar for the buttermilk and a neutral oil. For the frosting, use a high-quality vegan butter stick and non-dairy cream. Check that your mini eggs align with your dietary needs.
- Cupcake Version: This batter makes about 24 perfect cupcakes! Bake for 18-22 minutes. Frost and top each with 2-3 mini eggs for adorable individual treats.
Chef Emily’s Extra Notes
This recipe has evolved in my kitchen from that first egg-sinking experiment to the reliable beauty it is today. One year, I tried folding crushed mini eggs into the batter. Verdict? Cute, but they bleed color a little and lose their crunch. Keeping them proudly on top is the way to go.
A funny story: I once brought this cake to a potluck, and a friend’s toddler, mesmerized by the “pretty stones” on top, tried to very carefully remove every single one before anyone noticed. We caught him with a fistful of eggs and a face full of chocolate buttercream. It’s still my favorite review of the cake.
You can bake the cake layers a day ahead. Once completely cool, wrap them tightly in plastic wrap and store at room temperature. Frosting is also best made fresh, but you can make it a day ahead, store it covered in the fridge, and let it come to room temperature, re-whipping briefly before using.
FAQs & Troubleshooting
Q: My mini eggs keep sliding off the frosting! How do I make them stick?
A: If your frosting is very smooth or it’s a warm day, the eggs can slide. Easy fix: create a small “well” or indent in the center of the frosted top with your spatula before adding the eggs. The slight depression helps hold them in place. Chilling the frosted cake for 20 minutes before decorating also helps.
Q: Can I use a different type of pan?
A: Absolutely! A 9×13-inch rectangular pan works wonderfully. Bake for 35-40 minutes. You can frost it right in the pan for an easy sheet cake. A bundt pan is also gorgeous—just grease it *extremely* well. Bake for 40-45 minutes, cool completely, then dust with powdered sugar or drizzle with a chocolate ganache before adding eggs around the base.
Q: My cake layers are dense, not fluffy. What happened?
A: The most common culprit is over-mixing once the flour is added. Mix just until you no longer see dry flour. Also, check your baking powder/soda expiration dates. Old leaveners won’t give you that lovely rise.
Q: How do I store this cake, and how long does it last?
A: Because of the buttercream, it’s best stored covered at cool room temperature for 1 day, or in the fridge for up to 4 days. The cake actually gets more moist as it sits! Let refrigerated slices come to room temp for 20 minutes for the best texture and flavor.
A Quick Nutritional Glance
Let’s be real—this is a celebration cake, meant to be savored and enjoyed fully! Providing nutritional info is about being informative, not putting a damper on the fun. These are approximate values per slice (based on 12 slices), calculated using standard ingredients.
Per Serving: Calories: ~460 | Total Fat: 24g | Saturated Fat: 12g | Cholesterol: 70mg | Sodium: 280mg | Total Carbohydrates: 58g | Dietary Fiber: 3g | Sugars: 42g | Protein: 5g
Remember, you can make modifications as suggested in the variations to suit different dietary preferences. Most importantly, share it with people you love—happiness is always better when it’s shared.
Final Thoughts: A Cake That Marks the Season
This Mini Egg Chocolate Cake has become more than just a recipe in my kitchen—it’s a signal that spring has officially arrived. It’s the cake that shows up when the windows are open, when laughter fills the room, and when celebrations feel a little lighter and more colorful.
What I love most about it is how effortlessly joyful it is. No intricate piping. No stress. Just rich chocolate layers, swirls of frosting, and a joyful tumble of pastel eggs that make everyone smile before the first bite. It’s proof that desserts don’t need to be complicated to be memorable—they just need heart.
If you make this cake, I hope it becomes part of your traditions, too. Maybe it’s the Easter dessert your family asks for every year. Maybe it’s the birthday cake that sneaks chocolate eggs into spring celebrations. Or maybe it’s just the cake you bake because you saw mini eggs at the store and thought, why not?
From my kitchen to yours,
may your frosting be fluffy, your chocolate deep, and your spring filled with sweet moments.
With love,
Emily 🌸🍫