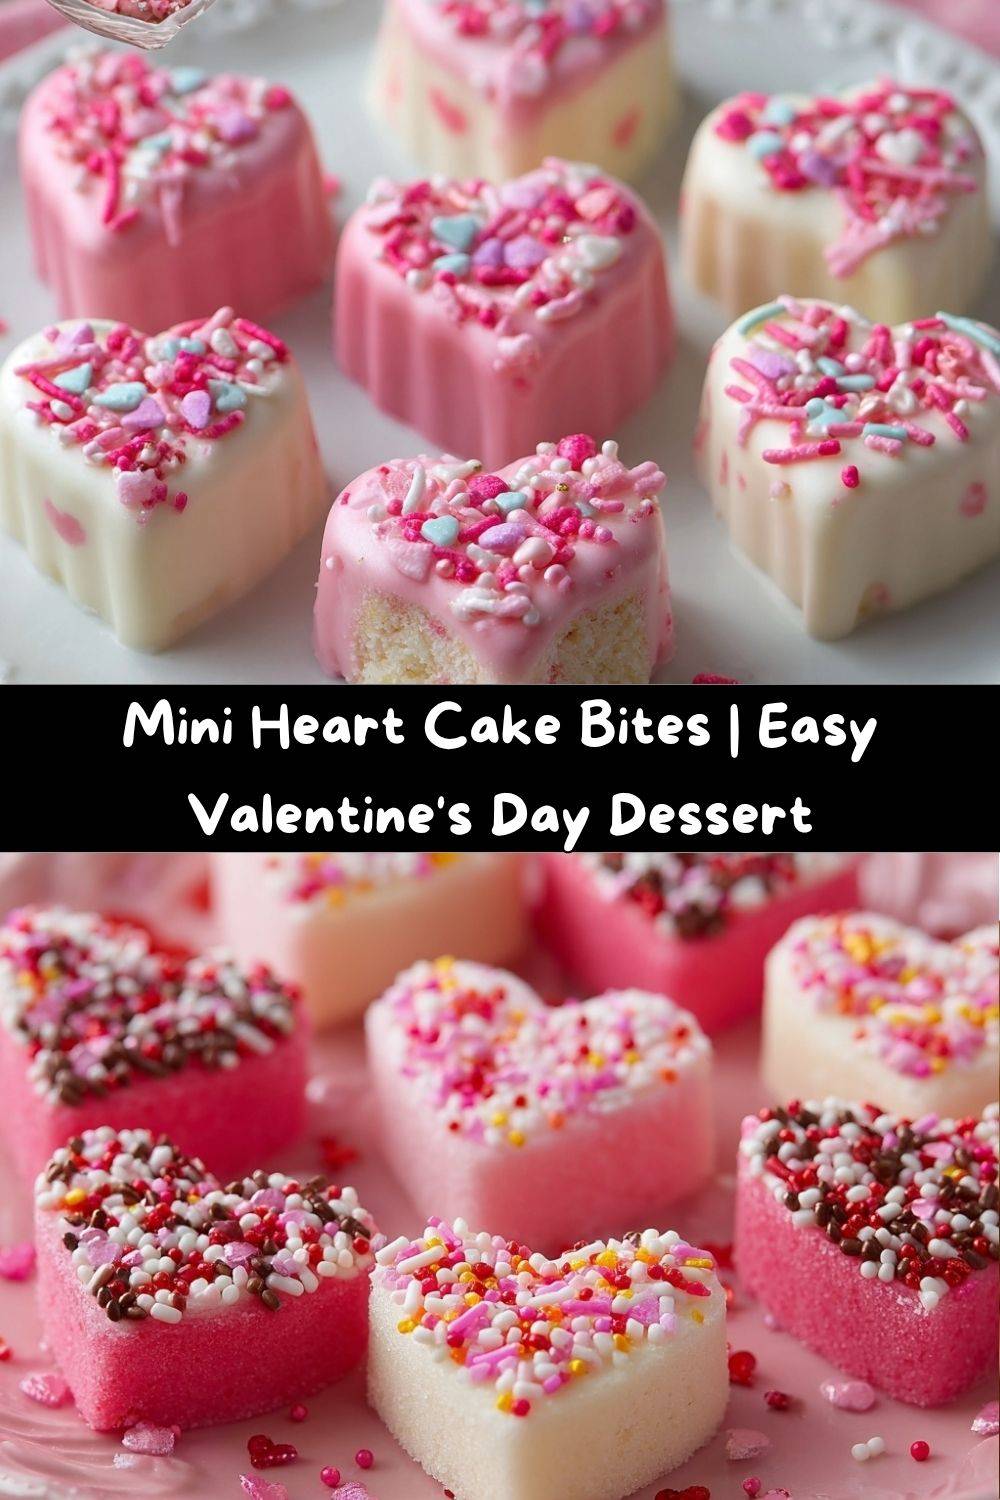
Mini Heart Cake Bites: Your New Favorite Way to Say “I Love You”
Hey there, my fellow flavor-seeker! Valentine’s Day is just around the corner, and if you’re anything like me, you’re already dreaming up ways to make it extra sweet for your favorite people. Sure, a box of chocolates is classic, but there’s something so special about a homemade treat made with, you know, actual love.
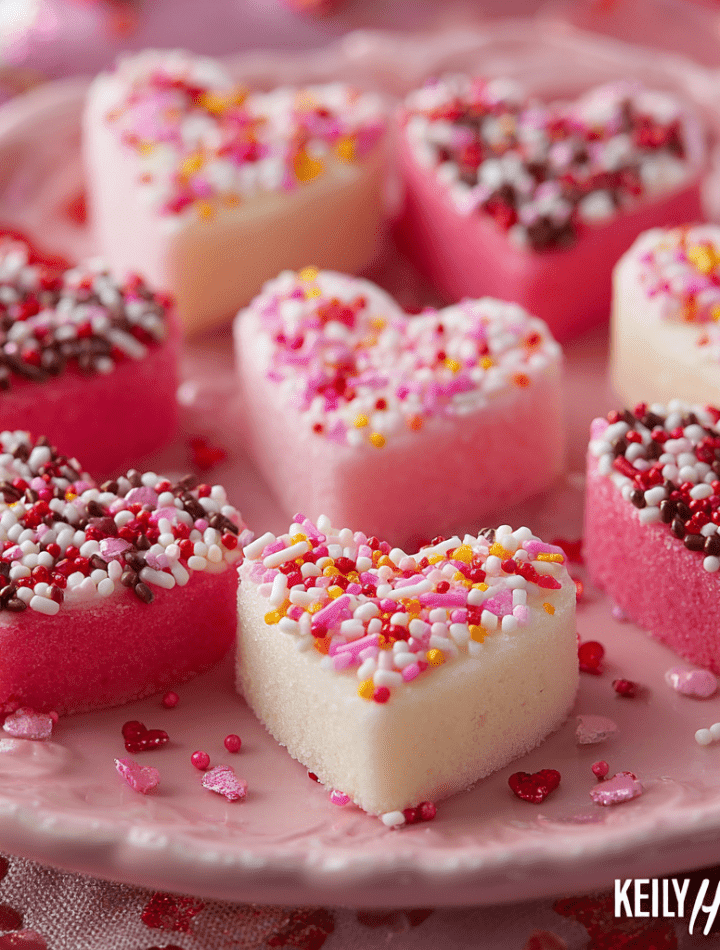
That’s where these utterly adorable Mini Heart Cake Bites come in. Imagine this: a soft, moist cake center, hugged by a sweet, creamy frosting, all encased in a crisp, colorful candy shell and finished with a shower of sparkling glitter. They’re like cake pops’ cute, bite-sized cousins who showed up to the party wearing their best glittery outfits.
The best part? They’re seriously fun and easy to make. No fancy pastry chef skills required—just a willingness to get a little messy and have a whole lot of fun. Whether you’re planning a Galentine’s bash, a cozy night in with your significant other, or a classroom party for the kiddos, these little hearts are guaranteed to steal the show. So, tie on your favorite apron (the one with the stains that tell a thousand kitchen stories), and let’s make something delicious together!
A Spoonful of Nostalgia: Where This Recipe Really Came From
This recipe always takes me right back to my grandma’s kitchen, a place that always smelled like sugar and love. She wasn’t a fancy baker, but she was a generous one. Every Valentine’s Day, without fail, she’d whip up a batch of her famous red velvet cupcakes with a mountain of fluffy cream cheese frosting for my entire second-grade class.
I’d sit at her Formica countertop, legs swinging, and “help” by enthusiastically licking the beaters. One year, we had a little cake-tastrophe. A few cupcakes got a bit too friendly with the oven rack and came out lopsided. Instead of tossing them, my grandma, the original kitchen hacker, simply crumbled them up, mixed in the leftover frosting, and rolled them into little truffle-like balls. “There now,” she’d said, dusting her hands on her floral apron. “No one will ever know. They’re just little bites of love.”
These Mini Heart Cake Bites are my playful, polished twist on her genius salvage operation. They’re a tribute to her belief that a little imperfection is just an opportunity for creativity—and that the best recipes are the ones that come with a side of a great story.
Gathering Your Sweet Supplies: The Ingredients
Here’s everything you’ll need to create these little masterpieces. I’ve included my favorite chef-y insights and swaps to make this recipe your own!
- 1 box cake mix, baked and cooled – This is our fantastic shortcut! Use any flavor you love. Classic vanilla or chocolate are always winners, but strawberry or red velvet feels extra festive for Valentine’s. Chef’s Tip: Bake the cake a day ahead so it’s completely cool and easy to crumble!
- ½ to ¾ cup frosting (your favorite flavor) – This is the “glue” that holds our cake bites together. Cream cheese frosting is my personal kryptonite, but vanilla, chocolate, or even strawberry work beautifully. Start with ½ cup and add more until the mixture is moldable.
- 2 cups candy melts (pink, red, or white) – These are the secret to that gorgeous, smooth, professional-looking shell. They melt beautifully and set firmly. You can find them in craft stores or the baking aisle. Substitution Tip: If you’re in a pinch, you can use high-quality white chocolate chips and mix in a little oil and food coloring, but candy melts are truly the MVP here for consistency.
- Sprinkles and edible glitter or color mist (for decorating) – This is where the magic happens! Heart-shaped sprinkles, red sanding sugar, or a quick spritz of pink edible glitter spray takes these from cute to absolutely breathtaking.
Let’s Get Making: Step-by-Step Instructions
Alright, friends, it’s time to create! Follow these steps, and you’ll have a plateful of perfect little hearts in no time.
- Prep Your Mold: First, grab your heart-shaped mold. Silicone is best—it’s flexible and makes popping the finished bites out a dream. Melt your candy melts according to the package instructions (I do 30-second bursts in the microwave, stirring in between). Using a small spoon, carefully coat each cavity of the mold. You want a nice, even layer covering the bottom and sides. This creates our chocolate shell. Pop the whole tray into the fridge for about 10 minutes to set firm. Chef’s Hack: Use a clean paintbrush to help spread the chocolate into all the nooks and crannies of the heart shape for a perfect coat!
- Make the Filling: While the shells are chilling, let’s make the filling. Take your fully cooled cake and crumble it into a large bowl. You want fine, even crumbs—no big chunks! Now, add your frosting. Start with ½ cup and use your hands or a spatula to mix it in. Keep going until the mixture holds together when you pinch it, almost like a soft Play-Doh. If it’s too dry, add more frosting a tablespoon at a time.
- Fill the Molds: By now, your candy shells should be firm to the touch. Take a small amount of your cake mixture and press it firmly into each heart cavity, leaving a little room at the top (about 1/8 inch). We need to seal these babies up! Now, spoon more of your melted candy melts over the back of each heart, covering the cake filling completely. Use a knife or offset spatula to smooth the top so it’s flush with the mold. Back into the fridge they go for another 10-15 minutes to set completely.
- Decorate: This is the most rewarding part! Gently flex your silicone mold to pop each perfect heart cake bite out. If they’re being stubborn, a little gentle push from the back usually does the trick. Now, let your creativity run wild! Drizzle with contrasting melted candy, dip the edges in sprinkles, or give them a light, glamorous mist of edible glitter. Let them set completely on a parchment-lined tray. Chef’s Hack: For a super-smooth drizzle, put your extra melted candy in a small zip-top bag, snip a tiny corner off, and pipe away!
How to Serve These Little Bits of Joy
Presentation is everything, especially when it comes to something this cute! For a simple, elegant look, arrange them on a beautiful white platter or a cake stand. They look incredible all on their own.
If you’re giving them as a gift (lucky recipient!), place them in a clear treat bag tied with a gorgeous ribbon, or stack them in a small gift box lined with parchment paper. You could even create a DIY Valentine’s box for your kids—way better than store-bought cards!
Serve them at room temperature for the best texture and flavor. They’re perfect alongside a glass of cold milk, a cup of coffee, or even a glass of bubbly for the adults. Honestly, they’re so adorable, they pretty much serve themselves!
Mix It Up! Delicious Recipe Variations
Once you’ve mastered the basic recipe, the flavor world is your oyster! Here are a few of my favorite twists:
- Chocolate Lovers’ Dream: Use devil’s food cake mix, chocolate frosting, and dark cocoa candy melts. Roll the cake mixture around a hidden chocolate chip in the center for a molten surprise!
- Cookies & Cream: Crumble baked chocolate cake and mix it with vanilla frosting. Use white candy melts for the coating and roll the set bites in crushed Oreo cookie crumbs.
- Lemon Berry Bliss: Use lemon cake mix and mix with vanilla or cream cheese frosting. For the coating, use white candy melts and sprinkle with freeze-dried raspberry powder for a gorgeous, tangy kick.
- Nutty & Nice: Use yellow cake mix and mix in chopped toasted pecans or almonds into the cake mixture. Use vanilla candy melts and finish with a drizzle of salted caramel.
- Funfetti Celebration: Use funfetti cake and vanilla frosting. The coating is white candy melts, and of course, you gotta go big with even more rainbow sprinkles!
Chef Emily’s Notes from My Kitchen to Yours
Oh, the stories these cake bites could tell! The first time I tested this recipe, I was so excited I tried to pop them out of the mold after only five minutes of chilling. Let’s just say I had to perform some emergency chocolate surgery with a butter knife and a lot of muttered promises to be more patient next time. The lesson? Let them chill completely. It’s a test of your willpower, but it’s worth it.
This recipe has evolved so much from my grandma’s simple cake balls. The molded heart shape makes them feel so special and eliminates the sometimes-tricky step of dipping cake pops on a stick. They’re sturdier, just as beautiful, and honestly, even more fun to decorate. It’s a recipe that reminds me that the best things in life—and in the kitchen—are often simple, joyful, and shared with people you love.
FAQs & Troubleshooting: Your Questions, Answered!
Q: My cake mixture is too wet and sticky! What do I do?
A: No worries! This just means you added a touch too much frosting. Easy fix. Just add a little more crumbled cake to balance it out until it reaches that perfect, moldable consistency.
Q: Why is my melted candy coating so thick and clumpy?
A: Candy melts can sometimes seize up if they get too hot or if a tiny bit of steam gets in. The trick is to melt them slowly. If they’re too thick, add a teaspoon of coconut oil or paramount crystals (a professional confectionery product) to thin them to a perfect dipping consistency.
Q: Can I make these gluten-free or vegan?
A> Absolutely! Use your favorite gluten-free cake mix and ensure your frosting is gluten-free. For a vegan version, use a vegan cake mix, vegan frosting (many are accidentally vegan!), and vegan candy melts or chocolate.
Q: How far in advance can I make these?
A> They are perfect for making ahead! Store them in a single layer in an airtight container in the fridge for up to 5 days. You can also freeze them for up to a month! Just thaw in the fridge overnight before serving.
Nutritional Information (Approximate)
Alright, let’s keep it real—these are a treat, through and through! But it’s always good to know what you’re enjoying. The following is an approximate nutritional breakdown per heart cake bite, based on using standard ingredients.
Per Heart Bite (approx.):
Calories: 210 | Fat: 10g | Saturated Fat: 6g | Carbohydrates: 28g | Sugar: 21g | Protein: 2g | Sodium: 140mg
Remember, this is just an estimate and can vary based on the specific brands of cake mix, frosting, and candy melts you use. My philosophy? Enjoy every single bite without guilt, especially when it’s made with love and shared with someone special.
Final Sweet Thoughts
And there you have it! Your complete guide to making the most adorable, delicious, and shareable Mini Heart Cake Bites. I hope this recipe brings as much joy to your kitchen as it does to mine. There’s something truly magical about taking a few simple ingredients and transforming them into a tangible expression of love and care.
So, whether you’re whipping these up for your Valentine, your Galentines, or just for yourself (because you deserve it too!), I hope you have the best time creating them. Don’t forget to snap a picture and tag me @TastyChow—I love seeing your kitchen creations!
Now go forth, spread the love, and most importantly, chow down!
— Emily 🧡