Let’s Build the Cutest (and Tastiest) Snowmen You’ll Ever Eat!
Hey there, my fellow foodie friend! Chef Emily here, coming to you from my flour-dusted kitchen, which currently smells like a happy mix of vanilla and melted chocolate. Is there anything more magical than the first snowfall of the season? Well, I’d argue that the only thing better is capturing that magic in a bite-sized, no-bake treat that’s bursting with creamy, dreamy flavor.
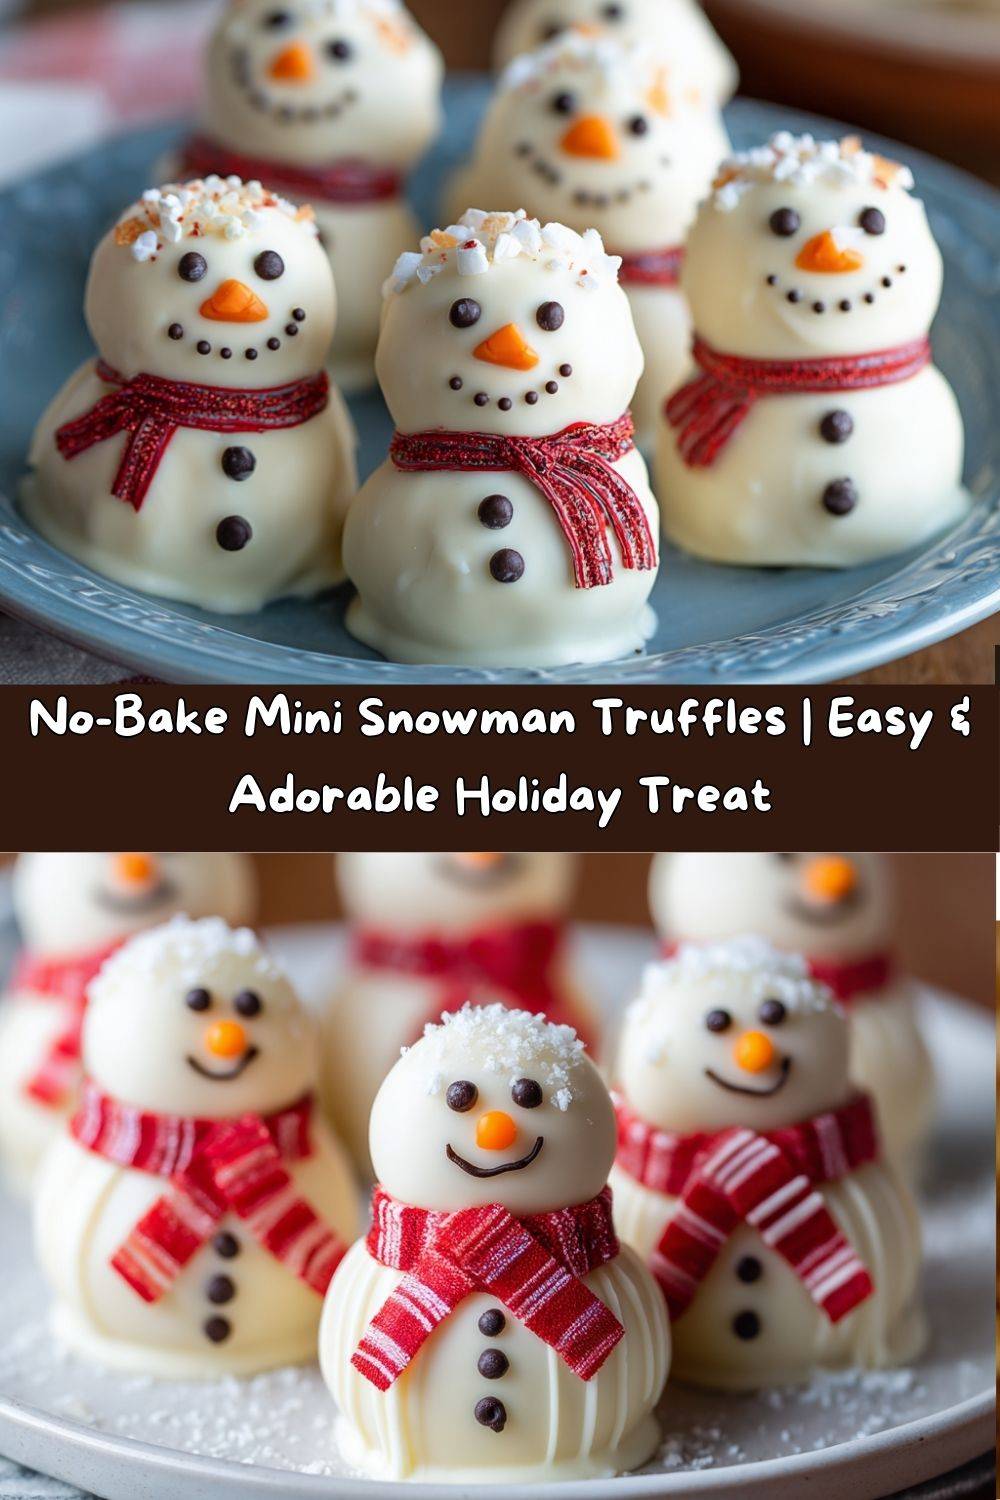
Today, we’re throwing on our imaginary snow boots and diving headfirst into a winter wonderland of deliciousness. We’re making Mini Snowman Truffles! These little guys are the absolute stars of any holiday cookie swap, the perfect project for a cozy family baking day, and the treat that will have your guests whipping out their phones for a photoshoot before they even take a bite.
Now, I know what you might be thinking: “Emily, those look complicated! I’m not a pastry artist!” But I promise you, with my simple, step-by-step guide, you are more than capable. We’re using a classic Oreo truffle base (a.k.a. the most forgiving dessert known to humankind) and dressing it up with a little holiday flair. The best part? They’re completely no-bake and coated in dairy-free white chocolate, making them a fantastic option for anyone with dietary restrictions (but I promise, no one will miss the dairy!). So, grab your favorite apron, put on some festive tunes, and let’s make some adorable, edible magic together.
The Snowman That Started It All
This recipe always takes me back to one particularly snowy December when my daughter, Lily, was about four years old. We were stuck inside, watching the flakes pile up, and she was itching for a “project.” We’d already built a slightly lopsided snowman in the yard, but she wanted to make one for inside, too. I looked at the sad remains of a box of vanilla Oreos and a block of cream cheese on the counter, and a lightbulb went off.
We mashed, we rolled, we got more truffle “snow” on our faces than in the bowl, and we created the most hilariously lumpy, crooked snowman truffles you’ve ever seen. Their chocolate chip eyes were crossed, and their scarves were a mess, but Lily’s face was lit up with pure, unadulterated joy. She declared them the “best snowmen in the whole world.” That messy, happy afternoon in the kitchen is the heart and soul of this recipe for me. It’s not about perfection; it’s about the fun, the laughter, and the sweet memories you create along the way.
Gathering Your Snowman Squad: The Ingredients
One of the best things about this recipe is the short and sweet ingredient list. You probably have most of this in your pantry already! Here’s everything you’ll need to build your snowy crew.
- 1 package (about 36 cookies) Vanilla Oreos: These are the foundation of our snowmen, creating that perfect, crumbly “snow” texture. The vanilla flavor is lighter and brighter than the chocolate version, making it the ideal canvas. Chef’s Insight: If you can’t find vanilla Oreos, the classic chocolate ones work beautifully too—you’ll just have chocolate snowmen, which are equally delicious!
- 170g (6 oz) Dairy-Free Cream Cheese, softened: This is the “glue” that binds our Oreo crumbs into a pliable, rollable dough. Using a dairy-free version keeps the whole recipe inclusive, but regular full-fat cream cheese works identically if you don’t have dietary needs. Pro Tip: Let it sit on the counter for 30-60 minutes before you start. A softened block mixes in smoothly and prevents lumpy truffles.
- Dairy-Free White Chocolate (for coating): This is our snowman’s pristine, white exterior! I love using high-quality dairy-free melting wafers because they set beautifully and have a lovely vanilla flavor. Substitution Tip: You can use regular white chocolate or even almond bark or candy melts. The key is to choose something that melts smoothly for easy dipping.
- Candy Scarves (fruit strips, sour belts, or ribbon candy): This is where their personalities shine! I adore using thin fruit strips—they’re pliable and easy to tie. Sour belts add a fun, tangy kick, and crushed ribbon candy looks incredibly festive.
- Mini Chocolate Chips or Edible Ink Pens (for eyes/buttons): Mini chocolate chips are my go-to for a classic, rustic look. But if you want super precise faces, an edible ink pen is a game-changer and much easier for little hands to manage.
- Orange Sprinkle or Icing (for the nose): The adorable carrot nose! A small, teardrop-shaped orange sprinkle is perfect. No sprinkles? A tiny dab of orange icing works just as well.
Let’s Build Our Snowmen! A Step-by-Step Guide
Okay, team! It’s time to get our hands dirty (in the best way possible). Follow these steps, and you’ll have a whole squad of charming snowmen in no time.
- Create the “Snow” Dough. Pop your entire package of Vanilla Oreos (filling and all!) into a food processor. Pulse them until you have a fine, sand-like crumb. No food processor? No problem! Place the cookies in a large zip-top bag, squeeze out all the air, and go to town with a rolling pin. It’s a great way to get out any pre-holiday stress! Chef’s Hack: Take a moment to make sure there are no large chunks of cookie left. A fine crumb means a smoother, more professional-looking truffle.
- Bring the Dough to Life. Transfer your beautiful Oreo crumbs to a medium-sized mixing bowl. Add your softened dairy-free cream cheese. Now, use a sturdy spatula or your (clean!) hands to mix it all together until it’s completely combined and forms a thick, smooth, and homogenous dough. It should feel like Play-Doh and hold together when you pinch it. Chef’s Commentary: I’m a hands-on cook, so I always finish the mixing by hand—it’s the best way to feel the texture and know it’s just right!
- Roll, Roll, Roll Your Snowmen! Now for the fun part! Pinch off a small amount of dough and roll it into two balls for each snowman: one slightly larger for the bottom and one a bit smaller for the head. I aim for about 1 tablespoon for the body and 2 teaspoons for the head. Roll them smoothly between your palms. Pro Tip: If the dough is too sticky, pop it in the fridge for 15 minutes. If it’s cracking, the dough might be a bit dry—a tiny splash of non-dairy milk can help bring it back together.
- The All-Important Chill Session. Place all your snowman body and head balls on a baking sheet lined with parchment paper. Pop the tray into the fridge for at least 30 minutes. Don’t skip this step! This firms up the truffles, making them much easier to dip in the chocolate without falling apart.
- Melt the “Snow” Coating. While the truffles are chilling, melt your dairy-free white chocolate. You can do this in a double boiler or, my preferred method for ease, in the microwave. Place the wafers in a microwave-safe bowl and heat in 30-second bursts, stirring vigorously between each burst, until it’s completely smooth and fluid. Chef’s Hack: Be careful not to overheat it, or the chocolate can seize and become clumpy. If it seems thick, you can add a tiny teaspoon of coconut oil to thin it out for easier dipping.
- The Great Dip & Stack! Remove your truffle balls from the fridge. Using a fork or a dipping tool, dip a larger (body) ball completely into the melted chocolate. Let the excess drip off, then place it on a fresh piece of parchment paper. Now, immediately dip the smaller (head) ball and carefully place it on top of the body while the chocolate is still wet and tacky. The chocolate acts as the glue! Pro Tip: If they’re a bit wobbly, you can gently use a toothpick to hold them together for a few seconds until they set slightly.
- Accessorize Your Snow Pals! This is where they get their character! Working quickly before the chocolate sets, wrap a thin strip of your chosen candy around the “neck” to make a scarf. Press mini chocolate chips into the head for eyes and down the body for buttons. Finally, give your snowman a personality by pressing a tiny orange sprinkle into the face for a carrot nose. Chef’s Commentary: Don’t stress about making them all identical! Give them different expressions—a happy one, a surprised one. It makes your platter even more charming.
- Let Them Set. Once all your snowmen are dressed and ready for their debut, let them sit at room temperature (or in the fridge if your kitchen is warm) until the white chocolate coating is completely firm to the touch. This usually takes about 30-60 minutes.
- The Optional Flat-Base Trick. If you find your snowmen are a little tipsy, here’s a final pro trick: gently press the bottom of each one onto a warm pan for just a second. This will melt a tiny flat spot, creating a perfectly stable base. Just be quick!
How to Serve Your Adorable Edible Snowmen
Presentation is half the fun with these little guys! You’ve put in the creative work, now let’s show them off. I love arranging them on a simple white platter or a rustic wooden board to make their white coating and colorful scarves really pop. Scatter a little powdered sugar or desiccated coconut around them to look like fresh-fallen snow.
These truffles are the ultimate holiday party treat. Pile them high on a cake stand as a centerpiece for your dessert table. They also make the most thoughtful homemade gift! Package a few in a clear cellophane bag, tie it with a pretty ribbon, and you have a present that’s straight from the heart (and the kitchen). They’re a guaranteed smile-maker for neighbors, teachers, and friends.
Get Creative! Fun Snowman Variations
Once you’ve mastered the classic vanilla snowman, the wintery world is your oyster! Here are a few fun twists to keep things exciting:
- The Peppermint Patty: Add ¼ teaspoon of peppermint extract to the Oreo dough and use crushed candy canes as the scarf for a refreshing, festive twist.
- Chocolate Snowman: Use classic chocolate Oreos instead of vanilla for a rich, double-chocolate snowman. You can even coat them in dark chocolate for a decadent treat.
- The Snow Lady: Give your snowman a festive hat by dipping the top of the head in melted dark chocolate and adding a red candy bead for a berry on the brim. A fruit strip bow can complete the look!
- Gluten-Free Frosty: Use your favorite gluten-free sandwich cookies (like Glutino or Goodie Girl) and ensure your other ingredients are certified gluten-free. The method stays exactly the same!
- Coconutty Snowman: Mix ¼ cup of finely shredded coconut into the truffle dough for a subtle tropical texture and flavor. Roll the finished, undipped truffles in more coconut for a fuzzy, snowy effect.
Chef Emily’s Extra Scoop
Over the years, I’ve made hundreds of these snowmen, and let me tell you, not all of them have been picture-perfect. One year, I tried to get fancy and use black icing for the faces. Let’s just say my snowmen looked like they’d survived a blizzard in a rock band—it was a grunge look I was not aiming for! That’s when I went back to the simple, charming look of mini chocolate chips. It taught me that sometimes, the simplest approach is the most beautiful. This recipe is wonderfully forgiving, so embrace any little imperfections. It just gives your snowmen more personality!
Your Snowman Questions, Answered!
Let’s tackle a few common questions to ensure your snowman-making experience is smooth sailing.
Q: My truffle dough is too sticky to roll. What do I do?
A: No worries! This usually means the cream cheese was a little too soft or the room is warm. Just pop the bowl of dough into the refrigerator for 15-20 minutes. It will firm right up and be much easier to handle.
Q: Can I make these ahead of time?
A: Absolutely! These are a fantastic make-ahead treat. You can store the finished snowmen in a single layer in an airtight container in the fridge for up to 5 days. You can also freeze them for up to 2 months! Just thaw in the refrigerator overnight before serving.
Q: My white chocolate is thick and clumpy. Can I fix it?
A> This is called “seizing,” and it often happens if a tiny bit of moisture gets into the chocolate. To rescue it, try stirring in a small amount (½ teaspoon at a time) of a neutral oil (like coconut or vegetable oil) while it’s still warm. This can often bring it back to a smooth, dippable consistency.
Q: The heads keep falling off! Help!
A: This usually means the chocolate coating started to set before you stacked them. The key is to work in small batches. Dip and stack 2-3 snowmen at a time, attaching the heads immediately while the chocolate is still very wet and tacky. Using a toothpick as a little support beam for the first minute can also work wonders.
Nutritional Nibble
While these are definitely a special occasion treat, it’s always helpful to know what you’re enjoying! The provided nutritional info is an estimate per snowman truffle. Using dairy-free cream cheese and white chocolate creates a dessert that’s friendly for those with lactose intolerance or a dairy allergy. The primary sources of calories are the Oreo cookies and the chocolate coating, providing carbohydrates for energy and a little fat for that satisfying, creamy mouthfeel. Remember, treats like these are all about balance and joy—so savor every adorable bite without guilt!
Approximate Nutrition (per snowman):
Calories: 200 | Fat: 10g | Carbs: 26g | Sugar: 18g | Protein: 2g
Your New Favorite Holiday Tradition
And there you have it! Your very own squad of delicious, no-bake Mini Snowman Truffles. I hope you had as much fun making them as I always do. This recipe is more than just a list of ingredients and steps; it’s an invitation to slow down, get a little messy, and create something that sparks joy.
I’d love to see your creations! Tag me on social @TastyChow and use the hashtag #TastyChowSnowmen so I can share in your holiday baking fun. Seeing your kitchen masterpieces truly is my favorite part of the job.
From my cozy kitchen to yours, happy holidays and happy baking!
With love and a sprinkle of sugar,
Emily