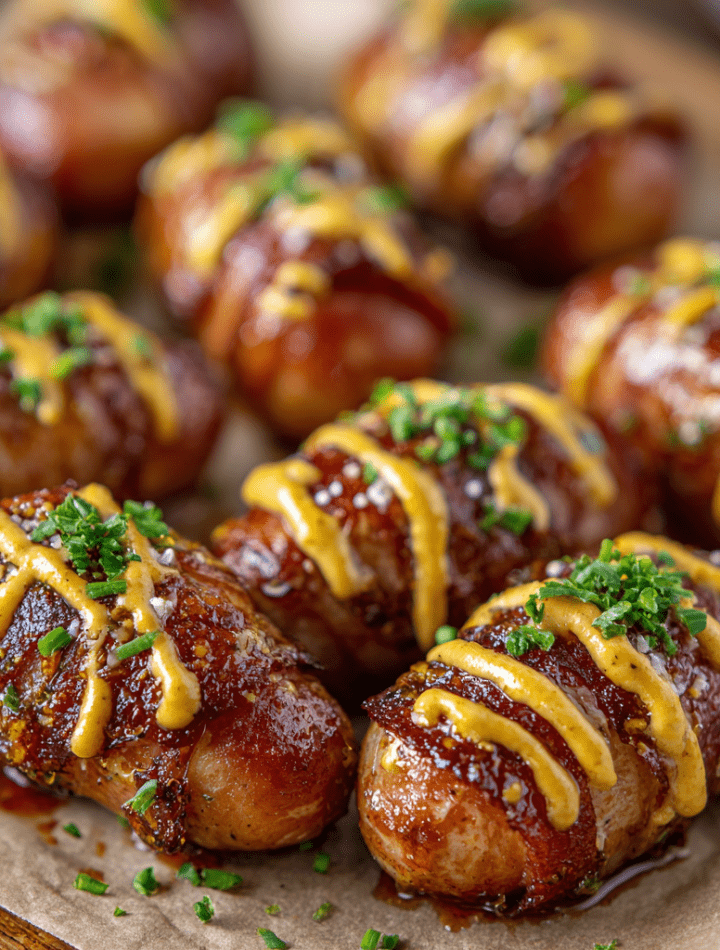
Mustard Hasselback Kielbasa Bites: Your New Party Hero!
Hey, friends! Chef Emily here, waving at you from my inevitably messy kitchen. Can we talk about that magical moment when you walk into a party, spot a platter of something absolutely irresistible, and think, “I need to be best friends with whoever made that?” That’s the exact vibe I’m going for with these Mustard Hasselback Kielbasa Bites. Imagine this: smoky, juicy kielbasa, transformed with little Hasselback slits that cradle a tangy, sweet, and subtly spicy mustard glaze. In the oven, that glaze caramelizes into a sticky, golden-brown jacket, while the slices fan out just enough to get delightfully crisp on the edges.
This isn’t just another sausage appetizer. This is a texture and flavor explosion designed for maximum joy-per-bite. They’re laughably easy to make, totally hands-off for most of the cooking time (freeing you up to, you know, actually enjoy your own party), and guaranteed to disappear faster than you can say “pass the plate.” Whether you’re gearing up for the big game, hosting a backyard BBQ, or just treating yourself to a seriously epic snack night, these bites are your ticket to snack stardom. So, tie on your favorite apron—the one with the questionable stains that tell the best stories—and let’s make something incredibly delicious together.
The Humble Sausage & A Grandma’s Wisdom
This recipe takes me right back to my grandma’s linoleum-floored kitchen. She was a wizard with humble ingredients, especially sausage. Every fall, during family football weekends, a big, coiled kielbasa would always find its way into her cast iron skillet. She’d simmer it with onions and beer, and the aroma would wrap around the house like a warm blanket. It was simple, hearty, and the center of everyone’s attention.
Years later in culinary school, I was introduced to the Hasselback technique, usually for potatoes. I was obsessed with how those thin, accordion-like cuts could create so much surface area for crisping and soaking up flavor. One day, staring at a package of kielbasa and dreaming of my grandma’s kitchen, it hit me: What if…? By combining her love for that smoky sausage with this clever cutting method and a glaze that reminds me of her favorite mustard potato salad, I created a bite that feels both nostalgic and excitingly new. It’s my little culinary love letter to simplicity with a twist.
Gathering Your Flavor Arsenal
Here’s everything you need to make these addictive bites. I’ve added my chef-y two cents on each one, because knowing your ingredients is the first step to cooking with confidence!
- 1 lb Kielbasa Sausage (or any smoked sausage): This is the star! Look for a good-quality Polish kielbasa for that authentic smoky flavor. Chef’s Insight: If you can find it, a sausage with a natural casing will give you an even better “snap” when you bite in. No kielbasa? Andouille or a smoked beef sausage are fantastic swaps.
- 2 tbsp Dijon or Whole Grain Mustard: Our tangy base. Dijon gives a smoother, sharper tang, while whole grain offers pops of texture and a milder flavor. I often use half of each for the best of both worlds!
- 1 tbsp Honey or Maple Syrup: A touch of sweetness to balance the mustard and help that beautiful caramelization happen. Maple syrup adds a deeper, rustic sweetness that’s incredible with the smoke.
- 1 tbsp Olive Oil: Helps the glaze coat smoothly and encourages browning. Sub Tip: Any neutral oil works, or for a next-level flavor, use bacon fat. (You’re welcome.)
- ½ tsp Garlic Powder: We’re using powder here instead of fresh because it distributes evenly in the glaze without burning. It’s the secret to consistent, mellow garlic flavor in every bite.
- ½ tsp Smoked Paprika: This is the magic dust! It doubles down on the smoky notes from the sausage and gives the glaze a gorgeous red hue. If you only have sweet paprika, it’ll still be tasty, but smoked is a game-changer.
- Chopped Fresh Parsley or Chives (optional): Don’t skip the fresh herbs! That bright green sprinkle just before serving isn’t just pretty—it adds a crucial pop of fresh flavor that cuts through the richness.
Let’s Get Cooking: Step-by-Step to Snack Heaven
Ready? This is where the fun (and the very minimal effort) happens. I’ll walk you through each step with my favorite kitchen hacks.
- Preheat & Prep: Crank your oven to 425°F (220°C) and line a baking sheet with parchment paper. Chef’s Hack: Lining the pan isn’t just for easy cleanup; it prevents the sugary glaze from sticking and burning onto your pan, which is a total pain to scrub later.
- The Hasselback Slice: Slice your kielbasa into 1-inch thick rounds. Now, take each round and make 3-4 shallow vertical cuts across the top, about ¾ of the way down. The key is not to slice all the way through! Pro Tip: Place the sausage round between two chopsticks or the handles of two wooden spoons. The sticks will stop your knife from going too deep, giving you perfect, worry-free Hasselback cuts every single time.
- Whisk the Magic Glaze: In a small bowl, whisk together the mustard, honey (or syrup), olive oil, garlic powder, and smoked paprika until it’s a smooth, luscious sauce. Give it a taste! Want more tang? Add a dash more mustard. More sweetness? A drizzle more honey. Make it yours.
- Glaze Generously: Using a pastry brush or just a spoon, coat each kielbasa round thickly with the glaze. Get in there and really press the sauce into those Hasselback cuts—this is where the flavor soaks deep into the meat. Don’t be shy!
- Roast to Perfection: Arrange the glazed bites on your prepared sheet. Pop them in the hot oven for 20-25 minutes. Midway Chef Move: About halfway through, I pull the tray out and baste them with any glaze that’s dripped onto the pan. This builds layers of flavor and ensures maximum caramelization. You’ll know they’re done when the tops are glistening and golden-brown, and your kitchen smells unbelievable.
- The Finishing Touch: Let them cool for just a minute on the tray (the glaze is molten lava hot straight out of the oven!). Then, transfer to a platter and shower with the chopped parsley or chives. This final step makes them look professionally pretty and taste perfectly balanced.
How to Serve These Show-Stopping Bites
Presentation is part of the fun! I love using a simple, rustic wooden board or a colorful ceramic platter. Pile the warm bites high and scatter a few extra herb sprigs around for that “I totally threw this together effortlessly” look (we’ll keep our secret).
Provide plenty of toothpicks or small forks for easy grabbing. For dipping sauce enthusiasts (I see you!), serve with small bowls of extra whole grain mustard, a cool and creamy garlic aioli, or even a quick pickle relish. They’re also incredible perched on top of a creamy polenta for a hearty appetizer, or tossed into a salad for a warm, protein-packed topping. Honestly, just getting them from the tray to your mouth is a perfectly acceptable serving method too.
Get Creative! Flavor Twists & Swaps
Once you’ve mastered the classic, the playground is open! Here are a few of my favorite ways to mix it up:
- Spicy Chipotle Lime: Swap the Dijon for 1 tbsp adobo sauce from a can of chipotles, and use lime juice instead of honey. Add ¼ tsp cumin to the glaze. Spicy, smoky, and tangy!
- Sweet & Sticky Asian-Inspired: Use hoisin sauce instead of mustard, and swap the honey for brown sugar. Add a teaspoon of grated fresh ginger and a splash of rice vinegar to the glaze. Garnish with sesame seeds and sliced green onion.
- Apple Cider Glaze: Perfect for fall! Use whole grain mustard and replace the honey with 1 tbsp of apple butter or reduced apple cider. A pinch of cinnamon or thyme in the glaze is divine.
- For a Lighter Option: Use a chicken or turkey smoked sausage. You can also grill these! Prepare them through step 4, then cook on a medium-hot grill for 10-15 minutes, turning occasionally, until nicely marked and cooked through.
- Cheesy Pull-Apart Style: Before the final bake, tuck a thin slice of sharp cheddar or a cube of mozzarella into each Hasselback slit. Bake as directed for an ooey-gooey surprise inside.
Chef Emily’s Notes From a Messy Apron
This recipe is a testament to the fact that the best dishes often come from happy accidents and playing with your food. The first time I made these, I may or may not have been using a slightly too-dull knife and created more of a “crisscross” pattern than neat slits. It was messy… but it held even MORE glaze! So don’t stress about the Hasselback cuts being perfect. As long as you don’t cut all the way through, you’re golden.
Over the years, this has become my most-requested party recipe. I’ve doubled, tripled, and even quintupled it for big gatherings. The only constant piece of feedback? “I ate way more than I planned to.” Mission accomplished. They also reheat beautifully in an air fryer or toaster oven for a next-day treat that’s almost as good as fresh.
FAQs & Kitchen Rescue Tips
Q: My glaze is burning before the sausage is cooked through. Help!
A: Ovens can run hot! If you see the tops getting too dark too fast, simply tent the baking sheet loosely with aluminum foil for the remainder of the cooking time. Also, ensure your oven rack is in the center position, not too close to the top heating element.
Q: Can I make these ahead of time?
A: Absolutely! You can slice and glaze the kielbasa bites up to 24 hours in advance. Keep them covered in the fridge on the baking sheet. Let them sit at room temp for 15 minutes before baking. You may need to add 2-3 extra minutes to the cook time since they’ll be going in cold.
Q: What’s the best knife to use for the Hasselback cuts?
A: A small, sharp paring knife gives you the most control. The key is a sharp blade—a dull knife will crush the sausage rather than slicing it cleanly. Remember the chopstick trick! It’s a lifesaver.
Q: Are these spicy?
A: The recipe as written has a gentle, tangy kick from the mustard, but it’s not spicy-hot. The smoked paprika adds smokiness, not heat. For spice, add a pinch of cayenne or red pepper flakes to the glaze, or use a hot smoked sausage.
Nutritional Info (Because We’re All Friends Here)
Okay, let’s keep it real: these are a treat, a celebration bite, a party food. And that’s perfectly wonderful! Here’s a general breakdown per serving (about 2 bites), to help you fit them into your day. Remember, ingredients vary by brand, so this is an estimate.
Calories: ~150 | Protein: 7g | Carbohydrates: 4g | Fat: 12g (Saturated Fat: 4g) | Sodium: 380mg
The protein comes from the sausage, keeping you satisfied. The carbs are minimal and primarily from the honey/maple syrup. To lighten it up slightly, you can use a turkey kielbasa and reduce the honey by half. But for game day or a special gathering, I say enjoy the full, glorious version!
Final Thoughts: Go Forth and Snack!
And there you have it, my friends! Your new secret weapon for any and every gathering that calls for something truly memorable. These Mustard Hasselback Kielbasa Bites are more than just a recipe; they’re a conversation starter, a crowd-uniter, and proof that with a few simple tricks, you can turn an everyday ingredient into something extraordinary.
I hope you have as much fun making them as I do. I hope your kitchen fills with that incredible smoky-sweet aroma, and I hope your people gather around the tray with big smiles. That’s what Tasty Chow is all about—sharing the love, one delicious bite at a time.
If you make them (and you totally should!), I’d be over the moon if you tagged me on social @TastyChow so I can see your masterpiece. Now, go grab that kielbasa and get slicing. Your snack fan club awaits!
With love and a well-used whisk,
Emily