Neapolitan Layered Protein Balls: Your New Favorite No-Bake Snack!
Hey there, friend! Chef Emily here, waving at you from my flour-dusted kitchen counter. Have you ever had one of those days where your stomach starts grumbling at 3 PM, your energy hits a wall, and you find yourself staring into the snack abyss, torn between something sweet, something healthy, and something fast? I’ve been there more times than I can count, usually with a spatula in one hand and a desperate look in my eyes.
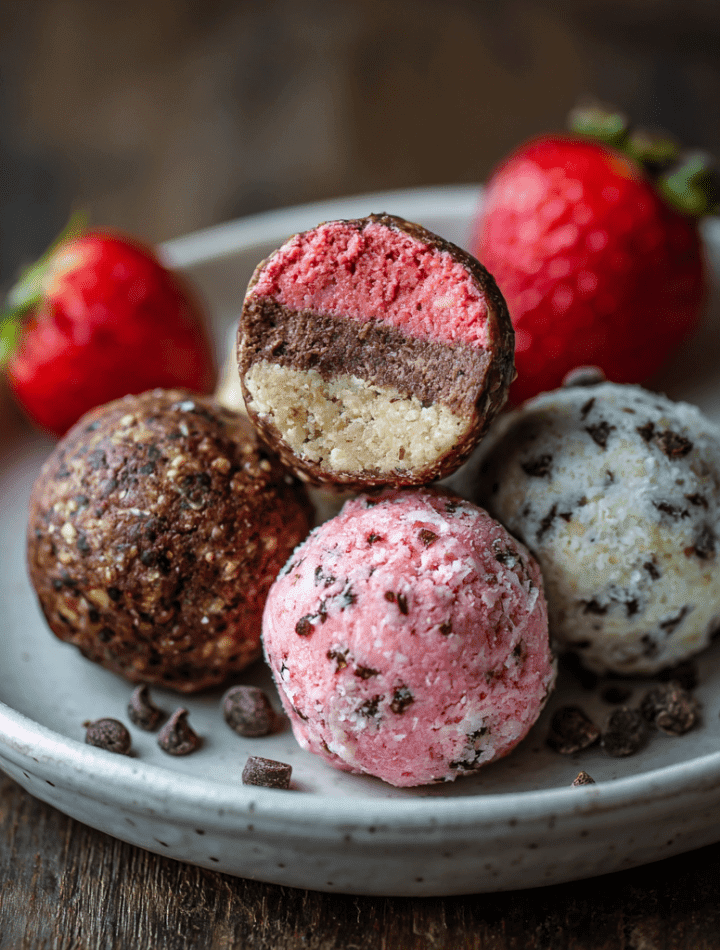
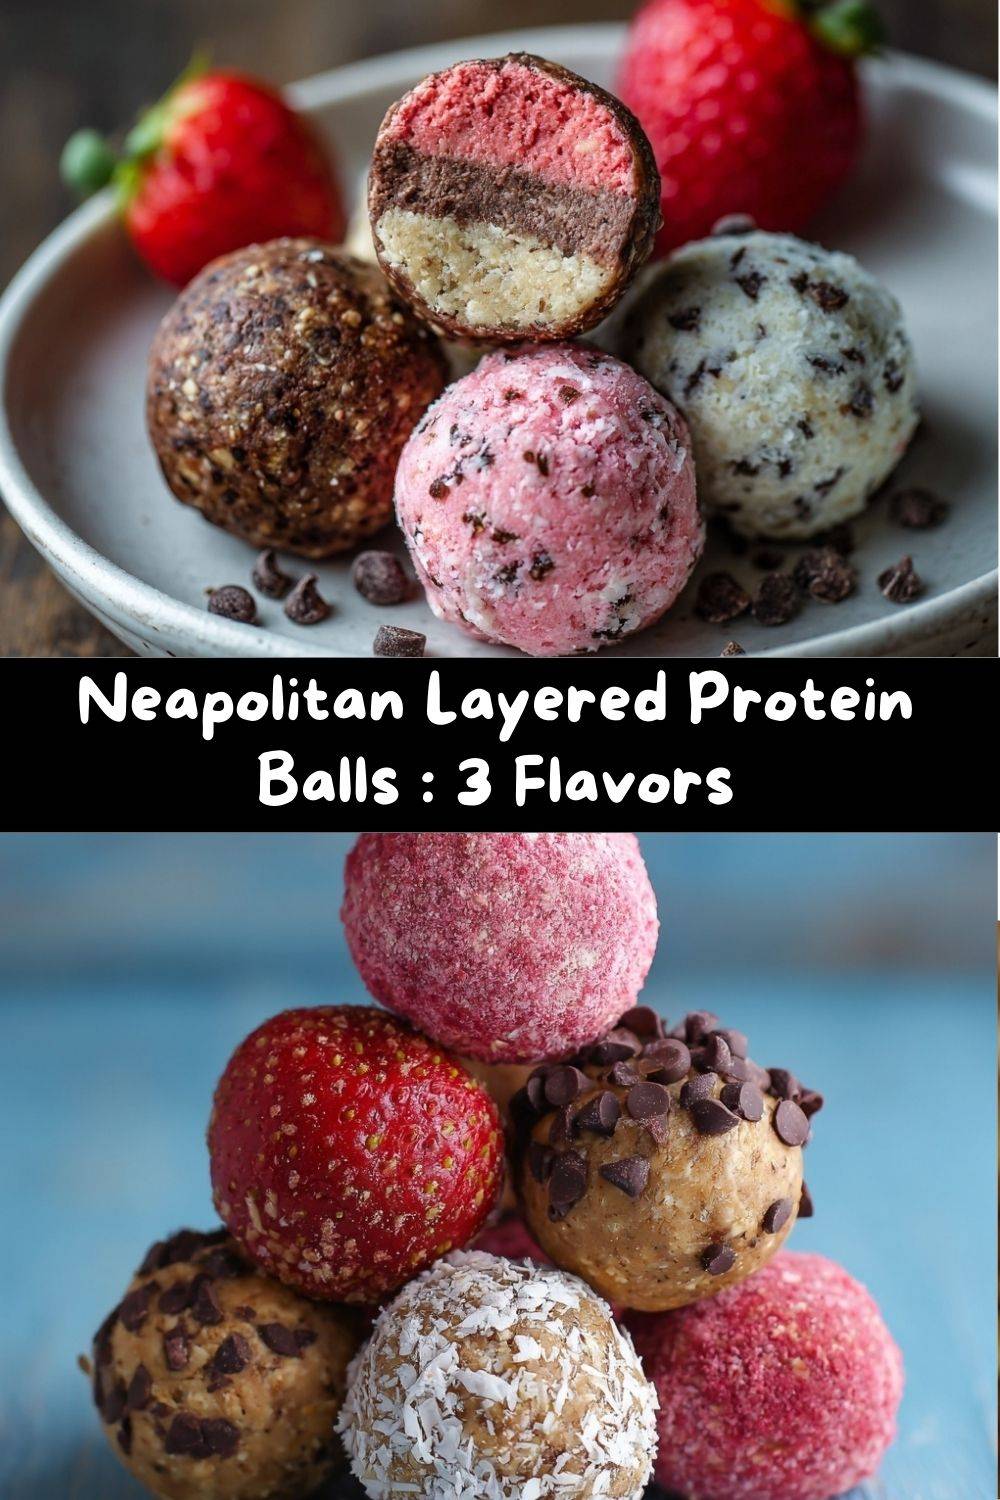
That’s exactly why I’m so crazy about these Neapolitan Layered Protein Balls. They’re the snack superhero we all need! Imagine the classic, beloved trio of strawberry, vanilla, and chocolate—the flavors of childhood birthday parties and happy summer days—all rolled into one adorable, energy-boosting bite. No oven required, just a few simple bowls, a spoon, and about 15 minutes of your time. These little guys are proof that “healthy” and “delightful” can absolutely live on the same plate (or in the same snack container!). They’re perfect for tucking into lunchboxes, stashing in your gym bag, or keeping front-and-center in the fridge for when that inevitable afternoon craving hits. Let’s make meal prep not just smart, but seriously fun and pretty. Ready to roll?
The Neapolitan Memory That Inspired It All
This recipe took a direct trip out of my own nostalgia file. My grandma, the woman who taught me that love is the first and most important ingredient, had a magical way with desserts. Every Sunday after our big family dinner, she’d bring out a carton of Neapolitan ice cream. It was a simple, store-bought treat, but it felt like a grand event. My brother always fought for the chocolate chunk, I was a strawberry devotee, and Dad would meticulously scoop a perfect slice with all three flavors. We’d sit around her linoleum table, spoons clinking, laughing and telling stories.
Years later, after a long day of recipe testing that left me covered in cocoa powder and craving both something sweet and something substantial, that memory floated back. I looked at my jars of oat flour and protein powder and thought, “What if I could capture that happy, triple-flavor magic in a snack that actually fuels my day?” A few messy, delicious experiments later (including one batch that turned an unfortunate shade of muddy gray—we learn from our mistakes!), these layered protein balls were born. They’re my kitchen’s little homage to Grandma, to shared joy, and to the idea that the best food always comes with a side of happy memories.
Gathering Your Flavor Trio: What You’ll Need
Here’s the beautiful part: you essentially make one simple base mix three times, then flavor each one. It’s like kitchen playtime! Let’s break it down. Pro-tip: Use measuring spoons and cups for the dry ingredients here for consistency. A little variance in flour can change the texture.
For the Base Mix (You’ll make this 3 separate times)
- ⅓ cup oat flour: This is our trusty foundation! It gives structure and a lovely, soft chew. Chef’s Insight: You can buy oat flour or make your own by blitzing old-fashioned oats in a food processor or blender until powdery. It’s cheaper and you control the texture!
- 2 tbsp protein powder: The power-up! I recommend a good-quality vanilla or unflavored whey or plant-based protein. Sub Tip: The type of protein powder can affect moisture. Vegan blends (pea, brown rice) often absorb more liquid, so you may need an extra splash of milk.
- 1 tbsp nut butter: Our natural binder and healthy fat source. Creamy almond butter or cashew butter keeps the flavor neutral, but peanut butter works great too for a more distinct taste. For nut-free: Sunflower seed butter is a fantastic swap!
- 1 tbsp maple syrup or honey: A touch of natural sweetness and stickiness. Pure maple syrup keeps it vegan, while honey adds its own floral note. Agave nectar works in a pinch.
- 1–2 tsp milk of choice: The texture wizard! Start with 1 tsp. We’ll use this to bring each dough to the perfect pliable, Play-Doh-like consistency. Any milk works—dairy, almond, oat, etc.
For the Flavor Layers
- For the Strawberry Layer:
- 1 tsp freeze-dried strawberry powder: This is my #1 secret for potent berry flavor without adding water! You can buy it or make it by crushing freeze-dried strawberries into a fine dust. Sub Tip: In a bind, use ½ tbsp of very finely mashed fresh or thawed frozen strawberries, but note this will make the dough wetter, requiring more oat flour.
- Optional: A drop of pink food coloring. For that classic, pretty pink hue! Natural options like beet powder work too.
- For the Vanilla Layer:
- ½ tsp pure vanilla extract: The soul of the vanilla layer! Don’t skimp. For extra luxury, use vanilla bean paste.
- For the Chocolate Layer:
- 1 tsp unsweetened cocoa powder: Use natural cocoa for a lighter chocolate taste, or Dutch-process for a richer, darker flavor.
- Optional: 1 tbsp mini chocolate chips: For little bursts of melty chocolate! I sometimes fold these into the chocolate dough for extra fun.
Let’s Build Some Flavor Layers! Step-by-Step
Okay, let’s get our hands a little messy! This process is simple, satisfying, and kinda like edible crafting. Put on some music, and let’s go.
- Set Up Your Station: Grab three small mixing bowls. I label them with little sticky notes (S, V, C) so I don’t accidentally add cocoa to my strawberry bowl—been there! Have all your ingredients measured and ready. This is your “mise en place,” and it makes everything flow smoothly.
- Make the Triple Base: In each of your three bowls, combine the base ingredients: ⅓ cup oat flour, 2 tbsp protein powder, 1 tbsp nut butter, and 1 tbsp maple syrup. Stir each one with a fork or small spatula. It will look crumbly and dry at first—that’s perfect! Chef’s Hack: If your nut butter is super thick, warm it for 5-10 seconds in the microwave to make it easier to mix.
- Flavor & Hydrate: Now, the fun part! To your first bowl, add the strawberry powder (and pink coloring if using). To the second, add the vanilla extract. To the third, add the cocoa powder (and mini chips if using). Mix each one thoroughly. Now, add milk, ONE TEASPOON AT A TIME, to each bowl, mixing until the dough comes together. You want it to be smooth, pliable, and hold together when pinched. It should not be sticky or wet. The strawberry layer may need a tiny bit more liquid if the powder is very absorbent. Key Tip: Add milk slowly! You can always add more, but you can’t take it out.
- Roll & Layer: Take a small portion of the chocolate dough (about 2 teaspoons) and roll it into a small, flat disc in your palm. Place it on a parchment-lined plate. Take an equal-sized portion of vanilla dough, flatten it, and gently place it on top of the chocolate disc. Repeat with the strawberry dough, placing it on top of the vanilla. You now have a little Neapolitan stack! Gently cup your hands and roll the stack into a smooth ball, pressing lightly to seal the layers together. The warmth of your hands will help them fuse. Pro Move: If the dough is sticking to your hands, lightly dampen your palms with water or a tiny bit of oil.
- Chill & Set: Place your finished balls on the parchment-lined plate or tray. Pop them into the fridge for at least 15 minutes. This crucial step firms them up, sets the shape, and makes the flavors meld beautifully. Patience, my friend!
How to Serve & Enjoy Your Masterpiece
Once they’re chilled and firm, the real joy begins—eating them! I love storing mine in a glass container in the fridge—they look so cheerful lined up like little edible gems. They’re the ultimate grab-and-go snack, but you can also get fancy with presentation. For a party or potluck, arrange them on a cute platter and maybe dust the strawberry ones with a tiny bit of extra strawberry powder for a pop of color. They pair wonderfully with a cup of coffee for your mid-morning break, or as a post-workout refuel with a big glass of cold water. Pack a couple in a small reusable container for hikes, road trips, or long afternoons running errands. They’re a little pocket of joy and energy, ready whenever you are.
Mix It Up! Fun Flavor Twists & Swaps
Once you’ve mastered the classic trio, the kitchen playground is open! Here are some of my favorite riffs on this versatile recipe:
- Cookies & Cream: For the chocolate layer, use black cocoa powder (it tastes just like Oreos!) and fold in crushed gluten-free Oreo pieces. Make the vanilla layer and leave the strawberry layer out for a duo-tone treat.
- Tropical Trio: Swap strawberry for mango (use freeze-dried mango powder), keep the vanilla, and for the “chocolate” layer, use cacao nibs blended into the base for a crunch instead of cocoa powder.
- Nutty Delight: Use peanut butter for the base and add chopped peanuts to the chocolate layer, a dash of cinnamon to the vanilla, and skip the strawberry for a PB-centric version.
- Superfood Boost: Add a teaspoon of chia seeds or ground flax to the base mix for extra fiber and omega-3s. You can also roll the finished balls in shredded coconut, crushed nuts, or more cocoa powder for extra texture.
- Birthcake Batter: For a funfetti vibe, add a sprinkle of rainbow sprinkles to the vanilla layer. It’s pure happiness in ball form!
Chef Emily’s Kitchen Notes
This recipe is a living, evolving thing in my kitchen! The first batch I ever made was… ambitious. I tried using fresh strawberry puree, and let’s just say the balls never firmed up. I had to eat them with a spoon (still tasty, but not the goal!). That’s how I discovered the magic of freeze-dried fruit powder—total game-changer for no-bake recipes. Over time, I’ve also learned that letting the balls sit overnight in the fridge makes the flavors even more harmonious. Sometimes, if I’m feeling less patient with the layering, I’ll just make three separate single-flavor batches and call it a variety pack. No rules, just deliciousness. The best part is hearing from readers who make it their own—one person told me she makes a “pizza” version, pressing the three doughs into a pan and slicing it like bars. Genius!
FAQs & Quick Fixes
Q: My dough is too wet and sticky! Help!
A: No worries—this is the most common hiccup. Simply add more oat flour, a teaspoon at a time, until the dough is no longer sticky and handles easily. This can happen if your nut butter was very runny or if you added a bit too much milk.
Q: Can I make these vegan?
A> Absolutely! Use a plant-based protein powder, maple syrup (not honey), and a nut butter and milk that fit your diet. Sunflower seed butter works great for a nut-free vegan version.
Q: How long do they last, and how should I store them?
A: They keep beautifully in an airtight container in the fridge for up to 2 weeks. They also freeze wonderfully for up to 3 months. Just thaw in the fridge or at room temperature for a few minutes before eating.
Q: The layers are blending when I roll the ball. What am I doing wrong?
A> This usually means your doughs are a bit too soft/warm. Pop each individual flavored dough in the fridge for 5-10 minutes before layering and rolling. Also, make sure you’re pressing the layers together gently, not aggressively squishing them.
A Quick Peek at the Nutrition
While I’m always about flavor first, I know it’s helpful to understand what’s fueling you! These estimates are per ball, assuming the recipe makes about 10 balls. Remember, exact numbers will vary based on your specific brand of protein powder, nut butter, and any additions you make.
Each ball provides a satisfying balance: around 110 calories, a solid 6 grams of protein to help keep you full and support your muscles, about 9 grams of carbohydrates (from the oats and natural sweeteners) for energy, and 5 grams of healthy fats (from the nut butter) for sustained satisfaction. They’re a source of fiber from the oats, and completely free of refined sugar when made as written. Think of them as a nourishing, homemade alternative to many store-bought protein bars or sugary snacks!
Final Thoughts from My Kitchen to Yours
Well, my friend, we’ve done it! We’ve taken a blast-from-the-past flavor and turned it into a smart, make-ahead snack that’s as fun to make as it is to eat. That’s what Tasty Chow is all about for me—finding those little moments of joy in the kitchen and sharing them with you. I hope these Neapolitan Layered Protein balls bring a smile to your face, a boost to your day, and maybe even inspire you to create your own flavor combinations. Remember, cooking isn’t about perfection; it’s about the love and creativity you stir into every bowl. Now, go forth, roll some balls, and enjoy every delicious, nutritious bite. And be sure to tag me if you make them—I love seeing your creations!
With love and a full jar of snacks,
Emily