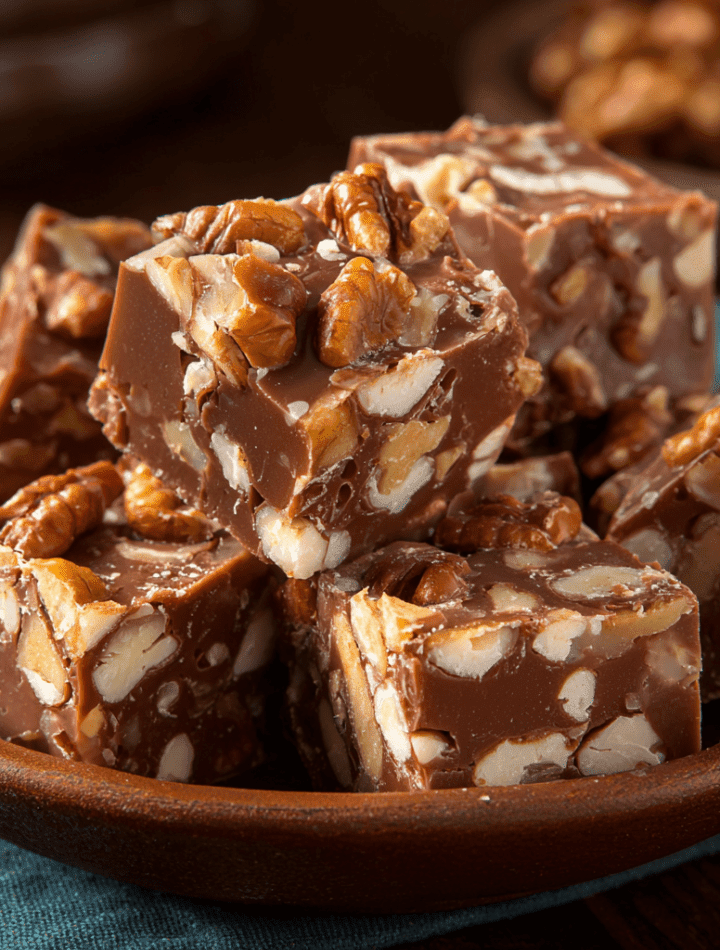
Oklahoma Nut Candy: Your New Favorite Old-Fashioned Treat
Hey there, friend! Emily here, from my flour-dusted kitchen to yours. Have you ever stumbled upon a recipe that feels less like a list of instructions and more like a warm, delicious secret? A recipe that, from the very first bite, feels like coming home? That’s exactly what Oklahoma Nut Candy is for me.
We’re talking about a classic Southern confection that’s the love child of a rich, creamy fudge and a nutty, crunchy praline. It’s the kind of treat that disappears from a holiday platter in minutes, the one that church socials and family reunions are built around. It’s deceptively simple, requiring no fancy techniques or equipment, but the result is pure, unadulterated magic. The kind of magic that makes you close your eyes and just sigh with happiness.
If you’ve ever been intimidated by candy-making, let this be your gateway recipe. It’s forgiving, it’s fun, and it’s packed with so much flavor and texture, you’ll feel like a certified candy genius. So, tie on your favorite apron (the messy one is always the best), and let’s dive into making a batch of this irresistibly nutty, wonderfully rich, and beautifully simple candy that’s steeped in heart and history.
A Sweet Slice of My Kitchen Story
My first memory of Oklahoma Nut Candy isn’t from a cookbook or a cooking show. It was in my Grandma Rose’s kitchen, a place that always smelled like cinnamon and unconditional love. I couldn’t have been more than seven, perched on a wobbly stool, my chin just barely clearing the flour-sprinkled countertop.
She was making her famous holiday candy, and I was her official “nut crusher,” armed with a wooden rolling pin and a zip-top bag full of pecans. I remember the rhythmic *thump, thump, thump* as I smashed them, the sound mingling with the gentle bubble of the sugar and milk mixture on her ancient stovetop. She didn’t use a fancy thermometer; she’d just dip a spoon into the molten syrup and let a drop fall into a glass of cold water, judging its readiness by the way it formed a soft, pliable ball. To me, it was pure wizardry.
That first warm, buttery piece she broke off for me, loaded with toasted pecans, was a revelation. It was crunchy, creamy, sweet, and salty all at once. It was more than candy; it was a lesson in patience, in tradition, and in the simple, profound joy of making something with your own two hands to share with people you love. Every time I make this recipe, I’m right back in that kitchen with her, and that’s a feeling I want to bottle up and share with every single one of you.
Gathering Your Candy-Making Crew: The Ingredients
One of the best things about this recipe is its beautiful simplicity. You only need a handful of pantry staples to create something truly spectacular. Here’s the lineup, with a few of my chef-y insights to help you understand the “why” behind the “what.”
- 2 cups Granulated Sugar: This is the foundation of our candy, providing the sweet structure and that classic fudge-like texture. It caramelizes with the milk to create the candy’s body. Chef’s Tip: Don’t be tempted to reduce the sugar; it’s crucial for the chemical reaction that makes the candy set properly.
- 1 cup Evaporated Milk (not sweetened condensed milk): This is the secret weapon! Evaporated milk has less water than regular milk, which means it helps create a richer, creamier texture without making the candy too soft or grainy. Substitution Alert: Do NOT swap this for sweetened condensed milk, which is much thicker and sweeter and will throw the whole recipe off balance.
- 2 tbsp Unsalted Butter: A little bit of butter adds a lovely richness and a silky mouthfeel. Using unsalted lets you control the salt level. We’ll add our own pinch later to make the flavors pop!
- 1 tsp Pure Vanilla Extract: The flavor enhancer! A good quality vanilla adds a warm, aromatic depth that complements the nuts beautifully. For a fun twist, you could use a tiny splash of almond extract alongside the vanilla.
- 2–3 cups Mixed Nuts, Toasted: The star of the show! I love a mix of pecans and walnuts for a classic Southern feel, but peanuts work wonderfully, too. Chef’s Non-Negotiable: TOAST YOUR NUTS! Spreading them on a baking sheet and giving them 8-10 minutes in a 350°F (175°C) oven wakes up their oils and gives them an incredible, deep, nutty flavor and crunch. It’s a game-changer, I promise.
- A Generous Pinch of Salt: This is the magic dust that makes all the other flavors sing. It cuts the sweetness and highlights the buttery, nutty notes. I use flaky sea salt for finishing, but any fine salt works in the mix.
Let’s Make Some Magic: Step-by-Step Instructions
Ready to create some kitchen alchemy? Follow these steps, and you’ll be a candy-making pro in no time. The key is patience and a good, heavy-bottomed saucepan—it distributes heat evenly and prevents scorching.
- Prep Your Pan and Toast Those Nuts! Before you even turn on the stove, generously butter an 8×8-inch baking pan. This ensures your candy will release easily. Then, get those nuts toasted and roughly chopped. Set them aside so they’re ready for their grand entrance. Chef’s Hack: Rubbing the toasted nuts in a clean kitchen towel helps remove some of the bitter skins from walnuts and pecans!
- The Gentle Melt. In your heavy-bottomed saucepan, combine the granulated sugar and evaporated milk. Place it over medium heat and stir constantly with a wooden spoon or heatproof spatula until the sugar is completely dissolved. Chef’s Tip: You can tell the sugar is dissolved when the mixture goes from looking cloudy and gritty to clear and smooth. This is a crucial step to avoid a grainy final texture.
- The Patient Simmer. Bring the mixture to a rolling boil. Once it’s boiling, immediately reduce the heat to a low, gentle simmer. This is where the patience comes in! You’ll need to cook it for about 12-15 minutes, stirring frequently to prevent the bottom from burning. Chef’s Key Insight: We’re cooking this to the “soft-ball stage,” which is 235°F (113°C) on a candy thermometer. If you don’t have a thermometer, use the old-fashioned method my grandma did: drop a small bit of the syrup into a glass of cold water. If it forms a soft, pliable ball that flattens when you take it out, it’s ready!
- The Flavor Infusion. As soon as your candy hits that perfect temperature, take the pan off the heat. Now, quickly stir in the butter, vanilla extract, and that all-important pinch of salt. It will sizzle and foam a bit—that’s a good sign! Stir until the butter is fully melted and incorporated.
- The Nutty Finale. Now, add your glorious toasted nuts. Stir vigorously! You’ll notice the mixture start to thicken and become less glossy as it cools slightly. Keep stirring until it’s well-combined and the nuts are completely coated. This step also helps the candy cool to the right consistency for pouring.
- Spread and Settle. Quickly pour the candy mixture into your prepared buttered pan. Use a spatula or the back of a spoon to spread it into an even layer. Chef’s Pro Move: If you like, you can sprinkle a little extra flaky sea salt on top right now for a beautiful, professional finish and an extra flavor boost.
- The (Hardest Part) Wait. Let the pan cool completely at room temperature until the candy is fully set. This usually takes 1-2 hours. I know, the temptation to cut into it is REAL, but letting it set properly ensures you get clean, perfect squares. Resist!
- Slice and Savor. Once it’s completely cool and firm, turn the slab of candy out onto a cutting board. Use a sharp knife to cut it into squares. Wiping the knife blade with a warm, damp cloth between cuts helps you get those super clean edges.
Sharing the Sweetness: How to Serve Your Masterpiece
Okay, you’ve made this gorgeous candy. Now, how do you present it? This treat is incredibly versatile and always a crowd-pleaser.
For a simple, homespun presentation, I love piling the squares into a rustic wooden bowl or a vintage ceramic plate. It just feels right. If you’re gifting it, stack the squares in a cellophane bag tied with a pretty ribbon, or layer them in a festive tin between sheets of parchment paper. It makes for such a thoughtful, homemade gift that says, “I made this just for you.”
This candy is the perfect partner for a strong cup of black coffee or a tall glass of cold milk. The bitterness of the coffee or the creaminess of the milk provides the perfect counterpoint to the candy’s sweetness. Serve it on a dessert platter at your next party, or just keep a container in the kitchen for when that 3 p.m. sweet tooth strikes. No judgment here!
Make It Your Own: Delicious Recipe Variations
The classic version is perfect, but playing with flavors is one of the great joys of cooking! Here are a few of my favorite twists on this timeless treat.
- The Chocolate Lover’s Dream: Stir in ½ cup of semi-sweet chocolate chips along with the butter and vanilla. They’ll melt into the hot syrup and create a decadent chocolate-nut fudge situation that is absolutely divine.
- The Salty-Sweet Sensation: Use salted, roasted peanuts for your nuts. Then, after you pour the candy into the pan, press a handful of mini pretzel twists into the top before it sets. The combination of sweet, salty, and crunchy is next-level.
- The Tropical Escape: Swap the traditional nuts for a mix of macadamia nuts and chopped, dried pineapple. Add a ¼ teaspoon of coconut extract along with the vanilla for a taste of the islands.
- The “Everything But the…” Bar: Feeling adventurous? Use a mix of nuts, and then stir in a handful of toasted coconut and a ¼ cup of chopped dried cranberries or cherries for a fruit-and-nut bar that’s packed with texture and flavor.
- Bourbon-Pecan Elegance: For a more grown-up version, add one tablespoon of good-quality bourbon along with the vanilla. It pairs incredibly well with pecans and adds a wonderful, warm complexity.
From My Kitchen to Yours: Chef’s Notes
This recipe has evolved so much from my grandma’s simple version. I’ve learned through many (many!) batches that toasting the nuts is non-negotiable, and that a generous pinch of salt is the key to a truly balanced candy.
I’ll never forget the first time I made it by myself as a teenager. I was so impatient that I didn’t let the sugar fully dissolve, and I ended up with a slightly gritty batch. My grandma, bless her heart, ate every piece and told me it was “delightfully rustic.” The lesson? Even the “mistakes” are usually still delicious. Don’t stress! Candy-making is a skill that gets better with practice. The most important ingredient is always the love and fun you put into it.
Your Candy Questions, Answered!
Let’s tackle a few common questions to make sure your candy-making adventure is smooth and successful.
Q: My candy turned out grainy. What happened?
A: This is usually caused by sugar crystals forming. The most common culprits are not dissolving the sugar completely at the beginning, or stirring too vigorously once the mixture comes to a boil. Make sure your sugar is fully dissolved in the milk before it boils, and then just stir gently and frequently during the simmering stage.
Q: My candy is too soft and won’t set. Help!
A: This likely means it didn’t reach the proper temperature (the soft-ball stage). A candy thermometer is your best friend here for accuracy. If it’s too soft, you can sometimes salvage it by re-heating it gently with a tablespoon or two of evaporated milk and cooking it back to 235°F. Consider it a delicious, nutty sauce for ice cream!
Q: Can I double this recipe?
A: You can, but proceed with caution! Doubling the batch means it will take significantly longer to reach the soft-ball stage, which can increase the risk of the bottom scorching. If you double it, use a large, heavy pot and be prepared for a longer cooking time, stirring almost constantly.
Q: How long does this candy keep, and how should I store it?
A: Stored in an airtight container at room temperature, it will keep beautifully for up to two weeks. It never lasts that long in my house, though! You can also freeze it for up to three months. Just separate layers with parchment paper in a freezer-safe container.
Let’s Talk Nutrition (The Real, Balanced Talk!)
As a chef who believes in both indulgence and balance, I like to be transparent about what we’re eating. This is a candy, through and through—a special treat to be savored and enjoyed mindfully.
Each square is a rich, energy-dense delight. The primary sources of calories come from the sugar and the healthy fats in the nuts. Speaking of nuts, they’re the nutritional powerhouse here! They provide a good amount of protein, along with essential vitamins, minerals, and heart-healthy fats. The small amount of butter adds to the fat content, contributing to that luxurious mouthfeel.
So, while this isn’t a “health food,” it is a real food treat made with simple, recognizable ingredients. Enjoy a square (or two!) with a cup of tea or as a post-dinner delight, knowing you’re enjoying a piece of culinary tradition. Life is all about balance, and a little homemade sweetness is good for the soul.
Final Sweet Thoughts
And there you have it! Your very own guide to creating a batch of unforgettable Oklahoma Nut Candy. This isn’t just a recipe; it’s a connection to kitchens past, a project filled with love, and a guaranteed way to make someone’s day a little sweeter.
I hope you feel empowered, excited, and ready to create some delicious memories of your own. Making this candy always brings me so much joy, and I truly hope it does the same for you. So, go on, give it a try! And when you do, I’d love to hear about it. Tag me on social or leave a comment below—seeing your creations is my absolute favorite thing.
Now, get out there and chow down!
— With love and a full heart,
Emily