Oreo No-Bake Cheesecake Cups: A Sweet Treat That Makes You Smile
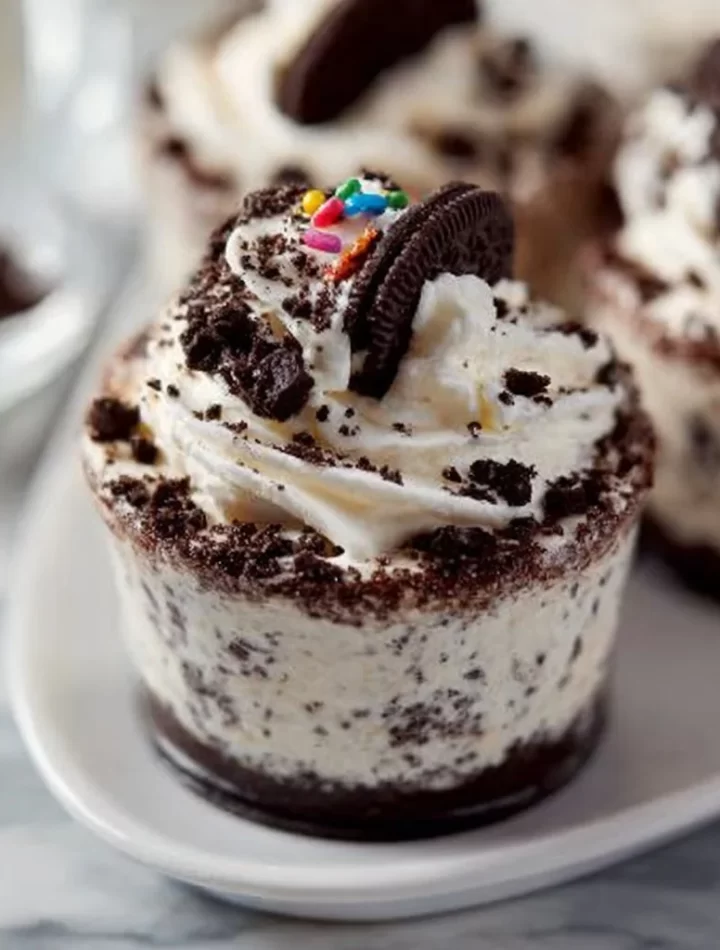
Hey there, fellow dessert enthusiasts! 🎉 If you’ve been searching for a recipe that’s as easy as it is scrumptious, then hello, you’ve hit the jackpot! Today, we’re diving into the delightful world of Oreo No-Bake Cheesecake Cups—a dessert that’s bound to sweep you off your feet! Picture this: velvety smooth cheesecake mingling with the iconic crunch of Oreos, all beautifully layered in a charming cup. Whether it’s a spontaneous mid-week treat or the star of your weekend soirée, these cheesecake cups promise smiles all around.
Why do I love them so much, you ask? Well, for starters, they’re no-bake! That means less time fussing around in the kitchen and more time enjoying the goodness of creamy cheesecake without turning on the oven. Plus, they’re as customizable as your favorite playlist. You can whip these up for a simple family night or jazz them up for a more festive occasion—believe me, they always impress!
These adorable cups are made to embrace the chocolate-loving heart in all of us and are perfect for sharing. Just try not to eat them all at once—they’re that good! So, grab your whisk, put on your favorite apron, and let’s dive into this cheesecake journey together!
Personal Story
Let me take you back a few years to a rainy Saturday afternoon at my grandma’s house. It was one of those cozy days where the rain pattered softly against the windows, and the kitchen smelled like heaven. Grandma decided it was a good day for baking, but instead of whipping up her famous cookies or pies, she opted for something different: a luscious cheesecake!
As she expertly crushed those Oreos, I was mesmerized. It seemed so simple, yet so magical! Between bursts of laughter and her endless stories about life, I got my first taste of that heavenly cheesecake. The rich, creamy texture contrasted perfectly with the crunch of chocolatey goodness. Honestly, it was love at first bite! Fast forward to now, and I knew I had to channel that memory into a recipe that evokes the same warmth and happiness. That’s how these Oreo No-Bake Cheesecake Cups were born!
Ingredients
Here’s what you’ll need to create these delightful cups:
-
Oreo Cookies: The star of the show! They not only provide flavor but also a fantastic texture. Substitution Tip: If you want a slightly different vibe, use chocolate wafer cookies for a milder taste.
-
Cream Cheese: This is the base of your cheesecake filling. Use full-fat for the creamiest texture. Chef Insight: Make sure to let it soften at room temperature; cold cream cheese can be a pain to mix!
-
Granulated Sugar: This sweetens the filling. Depending on your sweetness preference, you can adjust. Substitution Tip: Coconut sugar or agave syrup can be great alternatives if you’re avoiding refined sugar.
-
Vanilla Extract: A dash of this adds a warm flavor that complements the creaminess. Chef Insight: Always opt for pure vanilla extract if you can; it makes a noticeable difference.
-
Whipped Topping (Cool Whip): This gives the cheesecake its fluffy texture. Substitution Tip: If you want to go homemade, just whip some heavy cream with powdered sugar until stiff peaks form!
-
Butter: This helps to bind the crushed Oreo cookies for the crust layer. Chef Insight: Loving the melted butter smell? I know, right? Just don’t let it sit for too long; it should still be warm when you mix it in.
-
Chocolate Syrup (Optional): For drizzling on top to take your presentation over the top! Chef Insight: A splash of salt mixed in with chocolate syrup can instantly elevate the flavors.
Step-by-Step Instructions
Let’s get those delicious cups ready! Here’s how to do it, step by step:
Step 1: Crush the Oreos
Start by placing the Oreos in a food processor or putting them in a zip-top bag and crushing them with a rolling pin. You want a fine crumb texture—no big chunks here! This will be the base of your crust, so make sure they’re nice and uniform.
Step 2: Prepare the Crust Mixture
In a medium bowl, mix the crushed Oreos with melted butter. You want it to resemble wet sand. If it’s too dry, add a bit more melted butter. This crust will provide a delicious crunch!
Step 3: Create the Cheesecake Filling
In a large bowl, using an electric mixer, beat the softened cream cheese until smooth. Gradually add in the granulated sugar and vanilla extract, mixing until combined. It should be creamy and luscious! Remember, no lumps are allowed—keep mixing!
Step 4: Fold in the Whipped Topping
Gently fold in the whipped topping until the mixture is smooth and fluffy. I love this part because the vanilla scent fills the kitchen, making it feel so inviting.
Step 5: Layer it Up!
Now comes the fun part—layering! Take your dessert cups (these can be small glasses, dessert cups, or even mason jars) and begin by adding a spoonful of the Oreo mixture for the crust at the bottom. Follow it up with a generous layer of the cheesecake filling.
Repeat this process until your cups are full, ending with the cheesecake layer on top.
Step 6: Chill Out!
Once you’ve layered all your cups, cover them with plastic wrap and place them in the refrigerator for at least 2 hours, or until set. This is the perfect time to catch up on your favorite series or take a well-deserved break—just don’t forget about the dessert!
Step 7: Serve and Enjoy!
When you’re ready to serve, drizzle a bit of chocolate syrup on top for an extra touch. You can also garnish with some crumbled Oreos or a dollop of extra whipped topping. Now, grab a spoon and dig in!
Serving Suggestions
To wow your guests (or yourself), consider these serving suggestions:
-
Garnish: Top with a dollop of whipped cream, a sprinkle of crushed Oreos, or a drizzle of chocolate syrup. It not only looks fancy but adds to the taste experience!
-
Serving Dishes: Individual mason jars or pretty dessert glasses make for beautiful serving options. They add a rustic charm and can even be transported easily for picnics or gatherings.
-
Chill Before Serving: Serve these treats straight from the fridge to keep that creamy texture truly refreshing. Just like Grandma used to say—nothing beats dessert that’s perfectly cooled!
Recipe Variations
Feeling adventurous? Here are some fun twists on your basic Oreo No-Bake Cheesecake Cups:
-
Peanut Butter Delight: Swirl in some creamy peanut butter into the cheesecake filling for a nutty flavor explosion.
-
Mint Chocolate: Swap out regular Oreos for mint-filled ones. Add a few drops of mint extract to the filling for a refreshing minty cheesecake!
-
Fruit Fusion: Add fresh berries like strawberries or raspberries in between the layers for a fruity punch. Not only does it brighten the flavors, but it also looks gorgeous!
-
Coffee Lover’s Dream: Add a splash of strong brewed coffee or espresso to the cheesecake filling for a delightful coffee-infused version. Trust me, it’s a game-changer!
-
Vegan Version: Replace the cream cheese with a vegan cream cheese alternative, use coconut cream for the whipped topping, and ensure the cookies are dairy-free. You won’t miss the traditional version at all!
Chef’s Notes
As a chef, there’s always a story behind each recipe, right? The concept of no-bake cheesecakes comes from my constant kitchen experimentation. I recall a hilarious attempt when I mistakenly thought adding gelatin would help set my cheesecake faster. Spoiler alert: it didn’t. Instead, it turned into an unintentional dessert soup! But hey, we enjoyed it all the same—the taste was spot on!
This recipe has truly evolved into something that comforts me; it reminds me of family gatherings, laughter, and that heavenly first bite in grandma’s kitchen. I hope it does the same for you!
FAQs and Troubleshooting
Q1: Why is my cheesecake filling lumpy?
A: This usually happens when the cream cheese isn’t softened enough. Make sure to let it warm at room temperature before whipping it.
Q2: How long should I chill it for?
A: For best results, chill for at least 2 hours to allow it to set. If you can wait longer (like overnight), even better!
Q3: Can I use light cream cheese?
A: Absolutely, but be aware that the texture and flavor may slightly change. Full-fat cream cheese gives a richer, creamier taste.
Q4: What if my crust is too dry?
A: Just add a bit more melted butter until you reach that perfect “wet sand” consistency.
Nutritional Info
When it comes to indulgent desserts, portion control is essential! Each Oreo No-Bake Cheesecake Cup contains approximately 320 calories, 23 grams of fat, 30 grams of carbohydrates, and 4 grams of protein. Of course, this varies depending on what substitutions you make or how you decorate your cups.
Nutrients to Consider:
- Calcium: Thanks to the cream cheese and whipped topping, these cups can offer a decent source of calcium.
- Sodium: Be mindful of the added salt in the cookies and any other mix-ins you may choose.
Final Thoughts
And there you have it, my dear food friends! The recipe for Oreo No-Bake Cheesecake Cups that are not only oh-so-delicious but also filled with lovely stories and memories. Whether you’re treating yourself after a long day, celebrating a special occasion, or simply whipping up some deliciousness for your family, these cheesecake cups never disappoint.
Food has a unique way of bringing us together, creating laughter, and evoking memories. I hope this recipe fills your kitchen with joy and allows you to create sweet moments with loved ones. So, what are you waiting for? Gather those ingredients, channel your inner chef, and let’s make some magic happen in the kitchen. Happy cooking, everyone! 🍰✨
Print
Oreo No-Bake Cheesecake Cups
- Total Time: 120 minutes
- Yield: 4 servings 1x
- Diet: Vegetarian
Description
Delightful Oreo No-Bake Cheesecake Cups featuring velvety smooth cheesecake and the crunch of Oreos, all beautifully layered.
Ingredients
- 24 Oreo Cookies, crushed
- 8 oz Cream Cheese, softened
- 1/2 cup Granulated Sugar
- 1 tsp Vanilla Extract
- 1 cup Whipped Topping (Cool Whip)
- 1/4 cup Butter, melted
- Chocolate Syrup (Optional, for drizzling)
Instructions
- Crush the Oreos in a food processor or zip-top bag until fine crumbs form.
- Mix the crushed Oreos with melted butter until it resembles wet sand.
- Beat the softened cream cheese in a large bowl until smooth.
- Add the granulated sugar and vanilla extract, mixing until combined.
- Fold in the whipped topping gently until the mixture is smooth and fluffy.
- Layer the dessert cups starting with a spoonful of the Oreo mixture for the crust, followed by a layer of cheesecake filling.
- Cover the layered cups with plastic wrap and refrigerate for at least 2 hours until set.
- Drizzle chocolate syrup on top before serving and enjoy!
Notes
Chill before serving for a refreshing dessert experience. Customize with toppings such as crumbled Oreos, whipped cream, or fresh fruit.
- Prep Time: 15 minutes
- Cook Time: 0 minutes
- Category: Dessert
- Method: No-Bake
- Cuisine: American
Nutrition
- Serving Size: 1 serving
- Calories: 320
- Sugar: 17g
- Sodium: 250mg
- Fat: 23g
- Saturated Fat: 10g
- Unsaturated Fat: 7g
- Trans Fat: 0g
- Carbohydrates: 30g
- Fiber: 1g
- Protein: 4g
- Cholesterol: 30mg
Keywords: Oreo cheesecake, no-bake dessert, easy cheesecake recipe