Peppermint Bark Muddy Buddies: Your New Holiday Obsession
Hey there, my festive friend! Can you smell it? That magical blend of melted chocolate, cool peppermint, and pure, unadulterated holiday joy wafting from the kitchen? If you’re anything like me, the moment December hits, you’re on a mission to create treats that are not only delicious but also brimming with that special seasonal sparkle. You want something easy enough for a weeknight whim but impressive enough to gift to your favorite people.
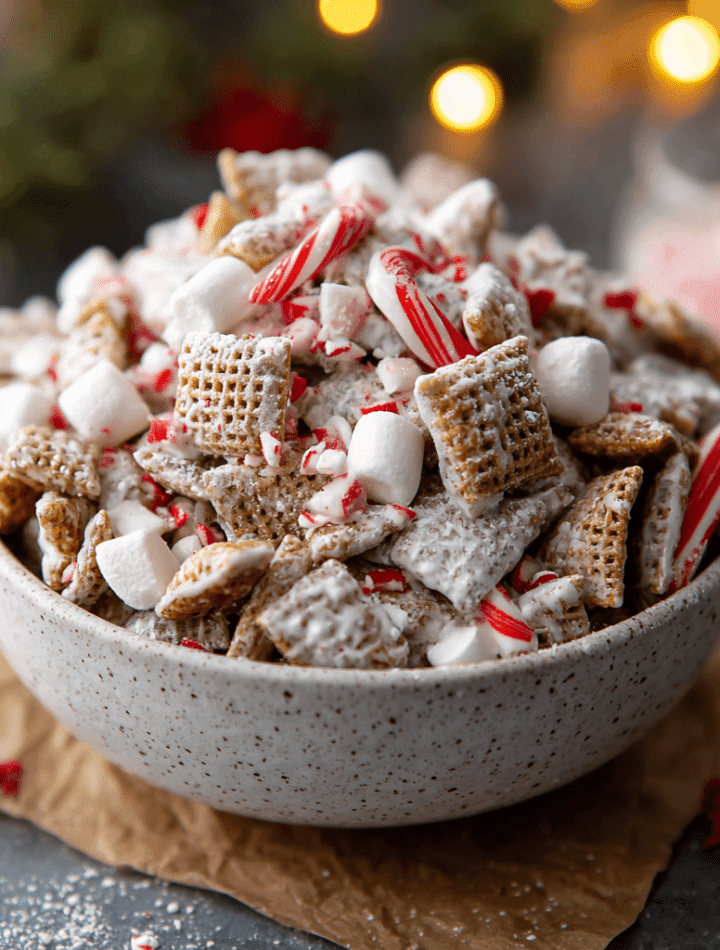
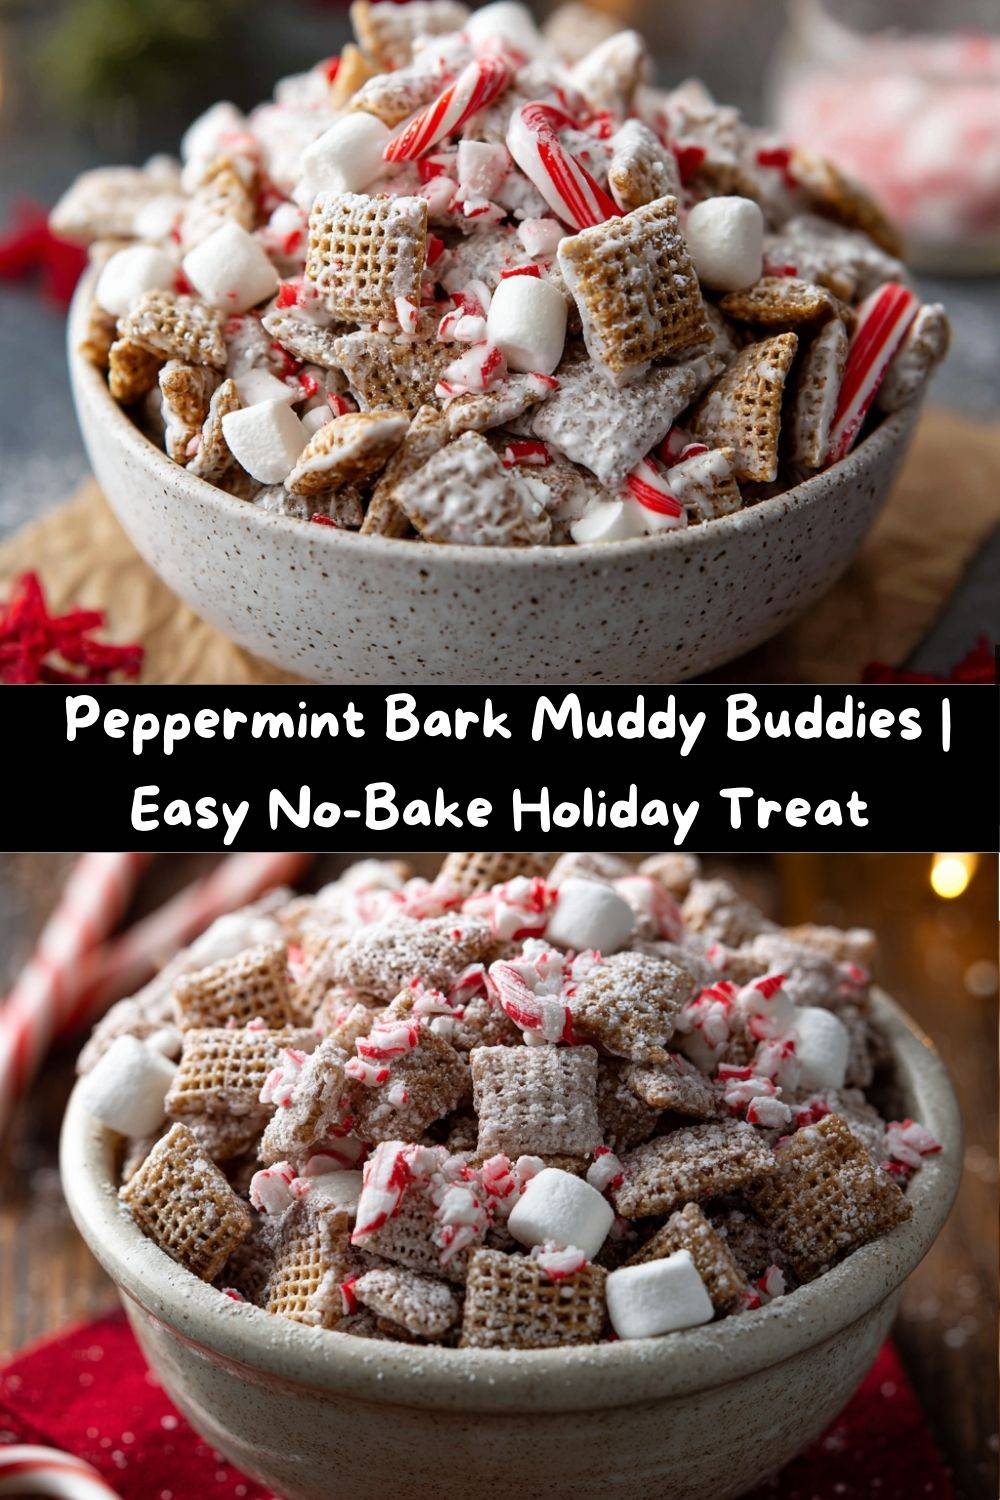
Well, pull up a stool and get ready, because I’m about to share a recipe that will absolutely become your go-to holiday hero: Peppermint Bark Muddy Buddies. We’re taking the classic, no-bake snack we all know and love and giving it a full-blown winter wonderland makeover. Imagine crispy Rice Chex cereal coated in a velvety blanket of sweet white chocolate, infused with a refreshing kick of peppermint, and tossed with cheerful red-and-white crushed candy canes. The whole mix gets a final snowy dusting of powdered sugar, creating a treat that’s crunchy, cool, and completely, utterly addictive.
This isn’t just a snack; it’s a experience. It’s the perfect thing to munch on while wrapping presents, the star of your cookie swap, or the most requested treat in your holiday gift bags. It comes together in minutes with zero baking required, which means more time for sipping hot cocoa and watching holiday movies. So, tie on your favorite festive apron—the one with the reindeer on it—and let’s make some magic happen!
A Spoonful of Peppermint Memories
This recipe always takes me right back to my grandma’s cozy kitchen. She was the queen of holiday treats, and her countertops would be covered in tins of cookies, fudge, and her famous peanut butter balls. But my favorite job was always crushing the candy canes. She’d hand me a few, wrap them in a clean kitchen towel, and give me a little wooden mallet. “Go on, Em,” she’d say with a wink, “make some noise!” I’d whack that towel with all the glee a seven-year-old could muster, creating a pile of sweet, minty rubble.
One particularly chaotic baking day, we were making a big batch of her classic muddy buddies (or “puppy chow,” as some folks call it) when I accidentally knocked over a bowl of those freshly crushed candy canes. A shower of red and white peppermint dust rained down right into the mixing bowl. Instead of being upset, Grandma just laughed. “Well,” she said, stirring it in, “let’s see what this tastes like!” That happy accident was a revelation—the cool peppermint cut through the richness of the chocolate in the most perfect way. This Peppermint Bark version is my grown-up, intentional tribute to that serendipitous moment of kitchen magic. It tastes like memory, mischief, and the best kind of holiday mess.
Gathering Your Holiday Magic: The Ingredients
One of the best things about this recipe is its simplicity. You probably have a few of these items in your pantry already! Here’s what you’ll need, along with a few chef-y insights to make your creation truly stellar.
- 9 cups Rice Chex cereal: This is our perfect, crispy base. Rice Chex is my go-to because it’s light and gets wonderfully coated without getting soggy. Chef’s Tip: Gluten-free friends, you’re in luck! Rice Chex is naturally gluten-free, so this treat is easily adaptable for everyone.
- 12 oz white chocolate chips or vanilla almond bark: This creates our creamy, sweet coating. I often use high-quality white chocolate chips for a rich flavor, but vanilla almond bark is fantastic because it melts smoothly and sets up with a great snap. It’s a matter of preference—both are winners!
- ½ teaspoon peppermint extract: This is where the real holiday flavor lives! A little goes a long way. Pro Substitution: If you only have peppermint oil, use just a drop or two, as it’s much more concentrated.
- 1 cup crushed peppermint candies or candy canes: This gives us that iconic peppermint bark texture and look. I love using candy canes for their festive stripes! Chef’s Hack: Unwrap them, place them in a zip-top bag, and use a rolling pin to crush them. It’s therapeutic and efficient!
- 1 ½ cups powdered sugar: The “snowy” finish that makes these muddy buddies so irresistible. It seals the deal and keeps everything from sticking together.
Let’s Make It! Your Step-by-Step Guide to Peppermint Bliss
Ready? This is where the fun begins. I’ll walk you through each step, sharing all my favorite kitchen hacks to ensure your Peppermint Bark Muddy Buddies are absolutely perfect.
- Prep Your Station. Place the 9 cups of Rice Chex cereal into the largest mixing bowl you own. I’m not kidding—go for the biggest one! This gives you plenty of room to toss and coat everything evenly without making a mess. Line a baking sheet with parchment paper and set it aside. This is where our finished mix will cool and set.
- Melt the Chocolate Like a Pro. Pour the white chocolate chips or chopped almond bark into a medium-sized, microwave-safe bowl. Heat it in the microwave on 50% power for 1 minute. Stir. Continue heating in 30-second intervals on 50% power, stirring each time, until the chocolate is melted and smooth. Why 50% power? This gentle heat prevents the chocolate from seizing up or getting grainy. Patience is key here! If you have a few unmelted lumps after stirring, the residual heat will often melt them. You can also use a double boiler if you prefer.
- Infuse the Minty Magic. Once your white chocolate is silky smooth, stir in the ½ teaspoon of peppermint extract. Take a quick whiff—it already smells like Christmas, doesn’t it?
- The Coating Dance. Pour the melted peppermint-white chocolate mixture over the cereal in your giant bowl. Now, using a large rubber spatula, gently fold the cereal into the chocolate. I say “fold” because you want to coat every piece without crushing all those lovely crispy squares. Be patient and thorough—get right down to the bottom of the bowl!
- Add the Crunchy Peppermint. Once the cereal is evenly coated, sprinkle in about ¾ of your crushed peppermint candies. Reserve the rest for topping later! Gently fold them in so they’re distributed throughout the mixture.
- The Shake-Up! Here’s the classic muddy buddy move. Pour the 1 ½ cups of powdered sugar into a large, gallon-sized zip-top bag. Carefully add the coated cereal mixture. Seal the bag tightly (double-check that seal!), and then… shake! Shake it like a polaroid picture! Shake it until every piece is beautifully coated in a layer of snowy powdered sugar.
- Cool and Set. Spread the finished mixture evenly onto your prepared parchment-lined baking sheet. Sprinkle the remaining crushed peppermint over the top for a gorgeous, festive look. Let it sit at room temperature for 15-20 minutes, or until the chocolate has fully set and hardened.
How to Serve These Festive Bites
Once your Peppermint Bark Muddy Buddies are set and ready, the real fun begins—deciding how to enjoy them! Here are a few of my favorite ways to serve this holiday treat:
The Casual Snack Bowl: Pile them high in a big, beautiful bowl right in the center of your holiday spread. It’s the perfect grab-and-go snack for guests. I guarantee it will be the first thing to disappear!
Gift-Giving Glory: This is my absolute favorite way to share the love. Fill clear cellophane bags with the muddy buddies, tie them with a pretty red or green ribbon, and attach a homemade gift tag. It’s a thoughtful, homemade gift that everyone adores. You can even create little gift boxes for teachers, neighbors, or your mail carrier.
Next-Level Dessert: Get fancy with it! Serve a scoop of these muddy buddies over a bowl of vanilla ice cream or peppermint ice cream. The combination of cold, creamy ice cream with the crunchy, minty cereal is a dessert dream come true.
Mix It Up! Fun Flavor Twists
Feel like playing around? This recipe is a fantastic canvas for creativity. Here are a few delicious variations to try:
- Fluffernutter Twist: After coating the cereal in the white chocolate, gently fold in 1 cup of mini marshmallows and ½ cup of crushed peanut butter cups. The marshmallows add a soft, chewy texture, and the peanut butter creates a delicious sweet-and-salty situation.
- Confetti Celebration: Make it extra colorful by adding ¼ cup of holiday sprinkles or red and green M&M’s along with the crushed peppermint. This is a huge hit with kids!
- Dark Chocolate Swirl: For a more sophisticated bark flavor, melt 4 oz of dark chocolate separately. After you’ve coated the cereal in the white chocolate mixture, drizzle the dark chocolate over the top and use a knife to gently swirl it in before adding the powdered sugar.
- Nutty Delight: Add a cup of toasted pecans or almonds for an extra layer of crunch and nutty flavor that pairs beautifully with the peppermint.
Chef Emily’s Kitchen Notes
This recipe has been a staple in my holiday lineup for years, and it’s evolved with every batch. One year, in a fit of holiday enthusiasm, I decided to double the recipe… in the same mixing bowl. Let’s just say I ended up with Peppermint Bark Muddy Buddies on the counter, the floor, and even a little on the dog. The lesson? Always use the biggest bowl you have, and don’t be afraid to work in batches if you’re making a huge quantity for gifting.
I’ve also learned that the quality of your white chocolate really does make a difference. A good brand with real cocoa butter will give you a smoother melt and a richer flavor. But you know what? Even on a busy year when I just grab what’s available, this treat is always a smash hit. It’s forgiving, fun, and full of spirit. That’s the beauty of it!
Your Questions, Answered!
Q: My white chocolate seized up and got clumpy! What happened?
A: Ah, the dreaded seize! This usually happens if a tiny bit of steam or water gets into the chocolate. To fix it, try stirring in a teaspoon of solid vegetable shortening (like Crisco) or a tiny splash of neutral oil (canola works) into the seized chocolate. This can sometimes bring it back to a smooth consistency. Prevention is best: make sure your bowl and utensils are completely dry.
Q: Can I make this ahead of time?
A: Absolutely! This is a fantastic make-ahead treat. Once completely cooled, store it in an airtight container at room temperature for up to a week. The cereal stays surprisingly crispy!
Q: The powdered sugar seems to be melting/disappearing. Why?
A> If you add the powdered sugar while the chocolate coating is still too warm, it can dissolve rather than creating a dusty coating. Make sure you let the chocolate-coated cereal cool for a minute or two before shaking it in the bag with the sugar. If it happens, you can always give it another light dusting of powdered sugar after it’s fully set.
Q: Can I use a different cereal?
A> You can! Corn Chex or even Crispix work well. I don’t recommend Wheat Chex as it can have a stronger flavor that might compete with the peppermint. Stick to a neutral, crispy rice or corn cereal for the best results.
Nutritional Information*
*Please note: The following is an approximate estimate based on the specific ingredients used and is calculated using a nutrition calculator. Values can vary greatly depending on the brands you choose.
Per Serving (approximately ½ cup):
- Calories: 180 kcal
- Fat: 6g
- Carbohydrates: 30g
- Sugar: 20g
- Protein: 1g
This is definitely a holiday indulgence! The main sources of sugar are the white chocolate, crushed candy, and powdered sugar. To make it a slightly lighter treat, you can use a sugar-free white chocolate alternative and reduce the amount of powdered sugar by a quarter cup. Remember, it’s all about balance—enjoy a handful as a sweet treat during the festive season!
Final Thoughts from My Kitchen to Yours
Well, my friend, there you have it—the recipe for what I truly believe is the perfect holiday snack. It’s quick, easy, bursting with festive flavor, and made with the most important ingredient of all: joy. Whether you’re making it for a party, for gifts, or just for a quiet night in with your family, I hope this recipe brings a little extra magic to your kitchen.
The holidays can be hectic, but moments like these—standing over a bowl of something you’ve created with your own hands, sharing stories and laughter—are what it’s all about. So, from my messy, flour-dusted kitchen to yours, I wish you the happiest of holidays filled with delicious food and even better company.
Now, I’d love to hear from you! Did you add any fun twists? Tag me on social @TastyChow with your creations so I can see your beautiful peppermint bark masterpieces. Happy cooking!
— Emily