The Ultimate Comfort Food Canvas: Why the Humble Baked Potato Deserves a Standing Ovation
Hey there, friend! Pull up a chair and let’s talk about one of the greatest kitchen magic tricks of all time: turning a simple, knobby, dirt-kissed potato into a steaming, fluffy, crispy-skinned masterpiece. I’m talking, of course, about the perfect baked potato. It’s the edible equivalent of your coziest sweater—utterly reliable, deeply comforting, and somehow always exactly what you need.
Now, I know what you might be thinking. “Emily, it’s a baked potato. How complicated can it be?” And you’re right! Its beauty lies in its simplicity. But here’s the thing: that very simplicity means every little step matters. The difference between a good baked potato and a legendary one—the kind with skin so crispy it crackles like autumn leaves and an interior so cloud-like it practically sighs when you open it—is just a few chef-approved secrets.
In my years of chasing flavor, from culinary school right back to my own messy kitchen, I’ve learned that mastering the classics is where real cooking joy begins. A perfect baked potato is a blank canvas waiting for your masterpiece, whether that’s a classic pat of melting butter, a mountain of chili and cheese, or something wildly inventive. It’s a side dish that can steal the show and a main course that satisfies a crowd. So, if you’ve ever been let down by a limp skin or a gummy center, you’re in the right place. Grab your favorite apron (the one with the questionable stains, I won’t judge), and let’s unlock the secrets to the only baked potato recipe you’ll ever need. Get ready for a standing ovation from your dinner table!

A Wooden Spoon, A Cloud of Flour, and the Potato That Started It All
My love affair with the baked potato didn’t start in a fancy restaurant. It began in my Grandma Winnie’s kitchen, which always smelled like a delicious collision of coffee, yeast, and whatever was roasting in her ancient oven. Sunday dinners were her grand performance, and while the roast was the headliner, the potatoes were her secret weapon.
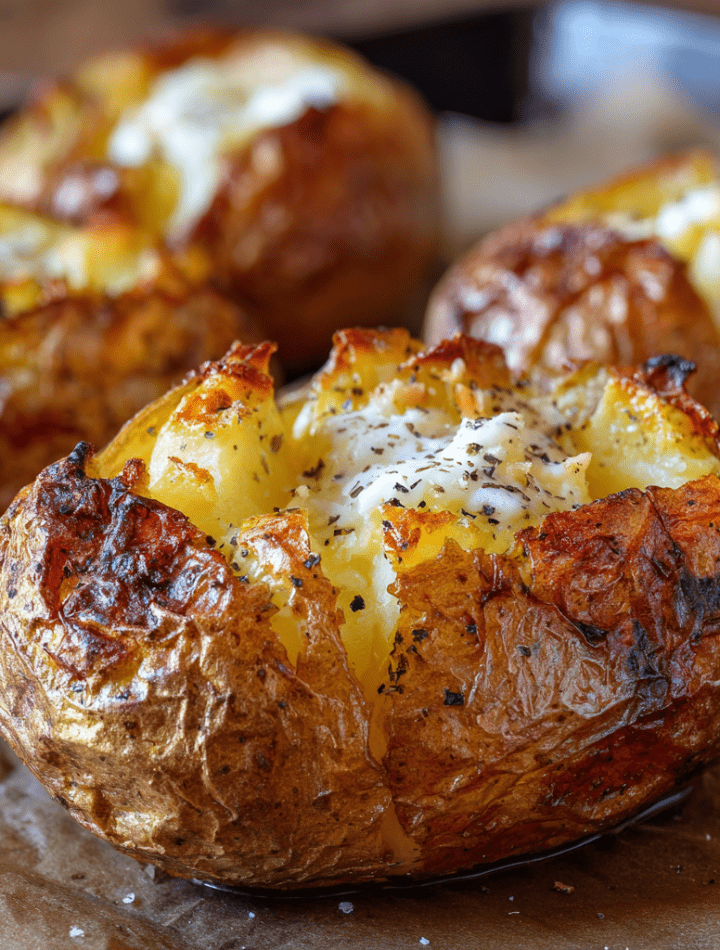
I remember standing on a step-stool, watching her scrub russets with a kind of fierce tenderness. She’d dry them so thoroughly you’d think they were going to a job interview. Then, with a ceremonial prick of her fork and a generous drizzle of oil (bacon fat, if she had it), she’d roll them in her hands before sprinkling them with coarse salt that glittered like tiny diamonds. “The salt isn’t just for flavor, Em,” she’d whisper conspiratorially. “It’s what makes the skin get that good, crispy bite.” To her, that crispy skin wasn’t a byproduct; it was the goal, a prize to be fought for and savored.
When she’d pull them from the oven, they looked like something from a fairy tale—gnarled, golden-brown treasures. The moment of truth was the split. She’d make a long cut, give the ends a gentle squeeze, and this incredible puff of steam would escape, carrying the most wholesome, earthy scent. Then, with the skill of a sculptor, she’d fluff the insides with two forks until it looked like a bowl of edible clouds. That first bite, loaded with her homemade chive sour cream, was pure magic. It taught me that the most profound joy often comes from perfecting the simple things. That lesson, and that memory, is baked right into this recipe.
Gathering Your Potato Posse: A Closer Look at the Ingredients
Here’s what you’ll need to create potato perfection. Remember, great ingredients are the first step to great flavor!
- 4 medium russet potatoes (about 8-10 oz each): Russets are the undisputed champions for baking. Their high starch content and thick, sturdy skin are precisely what gives us that iconic fluffy interior and crisps up so beautifully. Chef’s Insight: Look for potatoes that are oval, uniform in size for even cooking, and feel firm without any soft spots or excessive eyes.
- 1–2 tbsp olive oil: This is our crispy-skin catalyst! A light coating helps the salt adhere and conducts heat evenly, transforming the skin from leathery to crackling. Substitution Tip: Avocado oil, melted refined coconut oil, or even a very light, neutral vegetable oil work great. For a nod to Grandma Winnie, melted bacon fat or duck fat is a next-level, flavor-packed choice.
- Kosher salt: Don’t be shy! A generous coating of coarse salt is non-negotiable. It seasons the skin, draws out just a hint of moisture for better crisping, and creates that delicious, savory crust. Chef’s Insight: I prefer kosher salt for its clean flavor and easy-to-pinch texture. Table salt is finer, so use a bit less if that’s what you have.
The “Why Dry?” Secret: That instruction to dry the potatoes thoroughly? It’s a game-changer. Water is the enemy of crispness. A wet potato will steam itself in the oven, leading to a tough, chewy skin. Taking an extra minute with a kitchen towel ensures our oil can do its crispy, glorious job.
Your Roadmap to Potato Perfection: Step-by-Step
Follow these steps, embrace the tips, and you’re guaranteed a win. Let’s get baking!
- Preheat and Prep: Crank your oven to 425°F (220°C). This high heat is crucial—it shocks the skin into crisping up quickly. While it heats, line a baking sheet with foil or parchment for easy cleanup. Chef’s Hack: If you want ultra-crispy bottoms and don’t mind a little more cleanup, place a wire rack on the baking sheet. Elevating the potatoes allows hot air to circulate underneath for all-over crunch.
- The Scrub & Dry Dance: Give your potatoes a good scrub under cold running water to remove any dirt. This is your one chance to shower them with love! Then, pat them completely dry with a clean kitchen towel. I mean, seriously dry. Commentary: This is the step we all want to skip, but trust me, it’s the secret handshake to the Crispy Skin Club.
- Prick for Safety (and Texture!): Use a fork to prick each potato 6-8 times all over. This gives the built-up steam an escape route. Why it matters: Without these vents, steam pressure builds up inside… and potatoes can (and will!) explode. It’s a messy, sad, and avoidable tragedy. Plus, controlled steam release helps achieve that perfect fluffy texture instead of a dense, wet one.
- The Oil & Salt Massage: Drizzle the oil over the potatoes and use your hands to rub it over every single inch of the skin. Then, roll them generously in a plate of kosher salt until they look like they’ve been dusted with snow. Chef’s Tip: Doing this on the prepared baking sheet contains the mess. Don’t just sprinkle salt from above—rolling ensures even, all-over coverage.
- The Bake: Place the potatoes directly on your oven rack or on the prepared sheet. Bake for 45–60 minutes. Here’s the key: They’re done not just when a fork slides in easily, but when the skins are visibly wrinkled, dry, and sound slightly hollow when gently squeezed (with an oven mitt!). Size varies, so start checking at 45 minutes.
- The Fluff: As soon as they’re cool enough to handle, make a lengthwise cut and use two forks to gently fluff the insides. Pro Move: Fluffing creates all those nooks and crannies that perfectly trap melting butter, sour cream, or gravy. It’s the final act of potato transformation!
Let’s Get This Party on a Plate: Serving Your Masterpiece
Presentation is part of the fun! For a classic side, I love serving the potatoes whole on a rustic wooden board or a simple white platter, with small bowls of toppings like butter, sour cream, chopped chives, crispy bacon bits, and shredded cheddar for a DIY “loaded” bar. It’s interactive and lets everyone build their perfect bite.
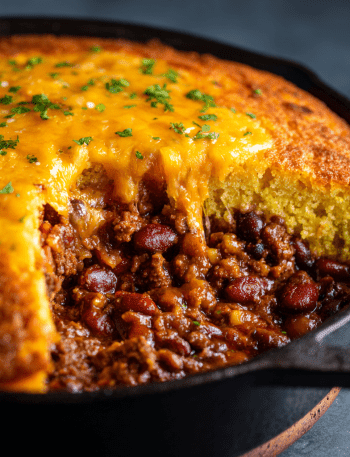
If you’re going for a full meal, split the potato open wide on the plate, fluff it generously, and get creative with your loads. Think: a ladle of hearty beef chili, a handful of sharp cheese, a dollop of cool sour cream, and a sprinkle of sliced jalapeños. For a brunch twist, top with a fried egg, avocado slices, and a dash of hot sauce. The goal is contrasting textures and temperatures—hot, fluffy potato meets cool, creamy toppings with a bit of crispy crunch. It’s a symphony in a spud!
Make It Your Own: Delicious Twists on the Classic
The beauty of this method is that it’s your perfect starting point. Here are some of my favorite ways to play with the formula:
- Herb & Garlic Infused: Mix your olive oil with 2 cloves of minced garlic and 1 tablespoon of chopped fresh rosemary or thyme before rubbing it on the potatoes. The oil infuses the skin with incredible fragrance.
- The “Diner-Style” Smashed Potato: After baking, place the potato on a cutting board and gently smash it down with the bottom of a mug or pan. Drizzle with more oil and broil for 2-3 minutes until the exposed edges are crazy crispy. Finish with Parmesan and black pepper.
- Sweet Potato Swap: Follow the exact same method with medium sweet potatoes! Their natural sugars caramelize beautifully. Top with black beans, corn, avocado, and a lime crema for a fantastic meatless meal.
- Fully Loaded & Re-Baked: After fluffing, mix the insides with butter, cooked broccoli, shredded chicken, and cheese. Spoon it back into the skins, top with more cheese, and bake for 10 more minutes until bubbly. It’s a casserole in a jacket!
- Lighter Touch: Skip the oil rub and simply prick, salt, and bake. The skin will be chewier, not crispy, but still delicious. Fill with Greek yogurt, steamed veggies, and a squeeze of lemon for a lighter option.
From My Kitchen to Yours: A Few Parting Thoughts
This recipe has been my trusty sidekick for years, but it wasn’t always perfect. I’ll never forget the time I got impatient, cranked the oven to 500°F, and created four potato-shaped charcoal briquettes. Lesson learned: high heat is key, but patience is the real secret ingredient.
I’ve also evolved on the “foil debate.” Wrapping potatoes in foil steams them, giving you a soft skin (which has its place, like for camping). But for that crave-worthy crackle, naked and proud on the rack is the only way to go. Over time, I’ve found that letting the potatoes rest for just 5 minutes after baking helps the starches set slightly, making them even fluffier when you cut in. Every batch teaches you something new—that’s the joy of cooking!
Your Questions, Answered: Baked Potato FAQs
Q: Can I bake potatoes ahead of time?
A: Absolutely! Bake them as directed, let them cool completely, and store them whole in the fridge for up to 3 days. Re-crisp them in a 400°F oven for 15-20 minutes, or until heated through. The texture is still fantastic!
Q: My potato skin is still tough/chewy. What happened?
A: This almost always means the skin wasn’t dry enough before oiling, or there wasn’t enough oil. Oil is the conductor for crisp heat! Next time, be militant about drying and don’t skimp on that oily massage.
Q: Is it safe to bake a potato directly on the oven rack?
A> Yes, it’s perfectly safe and promotes the best air circulation. Placing a baking sheet on the rack below catches any potential drips (though with proper pricking, this is rare). If you’re nervous, the baking sheet method works great too.
Q: How do I know for SURE it’s done?
A: The fork test is reliable, but for complete confidence, use an instant-read thermometer. Insert it into the center of the potato; you’re looking for an internal temperature of 205–210°F (96–99°C). This is the sweet spot where the starches are fully gelatinized and fluffy.
Straight Talk on Nutrition
Let’s keep it real! A plain, medium-sized russet potato (about 6 oz) is a fantastic, naturally fat-free source of energy. It provides complex carbohydrates for fuel, along with a good dose of Vitamin C, potassium (even more than a banana!), and about 4 grams of fiber, especially if you eat the nutrient-rich skin. The calorie count is modest, hovering around 160 calories for the potato itself.
The nutritional story, of course, changes with your toppings. Butter, cheese, sour cream, and bacon add delicious fats and proteins. For a lighter approach, try Greek yogurt, salsa, steamed vegetables, or a sprinkle of nutritional yeast. The potato itself is a wholesome, versatile base—you’re in the driver’s seat to make it fit your nutritional goals and cravings!
The Last Bite: Keep Cooking, Keep Sharing!
And there you have it, friend—everything I know about achieving baked potato bliss. This isn’t just a recipe; it’s a technique, a confidence-builder, and a ticket to a million delicious meals. Mastering this one humble dish opens the door to so much kitchen creativity.
I hope this guide makes your next potato night a roaring success. When you pull those golden, crispy-skinned beauties from your oven, I hope you feel that same little thrill of magic I felt in my grandma’s kitchen. Don’t forget to snap a pic of your loaded creations and tag me @TastyChow—I love seeing what you make!
Now, go forth and bake. Get crispy. Get fluffy. And most importantly, get eating. Your perfect spud awaits.
With love and a well-salted spoon,
Emily 🥔❤️