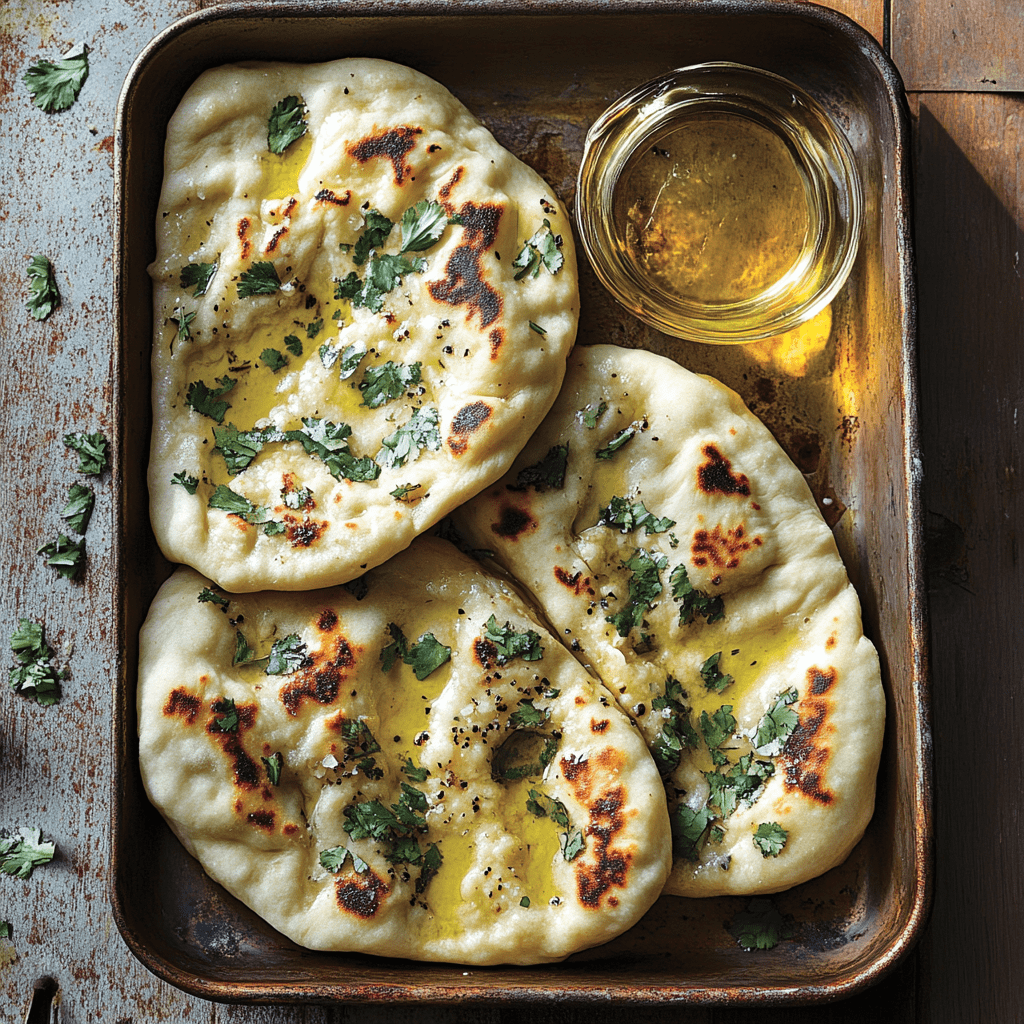
There’s Magic in the Puff: Let’s Make Homemade Pita Bread!
Hey, hey, my kitchen comrades! Chef Emily here, rocking my flour-dusted apron and ready to dive into one of my absolute favorite baking projects: homemade pita bread. Seriously, is there anything more delightful than watching a humble flatbread puff up like a little pillow in your oven or skillet, revealing that perfect, steamy pocket just waiting to be stuffed? That moment never gets old – it’s pure kitchen alchemy! Forget the store-bought stuff that’s often dry or cracks when you look at it. When you make pita at home, you unlock something special: bread that’s incredibly soft, slightly chewy, warm, and bursting with that simple, wholesome flavor that only comes from your own hands. It’s not just bread; it’s a vehicle for joy! Stuff it with crunchy falafel and tangy tzatziki, tear it for scooping up hummus so creamy it dreams are made of, or even use it as the base for the world’s quickest (and cutest!) personal pizzas. The best part? It’s way easier than you think. No fancy equipment needed – just some basic pantry staples, a little patience (mostly for the rise!), and a whole lot of love. So, grab your favorite mixing bowl, crank up some tunes, and let’s turn your kitchen into a pita paradise together. Trust me, once you experience the magic of your own puffy pockets, you’ll be hooked!
My First Pita Panic (and Triumph!)
Picture this: Culinary school, week three. We’re tackling flatbreads. I felt confident after nailing baguettes (or so I thought!). Then came pita. My instructor, Chef Marco, a man with forearms like tree trunks and a voice that could curdle milk, barked, “Walker! The pocket is everything. No pocket, no pass!” No pressure, right? My first batch? Sad, dense frisbees. Zero puff. Chef Marco just grunted, shaking his head like I’d committed culinary treason. Panic set in. Was my yeast dead? Did I knead too much? Too little? That night, back in my tiny apartment kitchen, flour covered every surface (including the cat). I channeled my grandma’s calm energy – she never panicked, just adjusted. I focused on the water temperature (warmer!), kneaded until the dough felt like a baby’s cheek, and rolled them thinner than before. When the first one ballooned in my smoking-hot cast iron skillet, I actually screamed. A happy, triumphant scream! I danced around my kitchen with that puffed-up prize, yelling, “POCKET!” to my bewildered cat. That moment – the aroma filling my apartment, the satisfying tear revealing the steam, the sheer disbelief that *I* made this – cemented my love for this humble bread. It taught me that sometimes, the simplest things hold the biggest magic (and the best lessons in resilience!). Now, I want you to feel that same magic, minus the grumpy chef!
Your Pita Pantry: Simple Ingredients, Big Flavor
Gather these kitchen rockstars! You probably have most already. Here’s the lowdown:
- 1 cup warm water (105-110°F / 40-43°C): Think baby bathwater warm, not hot! Too hot kills yeast, too cold puts it to sleep. Test it with your wrist – it should feel comfortably warm, not scalding. Chef Insight: This temp wakes the yeast up gently for perfect rising power.
- 2¼ tsp active dry yeast (1 standard packet): The tiny powerhouse! Ensure it’s not expired. Sub Tip: Instant yeast works too! Skip the initial proofing step and mix it right in with the dry ingredients. Use the same amount.
- 1 tsp sugar (or honey/maple syrup): Just a tiny snack for the yeast to get it bubbling happily. Chef Insight: Don’t skip this! It kickstarts fermentation, crucial for that signature puff.
- 2½–3 cups all-purpose flour (plus extra for dusting): The backbone! I start with 2½ cups and add more as needed during kneading. Sub Tip: For slightly chewier pita, swap in 1 cup of bread flour. For whole wheat, use 50% whole wheat flour and 50% all-purpose, expecting a denser (but still delicious!) pocket.
- 1 tsp salt: Flavor superhero! It strengthens the gluten too. Chef Insight: Add it *after* mixing the yeast water with some flour to protect the yeast initially.
- 1 tbsp olive oil (plus a smidge for the bowl): Adds tenderness, richness, and prevents sticking. Sub Tip: Any neutral oil (avocado, grapeseed) works, but olive oil adds a lovely Mediterranean hint.
Let’s Get Puffy! Your Foolproof Pita Steps
Ready to create magic? Follow these steps, and channel your inner pita pro!
- Wake Up the Yeast (The Proof is in the Froth!): Grab a large bowl. Pour in the warm water. Sprinkle the yeast and sugar over the top. Give it a gentle whisk. Now, walk away! Let it hang out for 5-10 minutes. Chef Hack: Cover the bowl loosely with a clean towel or plastic wrap to create a cozy, draft-free spot. You’re looking for a creamy, frothy layer on top – that’s your yeast saying, “Let’s do this!” If it doesn’t foam after 10 mins, your water might have been too hot/cold or your yeast was old. Start over with fresh yeast!
- Build the Dough (Embrace the Mess!): Once frothy, add 1 cup of flour, the salt, and the olive oil to the yeast mixture. Stir with a sturdy spoon (or your hands!) until it’s a shaggy mess. Gradually add more flour, about ½ cup at a time, stirring until the dough starts pulling away from the bowl sides. Chef Hack: Resist adding *all* the flour at once! You might not need the full 3 cups. We want a soft, slightly tacky dough, not a stiff one. The humidity in your kitchen plays a role!
- Knead with Love (Feel the Gluten!): Turn the dough onto a lightly floured surface. Time for a mini workout! Knead for 8-10 minutes. Push with the heel of your hand, fold, turn, repeat. Chef Hack: How do you know it’s ready? Do the “Windowpane Test”: Pinch off a golf-ball sized piece. Gently stretch it out with your fingers. If you can stretch it thin enough to see light through it (like a windowpane!) without it tearing immediately, you’re golden! This means the gluten is well-developed for that perfect puff. The dough should feel smooth, elastic, and springy.
- Let it Rise & Shine (Patience, Grasshopper!): Lightly oil a clean bowl (or just wipe out the one you used). Place your beautiful dough ball inside, turning it once to coat lightly in oil. Cover tightly with plastic wrap or a damp towel. Find a warm, draft-free spot (like your turned-off oven with the light on, or near a sunny window). Let it rise for about 1 hour, or until doubled in size. Chef Hack: No warm spot? Place the bowl over a larger bowl filled with warm water (not hot!).
- Punch & Portion (Gentle Fist Bump!): Gently punch down the dough in the center to release the air (this isn’t anger management!). Turn it out onto a lightly floured surface. Divide the dough into 6-8 equal pieces (a bench scraper is awesome here!). Roll each piece into a smooth ball. Cover the balls with a towel and let them rest for 10 minutes. Chef Hack: This rest relaxes the gluten, making the dough easier to roll out thinly without springing back. Crucial for even puffing!
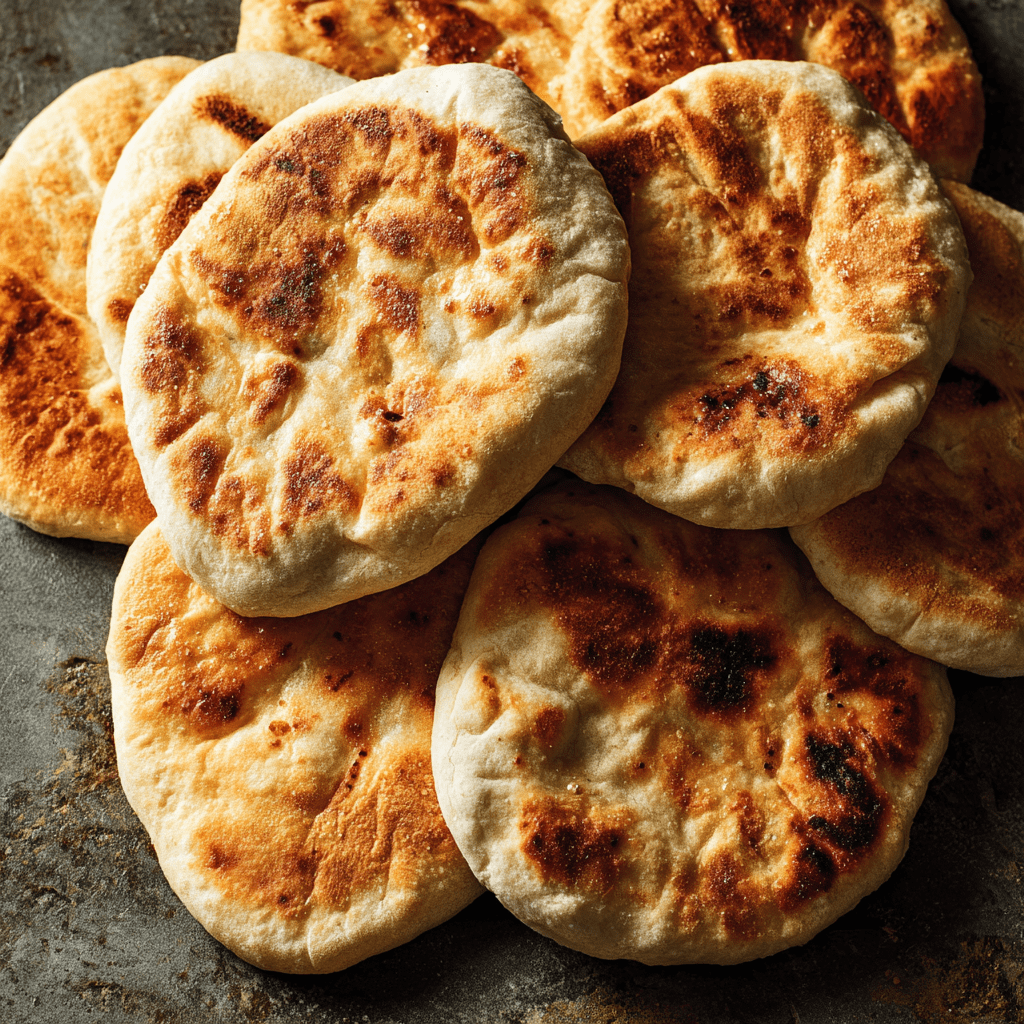
- Roll it Thin (Uniformity is Key!): Working with one ball at a time (keep others covered), use a rolling pin to roll each ball into a circle, about ¼-inch thick and 6-7 inches in diameter. Aim for even thickness! Chef Hack: Don’t roll them paper-thin – ¼-inch is the sweet spot. Too thick, and they won’t puff well; too thin, and they might burn before puffing. Dust lightly with flour if sticky, but don’t overdo it.
- Bake or Skillet Sizzle (The Big Reveal!):
- Oven Method (Best for Multiple Pitas): Preheat your oven to a screaming hot 475°F (245°C). Place a baking stone or a large, heavy-bottomed baking sheet (upside down works well!) in the oven to preheat for at least 30 minutes. Carefully place one or two rolled pitas onto the hot surface. Bake for 2-3 minutes ONLY. Watch the magic happen – they should puff up like balloons! Remove immediately once puffed and lightly golden. Chef Hack: The intense, direct heat is essential for the steam explosion that creates the pocket. Don’t open the oven door too early!
- Skillet Method (Great for Small Batches): Heat a dry, heavy-bottomed skillet (cast iron is perfect!) or griddle over medium-high heat until very hot. Place one rolled pita in the skillet. Cook for 1-2 minutes until large bubbles form on the surface and the bottom has golden spots. Flip! Cook another 1-2 minutes until puffed up completely and golden. Press down gently with a spatula if needed to encourage puffing. Chef Hack: No oil! A dry skillet gives the best puff and char.
- Cool & Keep Soft (Towel Hug!): As soon as the pitas come out of the oven or skillet, transfer them to a clean kitchen towel. Wrap them loosely in the towel as you cook the rest. Chef Hack: This traps the steam, keeping them incredibly soft and pliable for stuffing. Resist tearing into one immediately (hard, I know!) – letting them rest for 5 minutes wrapped up makes them even better.
Beyond the Pocket: Serving Up Pita Perfection
Oh, the possibilities! Serve these beauties warm for maximum joy. For dipping, pile them high in a basket alongside bowls of creamy hummus, smoky baba ganoush, or vibrant muhammara. Making wraps? Slice them open carefully (a serrated knife helps!) and stuff them to bursting with grilled chicken and veggies, crispy falafel and pickled turnips, or spiced lamb and tzatziki. Feeling snacky? Tear off pieces and scoop up dips directly – pure, messy bliss. For a fun twist, cut them into wedges, brush with olive oil, sprinkle with za’atar, and toast them into crispy pita chips! Or, spread them with pizza sauce, cheese, and toppings, then broil for lightning-fast mini pizzas. However you serve them, it’s all about sharing the homemade love!
Mix it Up! Pita Playtime
Once you master the classic, try these tasty twists!
- Herb & Garlic Infusion: Knead 1-2 tbsp finely chopped fresh herbs (dill, parsley, oregano) and 1 tsp garlic powder into the dough before the first rise.
- Whole Wheat Wonder: Substitute 1 to 1½ cups of the all-purpose flour with whole wheat flour for a nuttier flavor and extra fiber (expect slightly denser pockets).
- Mini Me’s: Divide the dough into 12-15 smaller balls for adorable mini pitas – perfect for appetizers or kids!
- Seeded Crunch: After rolling out the dough, lightly brush one side with water and sprinkle generously with sesame seeds, poppy seeds, or everything bagel seasoning before baking/skillet cooking.
- Spice it Up: Add 1 tsp ground cumin, smoked paprika, or za’atar to the dry ingredients for a warm, aromatic depth.
Chef Emily’s Pita Pearls of Wisdom
This recipe feels like an old friend now, but it definitely evolved! My “sad frisbee” phase taught me the importance of heat. I once tried baking a batch at 425°F – disaster! They cooked through without puffing. Crank that heat! I also used to roll them thicker, thinking it would guarantee a pocket. Nope! Thin and even is the mantra. The biggest laugh? The time I forgot the salt. Blandest. Pitas. Ever. Lesson learned – salt is non-negotiable for flavor! Now, I love making a double batch. The dough freezes beautifully after the first rise (punch down, divide, freeze balls in a bag). Thaw overnight in the fridge, let them come to room temp, and roll/bake fresh pitas anytime! Or, bake all the pitas, let them cool completely, and freeze them in a zip-top bag. Reheat frozen pitas directly in a toaster or warm oven for near-fresh perfection. Embrace the learning curve – even imperfect homemade pita tastes better than store-bought!
Pita Problems? Solved!
Even the best dough-slingers have off days—don’t sweat it! Let’s troubleshoot the most common pita pitfalls so you can puff like a pro next time:
❓Q: Help! My pitas didn’t puff! What went wrong?
A: Don’t panic—this is the #1 pita hiccup, and it’s fixable. Here’s what to check:
-
Heat wasn’t high enough: Your oven or skillet needs to be blazing hot. Think 475°F+ (245°C) for ovens and screaming hot cast iron for stovetop.
-
Not preheated long enough: Baking stone or sheet must be preheated for 30 minutes minimum to mimic that tandoor blast.
-
Dough wasn’t rolled evenly: If it’s too thick or has uneven spots, steam won’t build the way it should. Roll to an even ¼-inch and keep it uniform!
-
Too dry? Dough needs to be soft and slightly tacky—dry dough = no steam = no puff.
-
Not enough gluten development: Knead thoroughly and let the dough rest so it’s strong and stretchy. Try the windowpane test next time!
❓Q: Why is my dough so sticky or hard to work with?
A: Sticky dough usually means too much water or not enough kneading.
-
Too sticky? Add flour 1 tablespoon at a time during kneading.
-
Too tough? Could be over-kneaded or over-floured. Next time, spoon flour into your measuring cup (don’t scoop) for accuracy.
❓Q: Can I make pitas ahead of time or freeze them?
A: Yes and yes!
-
Freeze the dough: After the first rise, divide into balls and freeze in a zip-top bag. Thaw overnight in the fridge, rest 30 mins at room temp, then roll and bake.
-
Freeze baked pitas: Cool completely, stack with parchment between, seal tightly, and freeze. Reheat in a toaster or warm oven—magic!
❓Q: My pitas are hard or dry after baking. What now?
A: They probably lost steam. Wrap them immediately in a clean towel after baking to trap softness.
-
Reheat hardened pitas by lightly sprinkling with water and warming in a skillet or toaster oven—good as new!
❓Q: Can I bake multiple pitas at once?
A: Yes, but don’t crowd the baking stone or sheet. Two at a time max for best puff results. Overcrowding drops the temperature too fast.
Nutritional Spotlight (Per Pita)
Serving Size: 1 medium pita (approx. 6–7 inches wide)
-
Calories: 165
-
Total Fat: 3.5g
-
Saturated Fat: 0.5g
-
Trans Fat: 0g
-
-
Cholesterol: 0mg
-
Sodium: 220mg
-
Total Carbohydrates: 29g
-
Dietary Fiber: 1g
-
Sugars: 1g
-
-
Protein: 4.5g
-
Iron: 10% DV
-
Calcium: 1% DV
-
Potassium: 65mg
📝 Note: Values are estimates based on all-purpose flour, olive oil, and active dry yeast. Actual numbers may vary depending on exact brands or substitutions used (e.g., whole wheat flour or coconut yogurt).
Print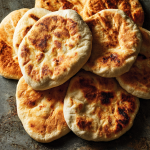
Pita Bread – Puffy, Pocket-Perfect Bread
- Total Time: 1 hour 35 mins
- Yield: 6–8 pitas 1x
Description
Light, puffy, and built with its signature pocket, pita bread is a versatile favorite from Mediterranean kitchens. It’s perfect for stuffing, dipping, or just tearing and sharing. Whether fresh from the oven or off the skillet, each bite is soft and slightly chewy — pure homemade comfort.
Ingredients
1 cup warm water
2¼ tsp active dry yeast (1 packet)
1 tsp sugar
2½–3 cups all-purpose flour
1 tsp salt
1 tbsp olive oil
Instructions
Activate Yeast: Combine warm water, sugar, and yeast in a bowl. Let sit 5–10 minutes until frothy.
Make Dough: Add flour, salt, and olive oil. Mix and knead for 8–10 minutes until smooth and elastic.
Let Rise: Place dough in a greased bowl, cover, and let rise for 1 hour or until doubled.
Shape Pitas: Punch down the dough and divide into 6–8 balls. Roll each into a ¼-inch thick round.
Bake or Skillet Cook:
Oven: Preheat to 475°F (245°C) with a baking stone or tray. Bake each pita 2–3 minutes until puffed.
Skillet: Heat a dry skillet over high heat. Cook each round 1–2 minutes per side until ballooned.
Cool & Serve: Wrap warm pitas in a towel to keep soft.
- Prep Time: 15 minutes
- Rise Time: 1 hour
- Cook Time: 20 minutes
Nutrition
- Calories: 165 per pita
- Sugar: 1g per pita
- Sodium: 220mg
- Fat: 3.5g per pita
- Saturated Fat: 0.5g per pita
- Carbohydrates: 29g per pita
- Protein: 4.5g per pita
Final Thoughts: Pocket-Sized Magic, Straight from Your Oven 🫓✨
Look at you, pita powerhouse! Whether your first batch puffed up like parade balloons or stayed a little flat (hey, still delicious!), you’ve just stepped into the world of real-deal, joyfully homemade bread. And that? That’s something to celebrate.
There’s something downright magical about pita—simple ingredients transforming into chewy, steamy pockets just waiting to be filled with flavor and love. No preservatives, no mystery ingredients—just your hands, your heat, and your heart. Every puff is a mini miracle that says: I made this.
The best part? Pita’s not about perfection—it’s about play. Your first one might look like a lopsided moon, and the next could be bakery-worthy. Doesn’t matter. Each one tells your kitchen story, full of floury counters, proud grins, and that satisfying moment when the bread balloons and you do a little victory shimmy. (I know you did.)
So whether you stuff ’em, dip ’em, toast ’em, or devour them warm with melted butter and a sprinkle of salt (my personal weakness), know that you’re part of a timeless tradition—bringing simple, soulful bread to the table.
Now go forth and bake, friend. Let your oven roar, your rolling pin roll, and your pita puff to glory.
With flour on my nose and joy in my pocket,