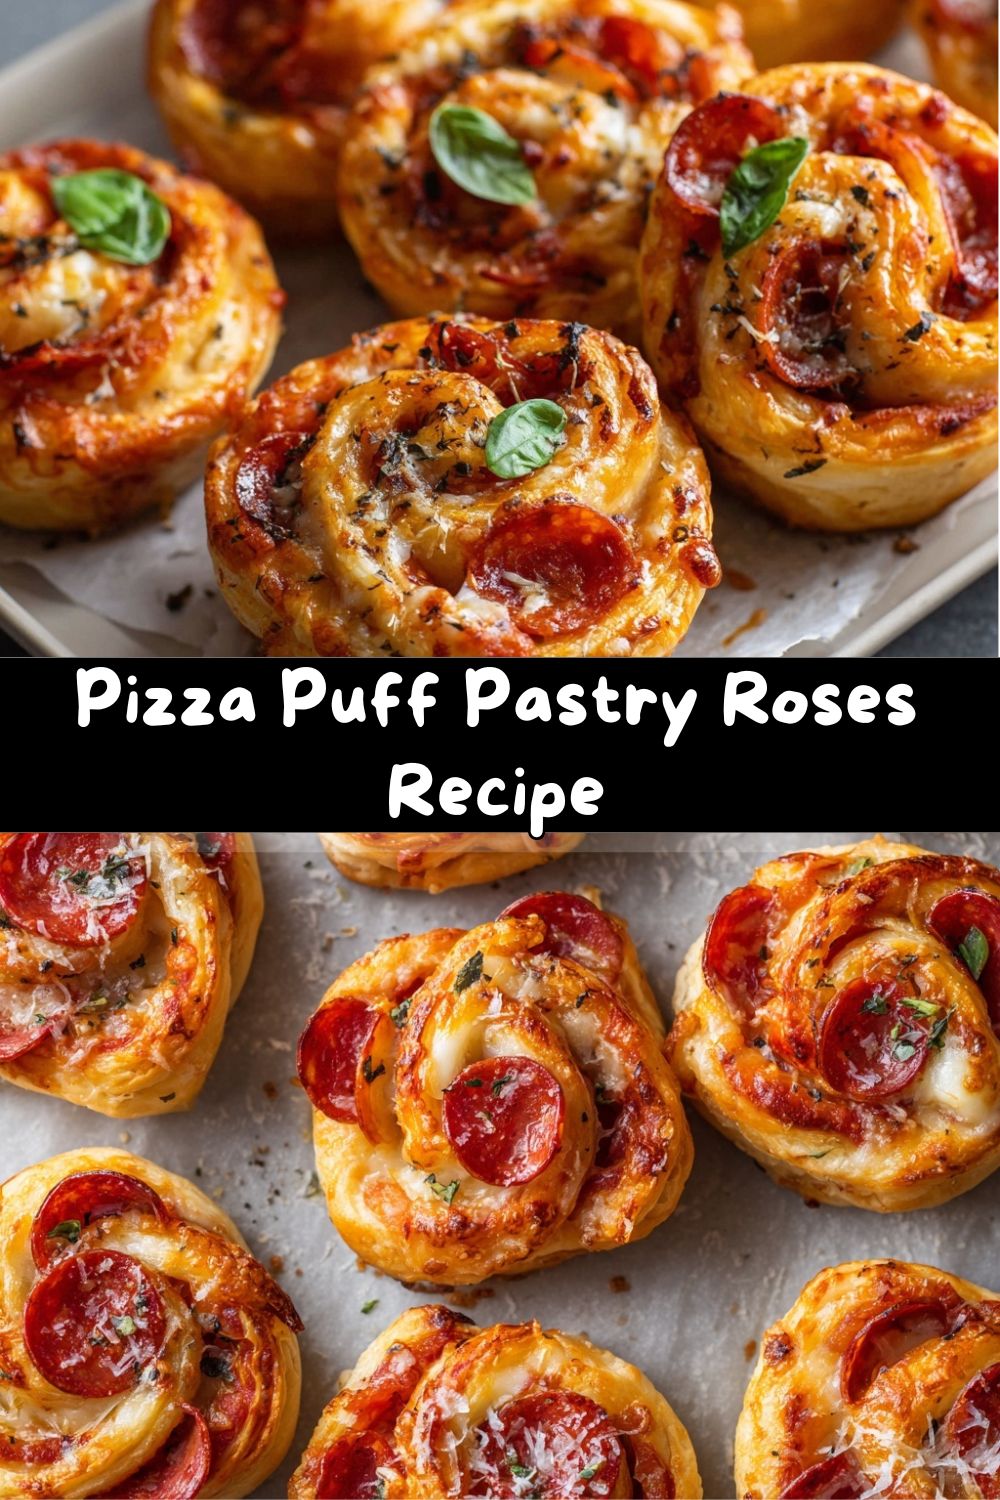
Introduction: Let’s Turn Pizza Night Into a Garden Party!
Hey there, friend! Come on in, grab an apron, and let me tell you about the little recipe that completely stole my heart (and my last party). Have you ever looked at a beautiful, flaky pastry and thought, “I could never make that”? I’m here to tell you—with a wink and a nudge—that you totally can. Today, we’re throwing the rulebook out the kitchen window and playing with our food in the best possible way. We’re turning the humble, everyone-loves-it flavors of pepperoni pizza into breathtaking, golden-brown Puff Pastry Roses.
Imagine this: layers of buttery, crisp puff pastry hugging pools of melted mozzarella and savory pepperoni, all baked into a gorgeous floral shape that looks like it came from a fancy bakery case. The best part? They’re unbelievably simple to put together. Whether you’re planning a romantic date night in, need a show-stopping appetizer for game day, or just want to make a regular Tuesday feel special, these edible roses are your secret weapon. They’re fun, they’re flaky, they’re cheesy, and they promise to make everyone at your table light up with that “wow, you made these?!” smile. So, let’s roll up our sleeves, dust the counter with a little flour, and create some delicious, shareable magic together.
The Story Behind the Bloom: A Tale of Two Pizzas
This recipe always takes me back to my grandma’s linoleum-tiled kitchen. Sunday nights were sacred in our house: they were for her deep-dish pizza, a thick, saucy masterpiece that required a fork and knife. But for me? I’d sneak pieces of pepperoni from the counter, rolling them up with stray shreds of cheese in my little hands, dreaming of my own creation. Fast forward to culinary school, where I first encountered the magic of puff pastry—how a simple dough could transform into a hundred delicate, shattering layers. My mind instantly raced back to those Sunday nights.
One rainy afternoon, experimenting for a friendsgiving appetizer, I had a sheet of puff pastry, some leftover pepperoni, and a serious case of kitchen-daydreaming. I started playing, layering and rolling almost absentmindedly. When I pulled the tray from the oven, I didn’t see quirky rolled-up pizzas; I saw a bouquet of golden roses. It was that beautiful “aha!” moment where childhood nostalgia and chef-y technique collided into something truly special. Now, every time I make these, I think of my grandma’s hearty pies and my own twist on that comfort—proof that the best recipes often bloom from happy accidents and a dash of memory.
Gathering Your Garden: Ingredients & Chef Insights
Here’s everything you’ll need to grow your own pizza rose garden. Don’t stress about perfection—cooking is about creativity! I’ve included my favorite tips and swaps so you can make this recipe your own.
- 1 sheet puff pastry, thawed: This is our star! Look for an all-butter puff pastry in the freezer aisle for the richest flavor. Chef’s Tip: Thaw it in the fridge overnight, not on the counter. Cold pastry is happy, flaky pastry. If it gets too warm, it becomes a sticky mess.
- 1/3 cup marinara or pizza sauce: The glue and the flavor booster. Use your favorite jarred sauce or a simple homemade one. Pro Swap: For a richer touch, try a tablespoon of pesto mixed with the marinara, or use a vodka sauce for a creamy twist.
- 1 cup shredded mozzarella cheese: Low-moisture, part-skim mozzarella is our friend here—it melts beautifully without making the pastry soggy. Chef’s Insight: Grate your own cheese from a block! Pre-shredded cheese is coated to prevent clumping, which can also prevent it from melting into those dreamy, stretchy pools we want.
- 20–25 slices pepperoni: The classic petal! Standard slices work great. Fun Twist: Try spicy pepperoni, thinly sliced salami, or even ham for a different vibe. For a vegetarian rose, use thin slices of roasted zucchini or eggplant.
- 1 egg (for egg wash): Our edible polish. A quick egg wash (just beat the egg with a teaspoon of water) gives the roses that professional, glossy, golden-brown finish. Don’t Skip This! It’s the difference between “pretty” and “pretty spectacular.”
- Optional: Italian seasoning, chili flakes, fresh basil for garnish: The finishing touches! A sprinkle of dried herbs before baking adds aroma, and fresh basil after baking brings color and a pop of freshness.
Crafting Your Blooms: Step-by-Step Instructions
Ready to create? Follow these steps, and don’t forget to read my little hacks along the way—they’re like having me right there in the kitchen with you, cheering you on!
- Prep Your Stage: Preheat your oven to 375°F (190°C). This is crucial for the pastry to puff properly right from the start. Line a standard muffin tin with parchment squares or give the cups a very light spritz of cooking spray. This isn’t just for non-stick insurance; it makes cleanup an absolute dream.
- Roll and Cut: On a lightly floured surface, gently unfold your thawed puff pastry sheet. Using a rolling pin, give it a few light rolls just to smooth out any folds—you’re not trying to make it drastically bigger. With a pizza cutter or sharp knife, cut the sheet into 4 equal strips lengthwise. You should have four long, rectangular strips. Chef’s Hack: If the pastry gets soft and sticky, pop the whole baking sheet (with the strips on it) into the freezer for 5 minutes. Cold dough is your best friend here!
- Layer the Flavors: Now for the fun part! Spread a thin, even layer of marinara sauce over each strip, leaving a tiny ¼-inch border at the very top edge (this helps with sealing). Sprinkle your glorious mozzarella evenly over the sauce. Then, take your pepperoni slices and lay them along the top half of each strip, letting them hang over the top edge by about half an inch. This overhang is what will become the beautiful, ruffled “petals” of your rose!
- The Fold and Roll: Here’s the magic move. Gently fold the bottom half of the pastry strip (the saucy, cheesy part without pepperoni) up and over the pepperoni-lined half. You’re creating a long, filled log. Now, starting at one end, begin rolling the log tightly into a spiral. Keep it snug but don’t squeeze it too tight. Once rolled, you’ll see the rose shape forming instantly!
- Nestle and Glaze: Place each beautiful rose spiral into a prepared muffin cup, seam-side down. In a small bowl, beat your egg with a teaspoon of water until smooth. Using a pastry brush, gently brush the egg wash over the visible top and sides of each rose. This is what gives them that gorgeous, bakery-style shine and color. Pro Tip: Avoid letting egg wash drip down the sides into the muffin cup, as it can glue the pastry to the tin.
- Bake to Golden Perfection: Slide your tin into the preheated oven and bake for 22-25 minutes. You’re looking for a deep, golden brown color and puffed, flaky layers. Ovens can vary, so keep an eye on them after the 20-minute mark. The smell will be absolutely irresistible!
- Cool and Garnish: Once out of the oven, let the roses cool in the tin for about 5 minutes. This allows the cheese to set slightly so it doesn’t all gush out when you lift them. Then, carefully transfer them to a wire rack or serving plate. Finish with a sprinkle of chili flakes, a dash of Italian seasoning, or a few leaves of fresh basil for that final, Insta-worthy touch.
Presenting Your Bouquet: Serving Suggestions
How you serve these can be half the fun! For a casual get-together, I love piling them high on a rustic wooden board or a simple white platter, maybe tucked in with some fresh rosemary sprigs to look like greenery. It creates that abundant, “help yourself” vibe that gets people chatting and reaching.
For something more elegant, like a date night or girls’ night in, plate individual roses. Place one or two roses on a small appetizer plate, drizzle a tiny zigzag of extra warm marinara sauce around the plate, and add a tiny bowl of that same sauce or a spicy ranch for dipping right in the center. It feels thoughtful and restaurant-worthy. No matter how you serve them, have napkins ready—these are gloriously flaky, which is a fancy way of saying deliciously messy!
Your Garden, Your Rules: Recipe Variations
Once you master the basic rose, the world is your flavorful oyster! Here are a few of my favorite twists to keep things exciting.
- The Supreme Bloom: Add a sprinkle of finely chopped green bell pepper, black olives, and cooked Italian sausage crumbles over the cheese before adding the pepperoni. It’s a full pizza experience in every bite.
- White Pizza Rose: Skip the red sauce. Instead, spread a layer of ricotta cheese mixed with a minced garlic clove, salt, and pepper. Top with mozzarella and prosciutto (instead of pepperoni) for a sophisticated, creamy treat.
- Spicy ‘Nduja Rose: For the heat seekers! Mix a tablespoon of spicy ‘nduja or a few dollops of calabrian chili paste into your marinara sauce. Use spicy coppa or soppressata for the meat layer. Wowza!
- Breakfast Rose: A sweet/savory morning miracle. Use cooked, crumbled breakfast sausage, a sprinkle of cheddar cheese, and a tiny drizzle of maple syrup instead of sauce. You can even add a little scrambled egg if you’re feeling ambitious.
- Veggie-Lover’s Rose: Go meat-free with thin strips of roasted red pepper, sliced black olives, and sautéed spinach (squeezed very dry). A sprinkle of feta cheese along with the mozzarella adds a fantastic salty tang.
Chef Emily’s Notes: From My Kitchen to Yours
This recipe has become a staple in my house, and it’s evolved in the funniest ways. The first time I made them for a big family picnic, my nephew, wide-eyed, asked if he could eat “the flower.” That’s when I knew they were a hit. Over time, I’ve learned that a slightly thicker sauce works better than a watery one, and that letting the assembled roses chill in the fridge for 10 minutes before baking gives you even more dramatic, defined layers. The biggest lesson, though? Always make a double batch. I don’t care how many people you’re serving; these disappear faster than you can say “more please.” They’re that good. They’re a reminder that food is meant to be playful, beautiful, and shared with joy.
FAQs & Quick Troubleshooting
Q: My puff pastry got too warm and sticky while I was working. Help!
A: No panic! This happens to all of us. Simply slide the whole baking sheet with your pastries into the freezer for 5-7 minutes. The cold will firm up the butter in the dough, making it easy to handle again. Working quickly and with cool hands helps prevent this.
Q: My roses are a little soggy on the bottom. What went wrong?
A: Sogginess usually comes from two things: too much sauce or the cheese releasing moisture. Next time, use a light hand with the sauce—just a thin smear. Also, ensure you’re using low-moisture, part-skim mozzarella (or draining fresh mozzarella very well). Letting them cool in the tin for 5 minutes after baking also helps the structure set.
Q: Can I make these ahead of time?
A: Absolutely! You can assemble the roses completely, place them in the muffin tin, cover the whole tin tightly with plastic wrap, and refrigerate for up to 24 hours. When you’re ready, brush with egg wash and bake straight from the fridge—you may need to add 2-3 extra minutes to the bake time.
Q: My pastry split or unraveled while baking. Why?
A: This often means the roll wasn’t quite tight enough, or the egg wash sealed the outer layer so well it trapped steam and forced a split. It’s purely cosmetic! They will still taste incredible. Just roll a little tighter next time and know that even “wild” roses are beautiful.
Nutritional Information (Approximate)
Please note: The following is an estimate per rose (assuming the recipe makes 4 roses) based on the ingredients listed and standard nutritional databases. Values can vary based on specific brands and ingredient quantities used.
Per Serving (1 rose): Calories: ~290 kcal | Fat: 19g | Saturated Fat: 7g | Carbohydrates: 18g | Fiber: 1g | Sugars: 1g | Protein: 10g | Sodium: ~480mg
This is a rich, indulgent appetizer meant for sharing and savoring. For a lighter version, you can use a lower-fat cheese, turkey pepperoni, and ensure you’re using just a light coating of sauce. Remember, I’m a chef who believes in balance—enjoy these delicious bites as part of a fun meal with lots of veggies on the side!
Final Thoughts: Go Forth and Bloom!
And there you have it, my friend—the complete guide to creating your own stunning (and delicious) Pizza Puff Pastry Roses. I hope this recipe brings as much laughter and “oohs and aahs” to your kitchen as it has to mine. Remember, cooking isn’t about flawless perfection; it’s about the joy of creating, the stories you tell while you chop and stir, and the shared smiles around the table. If your rose isn’t picture-perfect on the first try, I promise it will still taste like a million bucks. So, preheat that oven, embrace the fun, and get ready to serve up something truly special. Don’t forget to tag me on social if you make them—I love seeing your kitchen creations! Now, go on… let’s chow down.
With love and a flaky, buttery crunch,
Emily