The Secret to a Happy, Fueled Week: Protein-First Chicken Meal Boxes
Hey there, friend! Emily here, waving from my slightly-floured, always-busy kitchen. Can we have a real talk for a second? About that moment—you know the one—when it’s 2 PM on a Tuesday, your energy is tanking, your brain feels foggy, and lunch is a sad, mysterious container from the back of the fridge. Or when you get home after a marathon day and the very idea of “cooking dinner” makes you want to order pizza. Again. I’ve been there. We’ve all been there.
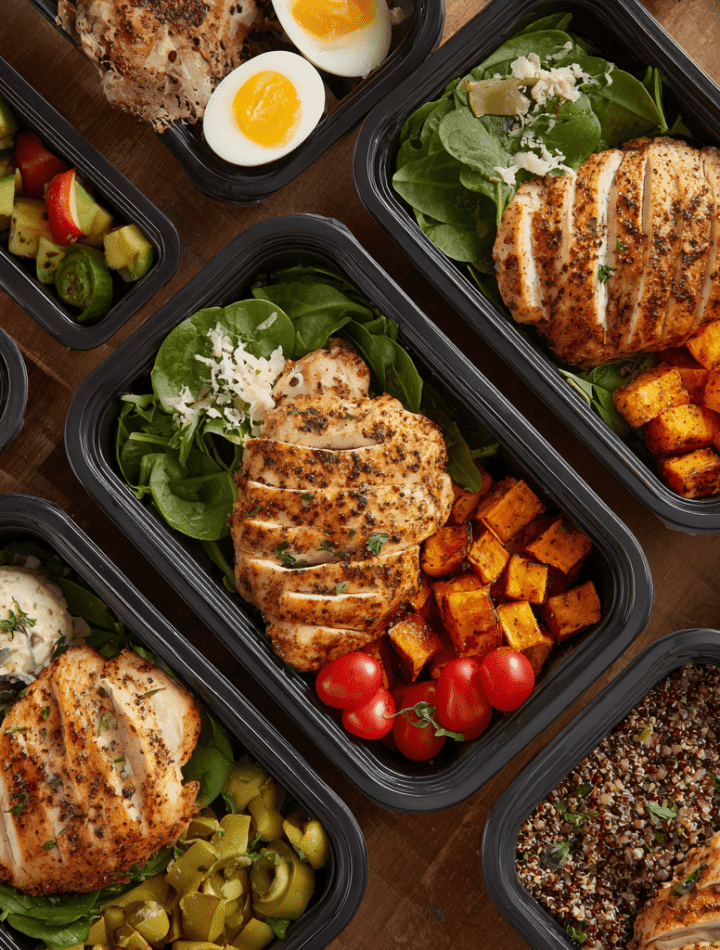
That’s exactly why I’m practically buzzing with excitement to share this concept with you today. Forget complicated meal plans with a million ingredients. We’re keeping it brilliantly simple, deliciously satisfying, and totally in your control. I’m talking about Protein-First Chicken Meal Boxes. This isn’t just “meal prep.” This is your secret weapon for a week of feeling full, focused, and fabulously fed.
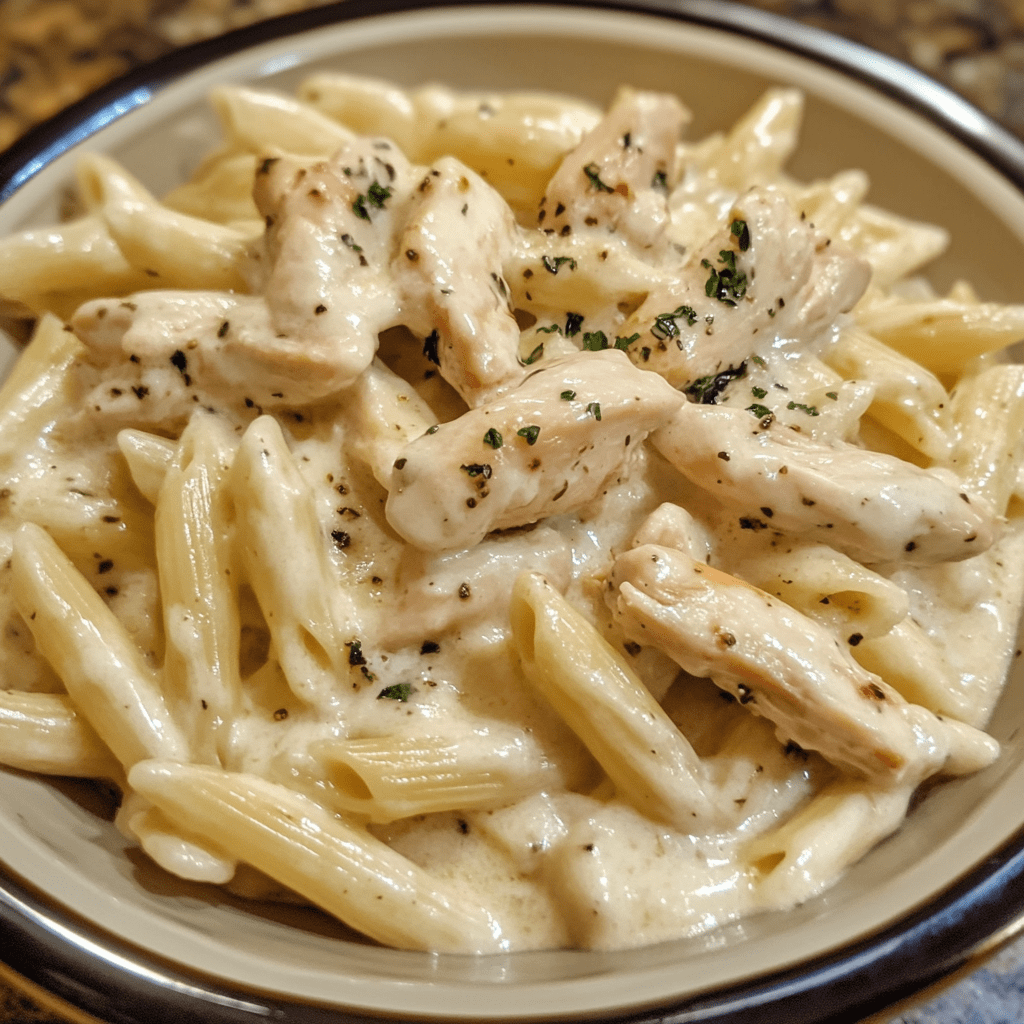
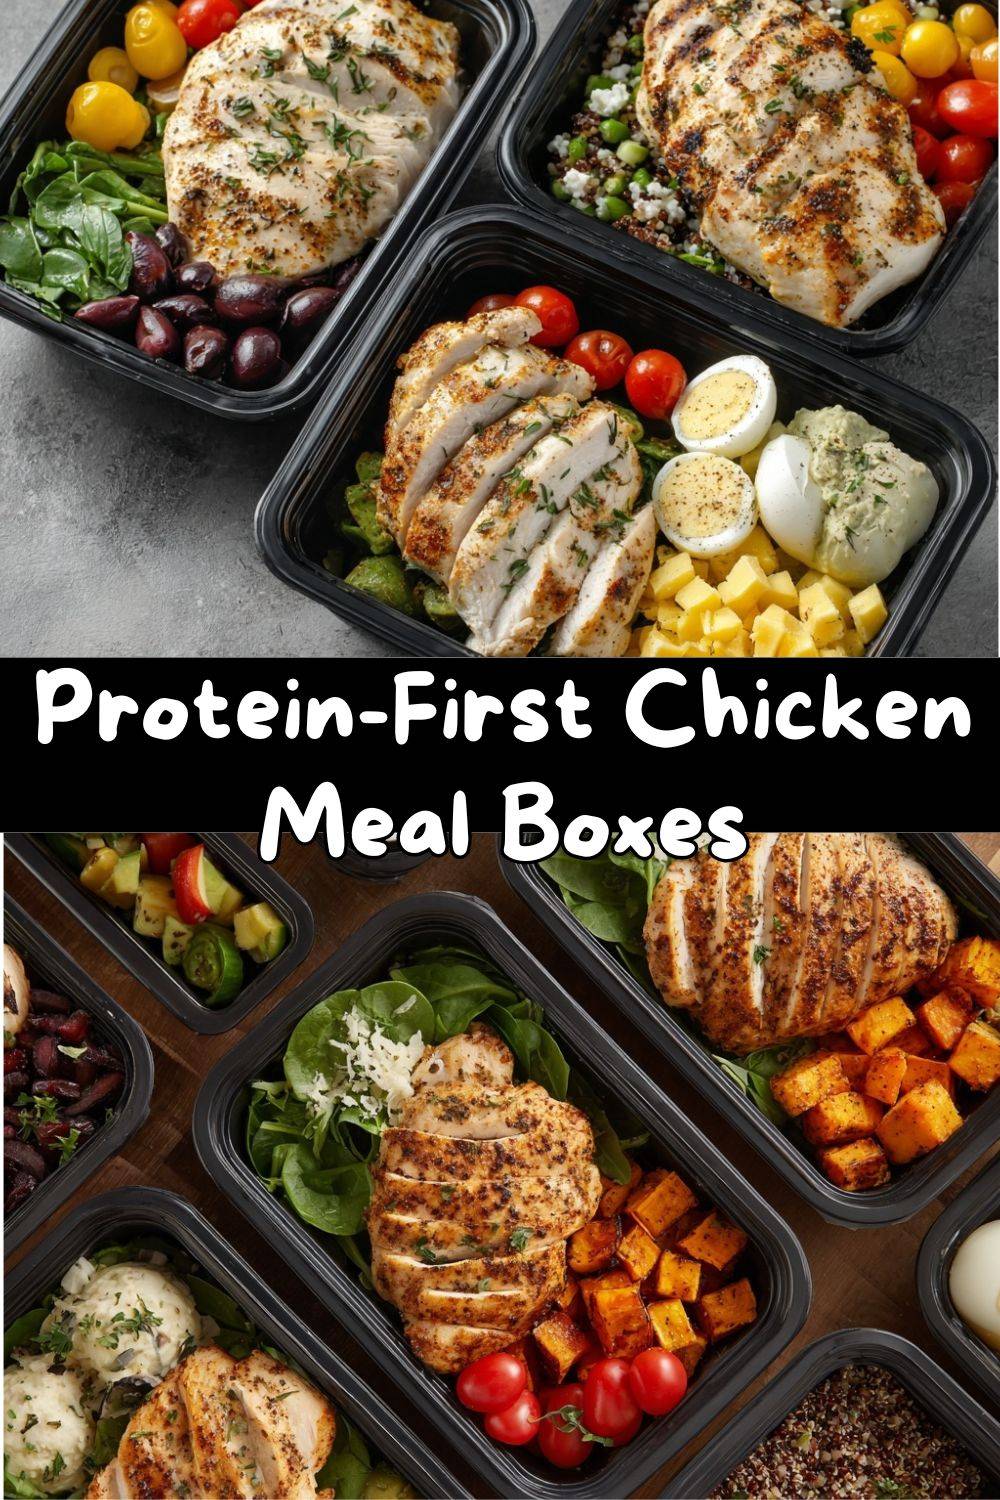
Built around humble, versatile chicken breasts, these boxes are designed to deliver clean, lean protein that keeps hunger locked up and energy high. The magic? You’re the boss. Pile on the rainbow veggies, keep it simple with just chicken and a tasty dip, or add a smart carb like quinoa. It’s all good. This is about creating a foundation of flavor and function that fits your life, not the other way around. So, grab your favorite containers and let’s build something delicious that your future self will high-five you for.
My Grandma’s “Fuel First” Philosophy (Long Before It Was Cool)
This whole “protein-first” idea? I credit my grandma, though she’d never call it that. In her world, it was just “eating sensible.” I remember watching her get ready for a big week of gardening and canning. She’d roast a whole chicken on a Sunday evening. The smell alone was a promise of good things to come.
While it rested, she’d pull out her old, mismatched set of glass containers. She’d slice that beautiful chicken, tucking portions into each box. Then came the “add-ins”: a scoop of her homemade cottage cheese, a handful of snap peas from the garden, a few crisp radishes, and always, always a wedge of buttered bread for my grandpa. She called them her “grab-and-go gardens.” No fuss, no elaborate recipes—just real, good food, ready to power her through her work.
She taught me that good food doesn’t have to be complicated to be powerful. Those little containers weren’t just meals; they were acts of care—for her family and for herself. Today, when I assemble my own chicken boxes, I think of her. It’s that same practical love, translated for our busy, modern lives. It’s kitchen wisdom that never gets old.
What You’ll Need: Your Building Blocks for Flavor
Here’s the beautiful part: the ingredient list is short, sweet, and incredibly flexible. Think of this as your blueprint.
- 2 Boneless, Skinless Chicken Breasts: Our star player! Look for plump, even-sized breasts for consistent cooking. Chef’s Insight: If you prefer darker meat, chicken thighs are a fantastic, juicier swap—just add a few minutes to the cook time.
- 1 Tablespoon Olive Oil: Our cooking workhorse. It helps the seasoning stick and gives us a beautiful, light sear. Avocado oil is a great high-heat alternative.
- Salt & Pepper to Taste: The dynamic duo! Don’t be shy here. Proper seasoning is the difference between “meh” and “more, please!”
- Optional Seasonings: This is where you personalize! My go-to trio is:
- Smoked Paprika: Adds a deep, almost bacony warmth without any heat.
- Garlic Powder: Gives that savory, rounded flavor without the risk of burning fresh garlic.
- Lemon Zest: A little zest brightens everything up! Add it after cooking for the brightest pop.
Your Mix & Match Add-Ins (Choose Your Adventure!):
- Boiled Eggs: The protein powerhouse add-in. I make a batch in my Instant Pot for peel-perfect ease.
- Hummus or Guacamole: Creamy, dreamy, and packed with healthy fats. Perfect for dipping or dolloping.
- Cooked Quinoa or Lentils: For a fiber and complex carb boost that keeps you satisfied for hours.
- Roasted Sweet Potato Cubes: Toss cubes with oil, salt, and pepper and roast at 400°F until caramelized. Sweet, hearty, and delicious cold or warm.
- Fresh Veggies: Cherry tomatoes, cucumber slices, snap peas, or a handful of baby spinach. Color, crunch, and nutrients!
- Briny Bites: Pickles, olives, or pepperoncini. They cut through the richness and wake up your taste buds.
- Cheese: Cubes of cheddar, mozzarella pearls, or crumbled feta. Because… cheese.
Let’s Build Your Boxes: A Step-by-Step Roadmap
Ready? Let’s turn these ingredients into your week’s victory. I’ll walk you through every step with my favorite simple hacks.
- Prep & Season Your Chicken: Pat those chicken breasts completely dry with paper towels. This is non-negotiable for getting a good sear and not steaming the chicken. Drizzle with olive oil and rub it all over. Now, season generously on both sides with salt, pepper, and your chosen seasonings. If you have 30 extra minutes, let them sit at room temperature. It helps them cook more evenly. Chef’s Hack: For super-juicy chicken every time, try a quick brine! Dissolve 1/4 cup salt in 4 cups of water, submerge the breasts for 15-30 minutes, then rinse and pat dry before seasoning.
- Cook to Perfection: You’ve got options, and they’re all great!
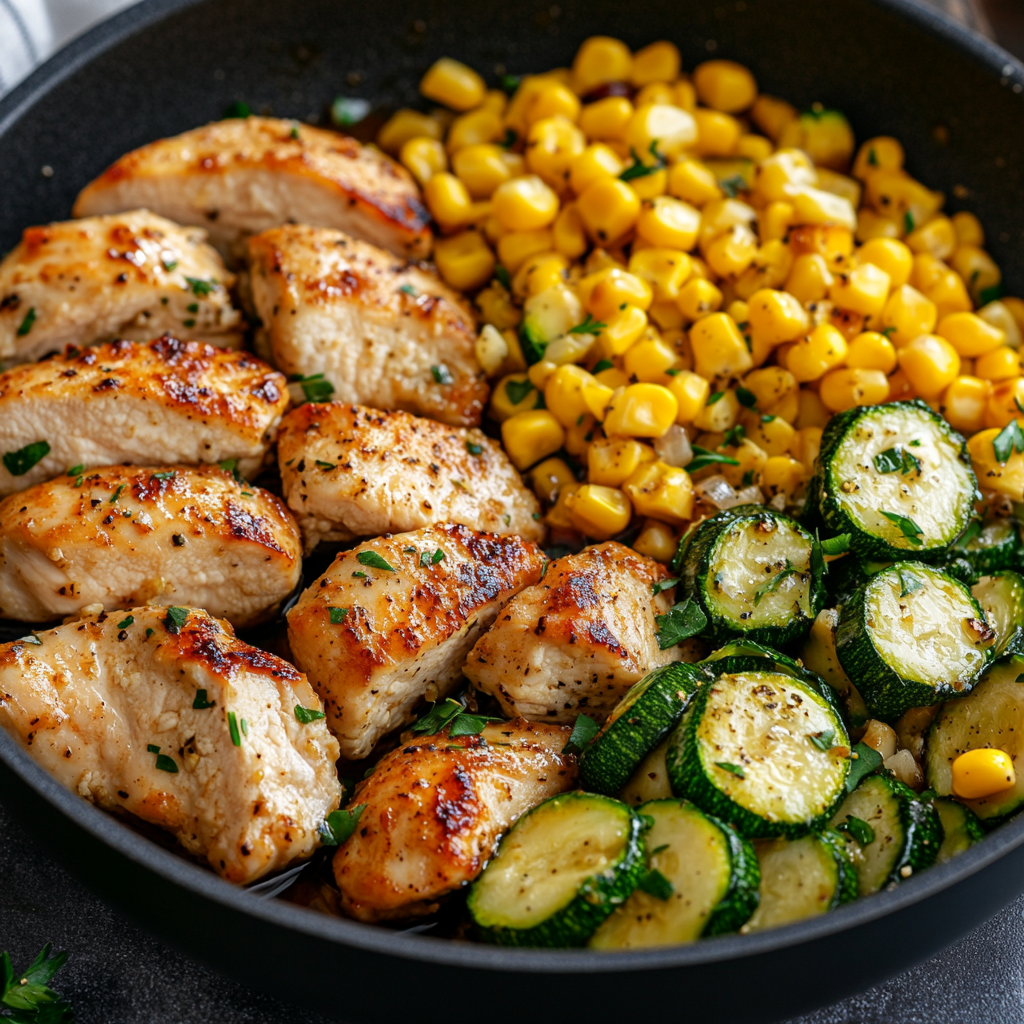
- Pan-Searing (My Weeknight Go-To): Heat a skillet (cast iron is ideal) over medium-high heat. Add a tiny bit more oil. Place the chicken in the hot pan and don’t touch it! Let it cook for 5-7 minutes per side, until you get a gorgeous golden crust. This method delivers the most flavor fast.
- Baking (For Hands-Off Ease): Preheat your oven to 400°F (200°C). Place seasoned breasts on a parchment-lined baking sheet. Bake for 20-25 minutes, depending on thickness.
- Grilling (For That Summer Vibe): Fire up the grill to medium-high. Grill for 6-8 minutes per side.
The Universal Truth: No matter your method, cook until the internal temperature in the thickest part hits 165°F (74°C). Use a digital meat thermometer—it’s the best investment for never having dry chicken again.
- The Crucial Rest: Once cooked, transfer the chicken to a cutting board and let it rest for 5-10 minutes. I cover it loosely with foil. This allows the juices to redistribute throughout the meat. If you slice it immediately, all those delicious juices will run right out onto the board.
- Slice, Cube, or Shred: Now, decide on your texture! Slice it against the grain for tender strips, cube it for easy forkability, or use two forks to shred it. The “grain” is the direction of the muscle fibers—slicing across them shortens the fibers, making the meat more tender.
- Assemble Your Masterpiece: Get your clean containers ready. Divide the chicken evenly among 3-4 containers. Now, have fun! Add a scoop of hummus, a handful of roasted sweet potatoes, some cucumber slices, and a boiled egg halved. There’s no wrong answer. Think about color, texture (creamy, crunchy), and flavor.
- Store for Success: Let the components cool completely before putting the lids on. This prevents condensation from making everything soggy. They’ll keep beautifully in the fridge for up to 4 days.
How to Serve & Savor Your Creation
The beauty of these boxes is they are ready whenever you are! You can eat them straight from the fridge, cold—the flavors are bright and refreshing. If you prefer a warm meal, simply remove any fresh veggies (like spinach or tomatoes), pop the chicken and any hearty cooked add-ins (quinoa, sweet potato) into a microwave-safe dish, and heat gently at 50% power for 60-90 seconds. This prevents the chicken from getting rubbery.
For a “non-box” experience, empty a container onto a fresh plate or into a bowl. Drizzle with a little extra virgin olive oil, a squeeze of lemon, or a sprinkle of everything bagel seasoning. It instantly feels like a plated meal. These boxes are perfect for lunch at your desk, a post-workout refuel, or a light dinner when paired with a simple side salad. They truly go anywhere you do.
Mix It Up! 5 Flavor Twists to Keep Things Exciting
Once you master the basic blueprint, the world is your chicken box! Here are a few of my favorite themed variations.
- Italian Herb Garden: Season chicken with dried oregano, basil, and a pinch of red pepper flakes. Add-ins: mozzarella pearls, cherry tomatoes, artichoke hearts, a drizzle of balsamic glaze.
- Asian-Inspired Sesame: Brush chicken with a mix of soy sauce, a touch of sesame oil, and grated ginger before cooking. Add-ins: edamame, shredded carrots, cucumber, and a side packet of sesame seeds or a sprinkle of green onion.
- Fiesta Lime: Season chicken with cumin, chili powder, and lime zest. Add-ins: a big scoop of guacamole, black beans, corn, and a lime wedge for squeezing.
- Everything But The Bagel: Coat chicken generously with Everything Bagel Seasoning before cooking. Add-ins: cream cheese for spreading/scraping, sliced radishes, cucumber, and everything bagel pretzels on the side.
- Vegetarian Power Swap: Not feeling chicken? No problem! Replace it with a can of chickpeas, rinsed, dried, tossed in oil and seasonings, and roasted at 400°F for 20-25 minutes until crispy. Or use extra-firm tofu, pressed and cubed, and pan-fried until golden.
A Few Notes from My Kitchen to Yours
This recipe has evolved from my own “desperation dinner” into a weekly ritual. I used to overcomplicate it, thinking I needed five different sauces. One hectic Monday, I just threw in what I had: the chicken, some leftover quinoa, and a handful of pickled jalapeños from a jar. It was the best one yet! The tangy crunch was everything.
My biggest lesson? Listen to your cravings. If you’re craving something creamy, add the hummus. If you want salt and crunch, those pickles are your friend. This template is here to serve you, not chain you to a rigid plan. Have fun with it, and don’t be afraid of a seemingly weird combo—it might just be your new favorite.
Your Questions, Answered
Q: My chicken always turns out dry. What am I doing wrong?
A: The usual culprits are overcooking and skipping the rest! A digital thermometer is your #1 tool to prevent this. Pull the chicken at 165°F and let it rest. The brine method mentioned in the steps is also a game-changer for moisture.
Q: Can I freeze the assembled boxes?
A: I don’t recommend freezing the fully assembled boxes with fresh veggies, as they’ll get mushy. However, you can absolutely freeze the cooked, cooled chicken by itself in airtight bags or containers for up to 3 months. Thaw in the fridge overnight and assemble your box fresh in the morning.
Q: What are the best veggies that won’t get soggy?
A: Hearty, low-moisture veggies are your best friends: cherry tomatoes (whole), cucumber (add the day you eat it if possible), bell peppers, snap peas, carrots, and blanched broccoli. Keep leafy greens separate in a little baggie until you’re ready to eat.
Q: How do I reheat this without making the chicken tough?
A> Low and slow is the key! Use your microwave’s power level setting (50% is perfect) and heat in short bursts. Or, place the chicken in an oven-safe dish with a tablespoon of broth or water, cover with foil, and warm in a 300°F oven for 10-15 minutes.
Nutritional Breakdown (The Good Stuff!)
Let’s talk fuel. The base recipe (one serving of the cooked, seasoned chicken breast) provides a fantastic, lean protein foundation:
- Calories: ~200
- Protein: 30g (This is what keeps you full and supports muscle!)
- Fat: 8g (Mostly from the healthy olive oil)
- Carbohydrates: 0g
Remember: This is just the chicken. Your chosen add-ins will change these numbers, and that’s the point! Adding quinoa brings smart carbs for energy. Hummus adds healthy fats and fiber. A pile of veggies packs in vitamins and volume with minimal calories. This modular approach lets you tailor your nutrition to your specific goals for the day—more carbs for high activity, more veggies for volume, more fats for satiety. It’s the ultimate customizable fuel.
You’ve Got This—Now Go Fuel Your Week!
And there you have it, my friend! Your complete guide to building simple, satisfying Protein-First Chicken Meal Boxes. This is more than a recipe; it’s a strategy. A strategy for fewer stressful afternoons, fewer frantic food decisions, and more moments where you feel energized and in control of what you’re eating.
I hope this inspires you to give it a try this coming Sunday. Put on some good music, spend a peaceful half-hour in the kitchen, and set your future self up for a winning week. Remember what my grandma knew: good food is a form of care. You deserve that care, especially from yourself.
I’d love to hear how you make these boxes your own! Tag me on social @TastyChow with your creations. Now, go forth and build something delicious. Your fork (and your focused, fueled self) is waiting.
With love and a well-stocked fridge,
Emily