
Your New Favorite Holiday Party Showstopper: Pull-Apart Christmas Tree Pizza Bites!
Hey there, my festive foodie friend! 👋 Is there anything better than the smell of garlic, baking dough, and bubbling cheese wafting through your kitchen during the holidays? I’m Emily Walker, and if you’ve been around Tasty Chow for a while, you know I live for recipes that are equal parts delicious, fun, and meant for sharing. And let me tell you, these Pull-Apart Christmas Tree Pizza Bites are about to become the star of your holiday spread.
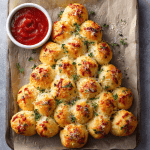
Picture this: a gorgeous, golden-brown Christmas tree made of dozens of soft, fluffy dough balls, each one stuffed with melty mozzarella, spicy jalapeño, and sweet bell pepper. It’s brushed with a tangy pizza sauce, loaded with garlic and parmesan, and baked until it’s irresistibly pull-apart-able. The best part? It’s sitting right in the middle of your table, and everyone gathers around, laughing and reaching in to grab a cheesy, warm bite. It’s not just food; it’s an experience. It’s a conversation starter. It’s pure, unadulterated holiday joy on a baking sheet.
This recipe is perfect for your Christmas Eve bash, a cozy family game night, or even as the most epic holiday appetizer that will have your guests texting you for the recipe. It’s surprisingly simple to make, totally customizable, and kid-approved (trust me, my little kitchen helpers go crazy for these). So, tie on your favorite messy apron, preheat that oven, and let’s create some delicious, cheesy magic together!
A Kitchen Full of Laughter & (Slightly Lopsided) Trees
This recipe always takes me right back to one particularly chaotic, flour-dusted Christmas a few years ago. I was testing holiday recipes, and I had the wild idea to turn my classic pull-apart bread into a festive shape. My niece and nephew were visiting, their little hands eager to “help.” What ensued was less of a meticulous cooking session and more of a joyful, cheesy mess.
Dough balls were rolling off the counter, a rogue jalapeño seed led to a very dramatic (but short-lived) tearful moment, and our first attempt at a tree looked more like a friendly, amoeba-shaped blob. But we were laughing so hard our sides hurt. We fixed the tree shape, popped it in the oven, and when that golden, aromatic masterpiece emerged, we all cheered. That first bite, shared with my family, surrounded by laughter and a lightly floured kitchen, was pure magic. It wasn’t about perfection; it was about the joy of creating something together. That’s the spirit I want you to bring to this recipe. Don’t stress about making it perfect—just have fun with it!

Gathering Your Cheesy, Festive Ingredients
Here’s everything you’ll need to create this edible centerpiece. I’ve included some of my favorite chef insights and easy swaps to make this recipe your own!
- Pizza Dough (2 lbs): This is your blank canvas! I often use store-bought dough from the deli section for ultimate ease. Homemade is fantastic if you have the time! Chef’s Tip: Let the dough sit at room temperature for at least 30 minutes before you start. It becomes much easier to stretch and work with!
- Red Bell Pepper (1, diced): This adds a sweet crunch and a pop of festive red color. Don’t love peppers? Swap them for sun-dried tomatoes for a deeper, tangy flavor.
- Jalapeños (2, seeded and diced): These give a wonderful, gentle heat that cuts through the richness of the cheese. For no heat, use a green bell pepper. For more fire, leave in some of the seeds!
- Mozzarella Cheese (1 cup, shredded): The king of meltiness! I highly recommend shredding your own from a block, as it melts far better than pre-shredded (which has anti-caking agents). For a more robust flavor, try smoked mozzarella or provolone.
- Italian Seasoning (1 tsp): A simple blend that packs an herby punch. No blend? Use a ½ tsp each of dried oregano and basil.
- Pizza Sauce (1 cup + extra for dipping): Use your favorite jarred brand for simplicity, or whip up a quick homemade version with crushed tomatoes, garlic, and herbs. This is our “glue” and flavor base for the top.
- Garlic Cloves (4-5, finely chopped): Fresh is best here! That potent, aromatic garlic flavor is non-negotiable for me. Please, please don’t use jarred pre-minced garlic for this—the flavor difference is huge.
- Fresh Basil (⅔ cup, chopped): We add this after baking to keep it bright, green, and fragrant. It makes the whole dish taste fresh and fancy.
- Parmesan Cheese (4 tbsp, grated): The salty, savory finishing touch that gets wonderfully crispy. For the best flavor, grate it yourself from a wedge!
Let’s Build Our Delicious Christmas Tree!
Okay, team! Let’s get our hands a little dirty and build this beautiful, cheesy tree. Follow these steps, and you’ll have a perfect pull-apart pizza in no time.
- Preheat & Prep: Crank your oven to 375°F (190°C). This is the perfect temperature to cook the dough through without burning the top. Line a large baking sheet with parchment paper. Chef’s Hack: Give the parchment a very light spritz of cooking spray. It guarantees nothing will stick, not even a single bit of runaway cheese.
- Divide the Dough: Lightly flour your hands and your work surface. Divide your dough into roughly 48 small balls, about 1-inch in size. They don’t have to be perfect! A kitchen scale is great for accuracy, but eyeballing it is totally fine. Fun Fact: This is a fantastic step for kids to help with! They love rolling dough balls.
- Stuff & Seal: This is the fun part! Take one dough ball and flatten it slightly in the palm of your hand. Place a pinch of mozzarella, a few pieces of diced red pepper, and a few pieces of jalapeño in the center. Now, carefully pull the edges of the dough up and over the filling, pinching them together firmly to seal it inside. Roll it gently in your hands to make a neat ball again. Place it seam-side down on a plate. Repeat with all the balls. Pro Tip: Don’t overstuff! A little filling goes a long way. An overstuffed ball is more likely to burst open during baking.
- Shape the Tree: Time for arts and crafts! On your prepared baking sheet, start arranging your stuffed dough balls into a triangle (tree) shape. Place one ball at the top for the star. Then, make a row of two balls underneath it. Then a row of three, and so on, widening each row until you have a base you’re happy with. You’ll likely have 6-7 rows. The balls should be touching each other. For the trunk, I use 2-3 extra dough balls lined up vertically at the bottom.
- Top It Off: Using a pastry brush, gently brush the entire surface of your tree with the pizza sauce. You don’t need to drown it—just a light, even coating. Now, sprinkle the finely chopped garlic and the grated parmesan cheese evenly over the sauced tree. This is where the magic starts to smell incredible!
- Bake to Golden Perfection: Slide your masterpiece into the preheated oven and bake for 20-25 minutes. You’re looking for a deep golden-brown color on the dough and you should see cheese bubbling enticingly out of a few seams. Your whole house will smell like an Italian holiday dream.
- Garnish & Serve: Carefully remove the baking sheet from the oven. Immediately scatter the freshly chopped basil and an extra sprinkle of parmesan over the top. Let it cool for just 5 minutes—this helps the cheese set slightly so you don’t burn your mouth! Serve right on the baking sheet or transfer carefully to a platter, with a bowl of warm pizza sauce for dipping on the side.
How to Serve Your Festive Masterpiece
Presentation is part of the fun! Place the entire baking sheet or platter right in the center of your table so everyone can dig in. I love putting a small bowl of warm pizza sauce for dipping right at the base of the “tree trunk.” For a extra festive touch, you can add a star-shaped cutout of yellow pepper or a piece of starfruit on the top ball before baking, or place a little ceramic star ornament on top after it comes out of the oven.
This is the ultimate shareable appetizer, so it pairs perfectly with other holiday finger foods! Think a board of Italian cold cuts, a big, crisp salad, or some roasted vegetable skewers. And of course, a glass of crisp white wine or a festive sparkling cocktail is the ideal beverage companion to all that cheesy, garlicky goodness.
5 Fun Ways to Mix It Up!
One of the best things about this recipe is how adaptable it is. Here are a few of my favorite twists:
- Meat Lover’s Tree: Add about ½ cup of mini pepperoni slices or cooked Italian sausage crumbles into the filling with the cheese. So hearty and satisfying!
- Spicy ‘N Sweet Tree: For a incredible flavor contrast, drizzle the baked tree with a little honey or hot honey right after it comes out of the oven. The sweet and savory combo is mind-blowing.
- Pesto Paradise Tree: Swap the red pizza sauce for basil pesto for a gorgeous green-hued tree. It tastes incredibly fresh and herby.
- Three-Cheese Wonder: Mix your mozzarella with equal parts shredded fontina for creaminess and a touch of sharp cheddar for bite.
- Breakfast Tree: Make this for Christmas morning! Fill the balls with scrambled breakfast sausage, a tiny bit of scrambled egg, and cheddar cheese. Brush the top with melted butter instead of sauce and sprinkle with everything bagel seasoning.
Chef Emily’s Notes from My Kitchen to Yours
This recipe has evolved so much since that first lopsided attempt! I’ve learned that a light hand with the filling is key to a beautiful tree that doesn’t explode. I also used to add the basil before baking, but I found it burns and loses its vibrant flavor. Adding it fresh at the end was a total game-changer.
Also, a little kitchen confession: I am the queen of “cheese leakage.” Don’t fret if some cheese escapes during baking! Those crispy, caramelized bits of cheese that ooze out and onto the parchment paper are secretly the cook’s reward. Consider them your tasty trophy for a job well done.
FAQs & Troubleshooting Your Pizza Tree
Q: My dough balls are bursting open in the oven! What did I do wrong?
A: This usually means they were overstuffed or not sealed tightly enough. Next time, use a little less filling and really pinch that seam closed firmly. A little leakage is normal, but a full-blown explosion means less filling next time.
Q: Can I make this ahead of time?
A: Absolutely! You can assemble the entire tree on the baking sheet, cover it tightly with plastic wrap, and refrigerate it for up to 8 hours before baking. Let it sit at room temperature for 20 minutes while the oven preheats. You may need to add 2-3 extra minutes to the bake time since it’s going in cold.
Q: My tree is browning too quickly on top but the dough isn’t cooked inside. Help!
A: This means your oven might run hot, or your rack is too high. Next time, try baking at 350°F. If it’s browning too fast during this bake, simply lay a loose piece of aluminum foil over the top for the last 10 minutes of baking.
Q: I can’t find fresh pizza dough. What can I use instead?
A: No problem! You can use frozen bread or pizza dough, fully thawed. In a real pinch, you can even use two tubes of refrigerated biscuit dough, each biscuit cut into quarters and rolled into balls. The texture will be a bit more biscuit-like, but still utterly delicious.
PULL-APART CHRISTMAS TREE PIZZA BITES
- Total Time: 45 minutes
- Yield: 48 Bites 1x
Description
Festive, cheesy, and packed with bold flavor, these pull-apart pizza bites are shaped like a Christmas tree and meant for sharing! Every bite is melty, garlicky, and perfectly poppable—ideal for holiday parties, cozy nights, or as a fun family cooking project.
Ingredients
Dough Base:
2 lbs pizza dough (store-bought or homemade)
Filling:
1 red bell pepper, diced (¼” pieces)
2 jalapeños, seeded and diced
1 cup shredded mozzarella (or torn into small chunks)
1 tsp Italian seasoning
Toppings:
1 cup pizza sauce (plus extra for dipping)
4–5 garlic cloves, finely chopped
⅔ cup fresh basil, chopped
4 tbsp grated parmesan cheese
Instructions
Preheat oven to 375°F (190°C). Line a baking sheet with parchment paper.
Divide dough: Roll dough into ~48 small balls (~1-inch each).
Stuff & seal: Flatten each ball slightly. Add a pinch of mozzarella, diced red pepper, jalapeño, and a dash of seasoning. Fold edges to seal.
Shape the tree: Arrange stuffed balls into a triangle shape (tree) on the baking sheet.
Top it off: Brush lightly with pizza sauce, then sprinkle with chopped garlic and parmesan.
Bake for 20–25 minutes, or until golden and bubbling.
Garnish: Once out of the oven, scatter chopped basil and more parmesan on top. Serve with warm pizza sauce for dipping!
- Prep Time: 20 minutes
- Cook Time: 25 minutes
Nutrition
- Calories: 80 / Bite
- Fat: 3g / Bite
- Carbohydrates: 9g / Bite
- Protein: 3g / Bite
Nutritional Information (Per Bite)
Okay, let’s be real—this is a holiday treat! It’s meant to be enjoyed in the spirit of celebration. But if you’re curious about the details, here’s a rough estimate per pizza bite (assuming the recipe makes 48 bites).
- Calories: ~80 kcal
- Protein: 3g
- Fat: 3g
- Carbohydrates: 9g
Remember, these are estimates and can vary based on the specific brands of ingredients you use and any modifications you make. The beauty of this recipe is that you can lighten it up by using part-skim cheeses and adding more veggies to the filling!
Final Thoughts: Share the Joy!
Well, my friend, there you have it! Your guide to creating the most fun, festive, and downright delicious holiday appetizer. This Pull-Apart Christmas Tree Pizza is more than just a recipe; it’s a reason to gather, to laugh, and to share something made with love (and a whole lot of cheese).
I hope this recipe brings as much laughter and light to your kitchen as it has to mine. Don’t forget to tag me @TastyChow on Instagram if you make it—I absolutely love seeing your creations! From my messy apron to yours, I wish you the happiest of holidays filled with good food and even better company.
Now go forth and bake! 🎄✨
With love,
Emily