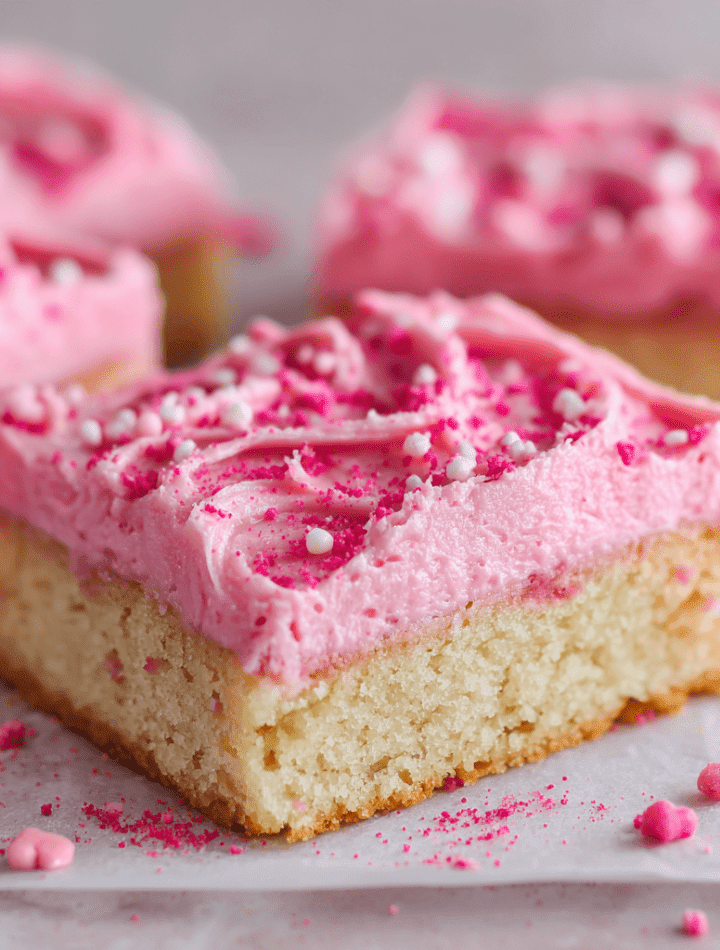
Raspberry Frosted Sugar Cookie Bars: Your New Favorite Sweet Escape
Hey there, my fellow food lover! Let’s be real for a second. Sometimes, you just need a cookie. But not just any cookie. You need a cookie that feels like a celebration, looks like a tiny pink cloud, and tastes like pure, unadulterated joy. You need a treat that’s easy to share but so good you’ll consider hiding the whole pan. (No judgment here, I’ve totally been there.)
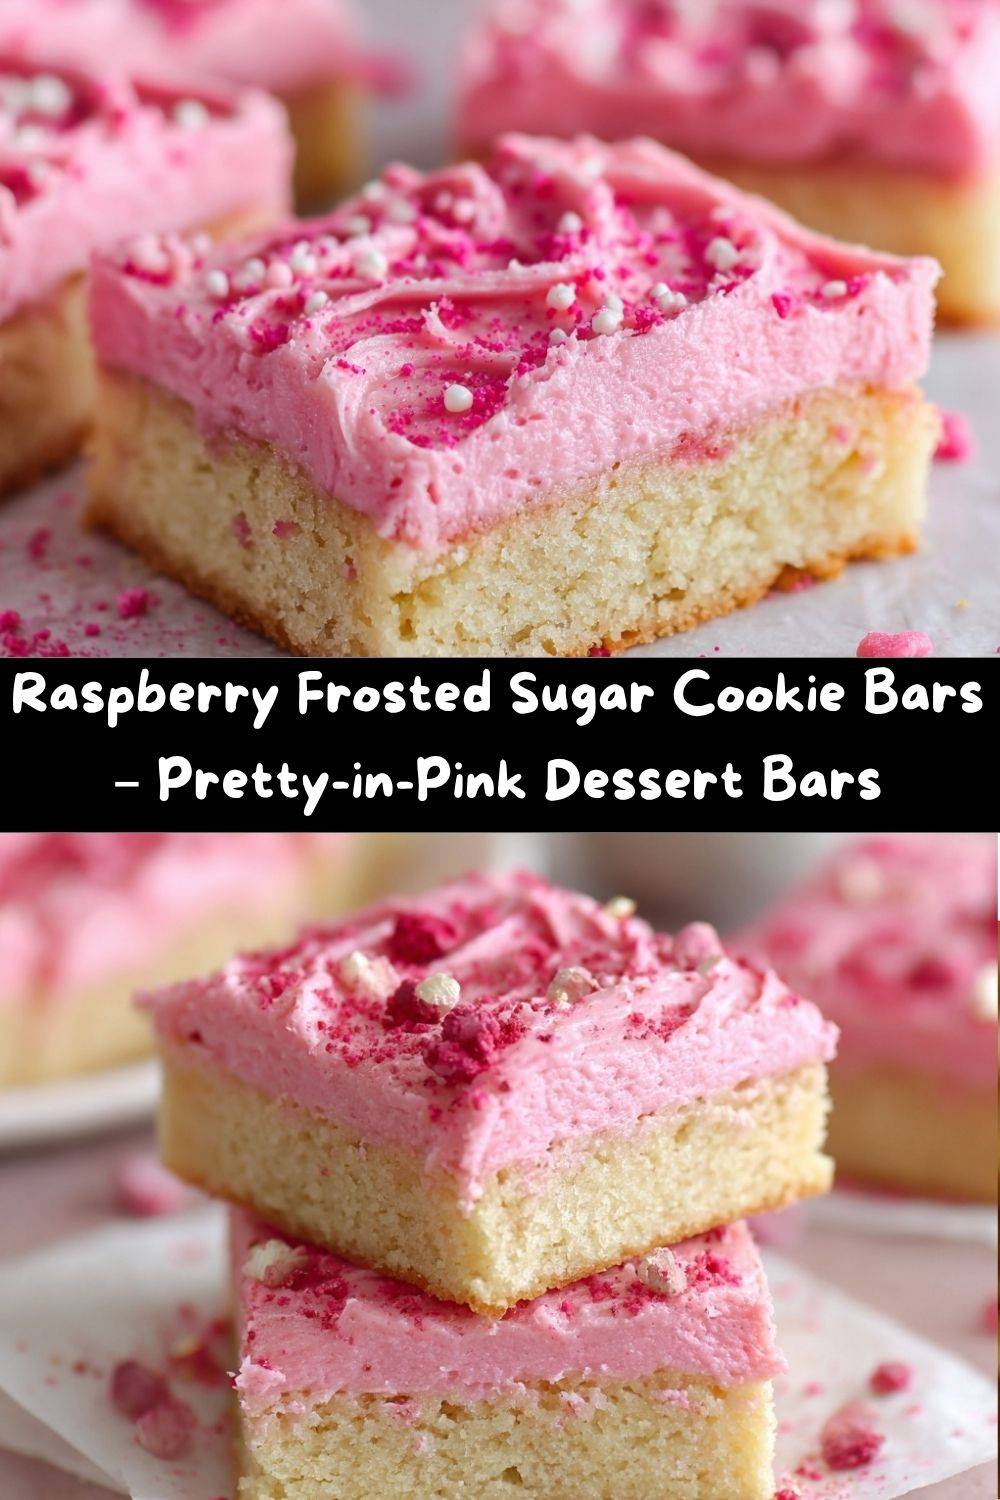
Well, my friend, your sweet tooth has called, and I am answering with the most glorious, soft-baked, dreamily-frosted Raspberry Frosted Sugar Cookie Bars you’ve ever laid eyes on. Imagine the softest, thickest sugar cookie you’ve ever had, baked into one easy, no-fuss bar. Now, picture it slathered with a fluffy, vibrantly pink raspberry frosting that’s just the right amount of sweet and tangy. It’s like your favorite childhood sugar cookie got a fabulous, grown-up makeover.
These bars are the perfect answer to a cozy January afternoon, a pretty-in-pink treat for Valentine’s Day, or just a “Hey, you made it through Wednesday!” victory dance. They’re inspired by those famous bakery-style cookies, but I’ve streamlined the process so you can get this deliciousness from your kitchen to your mouth in record time. So, tie on your favorite apron (the messy one is always the best), and let’s make something absolutely delicious together!
A Spoonful of Nostalgia & A Dash of Raspberry
This recipe always takes me right back to my grandma’s flour-dusted kitchen counter. She was the queen of what she called “bar cookies.” While other kids had drop cookies, I had these magnificent, sheet-pan-sized treats she’d cut into perfect squares. Her lemon bars were legendary, but it was her simple, iced sugar cookie bars that truly owned my heart.
I remember standing on a wobbly step-stool, my small hands desperately trying to help her press the dough into the pan. She’d let me have the first taste of the frosting straight from the bowl, a sweet, buttery mess that always ended up on my nose. There was no fancy freeze-dried fruit back then—just a little food coloring and a whole lot of love. This recipe is my homage to her, but with my own Chef Emily twist. Swapping out the plain frosting for a fruity, real-raspberry version feels like the perfect way to honor her memory while adding my own chapter to our family’s kitchen story.
Gathering Your Sweet Supplies
This is where the magic starts! I’ve broken everything down for the cookie base and the fabulous frosting. I’ve also included my favorite chef insights and substitution tips to make this recipe truly yours.
For the Soft-Baked Sugar Cookie Base:
- 1 cup (2 sticks) unsalted butter, softened: This is the heart and soul of our cookie base, giving it that rich, melt-in-your-mouth quality. Chef’s Tip: “Softened” means your butter should give slightly when pressed, but not be greasy or melted. If you forget to take it out, you can quickly soften it by cutting it into tablespoons and letting it sit for 15 minutes!
- 1 ½ cups granulated sugar: For the perfect sweetness and that classic sugar cookie texture.
- 2 large eggs: They bind everything together and add structure and richness. Make sure they’re at room temperature to create a smoother, fluffier dough.
- 1 ½ teaspoons pure vanilla extract: The secret flavor booster! Pure vanilla adds a warm, complex depth that imitation vanilla just can’t match.
- 2 ¾ cups all-purpose flour: The foundation of our bar. Chef’s Insight: For a slightly softer bar, you can replace ¼ cup of the all-purpose flour with cornstarch. It’s a little baker’s hack for a more tender crumb!
- 1 teaspoon baking powder: Our leavening agent, which gives the bars a gentle lift and a soft, cake-like texture instead of being dense.
- ½ teaspoon salt: Never skip the salt! It’s the flavor enhancer that makes all the sweetness pop and balances the rich butter.
For the Dreamy Raspberry Frosting:
- ½ cup (1 stick) unsalted butter, softened: The base for our creamy, spreadable frosting. Same softening rules apply!
- 2 cups powdered sugar: Also known as confectioner’s sugar, it dissolves beautifully for a silky-smooth frosting without any graininess.
- 2 tablespoons crushed freeze-dried raspberries: This is my favorite trick! It gives the frosting an incredible natural raspberry flavor and that gorgeous pink color without adding liquid. Substitution Tip: No freeze-dried raspberries? No problem! You can use 2 tablespoons of seedless raspberry jam. Your frosting will be a bit softer and sweeter, but just as delicious.
- 2-3 tablespoons milk or heavy cream: This is how we achieve the perfect spreading consistency. Start with 2 tablespoons and add the third if your frosting is too thick. Heavy cream will make it extra rich and luxurious.
- ½ teaspoon vanilla extract: A little more vanilla to round out the fruity flavors in the frosting.
- Optional: Extra freeze-dried raspberry powder for dusting: For that professional, bakery-style finish! Just blitz a few more freeze-dried raspberries in a blender until it’s a fine powder.
Let’s Bake! Your Step-by-Step Guide to Sweet Success
Ready to create some magic? Follow these steps, and you’ll be a sugar cookie bar superstar in no time. I’ve packed this section with all my favorite kitchen hacks to ensure your bars turn out perfect.
- Preheat & Prep: First things first, get that oven preheating to a cozy 350°F (175°C). Now, grab your 9×13-inch baking pan. This is my go-to for bar cookies! Line it with parchment paper, leaving a little overhang on two opposite sides. Chef’s Hack: This little “sling” is a game-changer! It lets you lift the entire slab of cookie bars out of the pan once they’re cool, making frosting and cutting an absolute breeze. No more awkward slicing in the pan!
- Cream the Good Stuff: In a large bowl, use an electric mixer (or some serious elbow grease with a wooden spoon) to cream together the softened butter and granulated sugar. We’re not just mixing here; we’re creaming. Beat it on medium-high speed for a good 2-3 minutes, until the mixture is light, pale, and wonderfully fluffy. This step incorporates air, which is key for a soft texture!
- Incorporate the Wet Ingredients: Beat in the eggs, one at a time, making sure each one is fully incorporated before adding the next. Then, pour in that lovely vanilla extract and mix it all together. Scrape down the sides of the bowl with a spatula—this ensures everything gets mixed evenly, and no pocket of butter gets left behind.
- Bring in the Dry Team: In a separate bowl, whisk together your flour, baking powder, and salt. This little pre-mix ensures the leavening and salt are evenly distributed throughout the flour, so you get a consistent bite in every bar. Now, with your mixer on low speed, gradually add the dry ingredients to the wet ingredients. Mix until the dough just comes together and no dry streaks of flour remain. Chef’s Tip: Don’t overmix! Overworking the dough can lead to tougher bars.
- Press & Bake: Transfer your cookie dough to your prepared pan. I like to use lightly floured hands or the bottom of a flat measuring cup to press the dough into a smooth, even layer. Get it into all the corners! Pop the pan into your preheated oven and bake for 18-22 minutes. You’re looking for set edges and a top that’s just barely starting to turn golden. The center might still look a tiny bit soft—that’s perfect! It will continue to set as it cools, giving you that famously soft, chewy texture. Chef’s Test: Give the pan a gentle jiggle. If the center jiggles like jello, it needs more time. If it’s just a slight, firm jiggle, it’s done!
- The All-Important Cool Down: This is the hardest part, I know! But you must let the cookie base cool completely in the pan on a wire rack before you even think about frosting it. If you frost a warm base, the butter in the frosting will melt, and you’ll have a delicious but runny mess. I sometimes pop the pan in the fridge to speed this up if I’m impatient!
- Whip Up the Raspberry Frosting: While the base is cooling, let’s make that pretty pink frosting! In a clean bowl, beat the softened butter until it’s smooth and creamy. Gradually add the powdered sugar, crushed freeze-dried raspberries, vanilla, and 2 tablespoons of milk/cream. Start on low speed unless you want a powdered sugar snowstorm in your kitchen! Once combined, crank the speed to medium-high and beat for 1-2 minutes until light and fluffy. If it seems too thick, add the remaining tablespoon of milk, one teaspoon at a time, until it’s spreadable.
- The Grand Finale: Frost & Finish! Once the base is completely cool, use an offset spatula or a butter knife to spread that beautiful raspberry frosting all over the top in a thick, even layer. For the final flourish, dust the top with your optional freeze-dried raspberry powder. It adds a pop of color and an extra burst of fruity flavor. So pretty!
How to Serve These Beautiful Bars
Okay, the moment of truth! Using the parchment paper sling, carefully lift the entire slab of frosted bars out of the pan and onto a cutting board. Using a sharp knife, cut them into squares. I like to wipe my knife clean between cuts for super clean, pretty edges.
These bars are a showstopper all on their own, piled high on a cute cake stand for a party or potluck. For an extra-special touch, serve them with a scoop of vanilla bean ice cream on the side—the combination of warm (if you gently reheat a bar), soft cookie and cold ice cream is next-level. They also pair perfectly with a hot cup of coffee to balance the sweetness or a cold glass of milk for the ultimate nostalgic treat. However you serve them, get ready for the compliments to roll in!
Get Creative! Fun Flavor Twists & Swaps
I love a recipe that you can make your own! Here are a few of my favorite ways to mix things up with these sugar cookie bars:
- Lemon Blueberry Bliss: Swap the raspberry in the frosting for 2 tablespoons of lemon juice and 1 teaspoon of lemon zest. Fold in ½ cup of dried blueberries into the cookie dough before pressing it into the pan for a bright, sunny flavor.
- Chocolate Chip Cookie Bar Base: Feeling classic? Fold 1 cup of semi-sweet or milk chocolate chips into the cookie dough before baking. Top with a simple vanilla frosting (just omit the raspberries and add an extra splash of milk).
- Funfetti Celebration Bars: Add ½ cup of rainbow sprinkles to the cookie dough along with the dry ingredients. Top with the raspberry or a classic vanilla frosting and more sprinkles! Instant party.
- Gluten-Free & Dairy-Free Friendly: You can easily make this recipe work for various diets! Use a 1:1 gluten-free all-purpose flour blend for the base. For the frosting, use a plant-based butter stick (like Miyoko’s or Earth Balance) and your favorite non-dairy milk.
- Strawberry Fields Forever: Not a raspberry fan? Use freeze-dried strawberries instead! They’ll give you a beautiful, slightly lighter pink frosting and a lovely strawberry shortcake vibe.
From My Kitchen to Yours: A Few Extra Thoughts
This recipe has seen a few iterations in my kitchen. The first time I made it, I got a little overzealous with the freeze-dried raspberries and ended up with a frosting that was a shocking shade of fuchsia and a little too tart. My husband took one bite, his eyes went wide, and he said, “Wow, that’s… PINK!” We still laugh about it. The measurements I’ve given you here are the perfect balance after a bit of trial and error.
I also love that this recipe is so forgiving. Even if your bars are a little overbaked or underbaked, that thick layer of frosting covers a multitude of sins! The goal is to have fun and enjoy the process. After all, the best recipes are the ones made with a happy heart and a slightly messy kitchen.
Your Questions, Answered!
I’ve gotten a few questions about this recipe over time, so I thought I’d answer the most common ones right here!
Q: My frosting isn’t very pink, even with the freeze-dried raspberries. What can I do?
A: The color can vary depending on the brand of raspberries! If you want a more vibrant pink, feel free to add a drop or two of red food coloring. Alternatively, you can add another tablespoon of crushed raspberries, but be mindful that it might make the frosting a bit seedier and tarter.
Q: Can I make these bars ahead of time?
A: Absolutely! They are a fantastic make-ahead dessert. You can bake and frost them, then store them in an airtight container at room temperature for up to 2 days, or in the fridge for up to 5 days. I think they taste best at room temperature, so I’ll take them out of the fridge about an hour before serving.
Q: My cookie bars came out really dense. What happened?
A: This usually happens for one of two reasons. First, you might have overmixed the dough after adding the flour. Remember, mix until *just* combined! Second, make sure your baking powder is fresh. If it’s old, it won’t provide the proper lift, resulting in a denser bar.
Q: Can I freeze these?
A> You bet! Freeze the unfrosted, baked cookie base tightly wrapped for up to 3 months. Thaw overnight in the fridge and frost the next day. You can also freeze the frosted bars; place them in a single layer on a baking sheet to “flash freeze” for an hour, then transfer to a freezer-safe container. They’ll keep for 1-2 months.
Nutritional Information (Because We’re All About Balance!)
Alright, let’s talk numbers! I’m a big believer in enjoying indulgent treats mindfully. This nutritional info is an estimate based on one bar if you cut the pan into 16 equal squares. Remember, this can vary based on the specific brands of ingredients you use.
Per Bar (Approximately):
Calories: ~310 | Total Fat: 15g | Saturated Fat: 9g | Cholesterol: 55mg | Sodium: 85mg | Total Carbohydrates: 40g
Final Thoughts
Well, my friend, if you’ve made it this far, you’re officially part of the sugar-cookie-bar squad. These Raspberry Frosted Sugar Cookie Bars aren’t just a dessert — they’re a little escape, a nostalgic hug, and a reminder that joy can be as simple as a soft cookie and a swipe of pink frosting. Whether you’re baking them for a celebration, a loved one, or just because you deserve something sweet today, I hope these bars bring a burst of color and comfort into your kitchen.
From my messy, raspberry-scented counter to yours — happy baking, and don’t forget to savor every single bite.