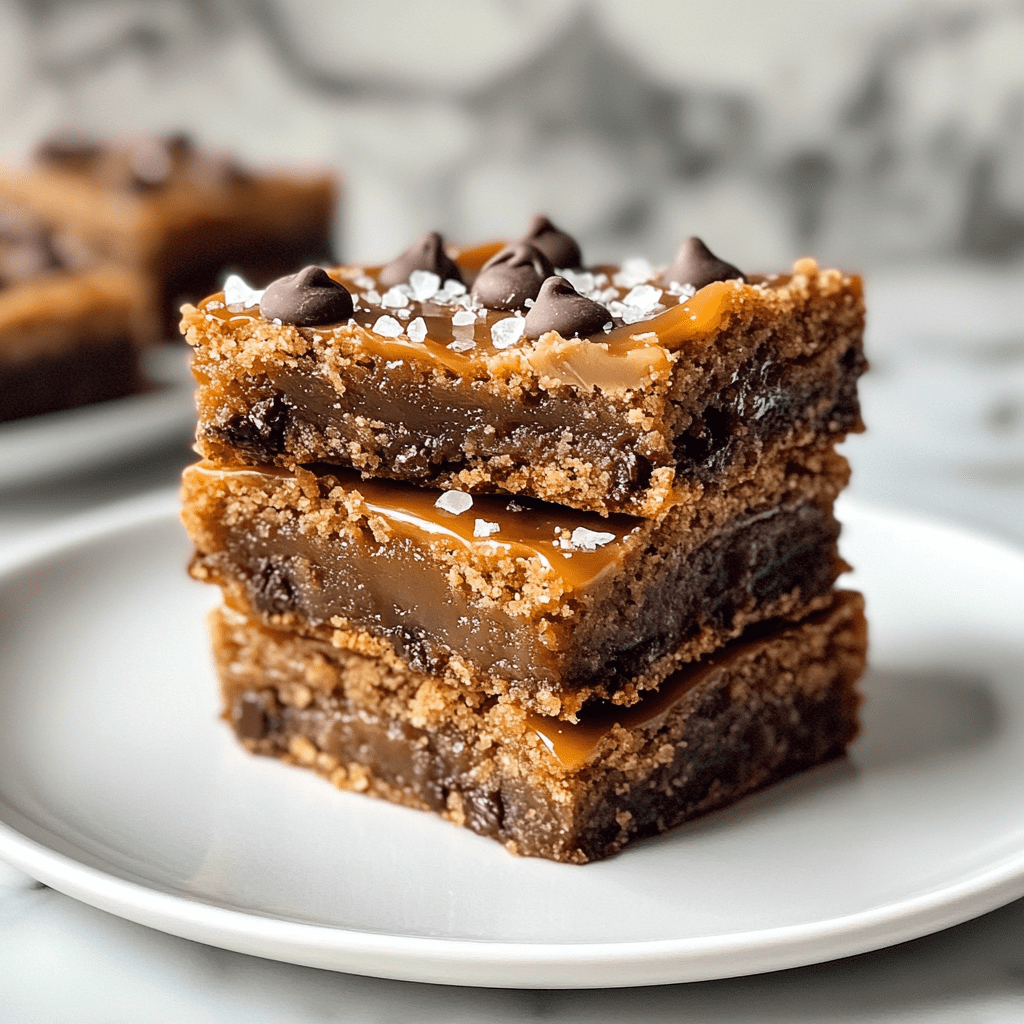
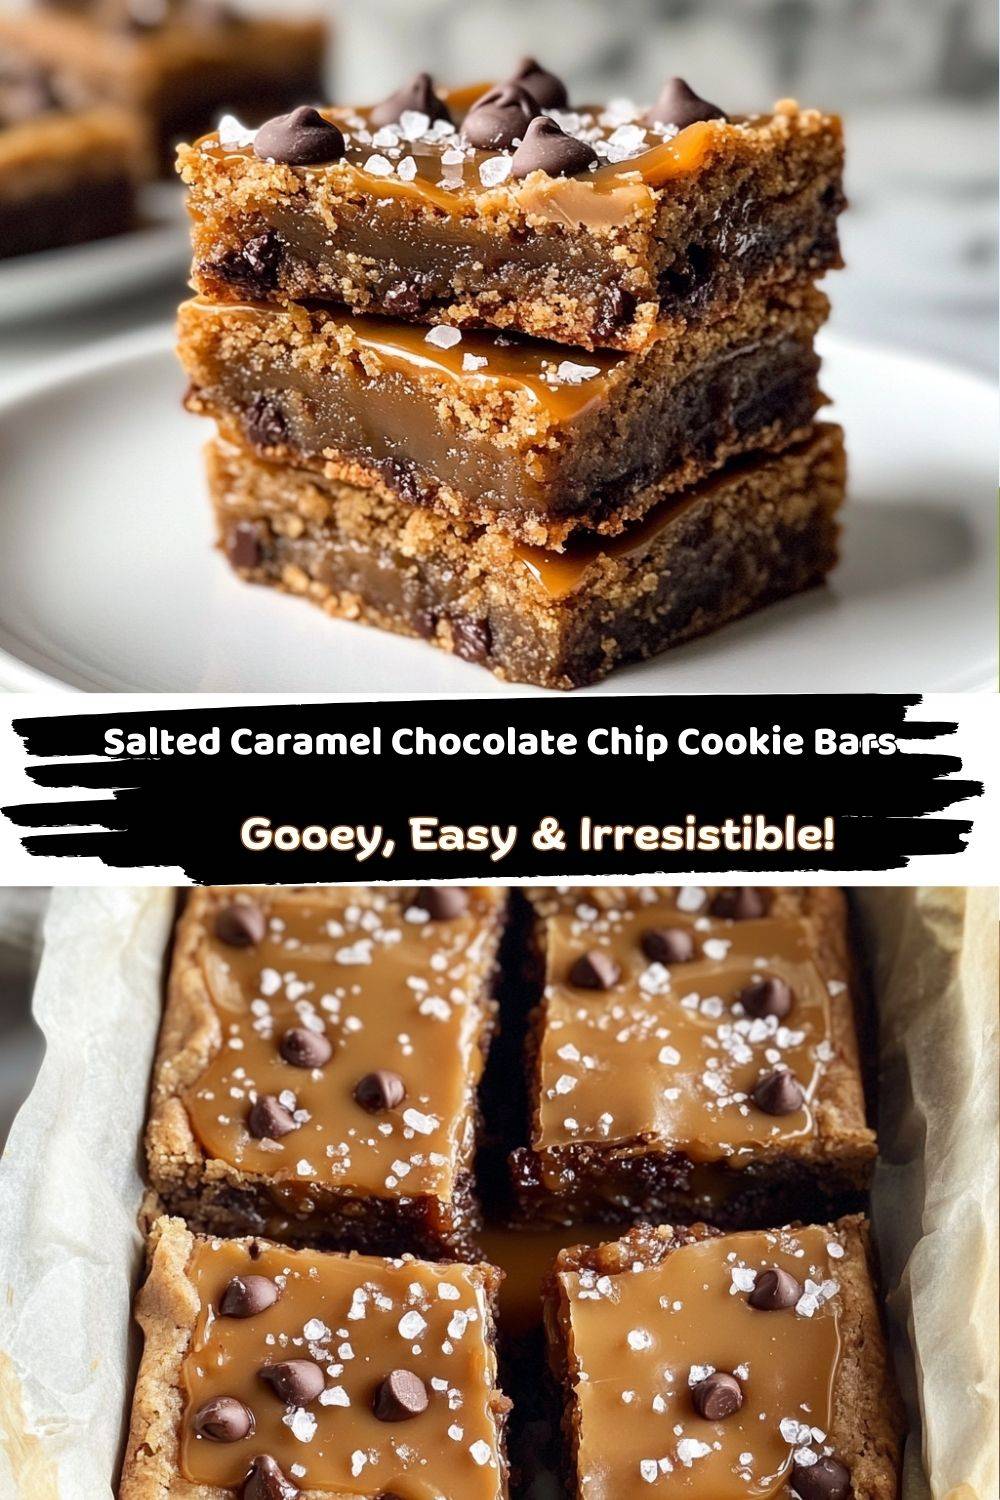
🍪 The Ultimate Salted Caramel Chocolate Chip Cookie Bars: Your New Favorite Indulgence
Hey there, fellow foodies! Chef Emily here, ready to spill the beans (or should I say chocolate chips?) on the most decadent, crowd-pleasing dessert you’ll ever bake. Picture this: a buttery chocolate chip cookie base, layered with oozy salted caramel, and topped with more melty chocolate chunks. These Salted Caramel Chocolate Chip Cookie Bars are the lovechild of your favorite cookie and a million-dollar candy bar—minus the fuss.
Now, I know what you’re thinking: “Caramel? From scratch? Sounds risky.” But trust me, this recipe is foolproof. Whether you’re a baking newbie or a seasoned pro, these bars are your ticket to becoming the MVP of potlucks, birthday parties, or “I-survived-Monday” celebrations. Plus, they’re Grandma-approved—and if there’s one thing grandmas know, it’s how to make treats that taste like a hug.
Let’s get one thing straight: these aren’t just cookie bars. They’re a nostalgia trip. They’re the kind of dessert that’ll have your friends texting you at midnight for the recipe. So tie on your favorite apron, crank up that oven, and let’s turn your kitchen into a caramel-scented paradise. Pro tip: Keep napkins handy. Things are about to get deliciously messy.
👵 Sneaking Sweets & Stealing Hearts: My Caramel-Fueled Childhood
Let me take you back to 1998. Spice Girls posters on the wall, butterfly clips in my hair, and a 10-year-old me perched on Grandma’s yellow linoleum countertop. Every Sunday, she’d whip up these cookie bars “for the church potluck.” Keyword: *supposedly* for the potluck. But between you and me? We both knew at least a quarter of the pan never made it out the door.
I’ll never forget the first time I “helped” make them. Grandma let me unwrap the caramels—a job I took VERY seriously—while she told stories about baking for my dad’s Little League team. But when she turned her back to check the oven? I went full cookie ninja. I’ll admit it: I swiped a still-steaming square straight from the pan. The caramel burned my fingertips, the chocolate smeared on my chin, and Grandma pretended not to notice… though she did “mysteriously” start making double batches after that.
Fast-forward 20+ years, and I’ve tweaked her recipe (sorry, Grams—your secret’s out!). But that magic combo of crispy edges, chewy centers, and salty-sweet caramel? That’s 100% pure, unadulterated childhood joy. And now? It’s yours.
🛒 What You’ll Need: Pantry Staples & Pro Swaps
- All-purpose flour (2 1/4 cups): The backbone of our bars. For gluten-free friends, swap in 1:1 GF flour—I like King Arthur’s blend.
- Baking soda (1/2 tsp): Not powder! This gives lift without making the bars cakey.
- Salt (1/2 tsp): Balances the sweetness. Use fine sea salt here—save the flaky stuff for topping.
- Unsalted butter (3/4 cup, melted): Browned butter takes these to VIP status. Just melt it until nutty and golden!
- Sugars (1 cup brown + 1/2 cup granulated): Brown sugar = chew. White sugar = spread. Together? Cookie perfection.
- Egg + egg yolk: Yolk adds richness. Save the white for morning omelets!
- Vanilla extract (2 tsp): Splurge on the good stuff—or use 1 tsp vanilla + 1 tsp bourbon for depth.
- Semi-sweet chocolate chips (2 cups): 60-70% cacao chips work best. Feeling fancy? Chop up a chocolate bar.
- Soft caramels (11 oz bag): Werther’s or Kraft work. Shortcut: Use 1 cup store-bought caramel sauce + 1/4 tsp salt.
- Heavy cream (2 tbsp): Makes the caramel drizzle-able. Milk works in a pinch, but cream is queen.
- Flaky sea salt: Maldon’s my ride-or-die. Those pyramid flakes? *Chef’s kiss*
👩🍳 Let’s Bake: Step-by-Step Magic
Step 1: Preheat & Prep
Fire up your oven to 325°F (165°C). Grab a 9×13” pan—no need to grease it if you’re using parchment paper. Pro tip: Let the parchment hang over the sides for easy lifting later. Your future self will thank you when slicing!
Step 2: Dry Team Assemble!
Whisk together flour, baking soda, and salt. Fun fact: Whisking = DIY sifter. No lumps, no problem! Set aside.
Step 3: Butter Business
In a big bowl, mix melted butter and both sugars. Stir until it looks like glossy sand. Add egg, yolk, and vanilla. Mix until smooth—no need for a mixer here, but biceps help!
Step 4: Bring It Together
Gradually add dry ingredients to wet. Mix until JUST combined—overmixing = tough bars. Fold in chocolate chips. The dough will be thick; that’s good! We want layers, not lava flow.
Step 5: Layer Up
Press half the dough into your pan. Wet your fingers or spatula to prevent sticking. Now, melt caramels and cream over low heat, stirring constantly. Once smooth, pour over dough. Dollop remaining dough on top—don’t stress about covering every inch. Rustic is charming!
Step 6: Bake & Bask
Bake 30-35 minutes until golden at the edges. The center will look underdone—that’s the caramel talking. Let cool COMPLETELY (2+ hours) before slicing. I know, I know—patience is hard. But rushing = caramel chaos.
Step 7: Salt & Serve
Sprinkle with flaky salt. Cut into squares—a plastic knife prevents sticking. Serve with milk, coffee, or straight from the pan. No judgment here.
🎉 Serving Vibes: How to Make These Bars Shine
Want to level up? Drizzle extra melted caramel on plates before placing bars. Top with vanilla ice cream and a pinch of salt—hot-cold contrast is EVERYTHING. For parties, cut into bite-sized squares and stick with toothpicks. Bonus points: Package leftovers (ha!) in cellophane with baker’s twine for foodie gifts.
✨ Mix It Up: 5 Killer Twists
- Pretzel Crunch: Add 1/2 cup crushed pretzels to the dough. Salty crunch FTW!
- Espresso Kick: Mix 1 tbsp instant espresso powder into the caramel. Coffee + chocolate = soulmates.
- Vegan Delight: Use plant-based butter, flax eggs, and vegan caramels. Skip the cream—coconut milk works!
- Peanut Butter Swirl: Swirl 1/2 cup warmed PB into the caramel layer.
- Dark & Stormy: Swap chocolate chips for white chocolate, and add 1 tsp grated ginger to the dough.
📝 Chef Emily’s Diary: Caramel Confessions
True story: The first time I made these solo, I used hard candies instead of caramels. Let’s just say I chipped a tooth and learned a valuable lesson about reading labels. These days, I keep a bag of soft caramels in my emergency dessert stash—right next to the wine.
Over the years, I’ve tweaked the salt levels (more is more!), tested every chocolate brand under the sun (Ghirardelli wins), and even baked these in a campground oven. Pro tip: If your caramel seizes up? Add a splash of cream and keep stirring. Crisis averted!
❓ FAQs: Saving Your Bars from Disaster
Q: My caramel layer turned rock-hard. Help!
A: Did you use the right caramels? Soft, chewy ones are key. If using sauce, avoid “thick” versions—they’re too sugary. Still hard? Microwave individual bars for 8 seconds before serving.
Q: Can I freeze these?
A: Absolutely! Freeze sliced bars in layers with parchment between. Thaw at room temp—or microwave for 15 seconds if you’re impatient like me.
Q: Why is my top layer sinking into the caramel?
A: You might’ve pressed the dough too thin. Next time, leave marble-sized chunks when topping—they’ll bake into perfect cookie islands.
📊 Nutrition Facts (Because Adulting)
Per bar: Calories 250 • Fat 13g • Carbs 32g • Protein 2g. Worth every bite! Store in an airtight container for up to 5 days… if they last that long.y
🍫 Final Thoughts: The Cookie Bar That’ll Ruin You for All Other Desserts
Let’s be real—once you’ve tasted these Salted Caramel Chocolate Chip Cookie Bars, there’s no going back. They’re the kind of dessert that doesn’t just satisfy a sweet tooth… it straight-up spoils it. Every bite is a warm hug of buttery dough, melty chocolate, and that glorious river of salted caramel running through the middle. Crunchy edges? Chewy centers? Flaky salt sparkles? Yes, yes, and yes.
These bars aren’t just easy—they’re dangerously easy. The kind you whip up “just to have something sweet,” only to realize half the pan disappeared during a “quality control” taste test. (We’ve all been there.)
So whether you’re baking for a party, bribing your coworkers, or indulging in a little self-love moment with a fork and a pan (no shame), these bars deliver every. single. time.