Santa’s Secret Stash: The Easiest, Most Festive No-Bake Peanut Butter Squares
Hey there, my fellow food lover! Chef Emily here, waving at you from my flour-dusted kitchen. Can you feel it? That magical, twinkly, sugar-cookie-scented buzz in the air? It’s Christmas time, and my heart is just soaring. It’s the season for cozy sweaters, glowing lights, and, let’s be real, an avalanche of delicious treats.
But here’s the thing I’ve learned after years of holiday hosting and frantic last-minute baking: sometimes, the recipes that bring the most joy aren’t the complicated, five-layer showstoppers. Nope. The real MVPs are the ones you can whip up in ten minutes flat, with zero oven stress, that make everyone’s eyes light up. The ones that look like you fussed for hours, but are secretly the easiest thing in your recipe arsenal.
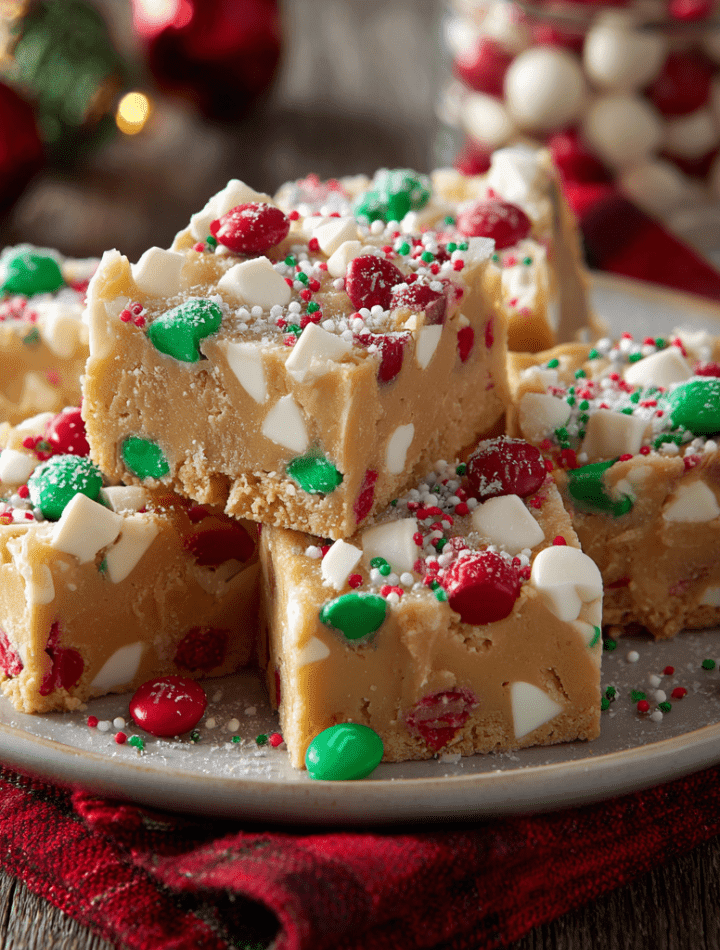
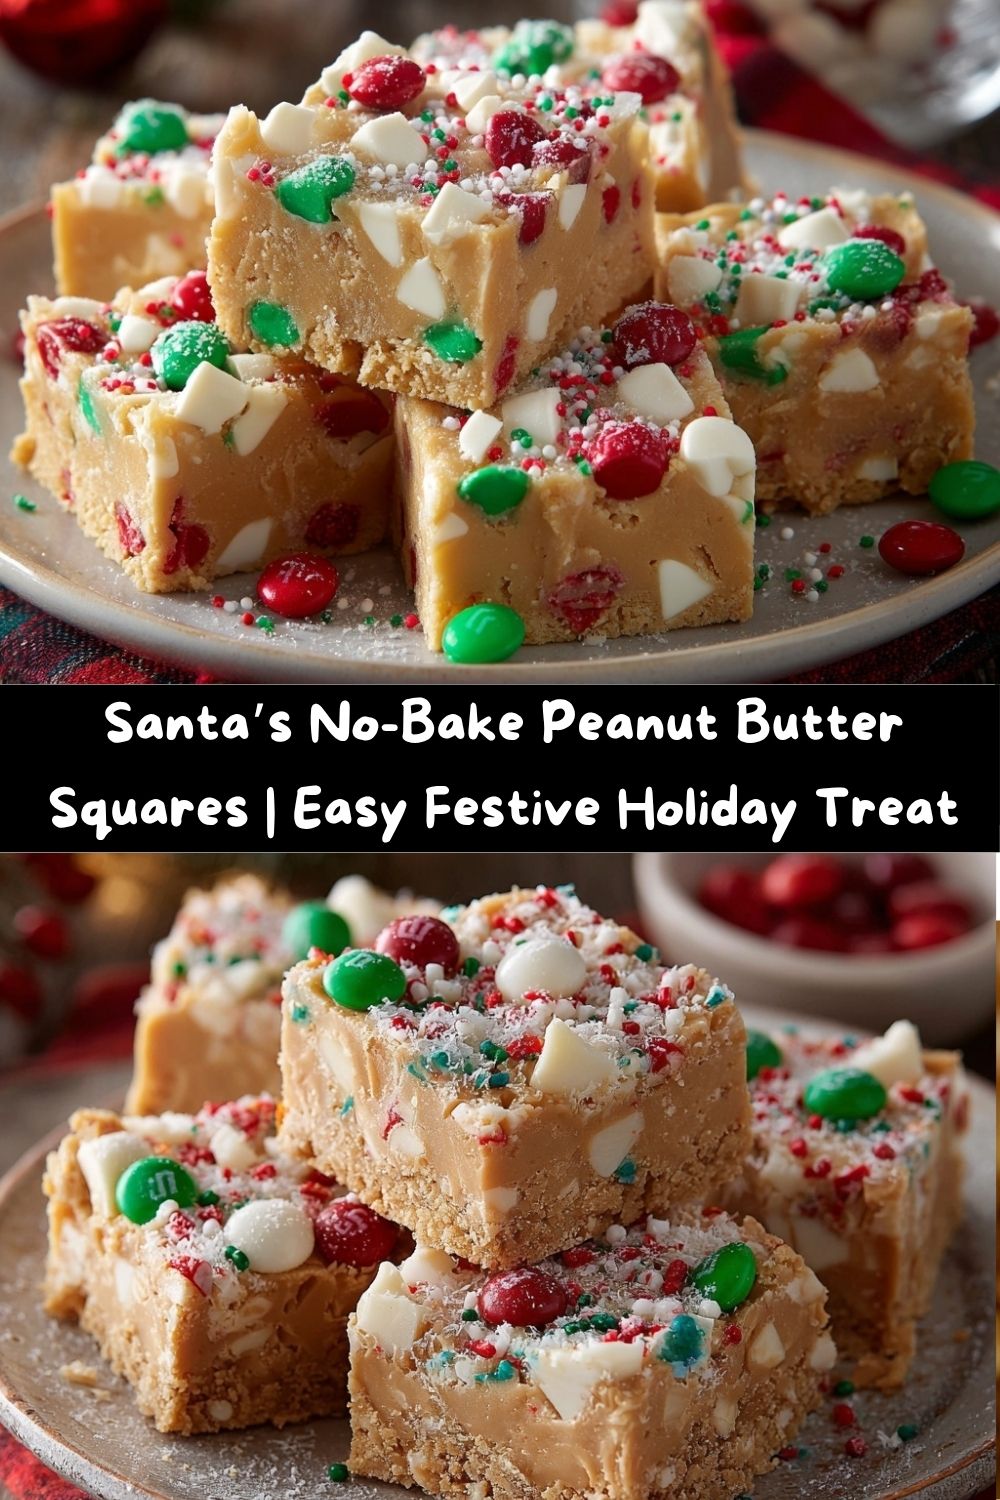
That, my friend, is the magic of these Santa’s Peanut Butter Squares. Imagine a fudgy, rich peanut butter base that’s somehow both creamy and crumbly, all at once. Now, picture it topped with a confetti of melty white chocolate, cheerful M&Ms, and the most festive holiday sprinkles you can find. These bars are an explosion of texture and pure, unadulterated happiness.
They are the ultimate treat to leave out for the big man in red on Christmas Eve—a guaranteed ticket to the Nice List, if you ask me. But let’s be honest, you’re definitely going to need to make a double batch, because these disappear faster than you can say “Ho Ho Ho!” So, tie on your favorite apron (the messy one is always the best), and let’s make some holiday magic together.
A Spoonful of Christmas Memories
This recipe always takes me right back to my grandma’s kitchen. She was the queen of no-bake treats. While other families had elaborate cookie platters, my grandma would be in the corner, humming a Christmas carol, melting peanut butter and butter on her stovetop. The scent alone was enough to make my brother and me abandon whatever new toy we were playing with and come running.
We’d jostle for position, hoping to be the one to “clean” the spoon. She’d always pretend the bowl needed a more thorough scraping, just to give us both an extra taste. Her version was simple—just the base, sometimes with a handful of chocolate chips if she was feeling fancy. Over the years, I’ve taken her foundation and built my own little holiday skyscraper on top, adding the white chocolate and colorful candies. It’s my way of honoring her simple, delicious wisdom while adding my own splash of festive confetti. Every time I press those M&Ms into the warm surface, I can almost hear her humming “Jingle Bells.”
Gathering Your Holiday Crew: The Ingredients
One of the best things about this recipe is that you probably have most of these ingredients in your pantry right now! Let’s break them down. This isn’t just a list; it’s your flavor roadmap.
- ½ cup unsalted butter: This is the rich, creamy foundation of our base. Using unsalted lets you control the saltiness, especially since peanut butter can vary. Chef’s Tip: If you only have salted butter, that’s totally fine! Just maybe skip adding any extra salt if you decide to sprinkle some in.
- 1 cup creamy peanut butter: The star of the show! I recommend a standard, no-stir creamy peanut butter like Jif or Skippy for the best consistency. The natural, oily kinds can make the base a bit greasy. This is our glue and our flavor powerhouse.
- 2 cups powdered sugar: This sweetens the deal and gives the bars their signature fudgy, firm-yet-tender texture. It dissolves beautifully into the warm peanut butter mixture.
- 2 cups graham cracker crumbs: Don’t sleep on this ingredient! This isn’t just a filler; it adds a subtle honey-kissed flavor and a wonderful crumbly texture that keeps the squares from being too dense. Chef’s Insight: You can buy pre-crumbled crumbs or throw whole graham crackers into a zip-top bag and roll them with a rolling pin. It’s a fantastic way to get out any pre-holiday stress!
- ½ teaspoon vanilla extract: The secret background singer that makes all the other flavors pop. It adds a warm, cozy depth that just screams “homemade.”
- 1 cup white chocolate chips: We’re scattering these on top while the base is still warm, so they get all melty and dreamy. When you press them in, they create a gorgeous, swirly, semi-frosting layer.
- ½ cup red and green M&Ms: The festive confetti! They add a delightful crunch and that classic Christmas color palette. Feel free to use mini M&Ms for more coverage, or even the peanut butter ones for a double PB punch!
- ¼ cup holiday sprinkles: Because more is more when it comes to sprinkles at Christmas! They add a pop of color and a little bit of crunchy fun. Use jimmies or quins for the best texture.
Let’s Build Some Magic: The Step-by-Step Guide
Ready? This is where the fun begins. We’re going from zero to hero in about ten minutes of active time. I’ll be with you every step of the way with my little chef hacks!
- Melt the Butter & Peanut Butter: Grab a medium-sized saucepan and place it over low heat. Add your butter and peanut butter. Now, patience is key here! We’re not trying to boil or brown anything; we just want a smooth, silky, unified mixture. Stir it frequently with a spatula until it’s completely melted and combined. It should look like a gorgeous, pourable peanut butter dream. Chef’s Hack: Low and slow is the motto. High heat can cause the fats to separate, and we want everything cohesive and happy.
- Combine the Base: Take the saucepan off the heat. This is important! We don’t want to cook the other ingredients. Now, stir in that ½ teaspoon of vanilla extract. Next, add your powdered sugar and graham cracker crumbs. I like to add them both at once. It might seem like a lot, but trust the process! Stir, stir, stir until every last bit of dry ingredient is fully incorporated. You’ll end up with a thick, fudgy, and incredibly fragrant mixture. Little Tip: If you have a few stubborn pockets of powdered sugar, just switch to clean hands and squish it all together. It’s the best tool for the job!
- Press it In: Grab a 9×9-inch baking pan. For the easiest cleanup and removal, I highly recommend lining it with parchment paper, leaving a little overhang on two sides. If you don’t have parchment, a light coating of butter or non-stick spray works too. Transfer your peanut butter mixture into the pan. Now, use your hands, a flat-bottomed glass, or a small spatula to press it down into a firm, even layer. Get it nice and compact—this ensures your squares won’t crumble later. Chef’s Secret: Lightly wet your fingers or the bottom of the glass to prevent sticking!
- The Festive Topping: Here comes the fun part! While the base is still warm from the saucepan, immediately sprinkle the entire surface with your white chocolate chips. The residual heat will start to soften them. Now, shower it with the M&Ms and holiday sprinkles. Don’t be shy! Once everything is scattered, gently press the toppings down into the soft base with your palms. This isn’t a shove, just a light pat to anchor them in place.
- The Chill Out: This is the hardest part: waiting. Pop the entire pan into the refrigerator for at least 1 hour, or until the squares are completely firm. This allows the butter and peanut butter to set up, giving you that perfect, sliceable texture. Pro Tip: If you’re in a serious hurry, the freezer will work in about 20-25 minutes! Just don’t forget about them.
- Slice and Serve! Once firm, use the parchment paper overhang to lift the entire block of deliciousness out of the pan. Place it on a cutting board and use a sharp knife to slice it into 16 squares (or 25 smaller ones if you’re serving a crowd). For super clean cuts, you can wipe your knife clean between slices.
Spreading the Joy: How to Serve These Beauties
Okay, the squares are set, and they look absolutely incredible. Now, how do we present them?
For Christmas Eve, I love placing a few of these on a small, decorative plate right next to the glass of milk for Santa. It feels so special and personal. For your holiday parties or cookie exchanges, stack them high on a festive platter or in a cute Christmas tin lined with wax paper. They look absolutely stunning and professional.
Pair them with a cold glass of milk, a hot cocoa with extra marshmallows, or a cozy cup of coffee. The rich peanut butter and sweet white chocolate are a match made in heaven with a bitter beverage to balance it all out. These squares are rich, so a little goes a long way—making them the perfect treat to have on hand for unexpected guests or a late-night holiday movie snack.
Make It Your Own: Fun Recipe Twists!
I love this recipe because it’s a fantastic canvas for your own creativity! Here are a few of my favorite ways to mix it up:
- The Chocolate Lover’s Dream: Swap the white chocolate chips for semi-sweet, milk, or even dark chocolate chips. Use holiday-colored chocolate M&Ms to keep the festive vibe.
- Nutty for Alternatives: Not a peanut butter family? No problem! You can use the same amount of almond butter or SunButter (made from sunflower seeds) for a nut-free version that’s just as delicious.
- Salty-Sweet Sensation: Sprinkle a light dusting of flaky sea salt (like Maldon) over the top right after you add the sprinkles. It cuts through the sweetness and elevates the flavors to a whole new level.
- Crunchy Christmas: Add ½ cup of crushed pretzels into the base along with the graham cracker crumbs for an amazing sweet-and-salty crunch.
- Festive Fruit & Nut: For a more “grown-up” twist, skip the M&Ms and sprinkles and top with a mixture of dried cranberries, chopped pistachios, and white chocolate chips. It’s elegant and delicious!
From My Kitchen to Yours: A Few Extra Thoughts
This recipe has evolved so much from my grandma’s simple version, and I have a feeling it will keep evolving in your kitchen, too! One of my funniest kitchen fails was the year I decided to “healthify” it by using the natural peanut butter. Let’s just say the squares never set, and we had to eat them with a spoon out of the pan! It was delicious, but not exactly plate-worthy. A good reminder that some classics are perfect just the way they are.
I also love making these with my kids now. They are at the perfect age to be in charge of the “sprinkle distribution,” and seeing their concentrated, joyful faces is better than any present under the tree. That’s what this is all about—creating memories and sharing love, one no-bake square at a time.
Your Questions, Answered!
Over the years, I’ve gotten a few common questions about this recipe. Let’s tackle them head-on!
Q: My base seems too crumbly and won’t hold together. What happened?
A: This usually means the butter-to-peanut-butter ratio was a bit off, or it wasn’t pressed firmly enough. Next time, make sure you’re using a standard, creamy peanut butter (not the natural kind that separates) and really pack that mixture into the pan. If it’s already made, don’t worry! Crumble it over ice cream—it’s a fantastic “mistake.”
Q: Can I freeze these peanut butter squares?
A> Absolutely! They freeze beautifully. Place the cut squares in a single layer on a parchment-lined baking sheet to freeze solid, then transfer them to a freezer bag or airtight container. They’ll keep for up to 3 months. Thaw in the fridge or at room temperature for about 15 minutes before serving.
Q: My white chocolate chips didn’t melt enough to create a frosting-like layer. Help!
A> This can happen if the base cooled down too much before you added the chips. No worries! Just pop the entire pan (toppings and all) under the broiler for literally 20-30 seconds. Watch it like a hawk! The goal is just to soften the chips, not brown them. Alternatively, you can melt the white chocolate chips separately and drizzle it over the top like a glaze before adding the M&Ms and sprinkles.
Q: How long do these last in the fridge?
A> Stored in an airtight container in the refrigerator, they will stay fresh and delicious for up to one week. The texture is best when they’re chilled!
Nutritional Information (For Your Info!)
I’m all about balance, and I believe that treats like these are an essential part of a happy life! Here’s a general nutritional breakdown per square (based on 16 squares from the recipe), so you can enjoy them mindfully.
- Calories: 290
- Total Fat: 17g
- Saturated Fat: 6g
- Cholesterol: 15mg
- Sodium: 110mg
- Carbohydrates: 30g
- Sugars: 20g
- Protein: 5g
Remember, these are estimates and can vary based on the specific brands of ingredients you use. The joy and memories they create, however, are immeasurable!
Final Sweet Thoughts
And there you have it! Your new go-to, no-fuss, superstar holiday treat. These Santa’s Peanut Butter Squares are more than just a dessert; they’re a little edible piece of holiday cheer. They represent simplicity, joy, and the magic of sharing something you made with love.
I am so grateful you spent this time in my virtual kitchen with me. Making these recipes and sharing these stories with you is my absolute favorite thing in the world. I hope these squares become a cherished part of your holiday traditions, just like they are in mine.
Now, I’d love to hear from you! Did you add your own twist? Did your family go crazy for them? Tag me on social @TastyChow or leave a comment below. Sharing your creations truly makes my day.
From my cozy, sprinkle-covered kitchen to yours, have the happiest, most delicious holiday season. Now, let’s chow down!