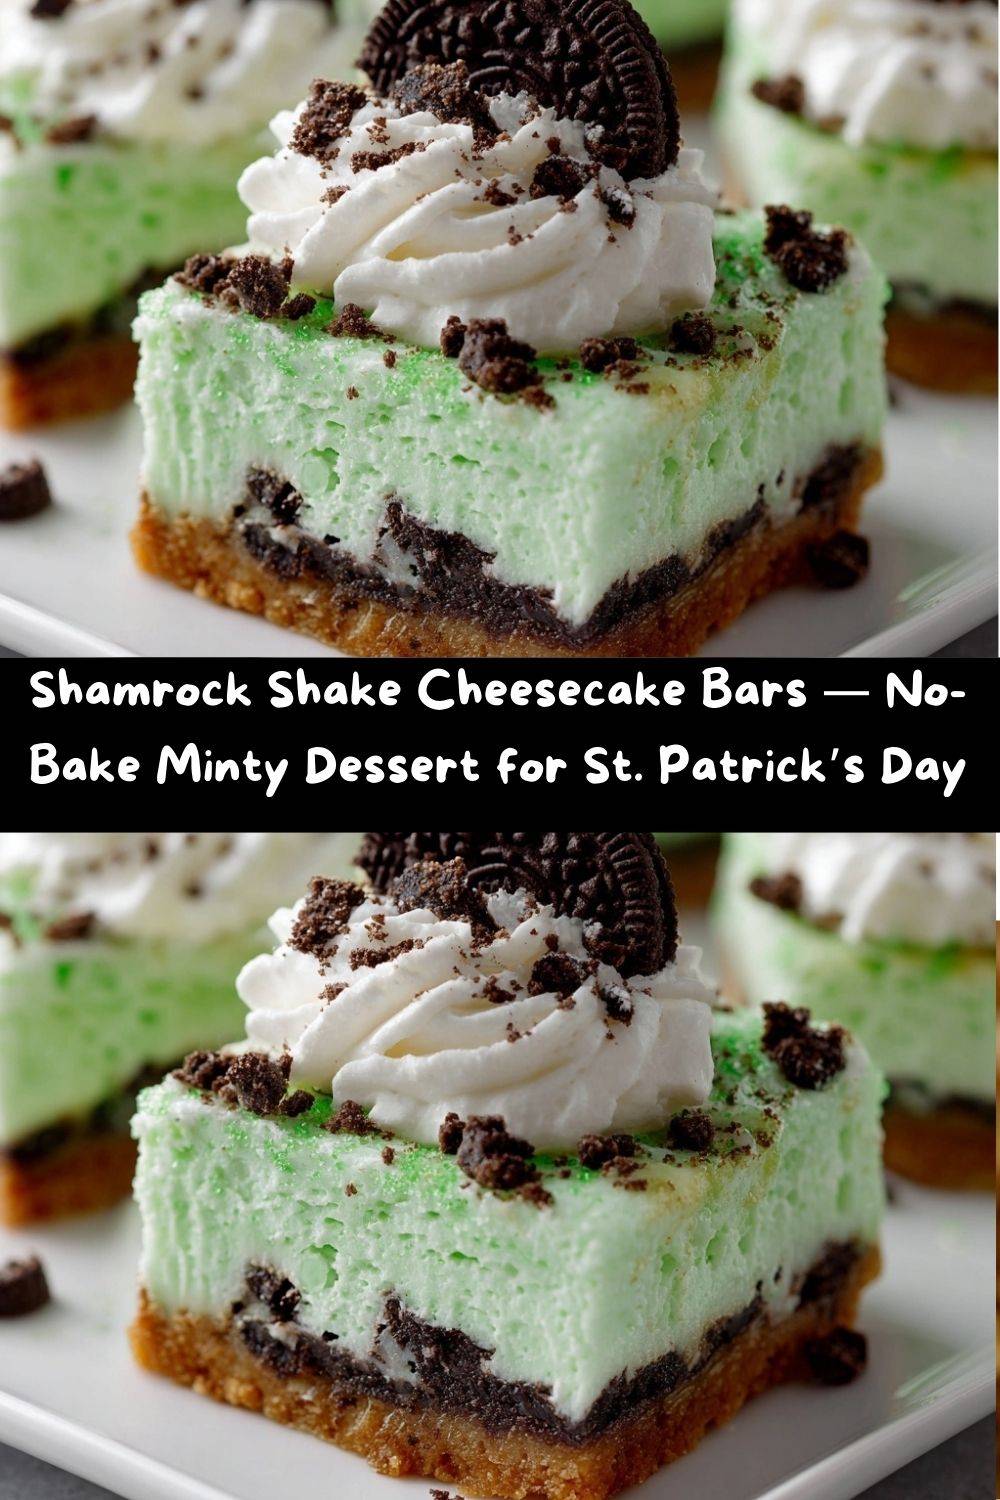
Shamrock Shake Cheesecake Bars: A Minty, Magical Bite of Joy
Hey friends, Emily here! Tell me, do you have a taste memory that just screams a certain time of year? For me, as soon as those first few green decorations pop up in March, my brain does a hard reset directly to my childhood, sitting in a booth with a frosty, minty, almost-impossibly-green milkshake. That iconic Shamrock Shake wasn’t just a treat; it was a celebration, a signal that spring and silliness were just around the corner.
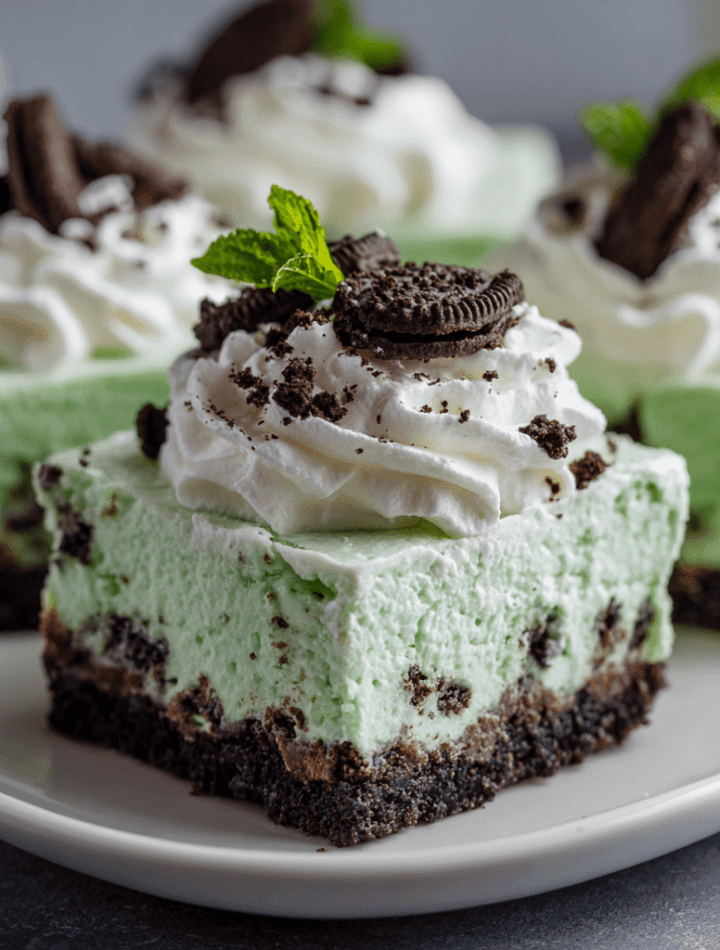
But as a grown-up (and a cheesecake fanatic), I started dreaming bigger. What if we could take all that nostalgic, minty-chocolatey joy and transform it into a dessert you can share, slice, and savor? A dessert that’s cool, creamy, and doesn’t require any fancy equipment? Enter my Shamrock Shake Cheesecake Bars. We’re talking a buttery, chocolate-mint Oreo crust, a cloud-like no-bake cheesecake layer infused with pure peppermint magic, all topped with a fluffy swirl of whipped cream. It’s the flavor of that beloved shake, reimagined into a handheld, party-perfect bar that’s guaranteed to make everyone at your table smile. So, grab your mixing bowl and your favorite shade of green food coloring—we’re about to make some delicious, minty memories together!
The Drive-Thru Dream That Started It All
My love for this flavor combo is 100% tied to my dad. He was the king of the “surprise treat” run. We’d be driving home from, well, anywhere, and he’d get this twinkle in his eye. “Feel like something green?” he’d ask, already turning the car toward the golden arches. It was our tiny, secret tradition. No siblings, no agenda—just me, him, two Shamrock Shakes, and about fifteen minutes of pure, sugary bliss and conversation. The mint was so refreshing, the whipped cream was the best part (always eaten with a spoon first, right?), and it felt wildly special.
When I started developing this recipe, I wanted to bottle that feeling. The creamy texture of the shake, the cool peppermint finish, and the crucial chocolate cookie crunch at the bottom. The first time I nailed the flavor balance and took a bite, it was a total time-travel moment. It tasted like a drive-thru window on a cool March evening, like laughing with my dad, like pure, simple joy. That’s the magic of food, isn’t it? It’s never just a dessert. It’s a story on a plate (or in a bar!). Let’s make yours.
What You’ll Need: Your Magical Minty Toolkit
Gathering your ingredients is the first step to kitchen success! Here’s everything you need, along with my little chef-y insights to guide you.
For the Dreamy Oreo Crust:
- 20 mint or chocolate sandwich cookies (like Oreos): Use the whole cookie, cream filling and all! The mint Oreos are a fantastic flavor booster, but classic chocolate work perfectly too. Chef’s Insight: If you’re in a pinch, about 1.5 cups of fine cookie crumbs will do.
- 4 Tbsp (½ stick) unsalted butter, melted: This is the glue! Unsalted lets you control the saltiness. Pro Sub: For a dairy-free crust, coconut oil works beautifully.
For the Cloud-Like Shamrock Cheesecake Filling:
- 225g (8 oz) full-fat cream cheese, softened: Full-fat is non-negotiable for that lush, creamy texture and stability. Leave it on the counter for 1-2 hours until it’s pliable. Chef’s Tip: Cold cream cheese = lumpy filling. Patience is key!
- ½ cup granulated sugar: This sweetens and helps create a smooth texture. You can reduce it slightly if you prefer, but don’t omit.
- 1 tsp pure peppermint extract: This is the HEART of the shake flavor! Use extract, not flavoring oil, for the best taste. It’s powerful, so measure carefully.
- 1 tsp pure vanilla extract: Vanilla is the best supporting actor. It rounds out the sharpness of the peppermint and adds depth.
- Green gel food coloring (to desired shade): Gel coloring gives vibrant color without thinning the filling. Start with a toothpick dab and build up! Liquid works in a pinch.
- 1 cup whipped topping (like Cool Whip), or stabilized whipped cream: This is our secret for an airy, light, no-bake texture that sets perfectly. Thaw frozen topping completely. Pro Swap: See Variations below for a homemade whipped cream method.
- Optional: ¼ cup mini chocolate chips: For a fun “chip” twist! Toss them in a bit of flour first to prevent sinking.
For the Festive Topping:
- Extra whipped topping or whipped cream: For piping or spreading. More fluff = more fun.
- Crushed cookies, sprinkles, chocolate shavings: Go wild! This is where you make it your own.
Let’s Build the Magic: Step-by-Step
Follow these steps, and you’ll have perfect bars. I’m talking you through it like you’re right here in my kitchen with me!
Step 1: The “No-Fuss, Just-Crush” Crust
First, line an 8×8-inch baking pan with parchment paper, leaving an overhang on two sides. This is your “cheesecake lifter”—you’ll thank me later when you’re pulling out perfect, clean slices! Now, toss your cookies into a food processor and pulse until you have fine, even crumbs. No processor? No sweat! Seal the cookies in a sturdy zip-top bag and roll, smash, or whack with a rolling pin until crumbly. It’s a great stress reliever! Pour the crumbs into a bowl, drizzle the melted butter over top, and mix with a fork until it looks like wet sand and holds together when you pinch it.
Chef Hack: Use the bottom of a measuring cup or glass to firmly and evenly press the crust into the pan. Really pack it down! This prevents a crumbly, falling-apart base. Pop the whole pan into the fridge to set while you make the filling.
Step 2: The Creamy, Dreamy Filling
In a large mixing bowl, beat your softened cream cheese with an electric mixer (or a LOT of arm strength) for about 30 seconds until it’s completely smooth and lump-free. Scrape down the bowl. Add the sugar and beat again for another minute until it’s fully incorporated and the mixture looks silky. Now, add the peppermint and vanilla extracts. Mix just to combine.
Time for color! Add your green gel food coloring a little at a time. I like a vibrant, “Shamrock Shake” green, but go for pastel or neon—it’s your party! Once you’ve reached your desired hue, it’s time for the magic ingredient: the whipped topping. This is the most important step: Use a spatula and fold gently. Stirring or beating aggressively will deflate the fluff and make your filling dense. Fold until no white streaks remain and the mixture is uniformly green and creamy.
Step 3: Assemble & The Big Chill
Pull your crust from the fridge. Scrape all that beautiful minty filling onto the crust. Using your spatula (or an offset spatula if you’re feeling fancy), spread it into a smooth, even layer, pushing it right to the edges.
Here’s the test of your willpower: COVER AND REFRIGERATE FOR AT LEAST 6 HOURS, BUT OVERNIGHT IS IDEAL. I know, I know. You want to dive in. But trust me, this time allows the flavors to marry and the bars to set up perfectly so you get clean, gorgeous slices. If you try to cut too soon, you’ll have a delicious mess. Patience, grasshopper!
Step 4: The Grand Finale (Decorating!)
Once fully set, use the parchment paper overhang to lift the entire slab of cheesecake out of the pan and onto a cutting board. This is the “ta-da!” moment. Now, get creative! Pipe or dollop on more whipped topping. Sprinkle with crushed Oreo crumbs, festive green sprinkles, or a drizzle of chocolate sauce. Using a large, sharp knife (wiped clean between cuts for pristine edges), slice into 9 or 12 bars.
How to Serve & Wow Your Crowd
Presentation is the final touch of love! For a St. Paddy’s party, arrange these vibrant green bars on a white platter with a dusting of gold or white sprinkles—so pretty! You can plate them individually on little dessert plates with a tiny mint leaf or a shamrock cookie on the side.
What to serve with them? A hot cup of coffee or a cold glass of milk are classic pairings that cut through the sweetness perfectly. For the adults, these bars are amazing alongside an Irish coffee or a glass of Baileys. Keep them chilled until the moment you serve them to maintain that perfect, firm-yet-creamy texture.
Make It Your Own: Fun Flavor Twists!
- The Chocolate Swirl: Before chilling, drizzle the top with melted chocolate (dark, milk, or white!) and use a toothpick to swirl it marbly and beautiful.
- Grasshopper Bars: Add 2 tablespoons of crème de menthe liqueur (instead of ½ tsp of the extract) for an adult-only, sophisticated twist. So good!
- “Shake” Float Style: Serve the bar in a bowl with a scoop of vanilla ice cream and a drizzle of hot fudge for the ultimate decadent dessert.
- Dairy-Free Delight: Use dairy-free cream cheese and coconut whipped topping. Ensure your cookies are vegan-friendly (many sandwich cookies are!).
- Hidden Chocolate Layer: After pressing in the crust, sprinkle a layer of mini chocolate chips or even a thin layer of hot fudge sauce before adding the cheesecake filling. Surprise!
From My Kitchen to Yours: A Few Parting Thoughts
This recipe has become a March staple in my house, but honestly, we make it year-round because that mint-chocolate craving knows no season! The first time I tested it, I may have gone a little overboard on the peppermint extract (think: toothpaste vibes). Lesson learned—it’s potent stuff! Start with a teaspoon and you can always add a tiny bit more if you’re a mint fiend.
I’ve also learned that the quality of your cream cheese really shows. A good, name-brand full-fat block makes all the difference in achieving that luxuriously smooth texture. Most of all, have fun with it! Cooking should be joyful. If your green isn’t perfect or your swirls are a little wild, it just adds to the charm. It will still taste incredible.
Your Questions, Answered!
Q: Can I make these bars ahead of time?
A: Absolutely, and I recommend it! They need that long chill anyway. You can make them up to 2 days in advance. Store them covered in the fridge. Add any whipped cream topping and sprinkles the day you plan to serve them for the freshest look.
Q: My filling is too soft/lumpy. What happened?
A: Two likely culprits: 1) The cream cheese wasn’t fully softened, leading to lumps. Ensure it’s at room temperature. 2) Not enough chilling time. The filling firms up in the fridge. If it’s still too soft after 6+ hours, your whipped topping may have been over-whipped or the ratio was off. It will still taste delicious—just serve it with a spoon as a mousse!
Q: Can I freeze Shamrock Shake Cheesecake Bars?
A: Yes! Freeze the undecorated, sliced bars on a parchment-lined tray until solid (about 2 hours), then transfer to a freezer-safe container for up to 1 month. Thaw in the fridge overnight before topping and serving. The texture will be slightly denser but still great.
FINAL THOUGHTS (Emily Walker Style)
At the end of the day, these Shamrock Shake Cheesecake Bars are more than a fun green dessert—they’re a slice of nostalgia, a wink to childhood traditions, and a sweet reminder that food has the power to make ordinary days feel just a little more magical. Every bite brings that cool, minty joy we all grew up with, but in a fresh, shareable way that fits right into grown-up life.
Whether you’re making them for St. Patrick’s Day, a family gathering, or simply because the mint-chocolate craving hits (we’ve all been there), I hope these bars bring you the same sense of delight they bring to my kitchen every year. Don’t stress about perfect swirls, perfect color, or perfect cuts—desserts made with joy always taste the best.
Here’s to minty memories, bright green treats, and desserts worth celebrating.
Until next time—keep whisking, keep creating, and keep finding magic in the little things.