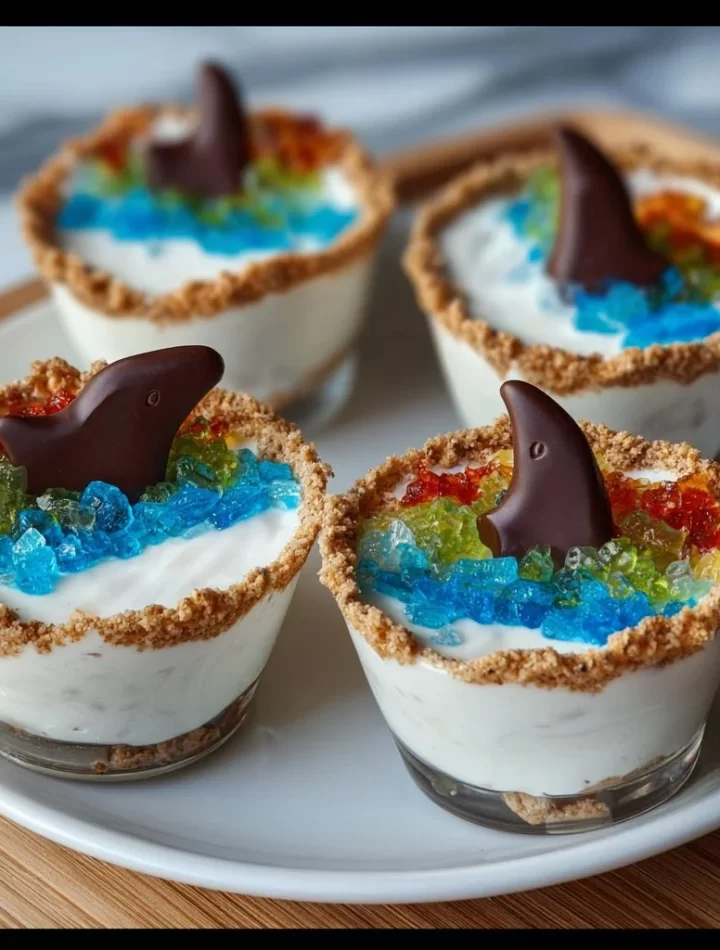
Dive into Deliciousness: Shark Snack Cups Recipe
Hey there, fellow food lover! 🦈 If you’re anything like me, there’s something exhilarating about bringing a splash of fun to the table. Today, we’re diving deep into a recipe that’s not just delicious but also brings out the kid in all of us—Shark Snack Cups! Perfect for parties, family movie nights, or just some quality time with your own little crew, these charming cups are like a mini ocean in a dish, complete with friendly sharks swimming amidst colorful waters.
Now, why are these Shark Snack Cups so special? Apart from being a hit with both kids and adults alike, they serve as a canvas for creativity in the kitchen! You can mix, match, and mold them to fit your flavor profile or dietary needs. Plus, they inspire giggles and conversations, particularly when those gummy sharks catch everyone’s attention.
Picture it: a chilly evening, comfy blankets, and the joyous laughter of loved ones filling the room as everyone digs into these delightful treats. They’re beautiful, tasty, and sure to create cherished memories, making every bite feel reminiscent of summer fun and beachy days. So grab your apron and let’s make something amazing that you can share with your family and friends!
Personal Story
I still remember the first time I concocted Shark Snack Cups. I was visiting my niece, who is a massive fan of sea creatures. You know those magical moments that seem to glow in your memory? Well, this was one of them. As I pulled out some colorful jelly and whipped cream while she was away, I decided to create something playful for her! The moment she returned to the kitchen and set her eyes on the cute, gummy sharks floating in their ocean of blue jelly, her face lit up like it was her birthday. The squeals of joy echoed through the house, and from that moment on, we made it a tradition to whip them up during every family gathering.
Those Shark Snack Cups became our special project, a way to bond, and a quirky treat we’d always look forward to sharing with others. I loved how the dessert brought us together, turning a simple afternoon into an unforgettable adventure. Now, every time I make these adorable snacks, I’m reminded of that magical day filled with laughter and creativity. And let me tell you, you don’t need a special occasion to whip these up; they’re perfect any time you need a little joy in your day!
Ingredients
Let’s gather our ingredients! Each element plays a unique role in creating these delightful Shark Snack Cups.
-
Blue Jell-O: This is the star of the show—the ocean! Choose your favorite flavor; blueberry or raspberry work best for that vibrant blue color. If you’re looking for an alternative, you can make your own gelatin using agar-agar for a vegetarian version.
-
Whipped Cream: Adds a fluffy, cloud-like layer and mimics the frothy sea waves. You can use store-bought whipped cream or, better yet, make your own by beating heavy cream with a bit of sugar and vanilla extract. For a dairy-free option, coconut whipped cream is a fabulous substitute.
-
Gummy Sharks: These cute little candies swim above the waves, creating a fun presentation! If you can’t find gummy sharks, sea turtles or fish candies can create a similar effect.
-
Crushed Graham Crackers: They represent the sandy shore, and their crunchy texture contrasts beautifully with the jelly and whipped cream. If you want a gluten-free option, use crushed almond cookies or gluten-free graham crackers.
-
Plastic Cup or Clear Dessert Cups: This is where all the magic happens! Using clear cups allows you to show off the vibrant layers. Fun fact: mason jars work beautifully, too, for a rustic touch!
Step-by-Step Instructions
Alright, time to channel your inner chef! Here’s how to bring these Shark Snack Cups to life.
Step 1: Prepare the Jell-O
Instructions: Start by preparing your blue Jell-O according to the package directions. Bring 1 cup of water to a boil in a saucepan, pour in the Jell-O powder, and stir until completely dissolved. Then, stir in 1 cup of cold water.
Tip: For an extra touch, consider making your Jell-O the night before and letting it set in the fridge overnight. This way, you’ll have that perfect, firm consistency.
Step 2: Set the Jell-O Cups
Instructions: Pour the prepared blue Jell-O into your clear cups, filling them about halfway. Place the cups in the refrigerator and let them set for at least 2-4 hours, or until firm to the touch.
Chef Hack: If you’re short on time, place the cups in a shallow dish filled with ice to help speed up the setting process. Just keep an eye on them to make sure they don’t freeze!
Step 3: Layer the Whipped Cream
Instructions: Once your Jell-O cups are set, it’s time to layer the whipped cream! Use a piping bag or a spoon to layer a generous amount of whipped cream on top of the Jell-O.
Tip: If you’re using a piping bag, consider using a star tip to create fun swirls that look like waves. It adds a delightful visual element!
Step 4: Grab the Crunch!
Instructions: Sprinkle a layer of crushed graham crackers on top of the whipped cream. This creates that sandy beach look and adds a fantastic crunch to your snack cups.
Chef Insight: Experiment with a mix of graham cracker crumbs and crushed cookies for a unique flavor twist. Oreos would work wonderfully for a chocolatey beach vibe!
Step 5: The Main Attraction
Instructions: Finally, top it all off with your gummy sharks! Place them gently on top of the crushed graham crackers, so they’re ready to swim in the waves.
Tip: If you want to take it up a notch, you can even add small candy shells or sprinkles to add some extra flair.
Step 6: Chill and Serve
Instructions: Place the assembled Shark Snack Cups back in the fridge to chill for another 30 minutes before serving. This step helps all the layers meld together and makes for easier serving.
Chef Note: If you have children helping, this is a great time to let them decorate their own cups and choose their shark pals!
Serving Suggestions
When it comes to serving these Shark Snack Cups, presentation is key! For a fun summer vibe, place the cups on a blue tablecloth or even serve alongside nautical-themed napkins and plates. You could even create a little “ocean” table centerpiece with sand and shells to delight the little ones.
If you’re having friends over, consider making a dessert table where these snacks shine as the star! Pair them with other fun treats like beach balls or tropical fruit skewers. And don’t forget to have fun straws to make sipping even more enjoyable!
Final Touches
For a truly great experience, accompany the Shark Snack Cups with a themed movie night featuring films like “Finding Nemo” or “Shark Tale.” Your guests will love the full oceanic adventure experience!
Recipe Variations
Here are a few creative twists and swaps you can play with to make these Shark Snack Cups your own:
-
Colorful Jell-O Layers: Instead of just blue, experiment with alternating layers of blue and green Jell-O. It’s like a layered ocean effect!
-
Fruit and Flavors: Toss in some small diced fruits like strawberries or mangoes in between the layers of jelly for a delightful surprise and added texture.
-
Sugar-Free Option: To make these more health-conscious, use sugar-free Jell-O and reduced-calorie whipped cream. Everybody deserves a treat!
-
Add a Splash of Lemon: For a zesty addition, whisk some lemon juice into your whipped cream for a refreshing twist.
-
Make It a Cake: Turn this fun idea into a cake! Layer blue cake and whipped cream in a larger trifle bowl or cake dish to feed a larger crowd.
Chef’s Notes
Throughout the years, I’ve tweaked this recipe to perfection. From trying different flavors of Jell-O to including various candy types, these Shark Snack Cups really can be molded to fit any occasion! One of my funniest moments was when I accidentally dropped a cup right before serving. Picture me scrambling to reassemble jelly and whipped cream while giggling and reminding myself that it’s the fun and love that counts, not perfection!
Also, I’ve found that adding a drizzle of chocolate syrup on top adds a whole new level of indulgence. Seriously, go for it—it’s a tropical twist that some might love!
FAQs and Troubleshooting
1. How long does the Jell-O take to set?
Typically, allowing the Jell-O to set for 4 hours ensures it’s firm enough. For best results, overnight is ideal!
2. What can I use instead of gummy sharks?
While gummy sharks are adorable, sea turtle candies, fish gummies, or even chocolate-covered almonds can create a similar whimsical effect!
3. Can I make this recipe in advance?
Absolutely! You can prepare the Jell-O cups a day before, layer toppings and refrigerate them until you’re ready to serve.
4. My Jell-O didn’t set properly; what could’ve gone wrong?
This can happen if there’s too much liquid added or if it’s not chilled long enough. Make sure to strictly follow the instructions on the Jell-O package, and rest assured, practice makes perfect!
Nutritional Info
While these Shark Snack Cups are a fun treat, it’s good to be aware of their nutritional aspects if you’re tracking intake:
- Calories: Approximately 150 per cup, depending on the whipped cream and Jell-O used.
- Fat: Around 5g (varies by whipped cream).
- Sugar: Approximately 20g per cup from jelly and whipped cream.
- Protein: 2g from dairy-based whipped cream.
Note: For a healthier version, use sugar-free Jell-O and light whipped cream!
Final Thoughts
Creating Shark Snack Cups isn’t just about satisfying a sweet tooth; it’s an opportunity to share laughter, creativity, and happy moments with the ones you love. So why not gather up your families or friends, dive headfirst into this delicious recipe, and let your culinary creativity shine? With each bite, you’ll create ripple effects of joy, much like the waves in the ocean!
Thanks for joining me today in this delightful underwater adventure! I can’t wait to hear how your Shark Snack Cups turn out. Until next time, keep cooking, keep smiling, and let’s make every kitchen experience a joyful memory. Happy chowing down! 🥳
Print
Shark Snack Cups
- Total Time: 240 minutes
- Yield: 4 servings 1x
- Diet: Vegetarian
Description
Dive into deliciousness with these fun and delightful Shark Snack Cups, perfect for parties and family gatherings!
Ingredients
- 1 box Blue Jell-O
- 1 cup boiling water
- 1 cup cold water
- 1 cup whipped cream (dairy or dairy-free)
- ½ cup crushed graham crackers
- Gummy sharks
- Clear plastic dessert cups or mason jars
Instructions
- Prepare the Jell-O by boiling 1 cup of water, dissolving the Jell-O powder, and stirring in 1 cup of cold water.
- Pour the Jell-O into clear cups, filling them halfway. Refrigerate for 2-4 hours until set.
- Layer a generous amount of whipped cream on top of the Jell-O once set.
- Sprinkle crushed graham crackers on top of the whipped cream.
- Top with gummy sharks, placing them gently on the crushed graham crackers.
- Chill the assembled cups in the refrigerator for another 30 minutes before serving.
Notes
For decorative flair, allow children to add their own gummy sharks and sprinkles!
- Prep Time: 15 minutes
- Cook Time: 0 minutes
- Category: Dessert
- Method: No-Bake
- Cuisine: American
Nutrition
- Serving Size: 1 cup
- Calories: 150
- Sugar: 20g
- Sodium: 50mg
- Fat: 5g
- Saturated Fat: 3g
- Unsaturated Fat: 2g
- Trans Fat: 0g
- Carbohydrates: 28g
- Fiber: 0g
- Protein: 2g
- Cholesterol: 15mg
Keywords: Shark Snack Cups, kid-friendly dessert, fun recipes, party treats