Your New Favorite Dinner Party Superpower: The Softest Bread Machine Rolls Ever
Hey there, my fellow food lover! Is there anything in this world that smells more like love and comfort than a batch of warm, homemade dinner rolls baking in the oven? That golden, buttery aroma that wafts through the entire house, pulling everyone into the kitchen with hopeful, hungry eyes? I’m telling you, it’s pure magic. But if you’ve ever been intimidated by the idea of making yeast bread from scratch—all that kneading, worrying about the yeast, the precise temperatures—I am so, so excited to share this recipe with you today.
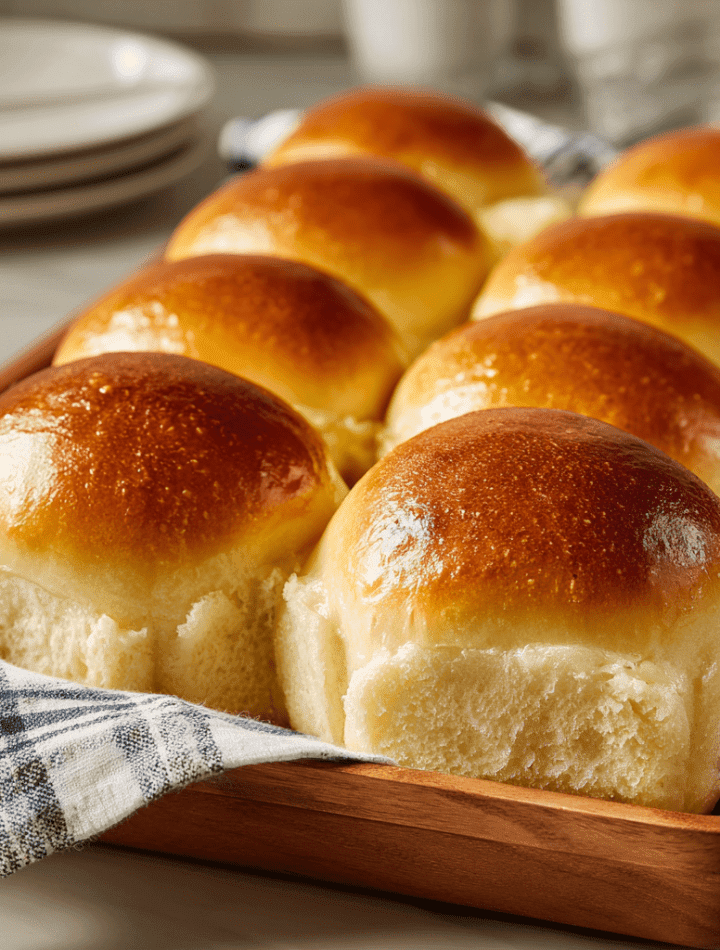
These are my legendary Soft Bread Machine Dinner Rolls. They are fluffy, they are tender, they have the most perfect, slightly sweet, buttery crumb, and they are an absolute dream to pull apart. And the best part? Your bread machine is doing about 95% of the work! We’re letting that handy countertop appliance handle the fussy part, so we can just swoop in for the fun part: shaping, baking, and of course, devouring.
This recipe is my ultimate secret weapon for holidays, Sunday suppers, or just because it’s Tuesday and you deserve something spectacular. So, tie on your favorite apron (the messy one is always the best!), and let’s make your kitchen the heart of the home once again. Trust me, after you taste these, that cardboard tube of store-bought rolls will be a thing of the distant past. Let’s get baking!

The Little Roll That Could: A Kitchen Memory
My love affair with these rolls started not in a fancy culinary school kitchen, but in my first tiny apartment with a counter so small my bread machine practically had its own zip code. I was determined to host my first “real” Thanksgiving. The turkey was… fine. The green bean casserole was a bit soupy. But these rolls? They were the undisputed stars of the show.
I remember the nervous excitement as I peeked through the oven door, watching them puff up and turn a perfect shade of golden brown. When I pulled them out and brushed them with melted butter, they gleamed like little edible jewels. The second I put them on the table, my friends’ faces lit up. They were warm, soft, and passed around until not a single crumb was left. In that moment, surrounded by laughter and flaky pastry scraps, I realized something powerful: the simplest, most humble food, made with a little bit of love, can truly make a gathering. That’s the magic I want to bring to your table today.
Gathering Your Cast of Characters
One of the things I adore about this recipe is its beautiful simplicity. These are pantry staples that come together to create something truly extraordinary. Here’s what you’ll need:
- 1 cup warm milk (about 110°F): This is the cozy bath that wakes up our yeast. The temperature is key! Too hot and you’ll kill the yeast; too cold and it won’t wake up. If you don’t have a thermometer, it should feel warm to the touch but not hot. No milk? Unsweetened almond or oat milk work beautifully.
- 2 large eggs, at room temperature: These are our superstars for richness and structure, giving the rolls that wonderful tender crumb. Pro Chef Tip: If you forgot to take them out, place your cold eggs in a bowl of warm water for 5-10 minutes to quickly bring them to room temp!
- ⅓ cup unsalted butter, melted: For that unmistakable, luxurious flavor and soft texture. Using unsalted lets you control the salt level in the dough. Salted butter works in a pinch, but maybe reduce the added salt by a quarter teaspoon.
- ⅓ cup granulated sugar: A little sweetness to balance the flavor and give the yeast a fantastic feast to get it going. You can easily reduce this to ¼ cup if you prefer a less sweet roll.
- 1 tsp salt: The flavor enhancer! Never skip the salt; it’s crucial for balancing the sweetness and deepening all the other flavors.
- 4 cups all-purpose flour: The backbone of our rolls. I use good old all-purpose for its reliable protein content. For a slightly chewier roll, you can swap one cup for bread flour.
- 2¼ tsp active dry yeast (1 packet): Our little miracle worker! Make sure your yeast is fresh and not past its expiration date for the best rise.
- Extra melted butter for brushing: This non-negotiable final step gives them that gorgeous, glossy, restaurant-quality finish.
Let’s Make Some Magic: Step-by-Step
Okay, team! Here’s where the fun begins. I’ll walk you through every single step. You’ve got this!
- The Foundation: First, always check your bread machine manual. Most machines want you to add the ingredients in a specific order, usually liquids first. For mine, it’s: warm milk, eggs, melted butter, then sugar and salt. Give it a little whisk right in the bread machine pan to help dissolve the sugar. Next, carefully add the flour on top, creating a little mountain. Make a small well in the very center of the flour mountain and pour your yeast into it. This keeps the yeast separate from the liquid until the mixing begins, ensuring it activates perfectly.
- Machine Time! Secure your pan into the bread machine, close the lid, and select the “Dough” cycle. This cycle typically mixes, kneads, and goes through the first rise for you. Now, walk away! Go read a book, fold some laundry, or do a little happy dance in the living room. This is your 1.5 hours of freedom. You’ll know it’s done when the machine beeps and you have a beautifully smooth, risen ball of dough.
- Shape with Love: Lightly flour your clean countertop. Turn the dough out onto it—it should be soft and slightly sticky, but manageable. Gently punch it down to release the air. This isn’t a boxing match, just a gentle deflation. Using a sharp knife or a bench scraper, divide the dough into 15-18 equal pieces. I aim for 15 for slightly larger rolls, or 18 for perfect, pull-apart size. To shape, take a piece of dough and pull the edges down and under, pinching them together at the bottom to create a smooth, tight top. Place it seam-side down. This technique gives you that lovely, smooth bakery-style dome.
- The Second Rise: Grease a 9×13-inch baking pan with butter or non-stick spray. Arrange your shaped rolls inside. They should be cozy and just touching—this is what helps them rise up, not out, giving you those perfect soft sides. Cover the pan loosely with a clean kitchen towel or plastic wrap. Let them rise in a warm, draft-free spot for 30-45 minutes, until they’ve puffed up and nearly doubled. Chef’s Hack: If your house is cool, turn your oven on to the lowest setting for one minute, then TURN IT OFF. Place the covered pan in the warm (not hot!) oven to rise.
- Bake to Golden Perfection: Once risen, it’s showtime! Preheat your oven to 375°F (190°C). Place the pan in the oven and bake for 15-18 minutes. You’re looking for a beautiful, deep golden brown on top. The second biggest chef trick I can give you? Tap the top of a roll. If it sounds hollow, they’re done!
- The Final Touch: The moment they come out of the oven, take that extra melted butter and generously brush it over the top of every single roll. You’ll hear that satisfying sizzle, and it will give them an unbelievable flavor and a soft, irresistible sheen. Let them cool in the pan for just about 5 minutes before devouring.
How to Serve These Heavenly Rolls
Honestly, they are sublime all on their own, fresh from the oven. But let’s talk presentation and pairings!
For a family-style meal, I love to serve the entire pan right on the table, letting everyone pull apart their own warm roll. It’s interactive and fun! If you’re plating for a dinner party, place a roll or two in a small linen-lined basket to keep them warm. A pat of good salted butter or a small dish of honey butter on the side is a must.
These rolls are the ultimate sidekick. They’re perfect for sopping up gravy from a roast chicken, alongside a steamy bowl of potato leek soup, or as the base for the world’s best leftover turkey sandwich. They also make a fantastic addition to any holiday spread—Easter, Thanksgiving, Christmas… they’ll fit right in and likely steal the show.
Make It Your Own: Delicious Variations
Once you’ve mastered the basic recipe, the flavor world is your oyster! Here are a few of my favorite twists:
- Garlic Herb Parmesan: Add 1 tsp of garlic powder, 2 tbsp of finely grated Parmesan cheese, and 1 tbsp of your favorite dried herbs (like Italian seasoning or a mix of rosemary and thyme) to the dry ingredients. Brush with garlic butter after baking!
- Whole Wheat Honey: Substitute 1 ½ cups of the all-purpose flour with whole wheat flour. Replace the granulated sugar with ⅓ cup of honey (add it with the wet ingredients). The honey gives them a wonderful warmth.
- Everything Bagel: After the final butter brush, immediately sprinkle the tops generously with everything bagel seasoning. Savory, salty, and utterly addictive.
- Cinnamon Sugar Swirl: After the first rise, roll the entire dough out into a large rectangle. Brush with melted butter and sprinkle heavily with a mix of cinnamon and sugar. Roll it up into a log, slice into swirls, and place them in the pan for the second rise. Bake as directed. Hello, dessert rolls!
Chef Emily’s Notebook Scribbles
This recipe has been my faithful companion for years, and it’s evolved in tiny ways. I once, in a frantic pre-Thanksgiving hurry, used cold milk straight from the fridge. The dough cycle finished and I had a sad, dense brick. I learned my lesson about yeast the hard way so you don’t have to! Always warm your milk.
I also highly recommend using a kitchen scale for dividing the dough. It feels a little extra, but it ensures every single roll bakes evenly and is the exact same size. No more fighting over the “big one”! Most of all, have fun with it. Cooking is never about perfection; it’s about the joy you pour into it.
Your Questions, Answered!
Q: Can I make these without a bread machine?
A: Absolutely! Warm the milk and stir in the sugar and yeast. Let it sit for 5-10 mins until foamy. In a large bowl, combine the flour and salt. Add the yeast mixture, eggs, and melted butter. Stir until a shaggy dough forms, then knead on a floured surface for 8-10 minutes until smooth and elastic. Place in a greased bowl, cover, and let rise in a warm place for 1-1.5 hours, until doubled. Then proceed from step 3!
Q: My dough didn’t rise. What happened?
A: Oh, we’ve all been there! The most common culprits are: 1) The liquid was too hot and killed the yeast, or too cold and didn’t activate it. 2) The yeast was old and expired. 3) The rising environment was too cold. Yeast loves a warm, cozy spot!
Q: Can I make the dough ahead of time?
A: Yes! After the bread machine cycle completes, instead of shaping, punch the dough down, place it in a greased bowl, cover tightly with plastic wrap, and refrigerate for up to 24 hours. When ready, let it sit on the counter for 30 minutes to take the chill off, then shape, rise, and bake.
Q: How do I store leftovers?
A: Once completely cool, store them in an airtight bag or container at room temperature for 2-3 days. They also freeze incredibly well! Wrap cooled rolls tightly in plastic wrap and then foil, and freeze for up to 3 months. Thaw at room temperature and warm in the oven for a few minutes to refresh.
Nutritional Information*
*Please note: This is an estimate provided by an online nutrition calculator. It should not be considered a substitute for a professional nutritionist’s advice.
Per Roll (based on 18 rolls): Calories: 170 | Fat: 5g | Saturated Fat: 3g | Cholesterol: 30mg | Sodium: 150mg | Carbohydrates: 26g | Fiber: 1g | Sugar: 5g | Protein: 4g
These rolls are a source of comfort and joy. While they contain carbs and sugars, they are a homemade treat free from the long list of preservatives found in many store-bought versions. Enjoy them as part of a balanced diet!
Final Thoughts from My Kitchen to Yours
Well, my friend, there you have it—my go-to recipe for creating those unforgettable, soft, buttery dinner rolls that will have everyone asking for seconds. This recipe is proof that you don’t need to be a professional baker to create something truly special and heartwarming in your kitchen. It’s about embracing the tools you have (hello, bread machine!), using simple ingredients, and sharing the delicious results with the people you love.
I hope this recipe becomes a trusted favorite in your home, creating its own stories and memories around your table. Now, I’d love to hear from you! Did you try a fun variation? Did your family go crazy for them? Tag me on social @TastyChow with your beautiful creations!
Until next time, happy baking, and may your kitchen always be filled with wonderful aromas and even better company.
With love and a full belly,
Emily
***
Pin This Recipe For Later!
Pin Title: Soft Bread Machine Dinner Rolls | Easy & Fluffy!
Pin Description: The softest, fluffiest, most irresistible homemade dinner rolls are just a bread machine away! This easy, fail-proof recipe delivers bakery-quality results every time. Perfect for holidays, Sunday dinners, or any night you need a warm, buttery comfort food fix. Step-by-step instructions, chef tips, and delicious variations included. Your new go-to roll recipe is here! #breadmachinerecipes #dinnerrolls #homemadebread #thanksgivingrecipes #easybaking #comfortfood