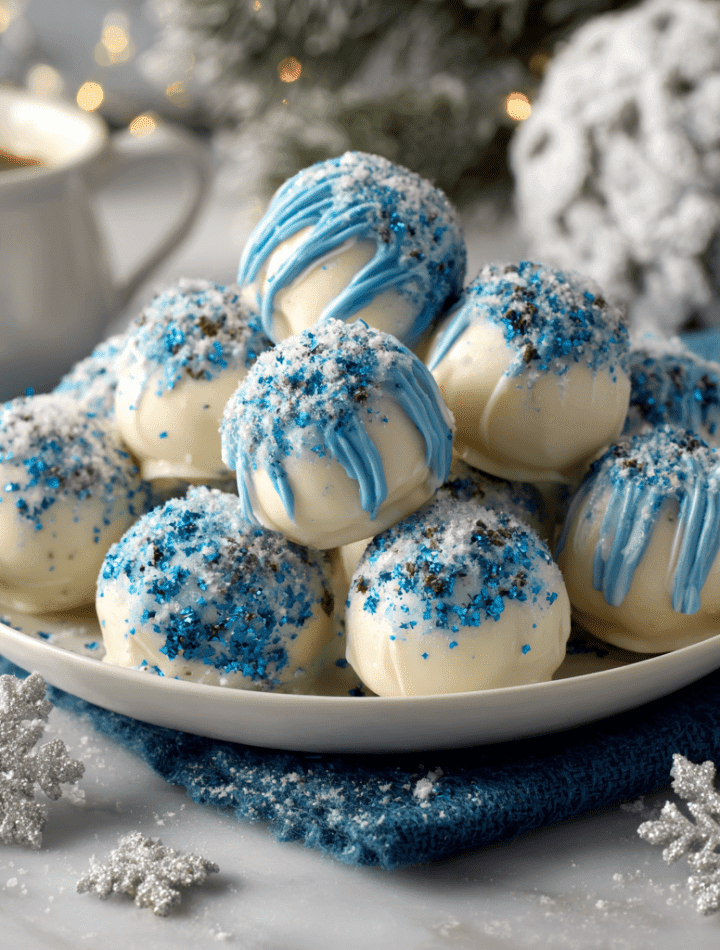
Sparkle Oreo Balls: Your New Favorite No-Bake Holiday Magic!
Hey there, my fellow food lover! Chef Emily here, coming to you from a kitchen that currently smells like sweet cream and melted chocolate. Can you smell it? I hope so, because we’re about to dive into one of my all-time favorite, can’t-fail, always-impresses-everyone treats: Sparkle Oreo Balls.
Picture this: it’s a chilly December afternoon. You’ve got holiday music playing, maybe a fire crackling, and you’re craving a little kitchen project that feels festive but doesn’t require turning on the oven or dealing with a mountain of dirty bowls. You want to create something that looks like it came from a fancy patisserie but is secretly so simple it feels like a kitchen hack. That, my friend, is the magic of these Sparkle Oreo Balls.
These little bites of joy are the ultimate crowd-pleaser. They’re rich, creamy, and have that incredible Oreo crunch-turned-chewy texture we all love, all enrobed in a smooth shell of white chocolate and finished with a dusting of pure, edible magic. Whether you’re building a holiday cookie tray that’ll make your neighbors swoon, need a last-minute treat for the school party, or just want to gift something beautiful and delicious to a friend, this is your recipe. So, tie on that apron (the messy one is always the best one), and let’s make some sparkle together!
The Snowy Day That Started It All
I have to share a little story about why these Oreo balls hold such a special place in my heart. It was my first holiday season after culinary school, and I was determined to host a “grown-up” cookie swap. I had plans for intricate gingerbread houses and delicate French macarons. But then, a massive snowstorm hit, my flight home was canceled, and I found myself alone in my apartment, feeling a little blue and far from family.
My best friend, Sarah, showed up at my door, dusted in snow, holding two boxes of Oreos and a block of cream cheese. “No moping,” she declared. “We’re making a mess.” We blasted Christmas music, crushed those Oreos with a wine bottle (a true chef’s hack!), and got our hands dirty rolling these little balls of dough. We didn’t have fancy chocolate, just some white chocolate chips we melted down, and we improvised the “sparkle” with some colored sugar I had leftover from a birthday cake. We laughed so hard, and that simple, messy kitchen session turned a lonely day into one of my warmest holiday memories. It reminded me that the best recipes aren’t about perfection; they’re about the joy you make and share. Now, every time I make these, I think of Sarah and that snowy day.
Gathering Your Sparkly Supplies
One of the best things about this recipe is the short and sweet ingredient list. You probably have most of this in your pantry right now! Here’s what you’ll need to make about 30 glorious Sparkle Oreo Balls.
- 1 package (14 oz) Oreo Cookies: This is the star of the show! I use the classic Original Oreos for that perfect, familiar flavor. Chef’s Insight: Don’t even think about removing the cream filling! It’s essential for the texture and sweetness of the ball. For a fun twist, you could try Mint Oreos for a festive peppermint version.
- 8 oz Cream Cheese, softened: This is the magic binder that turns the cookie crumbs into a pliable, rollable dough. Substitution Tip: For a slightly tangier flavor, you can use Neufchâtel cheese. Just make sure it’s fully softened to room temperature so it blends seamlessly without any lumps.
- 16 oz White Chocolate Melting Wafers or Almond Bark: This is key for that smooth, crackly coating. Chef’s Hack: I highly recommend using wafers like Candiquik or Ghirardelli brand over regular white chocolate chips. Melting wafers are specifically formulated to melt smoothly and harden with a beautiful snap, while chips can be temperamental and seize up. Almond bark is also a fantastic, reliable option.
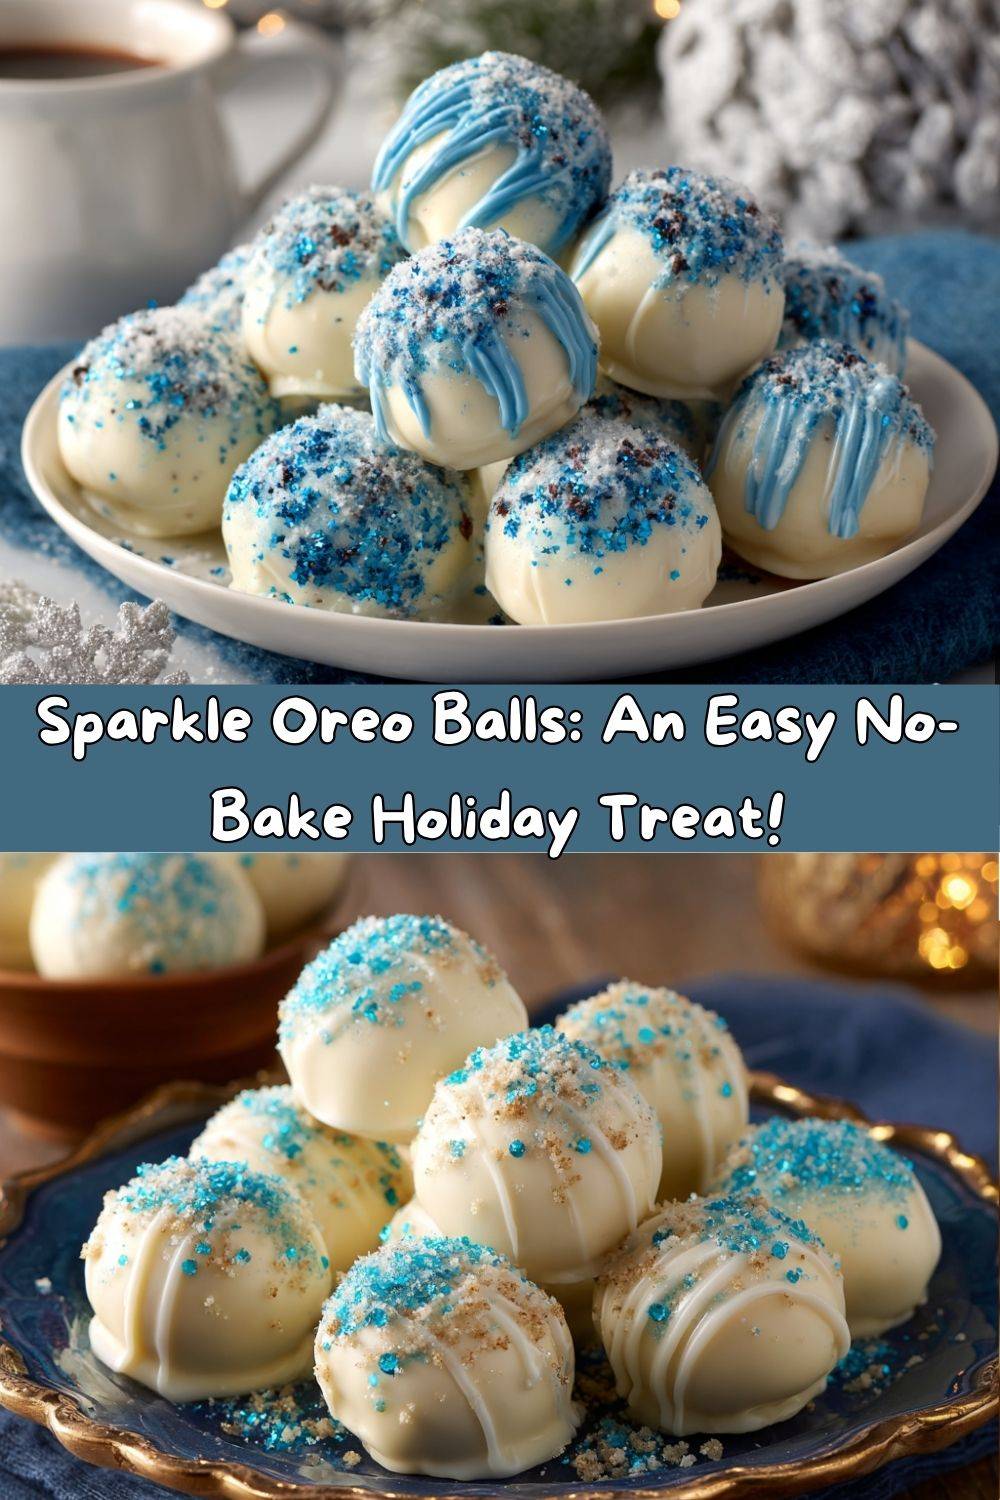
- Edible Glitter or White Sanding Sugar: This is where the “sparkle” comes in! Pro Tip: Look for products labeled “edible glitter” or “luster dust.” Regular decorative sprinkles are fun, but the fine glitter or sugar gives that elegant, snow-dusted look. You can find it in the baking aisle of most craft stores or online.
- Optional: ½ teaspoon Vanilla or Peppermint Extract: Want to level up the flavor? A tiny splash of pure vanilla extract adds warmth, while peppermint extract screams “holidays!” Add it to the cream cheese mixture before you mix in the crumbs.
Let’s Get Rolling: Your Foolproof Steps to Sparkle Town
Okay, team! This is where the fun begins. I’ll walk you through each step with all my favorite little hacks to ensure your Oreo balls are absolutely perfect.
- Crush Those Oreos! First, you need to turn those glorious Oreos into fine, uniform crumbs. The absolute easiest way is to use a food processor. Just pulse the entire package (creme filling and all!) until you have a texture that resembles dark, sandy soil. No food processor? No problem! Place the Oreos in a large, sturdy zip-top bag, press out the air, and seal it. Then, grab a rolling pin (or that trusty wine bottle) and crush them with gusto until they’re finely ground. This method is also a fantastic way to work out any pre-holiday stress!
- Create the Dreamy Dough. In a large mixing bowl, combine the finely ground Oreo crumbs with your softened cream cheese. I like to use a hand mixer on low speed for about a minute, just until everything is fully combined and looks like a thick, dark, and delicious dough. You can also do this by hand with a sturdy spatula—it’s a great arm workout! The goal is a uniform color with no streaks of white cream cheese visible.
- Roll, Roll, Roll Your Balls. Line a baking sheet with parchment paper or a silicone baking mat. Using a small cookie scoop (about 1 tablespoon in size) or a spoon, portion out the dough. Then, with clean, dry hands, roll each portion into a smooth, tight 1-inch ball. Place them on the prepared tray as you go. Chef’s Tip: If the dough is sticking to your hands, lightly dampen them with a bit of water. This creates a barrier and makes rolling much easier!
- The All-Important Chill Session. Once all your balls are rolled, pop the entire tray into the freezer for 15-20 minutes. Do not skip this step! This firming-up process is crucial. It prevents the balls from falling apart when you dip them into the warm chocolate. They should be cold and firm to the touch but not frozen solid.
- Melt the Chocolate Like a Pro. While the balls are chilling, melt your white chocolate wafers. The best method is a double boiler: place a heatproof bowl over a pot of simmering water (make sure the bottom of the bowl doesn’t touch the water) and stir the wafers until they’re melted and smooth. If you’re in a hurry, you can use the microwave. Heat the wafers in a microwave-safe bowl in 30-second bursts on 50% power, stirring thoroughly after each interval. This gentle heating prevents the chocolate from burning or seizing.
- The Grand Dip! Remove the tray of chilled Oreo balls from the freezer. Using a fork or a dipping tool, submerge one ball at a time into the melted white chocolate. Gently tap the fork on the edge of the bowl to let the excess chocolate drip off. Then, carefully place the ball back onto the parchment-lined tray. Pro Hack: If you have trouble with the ball sliding off the fork, use a toothpick! Poke it into the top of the ball, dip, let the excess drip, then place it back on the tray and gently twist to remove the toothpick. You can smooth over the tiny hole with a dab of chocolate.
- Make It Sparkle! Here’s the most important part: you must add your edible glitter or sanding sugar immediately after dipping each ball, before the chocolate sets. If you wait, the sparkle won’t stick! I like to sprinkle from a height for a nice, even dusting. You can also roll the wet ball in a small bowl of sugar for a more intense coverage.
- The Final Set. Once all the balls are dipped and sparkled, transfer the tray to the refrigerator for a final 10-15 minutes to allow the chocolate coating to set completely. And voilà! You’ve just created edible magic.
How to Serve These Little Gems
Presentation is part of the fun! These Sparkle Oreo Balls look stunning arranged in mini paper candy cups on a festive platter. They add height and elegance to any holiday dessert table. For gifting, place them in a clear cellophane bag tied with a pretty ribbon, or stack them in a decorative tin between layers of parchment paper. They make the most thoughtful and delicious homemade gift. They’re best served chilled straight from the fridge—the cool, creamy center is pure bliss against the crisp chocolate shell.
Get Creative! Fun Flavor Twists
The basic recipe is a blank canvas for your creativity! Here are a few of my favorite ways to mix it up:
- Peppermint Patty: Use Mint Oreos and add ¼ teaspoon of peppermint extract to the cream cheese. After dipping, top with crushed candy canes for a classic holiday combo.
- Chocolate Lover’s Dream: Dip the balls in dark or milk chocolate instead of white chocolate. The contrast with the white filling inside is gorgeous!
- Birthday Cake Fun: Use Golden Oreos and mix in a tablespoon of rainbow sprinkles into the dough. Dip in white or yellow candy melts and cover with more sprinkles.
- Peanut Butter Bliss: Use Peanut Butter Oreos and roll the finished balls in finely chopped salted peanuts for a sweet and salty treat.
- Dairy-Free Delight: Use your favorite vegan cream cheese and dairy-free Oreos. Look for dairy-free white chocolate brands like Enjoy Life to make this treat accessible to everyone.
Chef Emily’s Kitchen Confidential
This recipe has evolved so much since that first snowy day! I’ve learned that the quality of your melting wafers makes all the difference in the final look. I’ve also had my share of kitchen fails—like the time I tried to rush the chilling process and ended up with Oreo ball soup in my chocolate! Patience is a virtue here. The other fun evolution? My “glitter arsenal” has grown immensely. I now have gold, silver, red, green… you name it. It’s a bit of an obsession. The best part is seeing the joy these simple treats bring to people’s faces. They’re always a conversation starter!
Your Sparkle Oreo Ball Questions, Answered!
Q: My chocolate coating is thick and clumpy. What happened?
A: This is called “seizing,” and it usually happens if a tiny bit of water or steam gets into the chocolate. Chocolate and water are not friends! To fix it, try stirring in a tiny amount of neutral oil (like vegetable or coconut oil) one teaspoon at a time until it smooths out. Prevention is best: make sure all your bowls and tools are completely dry.
Q: Can I make these ahead of time?
A: Absolutely! They are the perfect make-ahead treat. Store them in an airtight container in the refrigerator for up to a week, or you can freeze the un-dipped balls for up to 3 months. Thaw in the fridge before dipping and decorating.
Q: My Oreo balls are cracking when I dip them. Why?
A: This is almost always because they weren’t chilled enough. The temperature shock between the frozen center and the warm chocolate is what causes the crack. Make sure they are firm and cold from that 15-20 minute freezer session. If your kitchen is very warm, you might even need to re-chill the tray halfway through dipping.
Q: Is edible glitter really edible?
A> Yes, if you buy the right kind! Always look for products specifically labeled “edible glitter” or “luster dust.” These are made with FDA-approved food ingredients. Avoid craft glitters, which are not safe for consumption.
A Quick Nutritional Note
Let’s be real—these are a decadent treat meant to be enjoyed in celebration! While they’re not a health food, it’s helpful to know what you’re enjoying. The nutritional information is an estimate per ball (assuming the recipe makes 30). Each one packs a sweet punch with about 120 calories, 13g of carbs, 7g of fat, and 11g of sugar. The beauty of their small size is that one or two can perfectly satisfy your sweet tooth without overdoing it. They’re rich, so a little goes a long way! Remember, balance is key. Enjoy your veggies at dinner so you can savor a sparkly ball (or two) for dessert guilt-free.
Prep Time: 25 minutes
Chill Time: 20 minutes
Total Time: 45 minutes
Makes: 30 balls
Final Thoughts from My Kitchen to Yours
Well, my friend, there you have it—the complete guide to creating these utterly delightful Sparkle Oreo Balls. I hope this recipe brings as much joy and sparkle to your kitchen as it has to mine. Remember, cooking and baking are about the experience—the laughter, the little messes, and the proud moment you present something you made with love. Don’t worry if they’re not perfectly round or if the glitter gets everywhere (it will!). It’s all part of the fun.
I’d love to see your creations! If you make these, tag me on social @TastyChow with #TastyChow so I can ooh and aah over your beautiful work. Now, go forth and sparkle! Wishing you a season filled with delicious food and warm memories.
With love and a sprinkle of glitter,
Emily