Let’s Build a Dessert That’s as Joyful as Spring Itself!
Hey there, friend! Emily here, from my flour-dusted kitchen to yours. Is there anything that captures the pure, hopeful joy of spring quite like a perfect, plump berry? That first bite of a sun-warmed strawberry, the pop of a tart raspberry, the deep sweetness of a blueberry… it’s nature’s confetti. And what better way to celebrate it all than with a dessert that’s as stunning to look at as it is downright heavenly to eat?
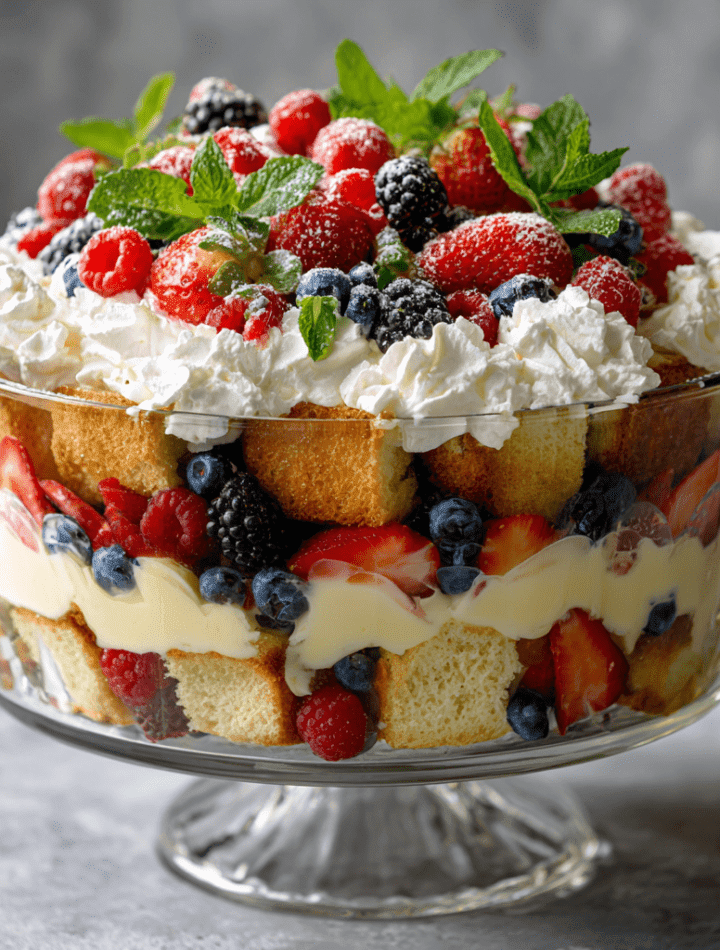
Enter my Spring Berry Trifle. This isn’t just a dessert; it’s an experience, a conversation piece, and the ultimate edible centerpiece for any gathering. We’re talking about soft, buttery vanilla cake, lush vanilla custard, clouds of whipped cream, and layers upon layers of jewel-toned fresh berries. Every spoonful is a different delicious adventure. The best part? It’s incredibly forgiving. No fancy pastry skills required—just a big bowl, a hungry heart, and a love for layers. Whether you’re hosting Easter brunch, a Mother’s Day feast, a baby shower, or just want to treat your family to something spectacular on a Tuesday, this trifle is your new secret weapon. So, tie on your favorite apron (the one with the stains that tell stories), and let’s make something beautiful together.

The Trifle That Stole My Heart (and a Few Berries)
My love affair with trifle started not in culinary school, but on a wobbly step-stool in my Grandma June’s kitchen. She had this magnificent, clear-glass pedestal bowl that only came out for “fancy occasions.” One spring, she let me help assemble her famous “berry mess,” as she called it. My job? To sneak bites of cake cubes and “quality-test” the berries (a job I took very seriously). I watched, mesmerized, as she built this towering, beautiful thing with such care, yet such ease. It felt like magic.
When she finally brought it to the table, the whole room went quiet for a second. Sunlight streamed through the window, hitting the glass and making the reds and blues glow. Then came the *oohs* and *aahs*. That moment—the shared anticipation, the collective delight—stuck with me. It taught me that the most impressive dishes aren’t always the most complicated; they’re the ones made with love and meant to be shared. Every time I make this trifle, I think of her, that wobbly stool, and the powerful truth that food is about so much more than just eating. It’s about creating a moment of pure, simple joy.
Gathering Your Spring Berry Bounty
Here’s the beautiful cast of characters for our layered masterpiece. I’ve included my chef-y notes and swaps so you can make this your own!
- 1 prepared vanilla cake (9×13 inch) – Homemade, boxed, or even a good-quality store-bought angel food or pound cake works wonders. Chef’s Insight: I often bake a simple vanilla bean cake the day before. Stale-ish cake soaks up the custard and cream beautifully without getting soggy!
- 3 cups mixed fresh berries – Strawberries (hulled and sliced), blueberries, raspberries, blackberries. Chef’s Tip: Frozen berries (thawed and well-drained) are a fantastic, budget-friendly option year-round! If using strawberries, toss them in a tablespoon of sugar to macerate and create a lovely syrup.
- 2 cups pastry cream or instant vanilla pudding – This is our lush, velvety middle layer. Substitution Central: Pastry cream is divine if you have 20 extra minutes. For a super quick fix, instant pudding prepared with milk is a total winner. For a lighter feel, use vanilla yogurt or a mix of yogurt and pudding.
- 2 cups heavy cream, whipped to stiff peaks (or 3 cups whipped topping) – The fluffy cloud on top! My Two Cents: Whipping your own cream with a little powdered sugar and vanilla is game-changing for flavor. But a quality whipped topping is a fantastic, stable shortcut for make-ahead ease.
- Optional Garnishes: Fresh mint leaves, a dusting of powdered sugar, edible flowers, or a few whole berries for the top. These are the “ta-da!” finishing touches.
Let’s Layer Up Some Magic: Step-by-Step
Ready to play dessert architect? Grab your big, beautiful trifle bowl or a clear glass serving dish. Seeing the layers is half the fun!
- Prep Your Components: First, cut your cooled cake into 1-2 inch cubes. They should be bite-sized and rustic—no perfection needed! If you’re making homemade pastry cream or pudding, get that done and let it cool. Whip your heavy cream with 2-3 tbsp of powdered sugar and 1 tsp of vanilla extract until you have beautiful, stiff peaks. Gently rinse and dry your berries, slicing the strawberries.
- The Foundation Layer: Start with a solid base of cake cubes. Cover the bottom of your dish. Don’t be shy—press them down slightly. Chef’s Hack: For an extra flavor punch, you can lightly brush this cake layer with a berry liqueur, lemon curd, or even a simple syrup!
- Velvet Ribbon Time: Spoon half of your custard or pudding over the cake layer. Use an offset spatula or the back of a spoon to spread it into an even, gorgeous layer, making sure to push it to the edges so you can see it from the side.
- The Berry Burst: Now, the color! Scatter a generous handful of your mixed berries over the custard. I like to place a few against the glass for that “wow” factor when people look at it. Use a mix of types for a confetti effect.
- Fluffy Cloud Application: Here comes the fluff! Dollop or gently spread half of your whipped cream over the berries. You can pipe it for fancy swirls or just spoon it on for a lovely, rustic look.
- Repeat the Symphony: Repeat the layers! Cake, custard, berries, whipped cream. You should have enough for two full, magnificent cycles. End with your final, prettiest layer of whipped cream on top. This is your canvas for the grand garnish.
- Chill and Meld: This is the hardest but most important step! Cover lightly with plastic wrap and refrigerate for at least 1 hour, but ideally 3-4. This rest time allows the cake to soak up all the lovely berry juices and custardy goodness, transforming from separate parts into one harmonious, decadent bite.
Presenting Your Masterpiece
When it’s time to serve, this is where you get to shine! Take your trifle out of the fridge about 15 minutes before serving to take the deep chill off. Now, for the garnish: artfully arrange your most perfect whole berries and mint leaves on top of the whipped cream. A light dusting of powdered sugar over everything adds a touch of snowy elegance. Place it right in the center of your table with a large serving spoon and a stack of bowls or glasses. I love serving it in clear cups or mason jars for individual portions, too—so cute! The beauty of this dessert is that it serves itself; everyone can dig in and see all the beautiful layers as they scoop. Get ready for the compliments to roll in!
Make It Your Own: Endless Twists!
The classic is perfect, but don’t be afraid to play! Here are a few of my favorite riffs on this berry beautiful theme:
- Lemon Berry Sunshine: Use lemon cake or pound cake, and add a layer of lemon curd between the custard and berries. It’s bright, zingy, and utterly refreshing.
- Tropical Escape: Swap the berries for a mix of diced mango, kiwi, pineapple, and raspberries. Use coconut cake and fold some toasted coconut into the whipped cream. Instant vacation!
- Chocolate-Berry Decadence: For the chocolate lovers, use chocolate cake cubes. Add a layer of chocolate pudding or mousse along with the vanilla. The combination of dark chocolate and tart berries is divine.
- Boozy & Grown-Up: Lightly brush the cake layers with a splash of Chambord (raspberry liqueur), Grand Marnier, or a sweet sherry for a sophisticated kick.
- Lighter & Brighter: Swap the custard for a mix of Greek yogurt sweetened with honey and a dash of vanilla. Use an angel food cake base. You get all the flavor with a lighter texture.
Emily’s Kitchen Notes & Stories
Over the years, this trifle has been my trusty plus-one to countless potlucks. One time, I was racing out the door and the whole trifle slid in my passenger seat… sideways. I thought it was a disaster! I frantically “reassembled” it in the bowl at my friend’s house with a spoon. You know what? It was *the* hit of the party—everyone called it the “deconstructed trifle” and thought I was a culinary genius. The moral? It’s incredibly hard to mess up. This recipe is a living thing in my kitchen. Sometimes I add a layer of raspberry jam swirled into the custard, sometimes I sprinkle toasted almonds between layers for crunch. Listen to your cravings and have fun with it. That’s what home cooking is all about.
Your Questions, Answered!
Q: Can I make this trifle a full day ahead?
A: Absolutely! In fact, I often do. Assemble it the night before, cover tightly, and refrigerate. The flavors meld even more beautifully. Just add any delicate berry or mint garnishes right before serving so they stay fresh and vibrant.
Q: My cake seems too soggy. What happened?
A> A little softening is perfect, but sogginess usually means the cake was very fresh/moist or the trifle wasn’t allowed to chill long enough before serving (the chilling helps set the layers). Using a slightly sturdier/drier cake (like pound cake) or day-old cake helps. Also, ensure your custard/pudding is fully cooled before assembling.
Q: What’s the best way to store leftovers?
A: Cover the bowl tightly with plastic wrap or transfer leftovers to an airtight container. It will keep in the fridge for 2-3 days. The berries may bleed a bit more and the whipped cream may soften, but it will still taste delicious!
Q: I don’t have a trifle bowl. What can I use instead?
A: No problem! A clear glass salad bowl, a 9×13 baking dish (you’ll see the layers from the side), or even individual parfait glasses or large mason jars work beautifully. The goal is just to see those gorgeous layers!
A Quick Note on Nutrition
While this is definitely a celebratory dessert, it’s also packed with real fruit! Here’s a general nutritional snapshot per serving (based on 12 servings, using homemade whipped cream and vanilla pudding made with 2% milk). Remember, these are estimates and will vary based on your specific ingredients and swaps:
Approximate Nutrition Per Serving: Calories: 320 | Protein: 4g | Carbohydrates: 38g | Fat: 16g | Saturated Fat: 10g | Cholesterol: 85mg | Sodium: 220mg | Fiber: 2g | Sugar: 25g
To lighten it up, consider the yogurt swap mentioned in the variations, use angel food cake, and opt for a light whipped topping. But for special occasions, I’m a firm believer in enjoying the real, lush deal—it’s all about balance and joy!
Final Thoughts from My Kitchen to Yours
Well, my friend, there you have it—my heart-on-a-plate Spring Berry Trifle. This recipe is more than just a list of steps; it’s an invitation to create, to share, and to savor the sweet, fleeting flavors of the season. Don’t stress about perfect layers or finding the most exotic berries. The magic is in the making and the sharing. I hope this trifle brings as much laughter and happy silence to your table as it has to mine over the years.
If you make it (and I truly hope you do!), I’d love to see your creation. Tag me @TastyChow on social media so I can cheer you on! Now, go forth, layer with abandon, and make some delicious memories. Until next time, happy cooking (and trifling)!
— Emily 🍓