Strawberry Cheesecake Protein Balls – Your New No-Bake Obsession!
Hey there, my fellow food lover! Let me paint you a picture. It’s 3:00 PM. Your energy is crashing, your stomach is doing that little pre-hanger gurgle, and you’re staring into the abyss of your pantry, willing something magically delicious and satisfying to appear. You want something sweet, something creamy… maybe even a little slice of cheesecake. But you also know you need something that will actually fuel you, not just give you a sugar crash 20 minutes later.
Sound familiar? I’ve been there more times than I can count, usually with a smudge of flour on my nose and a desperate look in my eyes. That’s exactly why I became obsessed with creating the perfect, protein-packed snack that feels like a total treat. And friends, I am so, so excited to share this one with you.
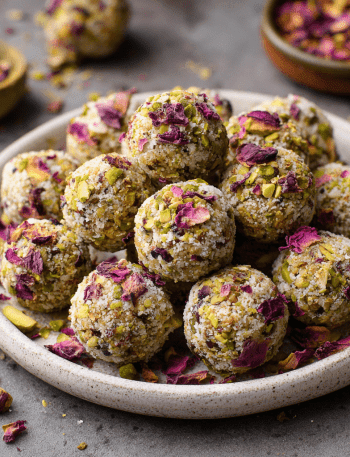
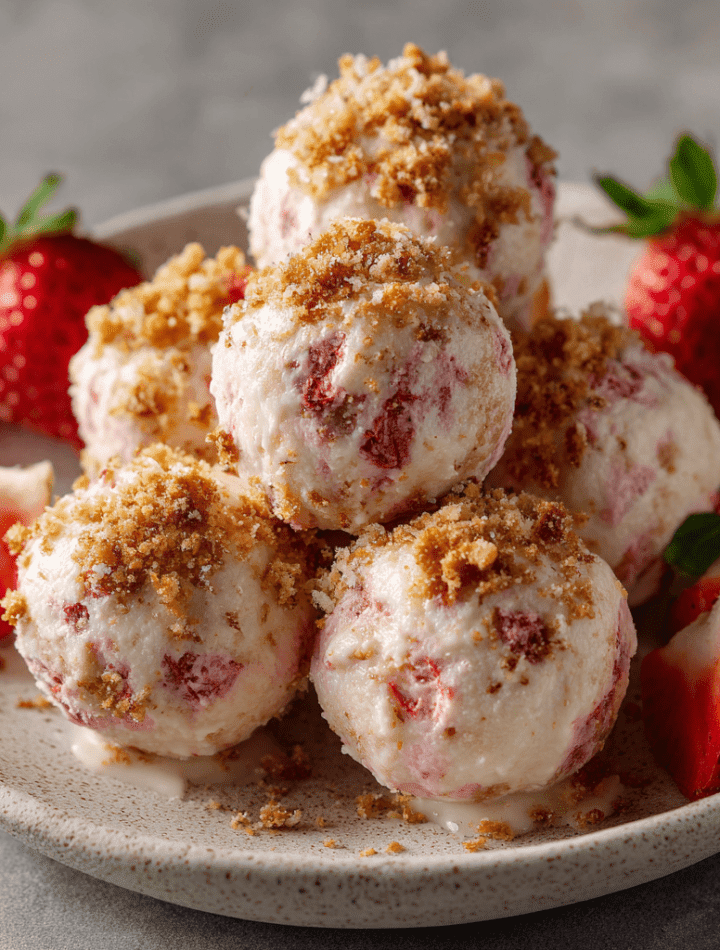
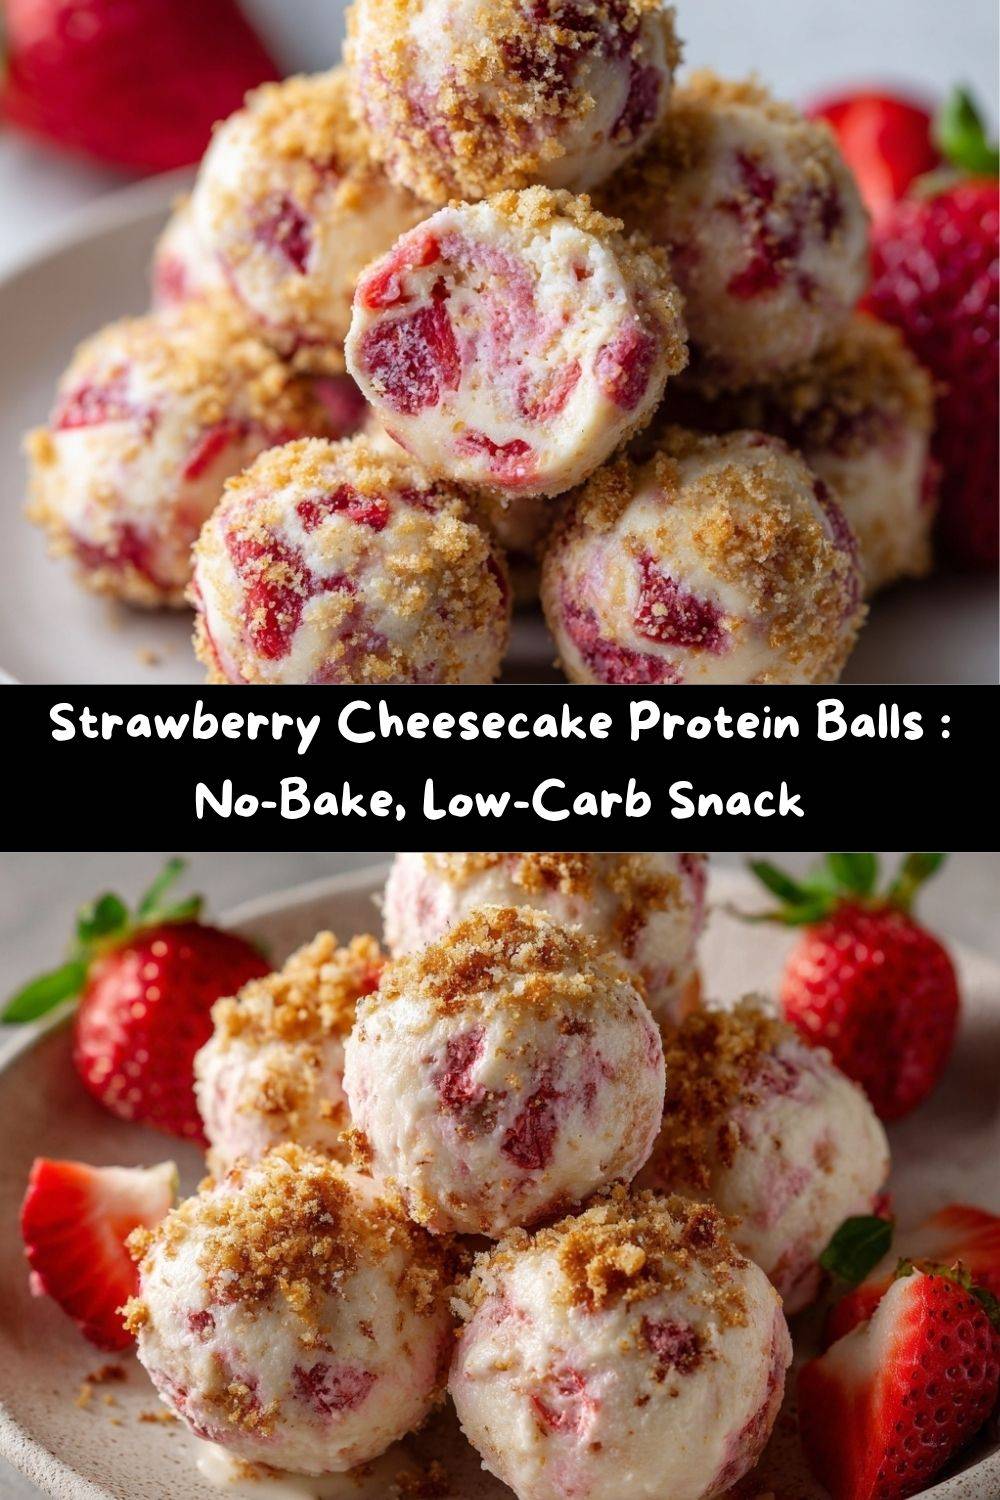
Get ready to fall in love with these No-Bake Strawberry Cheesecake Protein Balls! They are sweet, tangy, creamy, and pack a powerful protein punch to keep you going. They come together in one bowl in about 10 minutes, require zero baking, and are seriously low-carb. They’re the snack of your daydreams—the one that makes you feel like you’re getting away with something, when you’re actually doing something awesome for your body. So, tie on your favorite apron (the messy one is always the best), and let’s make something delicious together!
A Spoonful of Nostalgia, A Dollop of Protein
This recipe takes me right back to my grandma’s kitchen table. Not with the protein powder, of course—she’d have given that a very suspicious side-eye. But with the strawberries. Every summer, we’d go strawberry picking until our fingers were stained pink and our baskets were overflowing. The reward was always her legendary, mile-high strawberry cheesecake. It was a whole production, a labor of love that filled the whole house with the most incredible aroma.
I wanted to capture that same joyful, celebratory feeling in a snack I could grab on a busy Tuesday. I wanted the bright burst of real berry, the luxurious creaminess of cheesecake, and that little hint of buttery crust. After a few… let’s call them “enthusiastic kitchen experiments” (one batch was so sticky it could have been used as wallpaper paste!), I finally landed on this perfect formula. It’s my little homage to my grandma—a tiny, no-bake ball of happiness that carries all the flavor of that cherished memory, with a modern, healthy twist.
Gathering Your Happy Ingredients
Here’s the beautiful part: you probably have most of this in your pantry already! This is a simple, wholesome lineup that works together in perfect harmony.
- 1 cup Almond Flour: This is our base, giving these balls a perfect, tender crumb and keeping them gluten-free and low-carb. It has a subtly sweet, nutty flavor that just works. Chef’s Insight: If you don’t have almond flour, you can try oat flour, but the texture will be a bit denser and less fluffy.
- ½ cup Vanilla Protein Powder: This is our protein powerhouse and a major flavor booster! Chef’s Tip: I highly recommend a good-quality whey or casein protein powder for the best texture. Plant-based powders can work, but they sometimes absorb more liquid, so you might need to add a teaspoon of milk or water if the dough feels too dry.
- ¼ cup Cream Cheese, softened: This is the secret to that authentic, tangy “cheesecake” flavor and creamy texture. Pro Tip: Let it sit on the counter for 20-30 minutes before you start! Softened cream cheese blends seamlessly, while cold cream cheese will leave little lumps.
- ¼ cup Mashed Strawberries: The star of the show! We’re using real, mashed strawberries for that true fruity flavor. Heads up! The moisture from the berries can vary. If your dough seems a little too wet after mashing, just add another tablespoon of almond flour until it’s rollable.
- 2 tbsp Honey or Maple Syrup: This is our natural sweetener, adding just the right amount of sticky sweetness to bring everything together. Substitution Station: For a sugar-free version, a liquid monk fruit sweetener or agave works beautifully.
- ½ tsp Vanilla Extract: A must for any cheesecake recipe! It deepens the flavor and makes everything taste warmer and more decadent.
- ¼ cup Crushed Graham Crackers (optional, for rolling): This is the “pièce de résistance” for that true cheesecake experience. It gives you that classic buttery, crumbly crust in every single bite. Dietary Swap: For a gluten-free version, simply use gluten-free graham crackers or even crushed gluten-free vanilla cookies!
Let’s Roll! Your Step-by-Step Guide to Perfect Protein Balls
This is the fun part—it’s basically playing with edible play-dough. No fancy equipment needed, just a bowl, a spoon, and your own two hands!
- The Dry Team Assemble! In a medium-sized mixing bowl, add your almond flour and vanilla protein powder. Give them a quick whisk together. This isn’t just busywork; it ensures our leavening agents (well, in this case, our flavor and protein agents) are evenly distributed so every single ball is perfect. Little Chef Hack: If your almond flour is at all clumpy, sifting it here will give you an extra-smooth texture!
- Bring in the Creamy Dream. Now, plop in your softened cream cheese. Using a sturdy spatula or even your hands (my favorite tools!), start mixing it into the dry ingredients. It’s going to look a little crumbly and dry at first—that’s totally normal! Just keep working it until it’s mostly combined and has a texture like coarse sand.
- The Wet Ingredients Join the Party. Time for the good stuff! Add your mashed strawberries, honey (or maple syrup), and that glorious vanilla extract. Now, really get in there and mix until a soft, slightly sticky dough forms. Watch and Learn: The dough should hold together when you pinch it. If it seems too wet and sticky, add a tablespoon of almond flour. If it’s too dry and crumbly, add a teaspoon of honey or a splash of water.
- The Rolling Ritual. Line a small baking sheet or plate with parchment paper. Using a tablespoon or a small cookie scoop, portion out the dough. Then, get rolling! Scoop, then roll each portion between your palms to form a smooth, 1-inch ball. Place each one on your prepared parchment paper. Pro Tip for Non-Sticky Hands: If the dough is sticking to your hands, lightly dampen them with water. It creates a perfect non-stick barrier!
- The Crusty Finale (Optional, but Highly Recommended). If you’re using the crushed graham crackers, now’s the time! Pour them into a shallow bowl. Take each rolled ball and gently roll it around in the crumbs, pressing slightly so they adhere. This gives you that iconic cheesecake look and a wonderful textural contrast.
- The Patience Part. This is the hardest step, I know! Pop your beautiful protein balls into the refrigerator for at least 30 minutes to chill and firm up. This step is non-negotiable—it allows the flavors to meld together and gives them that perfect, firm-yet-creamy texture we’re after.
How to Serve & Savor Your Creation
Okay, the timer has beeped! Your protein balls are chilled, firm, and ready for their close-up. Now, how do we make them feel extra special?
I love serving these straight from the fridge for a cool, refreshing bite. Pile them high on a cute little plate or in a rustic wooden bowl for a stunning snack display. They’re the perfect grab-and-go breakfast with your morning coffee, a brilliant post-workout refuel, or the ultimate afternoon pick-me-up that feels like you’re indulging in a secret dessert.
For a next-level dessert experience, try serving a couple of them slightly warmed (just 10 seconds in the microwave) alongside a few fresh strawberry slices and a dollop of whipped cream. It’s like a deconstructed cheesecake that’s ready in seconds! However you choose to enjoy them, I promise each bite will be a little burst of sweet, creamy, strawberry bliss.
Get Creative! Fun Flavor Twists & Swaps
Once you’ve mastered the classic strawberry, the flavor world is your oyster! This base recipe is incredibly versatile. Here are a few of my favorite ways to mix it up:
- Chocolate Covered Cherry: Swap the mashed strawberries for chopped maraschino cherries (well-drained!) and add 2 tablespoons of cocoa powder to the dry ingredients. Roll them in crushed cocoa nibs for an antioxidant boost!
- Lemon Blueberry Bliss: Use mashed blueberries instead of strawberries and add the zest of one lemon to the dough. The bright, zingy flavor is absolutely incredible. Roll in crushed vanilla wafer cookies for a fun “pie crust” vibe.
- Cookies & Cream: Omit the strawberries and use chocolate protein powder. Mix in 2 tablespoons of crushed gluten-free Oreo-style cookies. Roll the balls in more cookie crumbs for a double dose of chocolaty goodness.
- Peanut Butter & Jelly: Replace the cream cheese with natural, drippy peanut butter (you may need a touch more almond flour if it’s very runny). Use a tablespoon of sugar-free strawberry jam instead of mashed berries for little sweet pockets of flavor.
- Dairy-Free Delight: Easy! Just use your favorite dairy-free cream cheese alternative. It works like a charm.
A Few More Kitchen-Confidential Tips from Me to You
This recipe has truly evolved in my kitchen. The first time I made them, I was a little overzealous with the fresh strawberries and created a situation that was… let’s just call it “protein ball soup.” A little more almond flour saved the day! It taught me that baking (or no-baking!) is all about feeling the texture.
I also love making a double batch and freezing them. They are a lifesaver on my most chaotic recipe-testing days. I just pull out two or three in the morning, let them thaw in the fridge, and by snack time, they’re perfect. They keep their texture beautifully and taste just as fresh. Don’t be afraid to make this recipe your own—that’s the true joy of cooking!
Your Questions, Answered!
I’ve gotten so many wonderful questions about this recipe over on Instagram! Here are the most common ones, answered just for you.
Q: My dough is too sticky to roll! What did I do wrong?
A: Don’t worry, this is super common, especially if your strawberries were extra juicy! The fix is easy. Just add more almond flour, one tablespoon at a time, until the dough is firm enough to handle. Also, lightly wetting your hands before rolling works wonders.
Q: Can I use frozen strawberries?
A: You can, but you must thaw and drain them COMPLETELY first. I actually pat them dry with a paper towel after thawing to get rid of any excess moisture. Using frozen berries without draining will almost certainly give you a too-wet dough.
Q: How long will these last in the fridge?
A: Stored in an airtight container in the refrigerator, they are perfect for up to one week. They also freeze magnificently for up to 3 months!
Q: My protein balls turned out a bit dry. How can I prevent that?
A: This usually means the dough was over-mixed or the protein powder you used is a real liquid-hog. Next time, try mixing just until combined and consider adding a teaspoon of milk, water, or even a little more honey to add back some moisture.
Strawberry Cheesecake Protein Balls : No-Bake, Low-Carb Snack
- Total Time: 40 minutes
- Yield: 12 Balls 1x
Description
These Strawberry Cheesecake Protein Balls are the perfect no-bake treat—bursting with fruity flavor, a creamy cheesecake texture, and loaded with protein. Made with almond flour, real strawberries, and a touch of honey, they’re a healthy snack that tastes like dessert. Easy to prep, low-carb, and great for meal prep or an on-the-go bite!
Ingredients
1 cup almond flour
½ cup vanilla protein powder
¼ cup cream cheese, softened
¼ cup mashed strawberries
2 tbsp honey or maple syrup
½ tsp vanilla extract
¼ cup crushed graham crackers (optional, for rolling)
Instructions
In a bowl, mix almond flour, protein powder, and softened cream cheese until mostly combined.
Add mashed strawberries, honey, and vanilla extract. Mix until a dough forms.
Roll into 1-inch balls.
For a true cheesecake finish, roll each ball in crushed graham crackers (optional).
Refrigerate for at least 30 minutes to firm up.
Serve chilled and enjoy the fresh, tangy, protein-packed bite!
- Prep Time: 10 minutes
- Cook Time: 30 minutes
Nutrition
- Calories: 90 / Ball
- Sugar: 2g / Ball
- Fat: 6g / Ball
- Carbohydrates: 4g / Ball
- Fiber: 1g / Ball
- Protein: 6g / Ball
A Quick Peek at the Nutrition
Now, I’m a chef, not a dietitian, so please treat this as a friendly estimate! These values can vary based on the specific brands of ingredients you use. But to give you a general idea, here’s the nutritional breakdown per ball (assuming the recipe makes 12 balls, without the graham cracker roll):
- Calories: ~90
- Protein: 6g (Heck yes! That’s what we’re here for.)
- Carbohydrates: 4g
- Fat: 6g (The good, healthy kind from almonds!)
- Fiber: 1g
- Sugar: 2g
They are a fantastic, balanced snack that provides sustained energy without the crash, thanks to the combination of protein, healthy fats, and fiber. It’s a win-win!
You Did It! Now, Go Enjoy Your Well-Deserved Treat
And there you have it! Your very own batch of Strawberry Cheesecake Protein Balls. See? I told you we could make something magical together. You’ve just created a snack that’s not only delicious but also nourishing and empowering. You’ve taken control of your 3 PM cravings and turned them into a moment of pure joy.
I am so incredibly proud of you for getting in the kitchen and making it your own. I hope these little balls of bliss bring a smile to your face and a spring to your step. If you make them (and I really hope you do!), please tag me @TastyChow on social media so I can see your beautiful creations! Now, go grab a glass of cold milk, enjoy your protein ball, and pat yourself on the back. You’re a kitchen rockstar.
With love and a full heart,
Emily