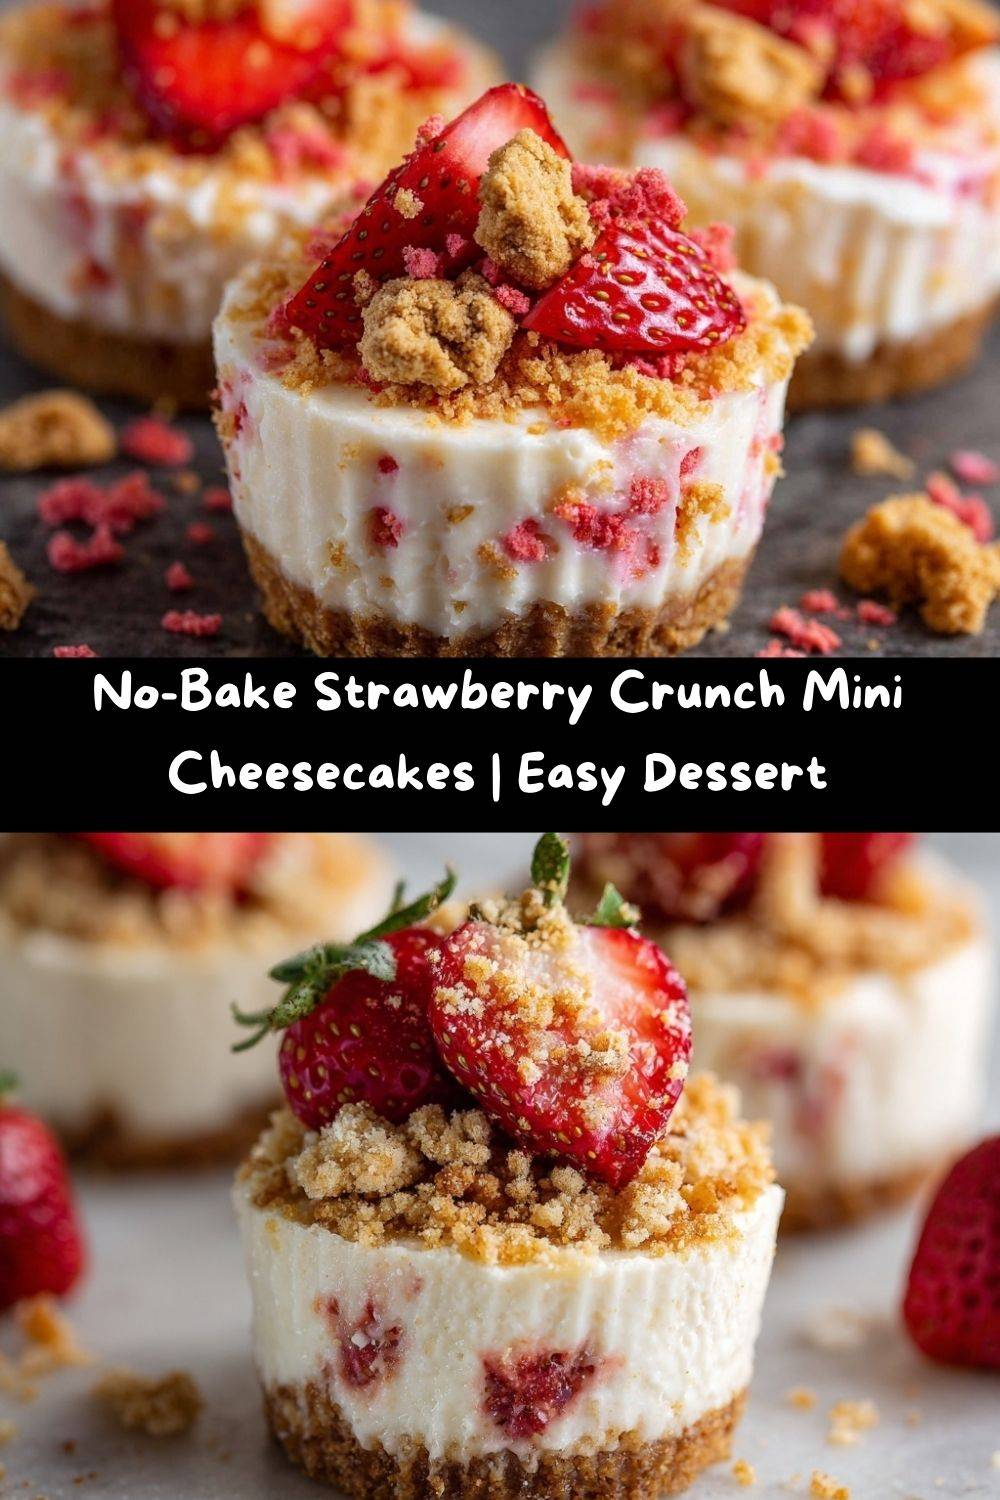
Strawberry Crunch Mini Cheesecakes: Your New No-Bake Obsession
Hey there, friends! Emily from Tasty Chow here, and I have to ask: have you ever been hit with a dessert craving so specific, so nostalgic, that it feels like a little food memory knocking on your heart? For me, it’s that iconic strawberry shortcake ice cream bar from the ice cream truck. You know the one—the vanilla ice cream coated in that magical, impossibly crunchy strawberry shell. I’ve been chasing that flavor and texture combo for years, wanting to turn it into something I could share at a backyard BBQ or just keep in my fridge for a little after-dinner happiness.
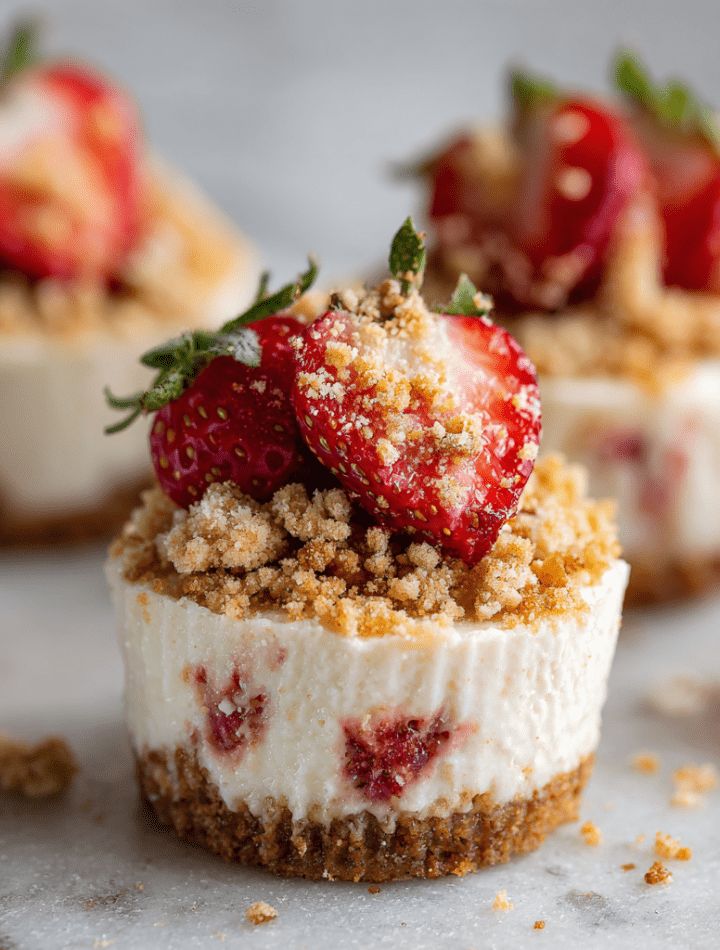
Well, my kitchen experiments have finally paid off, and I am so excited to share the result with you. These Strawberry Crunch Mini Cheesecakes are everything I dreamed of and more. We’re talking about a creamy, dreamy no-bake cheesecake filling bursting with fresh strawberry flavor, sitting on a buttery graham cracker crust, and topped with that legendary strawberry crunch crumble. The best part? They look like you spent hours in a fancy patisserie, but they come together with zero oven time and a whole lot of joy. No fuss, no stress—just pure, bite-sized bliss. So, tie on your favorite apron (the messy one is totally welcome here), and let’s make something delicious that’ll have everyone asking for the recipe.
The Ice Cream Truck & A Dream
Let me take you back for a second. Picture a hot, sticky summer afternoon in my grandma’s neighborhood. The sound of jingle bells wasn’t from Santa—it was the ice cream truck! My sister and I would sprint to the curb, coins clutched in our sweaty hands, debating our choices. But for me, the choice was always the same: the pink-wrapped strawberry shortcake bar. I’d carefully unwrap it, savoring that first bite where the crunchy coating gave way to the creamy center. It was a moment of pure, uncomplicated joy.
Years later, in culinary school, I found myself thinking about that texture contrast—the creamy against the crunchy, the sweet against the slightly tart strawberry. I wanted to recreate that feeling in a dessert I could make at home, something shareable and special. These mini cheesecakes are that dream realized. They’re my little homage to those sunny afternoons, to the simple pleasures, and to the idea that the best recipes often start with a happy memory.
Gathering Your Flavor Party
Here’s what you’ll need to bring this strawberry crunch magic to life! I’ve added my little chef notes next to each one because I love knowing the “why” behind ingredients.
For the Crust:
- 1 cup graham cracker crumbs: This is our sturdy, sweet, and slightly spiced foundation. Chef’s Insight: You can buy pre-crushed crumbs, but blitzing whole graham crackers in a food processor gives you more control over the texture—I like a few slightly bigger pieces for a rustic feel.
- 3 tbsp melted butter: The glue! It binds the crumbs into a perfect, pressable crust. Sub Tip: For a dairy-free version, coconut oil works beautifully here.
- 1 tbsp sugar (optional): I add this if my strawberries are a bit tart, but if you like a less-sweet crust or are using super-sweet berries, you can skip it!
For the Filling:
- 8 oz cream cheese, softened: Non-negotiable for that classic, lush cheesecake texture. Chef’s Hack: Let it sit on the counter for a good 1-2 hours. Room-temperature cream cheese blends smoothly and prevents lumps—trust me on this!
- 1/2 cup Greek yogurt or whipped topping: The secret to a lighter, tangier filling that sets perfectly. Greek yogurt adds protein and a lovely tartness, while whipped topping (like Cool Whip) makes it ultra-light and airy. Pick your adventure!
- 1/4 cup powdered sugar: It dissolves instantly into the filling, avoiding any graininess. No one wants gritty cheesecake!
- 1 tsp pure vanilla extract: The flavor enhancer. It rounds out all the other flavors beautifully.
- 1/2 cup chopped fresh strawberries: The star of the show! They give you those gorgeous bursts of real fruit flavor. Pro Tip: Chop them fairly small so they distribute evenly in every single bite.
For the Strawberry Crunch Topping:
- 5 Golden Oreos (crushed): These are the base of our iconic crunch. Their vanilla flavor and sandy texture are perfect. Fun Fact: Regular chocolate Oreos work too, but Golden ones give that authentic “shortcake” vibe.
- 2 tbsp crushed freeze-dried strawberries: This is the flavor power-up! They pack an intense, concentrated strawberry punch and add that signature pink hue without any moisture. Find them in the snack or dried fruit aisle.
- 1 tbsp melted butter: Just enough to help the crumble clump together into those delightful, sprinkle-able bits.
Let’s Build Some Bites of Joy!
Ready to create? These steps are super simple, and I’m walking you through each one with my favorite kitchen tricks.
- Prep Your Stage. Line a mini muffin tin with paper liners or use a silicone mold. The liners make for the easiest, prettiest presentation and zero cleanup—my kind of win!
- Make the Crust. In a medium bowl, mix your graham cracker crumbs, melted butter, and that optional tablespoon of sugar. You’re looking for a texture like wet sand that holds together when you pinch it. Chef’s Tip: I use the bottom of a small shot glass or a teaspoon measuring spoon to firmly press the crumbs into each cup. A solid, compact crust is key to holding everything together!
- Chill Out. Pop the whole tray into the freezer for just 10 minutes. This quick chill sets the butter and firms up the crust so it’s ready for its creamy topping.
- Whip Up the Filling. In a large bowl, beat your softened cream cheese with a hand mixer or stand mixer until it’s completely smooth and creamy. This should take about 1-2 minutes. Scrape down the sides! Now, beat in the Greek yogurt (or whipped topping), powdered sugar, and vanilla until everything is combined and silky. Gently fold in those chopped fresh strawberries with a spatula. Watch: The batter will turn a lovely, pale pink with beautiful red specks throughout.
- Fill ‘Er Up! Spoon or pipe the filling over your chilled crusts. I like to smooth the tops with the back of a spoon or a small offset spatula for a neat, professional look.
- Create the Magic Crunch. In a small bowl, toss together your crushed Golden Oreos, crushed freeze-dried strawberries, and melted butter. Use your fingers to mix it—it’s fun! You’ll get lovely pink, crumbly clusters. Now, generously sprinkle this strawberry crunch topping over each mini cheesecake. Don’t be shy!
- The Final Chill. This is the hardest part: waiting! Cover the tray loosely with plastic wrap and refrigerate for at least 2 hours, or until the cheesecakes are completely firm. For best results, I often let them go for 3-4 hours or even overnight. The flavor gets even better.
How to Serve These Strawberry Gems
Presentation is part of the fun! These minis are adorable just as they are in their liners, arranged on a simple platter. For a real “wow” moment, I love gently peeling off the liners and placing them on a dessert plate with a drizzle of extra strawberry sauce (just simmer some chopped berries with a touch of sugar and lemon juice) or a dollop of whipped cream. Add a single mint leaf or a tiny fresh strawberry slice on top for a pop of color. They’re perfect for parties because everyone gets their own individual treat—no slicing required! Pair them with a cup of hot coffee or a glass of cold milk for the ultimate experience.
Make It Your Own! Fun Twists & Swaps
Once you’ve mastered the classic, the kitchen playground opens up! Here are a few of my favorite ways to mix it up:
- Blueberry-Lemon Bliss: Swap the fresh strawberries for mashed blueberries and the freeze-dried strawberries for freeze-dried blueberries. Add a teaspoon of lemon zest to the filling. Use a lemon cookie (like Lemon Oreos) for the crunch topping. So bright and fresh!
- Chocolate-Dipped Dream: For the chocolate lovers, use chocolate graham crackers for the crust. After chilling, dip the tops of the cheesecakes halfway into melted dark or white chocolate and let it set before serving. Decadence!
- Peaches & Cream: In the summer, use ripe, finely diced peaches in the filling and peach-flavored yogurt. For the crunch, use crushed vanilla wafers or shortbread cookies with a pinch of cinnamon.
- Vegan & Gluten-Free Friendly: Use your favorite vegan cream cheese and coconut yogurt. For the crust and topping, use gluten-free graham crackers and gluten-free vanilla sandwich cookies. The method stays exactly the same!
A Few More Thoughts From My Kitchen
This recipe has evolved from a messy, full-sized cheesecake attempt (let’s just say it didn’t set, and we ate it with spoons like pudding—still delicious!) to these perfect little individual portions. The mini size is just right for satisfying a sweet tooth without overdoing it. I’ve found that keeping a bag of crushed freeze-dried strawberries in my pantry is a game-changer—I sprinkle them on oatmeal, yogurt, and ice cream for an instant flavor boost! One funny story: the first time I made these, I was so excited to try the topping that I accidentally used a whole bag of freeze-dried strawberries in the crumble. It was overwhelmingly tart and neon pink! My husband said they looked like “Barbie’s gravel.” We laughed, I adjusted the ratio, and now you get the perfected version. Cooking is all about those happy accidents, isn’t it?
Your Questions, Answered!
Here are answers to some common questions I get about this recipe:
Q: My filling is too runny. What happened?
A: This usually means the cream cheese wasn’t soft enough to blend completely smooth, or the Greek yogurt/whipped topping was particularly liquidy. Make sure your cream cheese is truly at room temperature. Also, full-fat ingredients will yield a firmer set. If it seems loose after mixing, just pop the bowl in the fridge for 20 minutes before spooning into the cups—it’ll firm up a bit!
Q: Can I make one big cheesecake instead of minis?
A: Absolutely! Press the crust into the bottom of a 6-inch springform pan. Double the filling recipe, and keep the topping amount the same. You’ll need to chill it for at least 6 hours, preferably overnight, before slicing.
Q: My crunch topping got soggy. How can I prevent that?
A> The key is to make sure the cheesecake filling is completely chilled and firm before adding the topping. Also, don’t add the topping until right before you plan to serve them if you can. If making ahead, store the topping separately in a baggie and sprinkle on just before serving.
Q: How long do these last in the fridge?
A> They keep beautifully! In an airtight container, they’ll be perfect for 3-4 days. The crust may soften slightly by day 3 or 4, but they’ll still taste amazing.
Nutritional Snapshot (Per Mini Cheesecake)
Hey, I believe in balance! Indulging mindfully is part of a happy food life. Here’s a general breakdown for one mini cheesecake (using Greek yogurt), but remember, these are estimates and can vary based on your specific brands and any substitutions.
- Calories: ~150
- Protein: 4g (Thank you, Greek yogurt!)
- Carbohydrates: 12g
- Fat: 10g
- Sugar: 7g
Using lighter cream cheese or fat-free Greek yogurt can lower the fat and calorie count. But sometimes, the full-fat version is worth it for that incredible, creamy texture. You do you!
Ready to Chow Down?
And there you have it, my friends—my heartfelt, no-bake tribute to a classic summer treat, wrapped up in a bite-sized package of joy. I hope these Strawberry Crunch Mini Cheesecakes bring as much fun to your kitchen and happiness to your table as they have to mine. Remember, cooking isn’t about perfection; it’s about the love you stir in and the people you share it with. So don’t stress over a lopsided swirl or an extra-big crumble chunk. That’s what makes it yours.
If you make them (and I really hope you do!), tag me on social @TastyChow so I can see your beautiful creations! Now, go grab a fork, get cozy, and let’s chow down on something wonderful.
With love and a fully stocked fridge,
Emily