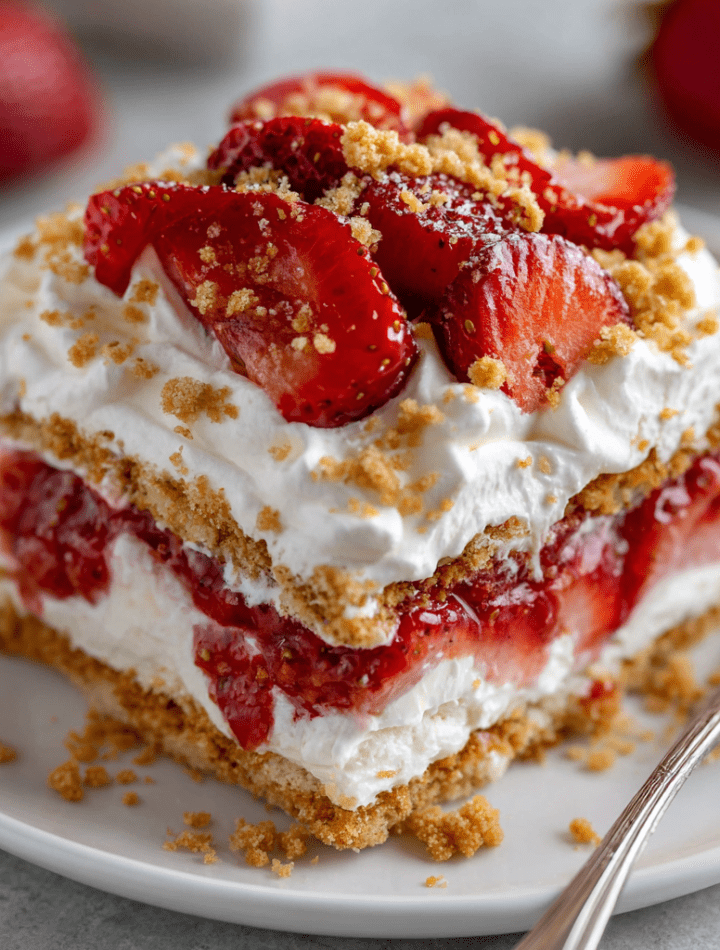
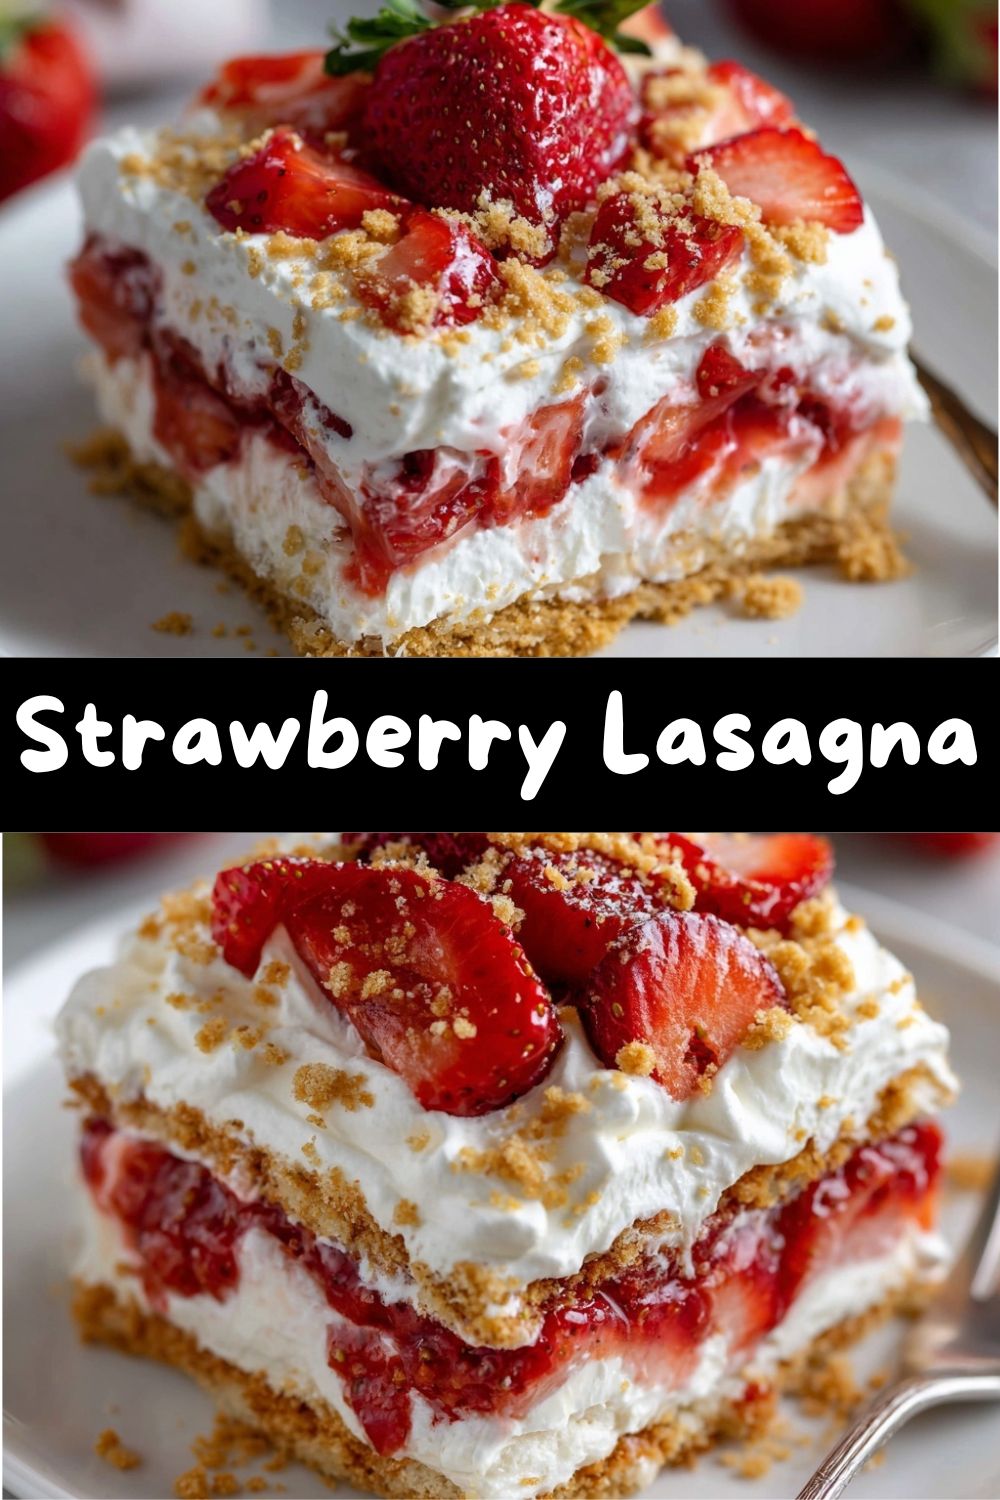
Strawberry Lasagna: Your New Favorite No-Bake Dessert
Let’s be clear: this is not your nonna’s lasagna. We’re trading marinara for sweet cream and noodles for buttery cookie crumbs. Imagine a dessert that’s like a cheesecake, a trifle, and a strawberry shortcake had the most delicious, melt-in-your-mouth baby. That’s this. We’re talking layers upon layers of crunchy Golden Oreo crust, a cloud-like sweet cream cheese filling, a lush vanilla pudding stratum, a blanket of juicy fresh strawberries, and a final crowning glory of fluffy whipped topping. Every bite is a textural symphony of creamy, crunchy, and fruity.
The best part? It’s embarrassingly easy. There’s no baking, no fancy techniques—just simple assembly and the magic of your fridge doing all the hard work. It’s the ultimate dessert for potlucks, BBQs, family dinners, or just treating yourself on a Tuesday because you deserve it. So, grab your favorite mixing bowl, and let’s make a dessert that’s going to have everyone asking, “Wait, you MADE this?!” Spoiler: you totally did, and you’ll feel like a dessert rockstar.
The Strawberry Standoff & A Dessert Dream
This recipe always takes me back to my very first “grown-up” summer party I hosted after culinary school. I was 22, living in a tiny apartment with an even tinier kitchen, and I wanted to impress my new friends with something that screamed “professional chef.” I planned an elaborate four-course meal. The main course? Fine. The appetizers? Passable. But dessert was a disaster. I attempted a delicate strawberry tart, and let’s just say the pastry cream curdled and the crust… let’s not talk about the crust.
Panicking, I stared at the pints of gorgeous strawberries on my counter. I had Oreos from a midnight snack stash, some cream cheese, and a box of pudding mix my mom had left “just in case.” In a sweaty, last-ditch effort, I started layering things frantically in a pan, chucked it in the fridge, and prayed. Four hours later, my friends dug into this haphazard, no-name dessert. The silence was followed by moans of pure bliss. “Emily, this is INCREDIBLE! What’s it called?” one friend asked, mouth full. I looked at the messy, beautiful stripes in the pan and blurted out, “Uh… Strawberry Lasagna!” The name stuck, and the pressure to be a “perfect” chef melted away. Sometimes, the best recipes are born from happy accidents and a well-stocked pantry.
Gathering Your Sweet Symphony: Ingredients & Insights
Here’s the dream team of ingredients that’ll come together to create magic. Don’t stress about perfection—cooking (and no-bake assembling!) is about joy, not rigidity.
- 1 package Golden Oreos (36 cookies), crushed: These are the sunny, vanilla-y foundation of our crust. Their slight sweetness is perfect. Chef’s Insight: Don’t have a food processor? Toss them in a heavy zip-top bag and channel your inner stress-relief therapist with a rolling pin. For a nuttier twist, try Biscoff cookies!
- 6 tbsp melted butter: This is the glue. It transforms crumbly cookie dust into a firm, pressable crust. Use unsalted to control the sweetness.
- 1 (8 oz) block cream cheese, softened: KEY WORD: softened. Leave it on the counter for a good hour. This ensures a silky-smooth layer without pesky lumps. Full-fat is best for structure and flavor here.
- 1 cup powdered sugar: It dissolves beautifully into the cream cheese, giving us a sweet, smooth filling. Sift it if you have time to avoid any little sugar lumps.
- 1 ½ cups whipped topping (like Cool Whip), divided: We use this in two places! It lightens the cream cheese layer and creates the final cloud on top. Keep it frozen until just before you need it. Substitution Tip: An equal amount of freshly whipped heavy cream, sweetened with a tablespoon of powdered sugar, works wonderfully.
- 1 (3.4 oz) package instant cheesecake or vanilla pudding mix: Instant is non-negotiable here—we’re not cooking it! The cheesecake flavor adds a lovely depth, but vanilla is a classic, beautiful choice.
- 1 ½ cups cold milk: The colder the milk, the quicker and thicker your pudding will set. I use whole milk for richness, but any milk you have will work.
- 2 cups fresh strawberries, sliced: The star of the show! Look for bright red, fragrant berries. Slice them evenly so they lay flat and pretty. In a pinch, well-drained thawed frozen strawberries can work, but fresh is truly best for texture and taste.
- Optional for topping: A drizzle of strawberry syrup, a handful of extra crushed cookies, or a few whole berries for a gorgeous finish.
Building Your Edible Masterpiece: Step-by-Step
Ready to play dessert architect? Follow these steps, and you really can’t go wrong. I’m right here with you, whispering tips and tricks.
- Make the Crust: In a medium bowl, combine your finely crushed Golden Oreos and the melted butter. Stir until every last crumb is shimmering and moistened. It should feel like wet sand. Pour this into your 9×13-inch baking dish and press it down firmly and evenly with the bottom of a measuring cup or glass. This compact layer is crucial—it’s our foundation! Pop it in the fridge for 10-15 minutes to let the butter firm up. Chef’s Hack: Lining your dish with parchment paper, leaving an overhang on two sides, will let you lift the entire dessert out for super-clean slicing later!
- Create the Cream Cheese Cloud: In a large bowl, beat the softened cream cheese with an electric mixer on medium speed until it’s completely smooth and creamy, about 1-2 minutes. Scrape down the bowl. Add the powdered sugar and beat again until it’s fully incorporated and fluffy. Now, gently fold in 1 cup of the whipped topping. “Folding” means using a spatula to cut down through the center, sweep across the bottom, and turn the mixture over itself. This keeps the air in the whipped topping, making this layer light as air. Spread this deliciousness evenly over your chilled crust.
- Whip Up the Pudding Layer: In another bowl, whisk the instant pudding mix with the cold milk. Whisk vigorously for a full 2 minutes. It will start to thicken beautifully right before your eyes. Let it sit for just a minute to set further, then pour and spread it over the cream cheese layer. Work somewhat quickly here, as it sets fast! The contrast between the tangy cream cheese and the sweet, smooth pudding is everything.
- Berry Bliss & Final Topping: Now for the pretty part! Take your sliced strawberries and arrange them in a single, beautiful layer over the pudding. You can do neat rows or just scatter them artfully—it’s your masterpiece. Then, take the remaining ½ cup of whipped topping and carefully spread it over the strawberries. This seals in the berries and gives us that iconic snowy top. Don’t worry about being perfect; rustic is charming!
- The (Hardest) Part: The Chill: Cover your dish and refrigerate for at least 4 hours, but overnight is gold. This non-negotiable wait time lets all the layers get to know each other and firm up perfectly, making it sliceable and dreamy. Before serving, add any final garnishes like a extra berry drizzle or a sprinkle of cookie crumbs.
How to Serve This Showstopper
Presentation is the final act of love! For a family-style treat, just place the whole dish on the table with a big serving spoon and watch the crowd gather. For a more elegant touch, use a sharp knife dipped in hot water to cut clean squares. Lift them out with a pie server or offset spatula.
Place each slice on a pretty plate. A tiny mint leaf, a single perfect strawberry fanned beside it, or a light dusting of powdered sugar takes it to cafe-level gorgeous. This dessert is rich, so servings can be on the smaller side—which means it feeds a crowd! It pairs wonderfully with a cup of iced coffee, black tea, or even a glass of bubbly prosecco for a celebration. The cool, creamy texture makes it the ultimate finish to any spicy or heavy meal.
Make It Your Own: Delicious Variations
The beauty of this recipe is its versatility. Once you master the basic blueprint, the flavor world is your oyster (or, more appropriately, your berry basket). Here are a few of my favorite twists:
- Mixed Berry Bonanza: Swap the strawberries for a mix of raspberries, blueberries, and blackberries. The color is stunning, and the flavor is a complex, tangy symphony.
- Chocolate Strawberry Dream: Use chocolate sandwich cookies (like regular Oreos) for the crust. You can even add a tablespoon of cocoa powder to the cream cheese layer for a double chocolate punch.
- Tropical Escape: Use crushed graham crackers or vanilla wafers for the crust. Layer with diced mango, kiwi, and pineapple on top of the pudding. A touch of toasted coconut sprinkled over the whipped topping sends you straight to the islands.
- Lemon Blueberry Bliss: Use lemon pudding mix and fold a little lemon zest into the cream cheese layer. Top with fresh blueberries instead of strawberries for a bright, sunny flavor.
- Dietary-Friendly Swaps: For a gluten-free version, use your favorite gluten-free sandwich cookies or graham crackers. For a lighter version, use Neufchâtel cheese, fat-free milk, and sugar-free pudding mix with light whipped topping. The structure will be slightly softer but still delicious.
Chef Emily’s Notes from a Flour-Dusted Kitchen
This recipe has been my trusty sidekick for years, and it’s evolved in little ways. I used to mix the strawberries right into the pudding, but I found they bled too much moisture. Layering them whole keeps everything distinct and pretty. I’ve also learned that the brand of pudding mix matters slightly for thickness; if yours seems a bit runny after whisking, just let it sit for 5 extra minutes—it’ll get there!
One summer, I brought this to a lakeside potluck, and a well-meaning friend put it in the cooler “to keep it cold.” It partially froze into a delicious ice cream cake hybrid! While not the original plan, it was a hilarious and happy accident that everyone loved. So, don’t fear imperfections—they often lead to the best kitchen stories and new recipe ideas.
Your Questions, Answered
Q: Can I make this dessert ahead of time?
A: Absolutely! In fact, I insist on it. Making it the night before is the BEST way to go. It gives the layers maximum time to set and the flavors to meld perfectly.
Q: My crust is soggy. What happened?
A: The most common culprit is not letting the butter firm up in the fridge initially, or not chilling the dessert long enough before serving. Ensure your butter is fully melted and mixed in, press the crust firmly, and give it that full 4+ hour chill. Also, make sure your strawberry slices are dry before adding them.
Q: Can I use homemade whipped cream instead of Cool Whip?
A: Yes! Whip 1 ½ cups of heavy cream with 3 tablespoons of powdered sugar and 1 tsp of vanilla until you have stiff peaks. Use it in the same measurements. The texture will be slightly less stable but phenomenally flavorful.
Q: How long does it last in the fridge?
A: It’s best enjoyed within 2-3 days. The crust will gradually soften the longer it sits (which is still tasty), but the berries are freshest within that timeframe. I don’t recommend freezing the assembled dessert, as the texture of the pudding and cream cheese layers can become grainy when thawed.
Nutritional Information*
*Please note: This is an estimate provided for informational purposes based on standard ingredients. Variations will change the values.
Per Serving (1 of 12):
Calories: ~320 | Total Fat: 20g | Saturated Fat: 10g | Cholesterol: 45mg | Sodium: 240mg | Total Carbohydrates: 33g | Dietary Fiber: 1g | Sugars: 20g | Protein: 3g
Remember, dessert is about joy and connection, not just numbers. Savor each bite mindfully and share it with people you love. This is a treat, and it’s meant to be enjoyed as part of a happy, balanced life full of delicious moments!
Final Thoughts from My Kitchen to Yours
And there you have it, my food-loving friend! My go-to, never-fail, always-impresses No-Bake Strawberry Lasagna. It’s more than just a recipe; it’s a reminder that the most memorable dishes don’t have to be complicated. They just have to be made with a dash of fun and a whole lot of love.
I hope this recipe becomes a staple in your home, the thing you’re asked to bring to every gathering, and the treat you whip up when you need a little kitchen win. Remember, cooking (and no-bake assembling!) is an adventure. If your layers aren’t perfectly even or your strawberries are a little lopsided, it doesn’t matter one bit. It will still taste incredible because you made it.
Now, I’d love to hear from you! Did you try a fun variation? Did your family go crazy for it? Tag me on social or leave a comment below—seeing your creations is my favorite part of this job. Until next time, keep your whisks busy, your berries fresh, and your hearts full. Happy cooking (or chilling)!
— Emily 🍓