Spring’s Sweetest Surprise: Strawberry Shortcake Easter Egg Bombs
Hey there, friend! Emily here, from my flour-dusted kitchen to yours. Is there anything more magical than that first truly warm day of spring? The birds are chirping, the flowers are peeking out, and my brain instantly switches into full-on celebration mode. Easter, for me, has always been less about pastels (though I love a good pastel) and more about that feeling of joyful renewal—and of course, the food that brings everyone together.
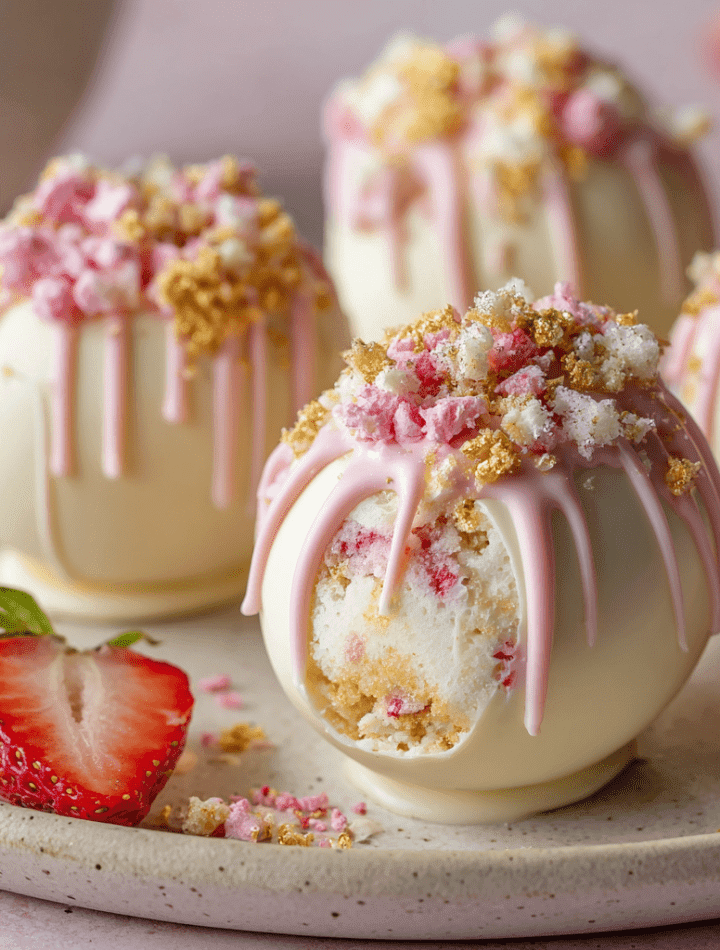
But let’s be real: sometimes, between hiding eggs and hosting family, you need a showstopper dessert that doesn’t require you to hover over a hot oven. Enter the hero of our spring table: Strawberry Shortcake Easter Egg Bombs. Imagine this: a smooth, creamy strawberry shortcake filling, studded with crunchy bits and berry flavor, all wrapped up in a crisp white chocolate shell shaped like a gorgeous Easter egg. It’s a bite of pure, unadulterated joy.
These bombs are the perfect blend of playful and elegant. They look stunning on a dessert table, make the most delightful edible gifts, and are an absolute blast to make with helpers of all ages (little hands are excellent crumb-crushers, just saying). So, tie on your favorite apron—the one with the stains that tell stories—and let’s create some sweet, shareable magic. This is more than a recipe; it’s a kitchen moment waiting to happen.

The Story Behind the Sweet: Grandma’s Sunday Shortcake
This recipe takes me right back to my grandma’s linoleum floor, standing on a step-stool so I could see over the counter. Every Sunday after church, the scent of her simple shortcake biscuits would fill her tiny house. She’d split them warm, pile on macerated strawberries from her garden, and top it all with a cloud of barely-sweetened whipped cream. It was messy, it was simple, and it was pure love on a plate.
I wanted to capture that exact feeling—the comforting crunch of the biscuit, the bright burst of strawberry, the lush creaminess—but in a form we could hold in our hands and share. The first time I unmolded one of these chocolate egg shells and filled it, I knew we had something special. It was like unwrapping a present, a little edible secret holding my favorite childhood memory inside. That’s the heart of Tasty Chow: taking those warm, fuzzy food feelings and giving them a fun, new life.
Gathering Your Treasure Trove of Ingredients
Here’s everything you’ll need to build your edible Easter treasures. I’ve included my favorite tips and swaps so you can make this recipe your own!
- 12 oz White Chocolate, Chopped: Use a good quality baking bar, not chips! Chips have additives to hold their shape, which can make melting finicky. Chopping it yourself ensures super smooth, dip-able chocolate. Chef’s Insight: I like a vanilla-heavy white chocolate here—it complements the strawberry so beautifully.
- 2 oz Pink Candy Melts (or white chocolate + pink food coloring): This is for our pretty drizzle! Candy melts are easy and set beautifully. If you’re an oil-based food coloring fan, tinting a bit of extra white chocolate works too.
- ½ cup Freeze-Dried Strawberries, Crushed: This is our FLAVOR SECRET WEAPON! They pack an intense, pure strawberry punch without adding moisture. Crush them in a bag with a rolling pin until you have a mix of powder and small bits. No substitute here—they’re key!
- ½ cup Strawberry Jam: This gives us that luscious, sticky-sweet berry heart. Use a good-quality jam you love the taste of. Seedless is great for ultra-smooth filling, but seeded adds nice texture, too!
- ½ cup Heavy Cream: We’re whipping this into stiff peaks for structure and airy lightness. Make sure it’s very cold!
- ½ cup Cream Cheese, softened: This adds a lovely tang and helps the filling stay firm when chilled. Leave it on the counter for 30-60 minutes before you start. Sub Tip: For a slightly lighter feel, mascarpone is a dreamy swap.
- 2 tbsp Powdered Sugar: Just a touch of sweetness for our whipped component. It dissolves instantly.
- 1 tsp Vanilla Extract: The flavor backbone. Always use pure vanilla if you can!
- ½ cup Crushed Shortcake Biscuits: Hello, texture! I use those classic, crunchy shortbread-style biscuits. Graham cracker crumbs are a fine substitute in a pinch. Crush them so you have a mix of fine crumbs and some pea-sized pieces.
- For Decoration: More crushed shortcake crumbs, fresh strawberry slices, edible gold sprinkles, and that melted pink chocolate. This is where you get to be an artist!
Let’s Build Some Magic: Step-by-Step
Don’t let the fancy look fool you—this is a fun, assembly-line process. Read through once, then let’s dive in!
- Prep Your Station: Clear some space in your fridge! Have your silicone Easter egg molds (the half-sphere kind) clean, dry, and ready on a baking sheet for easy transport. Crush your freeze-dried strawberries and shortcake biscuits now so they’re ready to go.
- Melt the Chocolate for the Shells: Place your chopped white chocolate in a microwave-safe bowl. Microwave in 30-second bursts at 50% power, stirring well between each burst. Stop when it’s mostly melted and just a few lumps remain—the residual heat will melt them as you stir. Chef’s Hack: OVERHEATING is the enemy of smooth chocolate. If it seizes (gets clumpy), stir in a teaspoon of vegetable oil or shortening to bring it back.
- Create the Chocolate Shells: Using a spoon or small brush, coat the inside of each mold cavity with a thick layer of melted chocolate. You want it to be opaque. Tap the mold firmly on the counter to release any air bubbles. Pop it into the freezer for 15 minutes. Once set, take it out and add a second coat of chocolate to any thin spots—this ensures a sturdy egg that won’t crack when you handle it. Freeze again for 15 minutes until completely solid.
- Make the Dreamy Filling: While the shells set, make the filling. In a large bowl, whip the cold heavy cream with the powdered sugar until you have firm peaks. In another bowl, beat the softened cream cheese until smooth. Gently fold the whipped cream into the cream cheese until combined. Now, fold in the strawberry jam, crushed freeze-dried strawberries, vanilla, and finally the crushed shortcake biscuits. Don’t overmix! We want to keep it fluffy. Give it a taste—is it heaven? Yes, yes it is.
- The Grand Assembly: Carefully pop your set chocolate shells out of the molds. They should release easily. Lay out half of them, open-side up. Spoon or pipe the strawberry shortcake filling into each shell, mounding it slightly. Leave a tiny lip around the edge. Take the other half of the shells—these are your lids. Briefly warm a plate and press the open rim of a “lid” shell onto it for just 2-3 seconds to barely melt the edge. Immediately press it onto a filled shell, sealing it shut. Repeat with all eggs. This “heat-seal” method creates a perfect, clean bond!
- The Final Chill: Place your assembled egg bombs on a parchment-lined tray and chill in the fridge for at least 10-15 minutes to let everything firm up completely.
- Decorating Party! Melt your pink candy melts. Drizzle it over the chilled bombs with a spoon or fork. Immediately sprinkle with shortcake crumbs, gold sprinkles, and top with a tiny slice of fresh strawberry before the drizzle sets. This is your moment to shine—make them sparkle!
How to Serve These Showstoppers
Presentation is part of the fun! For an Easter table, nestle each bomb in a bed of shredded green paper “grass” on a pretty platter. They look incredible on a tiered dessert stand mixed with some real eggs or spring flowers. If you’re gifting them, place each one in a small, clear cellophane bag tied with a ribbon—it’s a gift that will genuinely wow. Serve them straight from the fridge for the best texture: the chocolate will have a satisfying snap, giving way to the cool, creamy, crunchy filling inside. Pair them with a cup of fresh coffee or a glass of cold milk for the ultimate bite.
Make It Your Own: Delicious Twists & Swaps
Got a different berry craving? Dietary need? Let’s play!
- Lemon Berry Bliss: Swap the strawberry jam for raspberry jam and add the zest of one lemon to the filling. Use crushed vanilla wafers instead of shortcake. Bright, tangy, and incredible.
- Chocolate Dipped Dream: Use milk or dark chocolate for the shell instead of white. Fill with the same strawberry filling, or try a chocolate ganache and crushed Oreo filling for a cookies-and-cream egg!
- “Cheesecake” Style: Double the cream cheese to 1 cup and use ¼ cup of cream. Fold in blueberry jam and crushed graham crackers. Instant blueberry cheesecake eggs!
- Dairy-Free Delight: Use a high-quality dairy-free white chocolate. For the filling, use chilled coconut cream (the solid part from a can) whipped with powdered sugar, and a dairy-free cream cheese alternative. It works like a charm!
- “Nest” Bombs: Instead of sealing two halves, just use one chocolate shell as a cup. Fill it with the strawberry shortcake filling and top with a little mound of toasted coconut “nest” and a few jelly bean “eggs.” Adorable and easier for little ones to eat.
Emily’s Kitchen Notes & Stories
The first batch I ever made of these… well, let’s just say I learned the hard way about thin chocolate shells. I was too eager and didn’t do the second coat. When I went to seal them, *crack*! I had a mini kitchen meltdown, then started laughing. My solution? I called them “deconstructed strawberry shortcake bombs” and served the filling alongside the broken chocolate pieces for dipping. It was a hit! The lesson? Don’t fear mistakes—they often lead to new, delicious ideas. Over time, I perfected the double-coat method and the warm-plate seal, which are now non-negotiable steps in my kitchen. This recipe is a testament to the fact that the best creations come from a bit of mess, a lot of love, and the willingness to try again.
Your Questions, Answered!
Q: Can I make these ahead of time?
A: Absolutely! They are perfect for making ahead. Store the fully assembled and decorated bombs in a single layer in an airtight container in the fridge for up to 3 days. The filling stays perfect and the chocolate remains snappy.
Q: My chocolate got thick and clumpy when melting! What do I do?
A: Ah, seized chocolate. It usually means a tiny bit of steam or water got in, or it overheated. Don’t panic! Stir in about a teaspoon of neutral oil (like vegetable or coconut) or shortening. It should slowly come back to a smooth, glossy state. For prevention, always ensure your bowls and tools are completely dry.
Q: Can I use real strawberries instead of freeze-dried?
A: I don’t recommend it for the filling. Fresh berries release too much water and will make the filling soggy and prevent it from setting properly. The freeze-dried kind give massive flavor without the moisture. Save the fresh, juicy berries for decoration on top!
Q: Where do I find silicone Easter egg molds?
A: Craft stores, baking supply shops, or online retailers (like Amazon) have them in all sizes! A standard mold with 2-inch diameter cavities is perfect for this recipe.
A Note on Nutrition (Approximate)
While these are very much a celebratory treat, I believe in mindful enjoyment. Each Strawberry Shortcake Easter Egg Bomb (assuming the recipe makes 6) contains roughly: 260 Calories, 26g Carbohydrates, 15g Fat, 3g Protein, and 18g Sugar. The fat comes mainly from the cream and chocolate, providing that rich, satisfying mouthfeel. The protein from the cream cheese and cream helps balance the sweetness. Remember, treats like this are about the experience—the joy of making, the beauty of sharing, and the pure delight of that first bite. Savor them slowly and with good company!
Final Thoughts from My Kitchen to Yours
And there you have it, my friend—your ticket to becoming the dessert hero of your spring celebration. These Strawberry Shortcake Easter Egg Bombs are more than just candy; they’re little parcels of memory-making. They remind us that cooking is play, that presentation is part of the gift, and that the best recipes are the ones shared.
I hope you have as much fun making these as I do. I hope you get covered in a little powdered sugar and maybe even get a bit of pink chocolate on your nose. I hope whoever you share these with feels that special “made with love” touch. Now, go forth and create something delicious. And don’t forget to tag me @TastyChow if you share a photo—seeing your kitchen creations truly makes my day.
Until next time, keep your whisk handy and your heart hungry.
— Emily 🍓✨