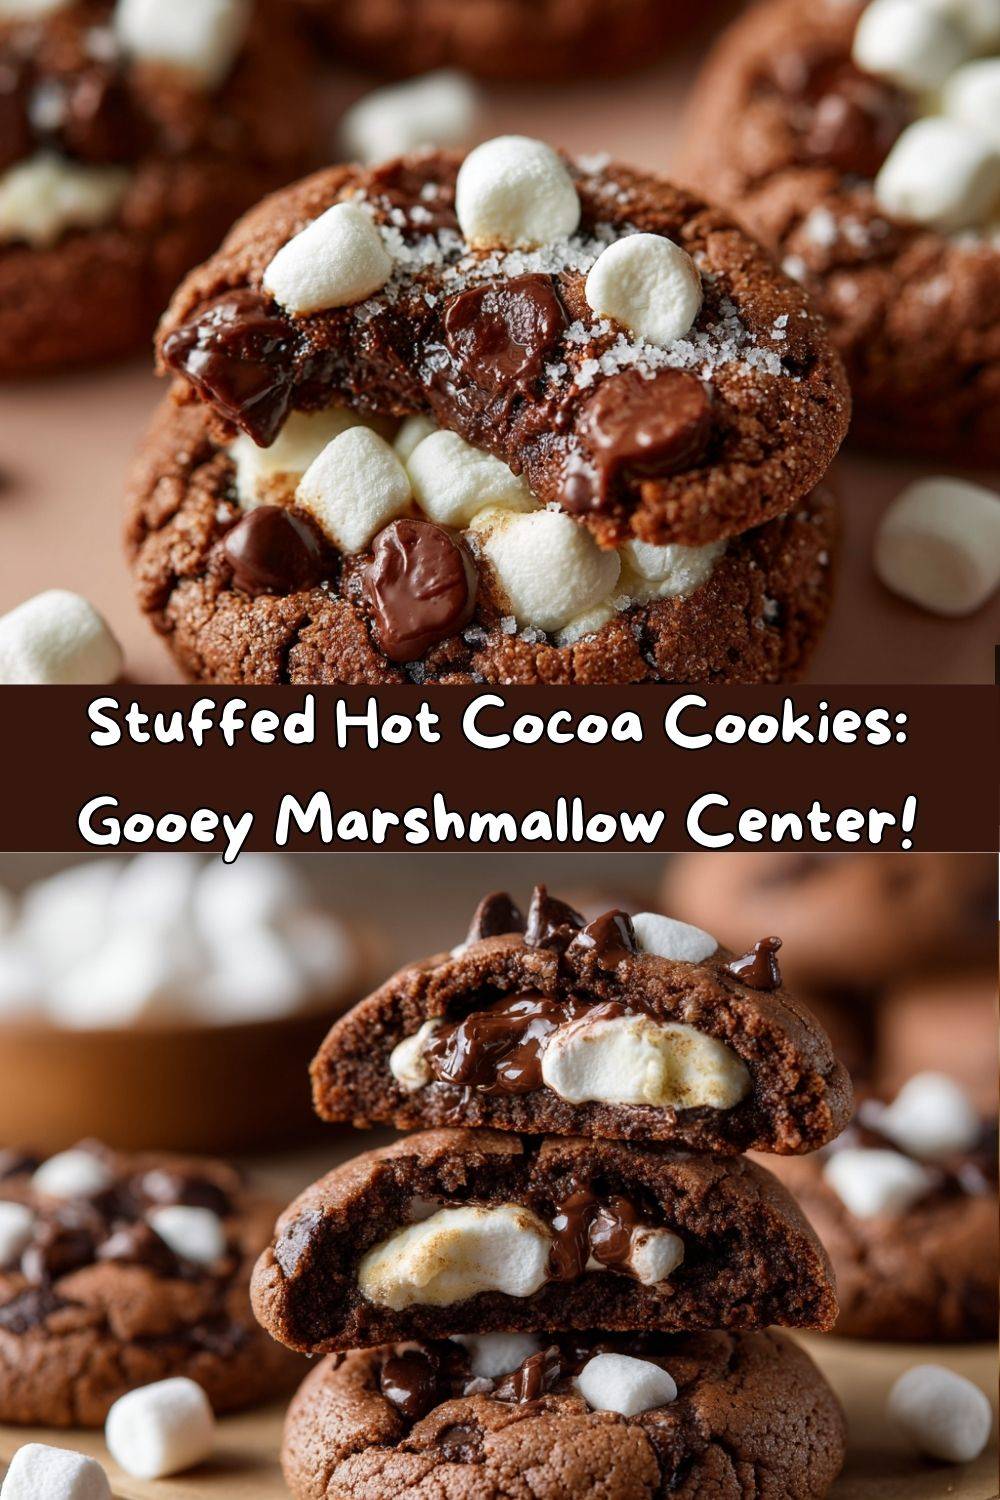
Your New Favorite Cookie: Stuffed Hot Cocoa Cookies Are Here!
Hey there, my fellow foodie friend! Chef Emily here, waving at you from my flour-dusted kitchen. Is there anything in the world that combines pure joy and comfort quite like a warm, gooey chocolate chip cookie? I’m not sure there is. But what if I told you we could take that classic, heartwarming feeling and somehow make it even more magical? What if we could somehow stuff all the cozy, marshmallowy goodness of a steaming mug of hot cocoa right into the center of a fudgy, chocolatey cookie?
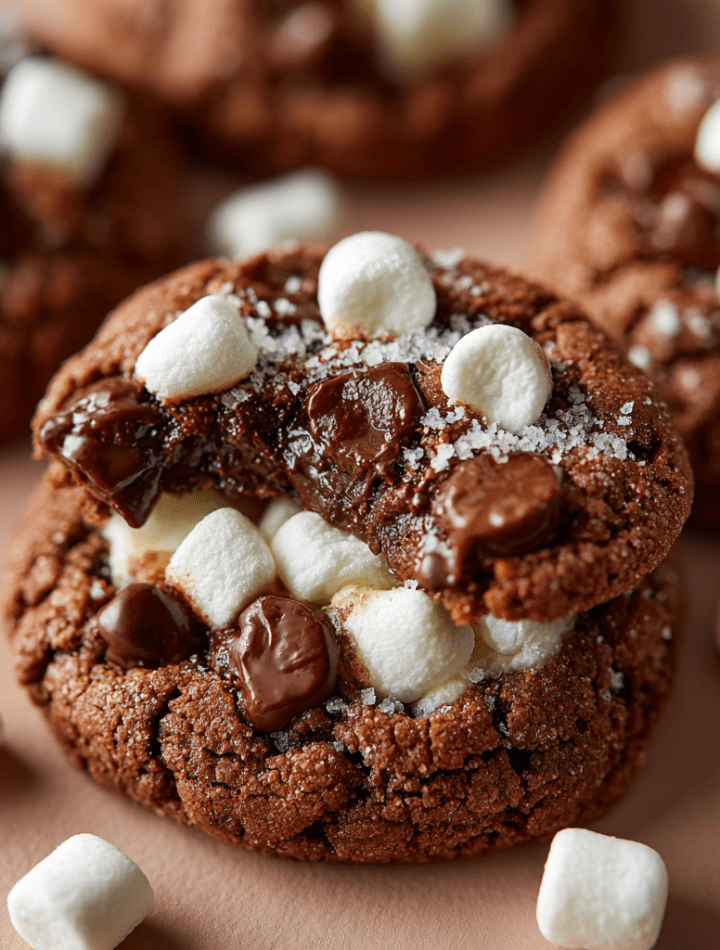
Well, stop dreaming, because that’s exactly what we’re doing today. These Stuffed Hot Cocoa Cookies are a game-changer. Imagine this: a rich, double-chocolate cookie base that’s soft and chewy, with a secret, melty marshmallow center that oozes out with every single bite. It’s like a delicious, edible hug. It’s the cookie you make when you want to impress your friends, spoil your family, or just treat yourself after a long day. They’re fun to make, absolutely irresistible to eat, and they fill your kitchen with the most incredible aroma. So, tie on your favorite apron (the messy one is always the best!), and let’s bake up some serious magic together.
A Snowy Day & A Sweet Idea
This recipe takes me right back to one particularly snowy afternoon a few winters ago. My little niece, Sophie, was over, and we had just come in from building a truly epic (and slightly lopsided) snowman. Our fingers were frozen, our noses were red, and we were desperately in need of a warm-up. The classic solution? A big mug of hot chocolate, piled high with mini marshmallows, of course.
As we sat there sipping, watching the marshmallows slowly melt into a sweet, pillowy cloud on top, Sophie looked at me with those big, serious eyes and said, “Auntie Em, I wish I could eat this feeling.” And you know what? So did I! That spark of an idea sent me straight to the kitchen. I started with my favorite chocolate cookie dough, grabbed a bag of marshmallows, and began experimenting. The first batch? Let’s just say the marshmallows decided to make a dramatic escape and create a sugary lava flow all over the baking sheet. But a little persistence (and a lot of laughter) later, we nailed it. That happy accident in the kitchen, fueled by a snowy day and a child’s brilliant idea, became one of my all-time favorite recipes. Every time I bake them, I think of that day and smile.
Gathering Your Cozy Cookie Ingredients
This is where the magic starts! The beauty of this recipe is that it uses simple, pantry-staple ingredients to create something extraordinary. Here’s everything you’ll need to make about two dozen cookies of pure bliss.
- 1 cup (2 sticks) unsalted butter, softened – This is the foundation of our rich, tender cookie. Using unsalted butter lets us control the salt level. Chef’s Tip: Your butter is perfectly softened when you can press your finger into it and leave a slight indentation. Too melted, and your cookies will spread too much!
- ¾ cup packed brown sugar – This brings that deep, molasses-like sweetness and moisture, which is key for a chewy texture.
- ½ cup granulated sugar – The white sugar helps create a slightly crisp exterior while aiding in that perfect spread.
- 2 large eggs – Always use large eggs at room temperature! They bind the dough together and add structure. Substitution Tip: For a dairy-free version, a good plant-based butter works wonderfully here.
- 2 teaspoons vanilla extract – Don’t you dare skip this! Vanilla is the flavor enhancer that makes all the chocolate notes sing. Use the real stuff if you can.
- 2½ cups all-purpose flour – The main structure of our cookie. Chef’s Insight: For a foolproof result, fluff your flour with a spoon, spoon it into your measuring cup, and level it off. No packing!
- ½ cup unsweetened cocoa powder – This is what gives our cookie its intense hot chocolate flavor! Use a good-quality cocoa powder for the best taste.
- 1 teaspoon baking soda – Our leavening agent, which gives the cookies their lift and that lovely, slightly cracked top.
- ½ teaspoon salt – Crucial! Salt balances the sweetness and enhances all the other flavors. If you only have salted butter, just reduce this to a ¼ teaspoon.
- 1½ cups semi-sweet chocolate chips – I love the classic flavor of semi-sweet, but feel free to use milk chocolate or dark chocolate chunks for a different vibe.
- 20–24 mini marshmallows (or 10-12 large marshmallows, halved) – The glorious, gooey surprise! Mini marshmallows are easiest to work with, but a halved large marshmallow creates an epic, lava-like center.
Let’s Bake: Step-by-Step to Gooey Greatness
Okay, team! Let’s get our hands dirty and make some cookie magic happen. Follow these steps, and you’ll be a stuffed cookie pro in no time.
- Preheat and Prep: First things first, preheat your oven to 350°F (175°C). This is non-negotiable for even baking. Line your baking sheets with parchment paper. Trust me on this—it prevents sticking and makes cleanup an absolute dream. No parchment? A silicone baking mat works great too.
- Cream the Butter & Sugars: In a large bowl, use a hand mixer or a stand mixer with a paddle attachment to cream together the softened butter, brown sugar, and granulated sugar. We’re not just mixing; we’re creaming! Beat it on medium-high speed for a good 2-3 minutes until the mixture is light, fluffy, and pale in color. This step incorporates air, which is the secret to a perfectly textured cookie.
- Add Eggs and Vanilla: Beat in the eggs, one at a time, making sure each is fully incorporated before adding the next. Then, mix in the vanilla extract. Scrape down the sides of the bowl with a spatula to ensure everything is perfectly combined.
- Combine Dry Ingredients: In a separate, medium-sized bowl, whisk together the flour, cocoa powder, baking soda, and salt. Whisking is important here—it evenly distributes the leavening agent and cocoa so you don’t get any bitter pockets in your dough.
- Bring the Dough Together: Gradually add the dry ingredients to the wet ingredients, mixing on low speed just until the flour disappears. Chef’s Hack: Do not overmix! Overmixing develops gluten and leads to tough cookies. As soon as you see no more dry flour, stop the mixer.
- Fold in the Chocolate Chips: Use your trusty spatula to gently fold in the chocolate chips. This ensures they’re evenly distributed without overworking the dough.
- The Fun Part: Stuffing! Now, for the main event! Use a cookie scoop or a tablespoon to portion out about 2 tablespoons of dough. Flatten the dough ball slightly in the palm of your hand. Place a mini marshmallow (or a half of a large one) right in the center. Carefully wrap the dough around the marshmallow, pinching it closed to seal it completely. This is the most important step! A good seal keeps the marshmallow from erupting out the sides during baking. Roll it into a smooth ball and place it on your prepared baking sheet, spacing them about 2 inches apart to allow for spreading.
- Bake to Perfection: Bake for 10-12 minutes. The cookies are done when the edges look set and the tops are slightly cracked. They might still look a little soft in the center—that’s perfect! They will continue to cook on the hot pan as they cool. Chef’s Tip: For an extra bakery-style touch, press a few extra chocolate chips on top of the cookies right when they come out of the oven.
- Cool (If You Can Wait!): Let the cookies cool on the baking sheet for at least 5 minutes. This allows them to set up so they don’t fall apart when you move them. Then, transfer them to a wire rack to cool completely… or, you know, grab a glass of milk and enjoy one warm and dangerously gooey. I won’t tell.
How to Serve These Chocolatey Wonders
Honestly, these cookies are a star all on their own, still warm from the oven with a cold glass of milk. But if you want to take them to legendary status, here are a few of my favorite ways to serve them up.
For the ultimate “Hot Cocoa” experience, serve a warm cookie nestled in a mug. Drizzle a little extra melted chocolate on top and add a few mini marshmallows for a adorable, over-the-top presentation. It’s a dessert and a drink all in one!
They also make an incredible ice cream sandwich. Let a couple of cookies cool completely, then sandwich a scoop of vanilla bean ice cream in between. The contrast of the cold ice cream and the fudgy, soft cookie is a little slice of heaven.
For a holiday party or a cookie exchange, simply pile them high on a beautiful cake stand. They look stunning and are guaranteed to be the first platter to empty. No matter how you serve them, get ready for compliments!
Get Creative: Fun Recipe Variations
Once you’ve mastered the basic recipe, the kitchen playground is yours! Here are a few delicious twists to keep things exciting.
- Peppermint Hot Chocolate Cookies: Add ½ teaspoon of peppermint extract to the wet ingredients and fold in ½ cup of crushed peppermint candies or candy canes along with the chocolate chips. The cool peppermint with the rich chocolate is a classic winter combo.
- Salted Carella Swirl: After sealing the marshmallow inside, gently roll the dough ball in a small dish of coarse sea salt or flaky Maldon salt before baking. The sweet and salty combination is absolutely irresistible.
- Rocky Road: Fold in ½ cup of chopped walnuts or pecans along with the chocolate chips. You could even try stuffing the cookie with a few almonds and the marshmallow for a true rocky road surprise.
- White Chocolate Raspberry: Swap the semi-sweet chips for white chocolate chips. Before sealing the marshmallow inside, add a small dollop (about ¼ teaspoon) of raspberry jam right on top of it. The tart jam cuts through the sweetness beautifully.
- Gluten-Free Friendly: You can easily make these cookies gluten-free! Simply substitute the all-purpose flour with a 1:1 gluten-free baking blend. I recommend one that includes xanthan gum for the best texture.
Chef Emily’s Notes from the Kitchen
This recipe has seen a lot of love (and a few happy mistakes) in my kitchen. My biggest lesson learned? DO NOT use a jumbo marshmallow whole. I learned this the hard way during a late-night baking session. I thought, “Bigger is better, right?” Wrong. The marshmallow expands way too much and creates a cavernous hole while bubbling all over the pan. Stick to minis or halved large ones for the perfect gooey-to-cookie ratio.
Also, if you’re a dough-a-holic like me, this dough freezes beautifully! Prepare the stuffed cookie dough balls and freeze them solid on a baking sheet. Then, you can toss them in a freezer bag. When a cookie craving strikes, just bake them straight from the freezer, adding a minute or two to the baking time. Fresh, warm cookies in under 15 minutes? Yes, please!
Your Questions, Answered!
Q: My marshmallow exploded everywhere! What did I do wrong?
A: The number one cause of marshmallow blowouts is not sealing the dough completely. Make sure the marshmallow is entirely enclosed with no cracks or thin spots. Chilling the stuffed dough balls for 15-20 minutes before baking can also help firm up the butter and prevent too much spreading, which can crack the seal.
Q: Can I use marshmallow fluff instead?
A: You can try! It’s a bit trickier. Freeze dollops of marshmallow fluff on a parchment-lined sheet pan until solid, then quickly wrap the dough around the frozen fluff puck. This prevents it from immediately oozing out.
Q: My cookies came out really flat. How can I prevent that?
A Flat cookies are usually due to butter that is too warm or melted. Make sure your butter is just softened, not melted. Also, double-check that your baking soda is fresh! Expired leavening agents won’t give your cookies the lift they need.
Q: How do I store these cookies?
A: Once fully cooled, store them in an airtight container at room temperature for up to 3 days. The marshmallow center will absorb into the cookie after the first day, but they’ll still be deliciously soft and chewy. To re-capture that fresh-from-the-oven gooeyness, pop a cookie in the microwave for 10-15 seconds!
Nutritional Information
I’m all about balance—indulging in treats made with love is part of a happy life! Here’s a general nutritional breakdown per cookie (assuming the recipe yields 24 cookies). Please note that this is an estimate and can vary based on specific ingredients and portion sizes.
Approximate values per cookie:
Calories: ~180 | Total Fat: 9g | Saturated Fat: 5g | Cholesterol: 30mg | Sodium: 85mg | Total Carbohydrates: 22g | Dietary Fiber: 1g | Sugars: 14g | Protein: 2g
These cookies are a treat, best enjoyed in the context of a balanced diet. Their true value is in the joy of baking and the smiles they bring to the faces of the people you share them with!
Final Sweet Thoughts
Well, my friend, there you have it! My all-time favorite Stuffed Hot Cocoa Cookies. This recipe is more than just a list of ingredients; it’s a invitation to create, to experiment, and to share something truly special. I hope these cookies bring as much warmth and happiness to your kitchen as they have to mine.
Remember, baking is an adventure. Don’t be afraid to get a little messy, to try a new variation, or to have a marshmallow mishap—it’s all part of the fun. The most important ingredient is always the love you stir into the bowl.
I’d love to hear how your cookies turn out! Tag me on social @TastyChow with your creations so I can see all the delicious magic you’re making. Now, go preheat that oven and get baking! Happy chowing!
— Emily 🍪