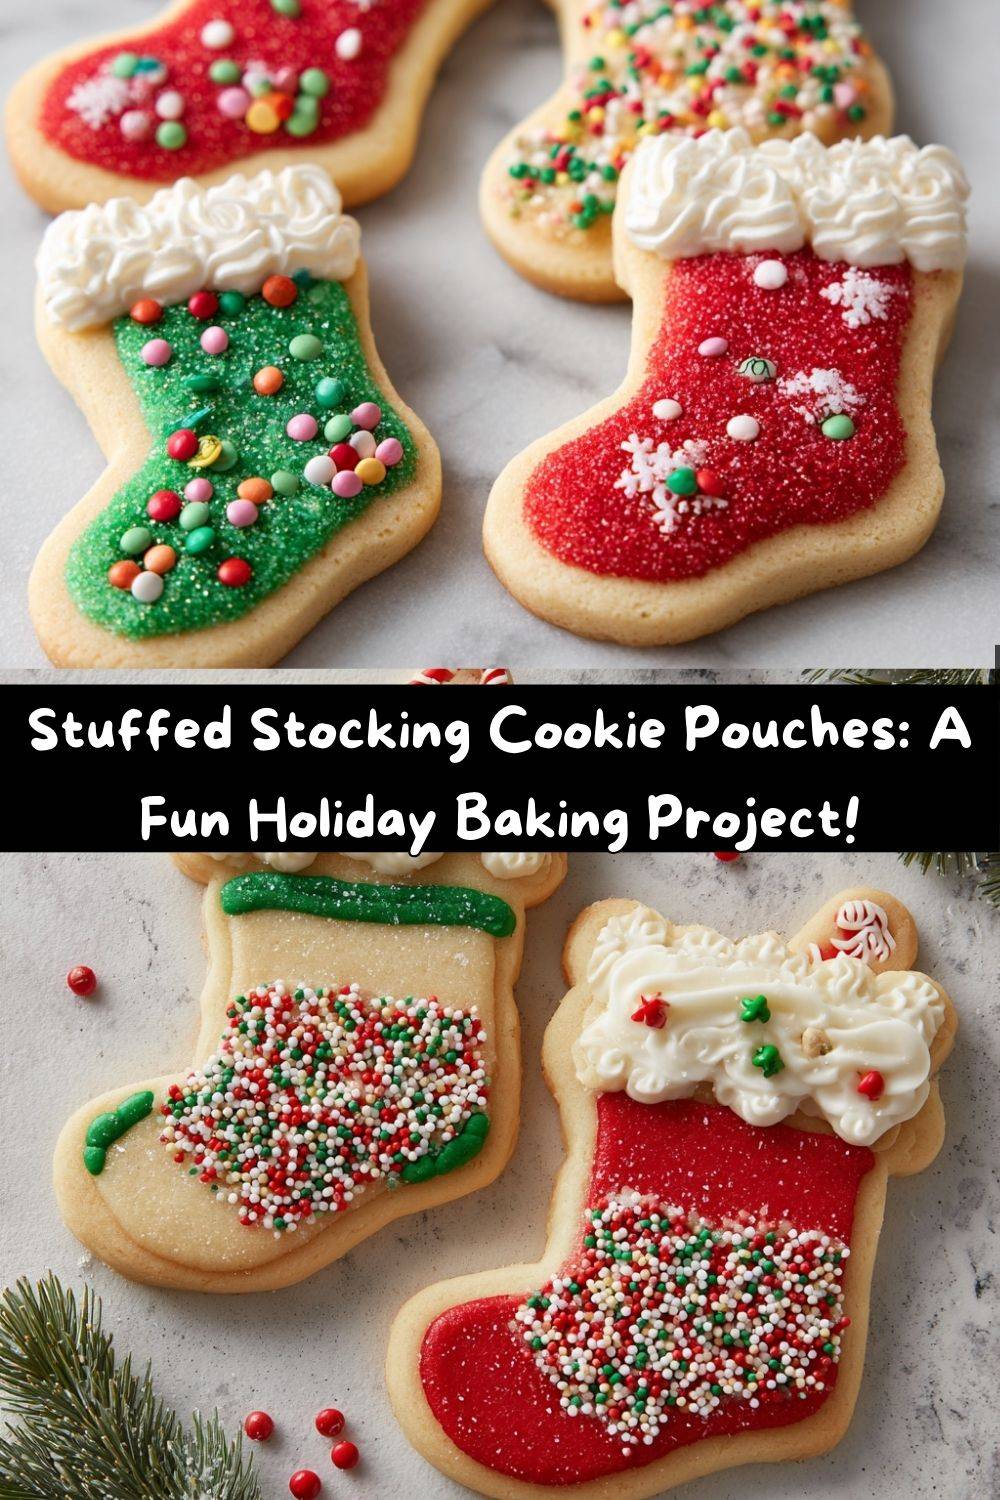
Stuffed Stocking Cookie Pouches: The Most Magical (and Edible!) Holiday Surprise
Hey there, my festive friend! Can you smell it? That warm, buttery scent of sugar cookies wafting from the kitchen is the official smell of holiday magic in my house. It’s a signal that it’s time to put on our favorite holiday tunes, sprinkle flour absolutely everywhere, and create something special.
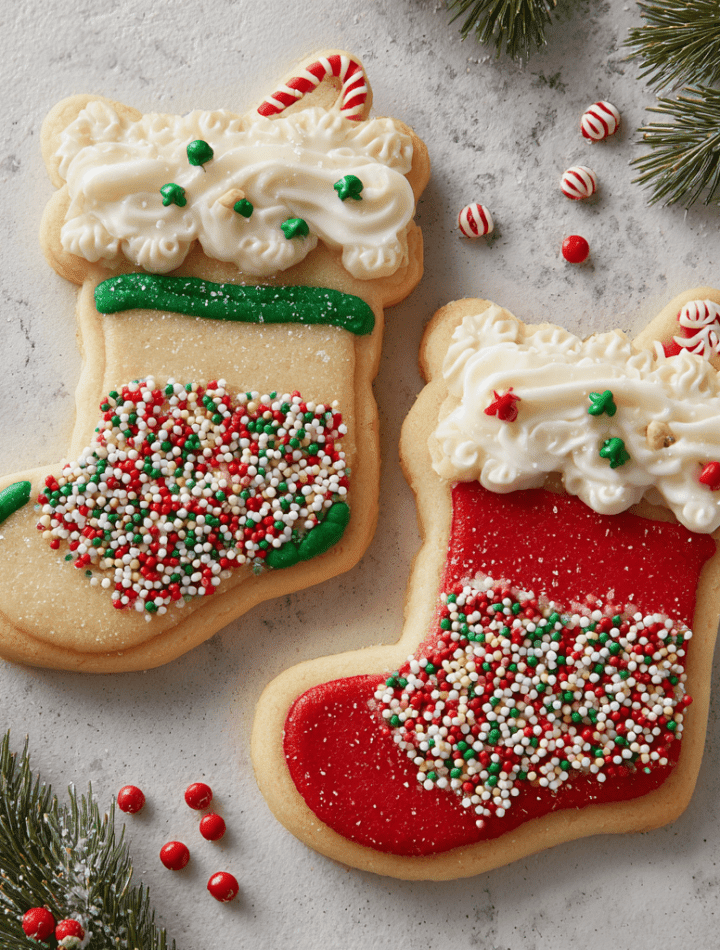
But this year, I’m so excited to share a recipe that takes the classic sugar cookie to a whole new level of fun. We’re making Stuffed Stocking Cookie Pouches! Imagine this: adorable, soft sugar cookie stockings, baked in pairs and sealed together to create little edible envelopes. The best part? We leave the tops open so you can tuck all sorts of sweet surprises inside—mini M&Ms, colorful sprinkles, or even a tiny, heartfelt note.
These aren’t just cookies; they’re an experience. They’re perfect for getting the kids involved in a fun kitchen craft, for setting out at a cookie decorating party, or for giving as the most thoughtful (and delicious) little gifts. They combine the joy of baking with the thrill of a surprise, and I just know they’re going to become a new tradition in your home, just like they are in mine. So, grab your apron, and let’s make some magic together!
A Sweet Memory: The Christmas Eve Surprise
This recipe always takes me right back to my grandma’s kitchen on a snowy Christmas Eve. I was about eight years old, and my job was to put out the cookies and milk for Santa. But my grandma, being the clever woman she was, had a trick up her sleeve. Instead of the usual plate of cookies, she presented me with what looked like a single, beautifully decorated stocking cookie, hanging from a mug with a ribbon.
“This one is extra special,” she whispered. “It’s Santa’s favorite.” I was mesmerized. Later that night, after I was supposedly fast asleep, I tiptoed downstairs to see if Santa had come. And there he was (okay, it was my dad in a very unconvincing beard), just pulling a tiny, rolled-up “Thank You” note from the top of the cookie stocking. My mind was blown! The cookie had a secret pouch! It was the most magical thing my little baker’s heart had ever seen. That moment of wonder and surprise is the soul of this recipe. It’s not just about eating a cookie; it’s about creating a moment of pure, edible joy.
Gathering Your Cookie Crew: What You’ll Need
This recipe uses my go-to, never-fail soft sugar cookie dough. It’s sturdy enough to hold its shape but stays tender and delicious. Let’s break down the ingredients—I’ve included some of my favorite chef insights and swaps so you can bake with confidence!
For the Sugar Cookie Dough:
- 1 cup (2 sticks) unsalted butter, softened: This is the foundation of our rich, tender cookie. Chef’s Tip: “Softened” means your butter should give slightly when pressed but still hold its shape. Too soft/melted, and your cookies will spread. For a quick fix, cut the sticks into tablespoons and let them sit for 15-20 minutes.
- 1 cup granulated sugar: For the perfect sweetness and that classic sugar cookie texture.
- 1 large egg: Our binding agent! It brings the dough together and adds structure. Make sure it’s at room temperature to help it incorporate smoothly with the butter.
- 1 tsp vanilla extract: The flavor MVP. For a real treat, try using vanilla bean paste—you’ll see those beautiful little specks throughout your dough!
- 2 1/2 cups all-purpose flour: The backbone of our dough. Substitution Tip: For a slightly softer cookie, you can replace 1/4 cup of the all-purpose flour with cornstarch (this is called a “cake flour hack”).
- 1/2 tsp baking powder: Our little leavening helper that gives the cookies a gentle rise and soft texture.
- 1/4 tsp salt: Never skip the salt! It balances the sweetness and makes all the flavors pop.
For Assembly & Filling:
- Royal icing or thick cookie icing (for sealing): This is crucial! You need a thick, sturdy icing to act as the “glue” for your cookie pouches. A runny icing won’t create a good seal. I’ll give you my quick icing recipe in the steps.
- Mini M&Ms, sprinkles, tiny notes, or candy bits: The surprise! Get creative here. Think mini chocolate chips, crushed peppermints, or even a few tiny, nonpareil sprinkles.
- Optional for Decorating: Red and white icing, sanding sugar, or edible glitter: This is where your personality shines! Make those stockings look festive.
Let’s Get Baking: Crafting Your Cookie Pouches Step-by-Step
Ready to roll up your sleeves? Follow these steps, and you’ll be a cookie pouch pro in no time. I’ve packed in all my favorite tips to ensure your baking adventure is a smashing success!
Step 1: Preheat and Prep
Preheat your oven to 350°F (175°C). Line your baking sheets with parchment paper. Trust me, parchment paper is your best friend here—it prevents sticking and makes cleanup a dream. Chef’s Hack: If you don’t have parchment, a light coating of baking spray works, but parchment is king.
Step 2: Cream the Butter and Sugar
In a large bowl, beat the softened butter and granulated sugar together on medium-high speed for 2-3 minutes. We’re not just mixing; we’re creaming! This step incorporates air into the dough, which is the secret to a light, soft cookie, not a dense one. You’ll know it’s ready when the mixture turns pale yellow and looks fluffy.
Step 3: Add the Egg and Vanilla
Scrape down the sides of the bowl with a spatula (a key step for even mixing!), then beat in the egg and vanilla extract until everything is beautifully combined. It might look a little curdled at first, but just keep mixing—it will come together.
Step 4: Incorporate the Dry Ingredients
In a separate bowl, whisk together the flour, baking powder, and salt. This ensures our leavening agents are evenly distributed. Gradually add the dry ingredients to the wet ingredients, mixing on low speed until *just* combined. Pro Tip: Overmixing at this stage can lead to tough cookies. Stop as soon as you no longer see streaks of flour.
Step 5: Roll and Cut
Lightly flour your work surface and rolling pin. Roll the dough out to about a 1/4-inch thickness—this is the perfect thickness for a sturdy pouch that’s still easy to bite into. Dip your stocking-shaped cookie cutter in flour before each cut to prevent sticking. Cut out an even number of shapes. Re-roll the scraps as needed. Fun Idea: If you have different sized stocking cutters, you can make a whole family of stockings!
Step 6: Bake to Perfection
Carefully place the cut-out cookies onto your prepared baking sheets, about an inch apart. Bake for 8-10 minutes. You’re looking for the edges to be just barely starting to turn a light golden brown. The centers might still look a tad soft, and that’s perfect! They will continue to set as they cool. Let them cool on the baking sheet for 5 minutes before transferring them to a wire rack to cool completely. Patience is key! If the cookies are even slightly warm, the icing will melt and your seal will fail.
Step 7: The Grand Assembly
Once your cookies are completely cool, pair them up by shape and size. Now, make a simple royal icing: whisk together 1 cup of powdered sugar with 1-2 tablespoons of milk or water until it’s thick and pipeable. It should hold a firm line. Spoon the icing into a piping bag or a zip-top bag with a tiny corner snipped off. Pipe a border of icing around the bottom and sides of one cookie, but leave the top edge completely open. This is our filling hole! Gently press the matching cookie on top to create a seal. Let this icing “glue” set completely, about 30 minutes to an hour.
Step 8: Fill and Decorate!
The moment of magic! Once the icing is firm, use a small spoon or your fingers to carefully fill the pouch through the top opening with your surprises. Finally, use colored icings to decorate your stockings—add a white “cuff” at the top, red “stitch” lines, or even write names on them for place settings. Let your creativity run wild!
How to Serve These Edible Treasures
Presentation is part of the fun! These cookies are a showstopper all on their own. Here are a few ways to make them even more special:
- The Classic Display: Arrange them on a festive platter, letting the colorful decorations shine.
- Hanging Surprise: Before baking, use a straw to poke a small hole in the top corner of each cookie shape. After they’re baked, decorated, and filled, thread a thin ribbon through the hole. You can hang them from your Christmas tree (just out of reach of pets!) or from the edge of a mug for a truly magical touch.
- Personalized Place Settings: Write each guest’s name on a stocking with icing and place one at each table setting. It’s a sweet and interactive favor that everyone will love.
Get Creative! Fun Recipe Variations
Once you’ve mastered the basic recipe, the world is your oyster (or, more fittingly, your stocking!). Here are some delicious twists to try:
- The Peppermint Twist: Add 1/2 teaspoon of peppermint extract to the dough along with the vanilla. Fill the pouches with crushed candy canes for a cool, festive crunch.
- Hot Cocoa Pouches: Fill the stockings with a few mini marshmallows and a packet of homemade hot cocoa mix (just combine powdered sugar, cocoa powder, and a pinch of salt). It’s a two-in-one treat!
- “Coal” for the Naughty List: This one is always a hit with kids. Use black food coloring to dye some of the dough dark grey or black, and fill the pouches with black sprinkles or dark chocolate chips. It’s all in good fun!
- Grown-Up Glow-Up: For a sophisticated version, add the zest of one orange to the dough and fill the pouches with dark chocolate chunks and dried cranberries. So elegant!
- Gluten-Free Friendly: You can easily make this recipe gluten-free by using a 1:1 gluten-free all-purpose flour blend. I’ve had great success with brands like Bob’s Red Mill.
Chef Emily’s Kitchen Notes
This recipe has evolved so much since that first Christmas Eve with my grandma. I’ve learned through trial and error (like the time I tried to use jam as a filling and it leaked everywhere—oops!) that simple is often best. The real magic isn’t in perfection; it’s in the laughter that happens when you’re decorating them with people you love. My kitchen is always a mess after we make these, with sprinkles on the floor and icing on our noses, and I wouldn’t have it any other way. Don’t stress if your stockings aren’t perfectly symmetrical or your icing lines are a little wobbly. That’s what gives them character and charm!
FAQs & Troubleshooting: Your Questions, Answered!
Q: My cookies spread too much! What happened?
A: This is usually due to butter that was too warm. Make sure your butter is just softened, not melted. Chilling the cut-out cookie shapes on the baking sheet for 10-15 minutes before baking can also help them hold their shape beautifully.
Q: My royal icing is too runny and isn’t sealing the cookies. Help!
A: No worries! This is a common issue. If your icing is too thin, add more powdered sugar, a tablespoon at a time, until it thickens up. It should be the consistency of toothpaste for piping a sturdy border. If it’s too thick, add liquid one drop at a time.
Q: Can I make the cookie dough ahead of time?
A: Absolutely! You can make the dough, wrap it tightly in plastic wrap, and refrigerate it for up to 3 days. Let it sit at room temperature for about 15-20 minutes before rolling it out. You can also freeze the dough for up to 3 months.
Q: How far in advance can I assemble these?
A: For the best texture, I recommend assembling and filling them the same day you plan to serve them. However, you can bake and decorate the cookie shells (without filling) 2-3 days in advance. Store them in an airtight container at room temperature, then fill them on the day of.
Nutritional Information (Approximate)
Let’s be real—these are a treat! But it’s always good to know what you’re enjoying. This info is for one filled cookie pouch (assuming a yield of 12), filled with mini M&Ms.
- Calories: 190
- Protein: 2g
- Carbohydrates: 22g
- Fat: 10g
- Sugar: 12g
- Sodium: 75mg
Remember, these values can change based on the specific ingredients and fillings you use. The joy and memories you create while making them, however, are calorie-free and priceless!
Final Thoughts from My Kitchen to Yours
Well, my friend, we’ve done it! We’ve created something truly magical. These Stuffed Stocking Cookie Pouches are more than just a recipe; they’re a vessel for creativity, connection, and a whole lot of holiday cheer. I hope this recipe brings as much laughter and warmth to your kitchen as it has to mine.
Don’t forget to tag me @TastyChow on social media if you make them—I absolutely love seeing your creations! Seeing your cookie masterpieces truly makes my day. Now, go forth, bake with love, and create some delicious memories. Happy holidays!
With love and a full cookie jar,
Emily
***
Prep Time: 25 minutes | Bake Time: 10 minutes | Assembly Time: 20 minutes | Total Time: ~1 hour | Yields: 12 filled pouches